
How to make a New Year's panel with flowers in the quilling technique? Master Class
The ability to decorate your home with helpvarious crafts - this is a unique opportunity, which is subject only to those people who want to change and decorate their homes. To do this, you also need to have some qualities and master modern techniques of needlework. On New Year's holidays, we try in every way to decorate our house and at least raise the atmosphere of the holiday. And as a rule, when we start working, we can no longer stop. Sometimes it happens that ideas run low and you need to come up with something new, something that will captivate the eye of the visitor of your home and show your master talents.
How to make a New Year's panel with flowers in the quilling technique? Master Class
Panno is a great opportunity to visuallydemonstrate their abilities. A small application, which is placed on a special surface of cardboard, and then placed in a frame - serves as our picture. But, Panno is an illustration made with the help of a variety of techniques. We will try to consider a variant of the New Year's panel made especially for the holidays. This option is designed to improve and make the appearance of the house more beautiful. It will be extremely difficult to create such a panel, but, thanks to special lessons and a thoughtful master class, this work will be quite possible even for novice craftsmen. Materials for the panel - New Year  It is not surprising that modern panels requirespecial photographs with explanations and materials, with which we will have to work on the subsequent crafting. The entire set of necessary materials and lessons will be presented for study, and a special structure inside with the scheme will allow the true master to surpass his own expectations and create a real miracle. We will need:
- The strips are 3 cm wide and 3 and 7 mm wide
- Panel and frame at 10x27 centimeters
- Silo for work (thin)
- Adhesive PVA
- Thermo-gun
- Wire
- Stripe for a width of 3 millimeters of a light-lime color, blue (light) color
- Strips 7 millimeters - white - middle of the flower, tender-green color, lilac color
- Stripe blue for a width of 3 centimeters
- White cardboard for the base on the size of 11x28 centimeters
- Korean paper
- Frame
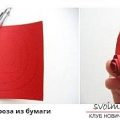
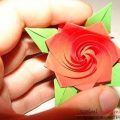
To start, you need to form a white bandin width by 7 millimeters, cutting them in the style of fine fringe. Then, the elements are twisted into a roll, but you do not need to swell it yet. To form sepals, you need to take two strips of light green and blue, glue them together, then twist the roll and then squeeze out a cone from them. Afterwards, it is necessary to carry out the lubrication with PVA glue to fix the mold. Formation of petals  To form petals, take a strip of bluecolor to a width of 3 centimeters. From it we will cut the "fence", but do not cut the edges to the end. 5-6 millimeters should be left. The width of the tooth is 4 millimeters. We form a composition of 5 flowers, as well as three buds. In order to make the assembly of the flower that has blossomed out, it is necessary to wind the strip, using not cut edges, to the middle. After, it is necessary to make the petal arching with the help of a funnel. For this, you need to pull and round the ends at the bottom. You can do this with scissors (at the blunt end). To form buds, it is necessary to take a third of the length of our "fence" and twist into a roll, not using the middle. The ends are bent into the outer part, and inside with the help of the "egg". After, it is necessary to paste the bud into the cup using PVA glue. Leaves and tails In order to form the leaves of the tails,You need to take a lilac strip in width by 7 millimeters and cut it into two parts. Each half of the strip is bent into two parts and cut using noodles. From edge to edge, to the bend line, not from 5 millimeters from the edge. Such blanks in the style of the letter "V" we do obliquely. It is necessary for the tail to come out in different lengths. After, it is necessary to take 3-4 such brooms and insert one into the other. Tighten the ends of the tails, dissolve. A mocker must go twenty times. Even if you do not draw well, you can take a white paper in the style of Handy. In stores, you can buy it under the name of rice paper. Tint the paper with a pastel, then fix the layer of rice paper. After this, it is necessary to fix the wire pointwise to the substrate using a thermo gun. Next, fix all these your items on the panel. Put the composition in the frame, it's ready!
Comments
Related posts:
 Quilling of a beautiful rose with your hands - a master class in quilling technique
 Installation of an abstract tree in the technique of quilling with flowers - a master class
 How to make a sharp rose in quilling technique? Master class in technique and photo
 This master class will teach you how to make a postcard by yourself in the technique of quilling.
 Quilling the New Year's panel with a Christmas tree - Quilling Christmas craft and master class