How to make a topiary "Paradise flowers" - a tree of happiness with your own hands, step-by-step photos of creating a topiary made of corrugated paper, napkins and foiurane
Crafts hand made every day are allmore popular. Why decorate your life with gizmos that exist almost everyone and can be bought in hundreds of shops? It is much more interesting to make them with your own hands. It is these things that give the house a unique atmosphere and become excellent gifts, because they retain a part of the creative energy of the needlewoman. Recently, more and more houses are decorated with topiary - small crafts, which are also called European trees of happiness. In fact, the history of the topiary is very old. And originates in ancient Rome. So called special slave-gardeners, who were responsible for a certain section of the garden - topia. They cut trees, giving them the right geometric shape. Contemporary topiary are beautiful miniature artificial trees, made of various materials for needlework: corrugated paper, ribbons, felt and much more. To decorate used beads, beads, rhinestones, buttons, organza, sequins, in general, everything that you like. In this article, we will offer several master classes for creating beautiful floral topiary with detailed instructions and step-by-step photos. Let's talk about the options and techniques for making flowers and ornaments. To create flowers that adorn the topiary, many techniques are used. One of them is a quilling. The history of the origin of this technique of creating various crafts is very old. Even the ancient Egyptians twisted small figures of papyrus. The word itself is derived from English, which can be translated as a "bird feather". This name appeared not accidentally. Small billets, from which do handicrafts do resemble bird feathers. In the Middle Ages, kviling techniques were used by monks, and bird feathers were used to twist paper strips. Approximately in the 15th century, this needlework came to Europe. Italian and French monks used killing for decorating icons' salaries, as an inexpensive alternative to gold and silver decor options. Paper at that time was an expensive pleasure, therefore, only the richest people could afford to create crafts. In England, the zwing was very popular among the noble ladies. Over time, even magazines are issued, where schemes for creating crafts in the technique of quilling are proposed. From the twisted strips of paper create a lot of amazing things: caskets, baskets, picture frames, Princess Elizabeth, daughter of George II gave her doctor one day a screen made in the technique of killing. These handicrafts were fond of such celebrities as Jane Austen and Sisters Bronte. Now in this technique create many crafts, and one of them can become the next charming topiary. Bright topiary with chamomiles, made in the technique of killing. 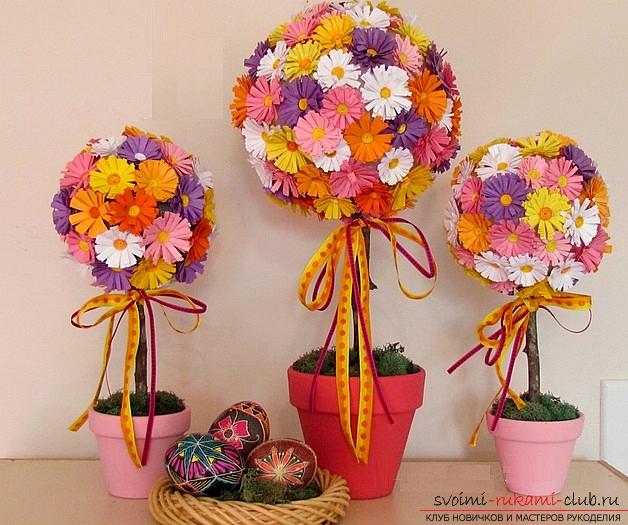 Materials and tools:
- Styrofoam or foam;
- Rod for the trunk;
- A pot (any capacity in which it will be possible to "plant" a topiary);
- Glue gun and hot glue;
- PVA glue;
- Paper (pink, yellow, purple, orange and white);
- Scissors;
- Toothpicks;
- Paint acrylic and brush;
- Elements for decoration (ribbons, artificial moss).
To begin with, you need to make a roundtopiary. You can use for this purpose a foam or penoklepovy ball. These are sold in floristic shops. It can also be cut out independently of the same materials or made from a lump of paper, rewound with threads and pasted with adhesive tape. Now it is necessary to cut the paper into strips of different thicknesses. Thick stripes for petals, thin for cores. Now strips with a larger thickness must be cut from one edge with fringe. Now to the flat edge of the cut fringed strip, glue the thin. Apply glue a thin strip and a thick bottom. Now we begin to twist into the washer, beginning with the edge of a narrow strip. So these are the blanks. Now it remains only to straighten the fringe in the form of petals. 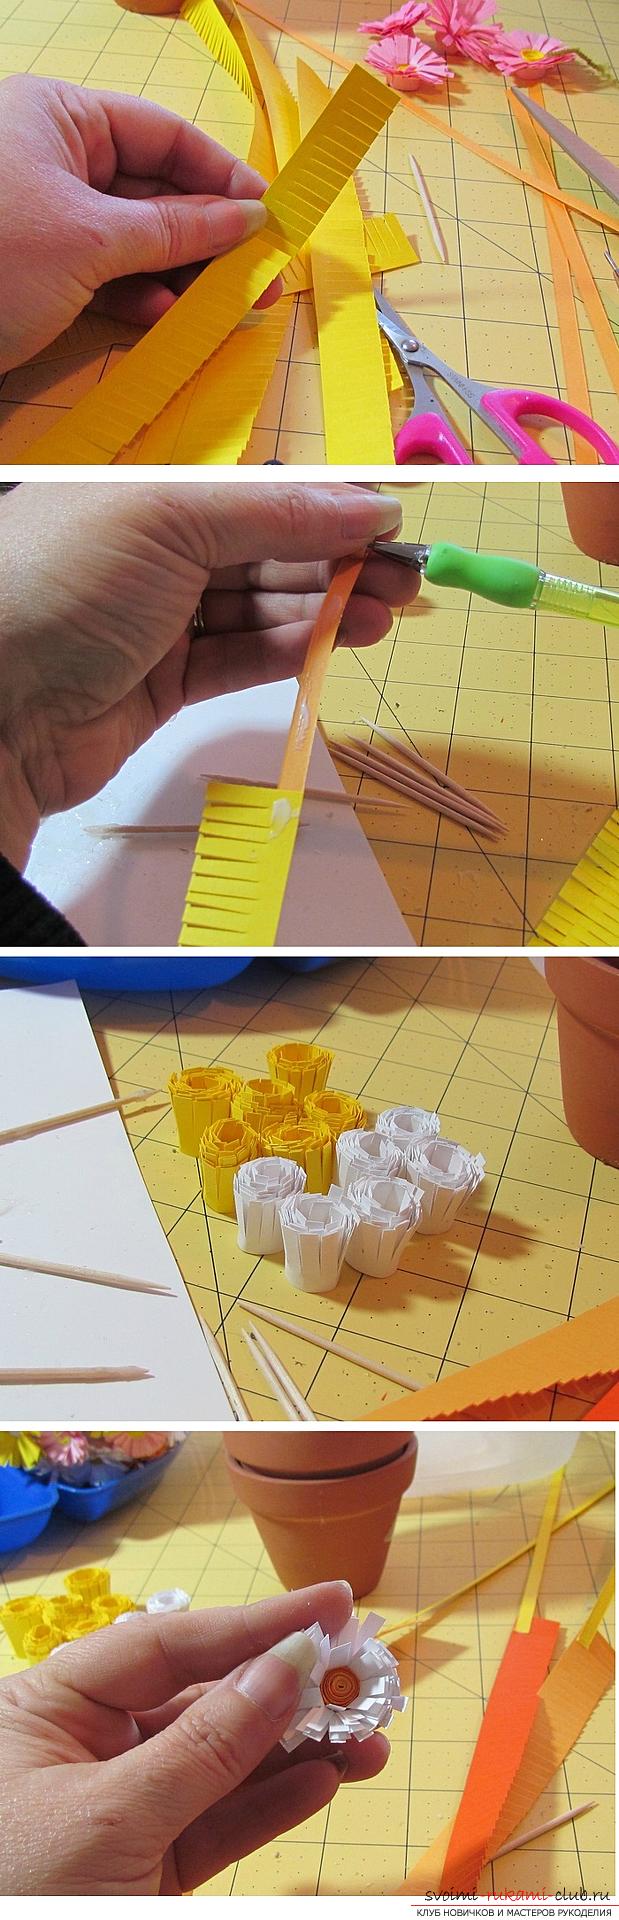 It is necessary to make many, many such daisies of different colors and shades.
  With the help of glue gun and hot glue we fix our daisies on a ball-base.
 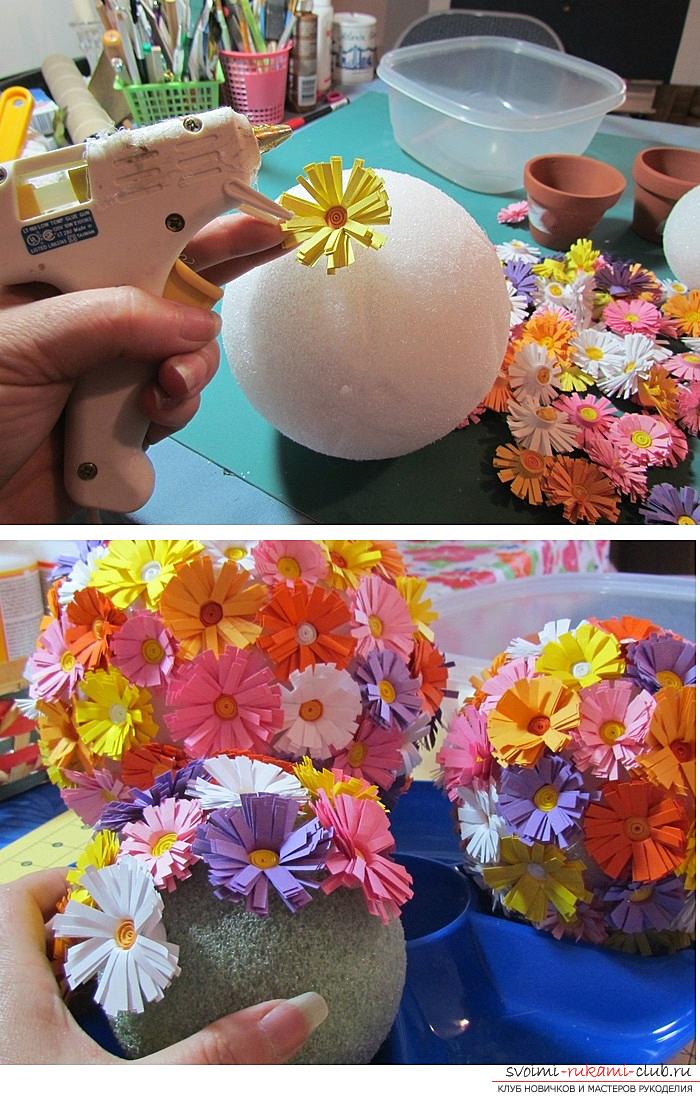 It is necessary to leave a small area free where we will attach the ball to the branch-trunk. Make it a hollow where you can apply glue.
 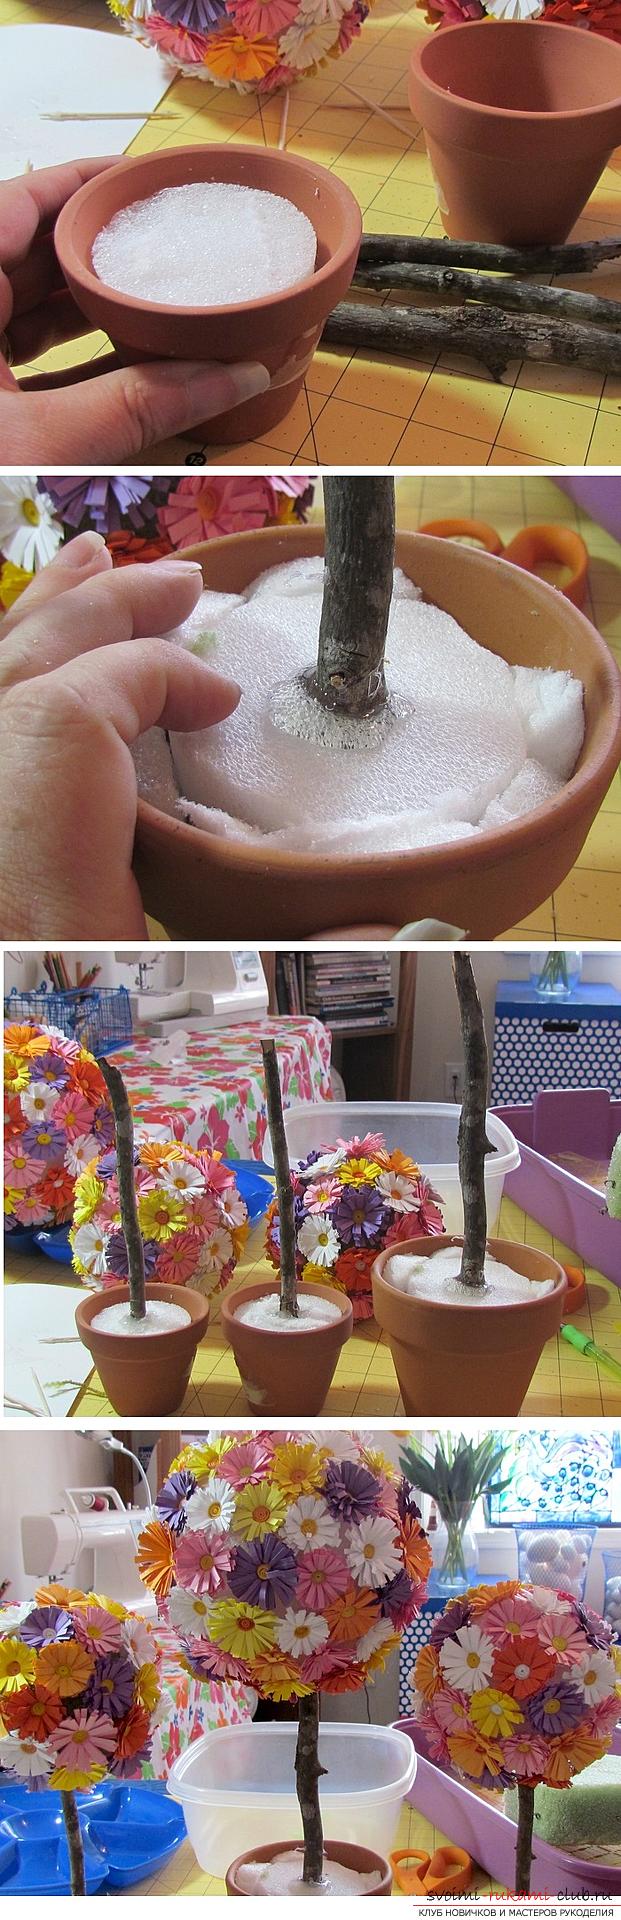 We take a pot and put a piece of styrofoam cut into it in the shape of a container. In it with the help of hot glue we fix in the pot the shelf for the trunk. We fix the flower ball on the branch.
 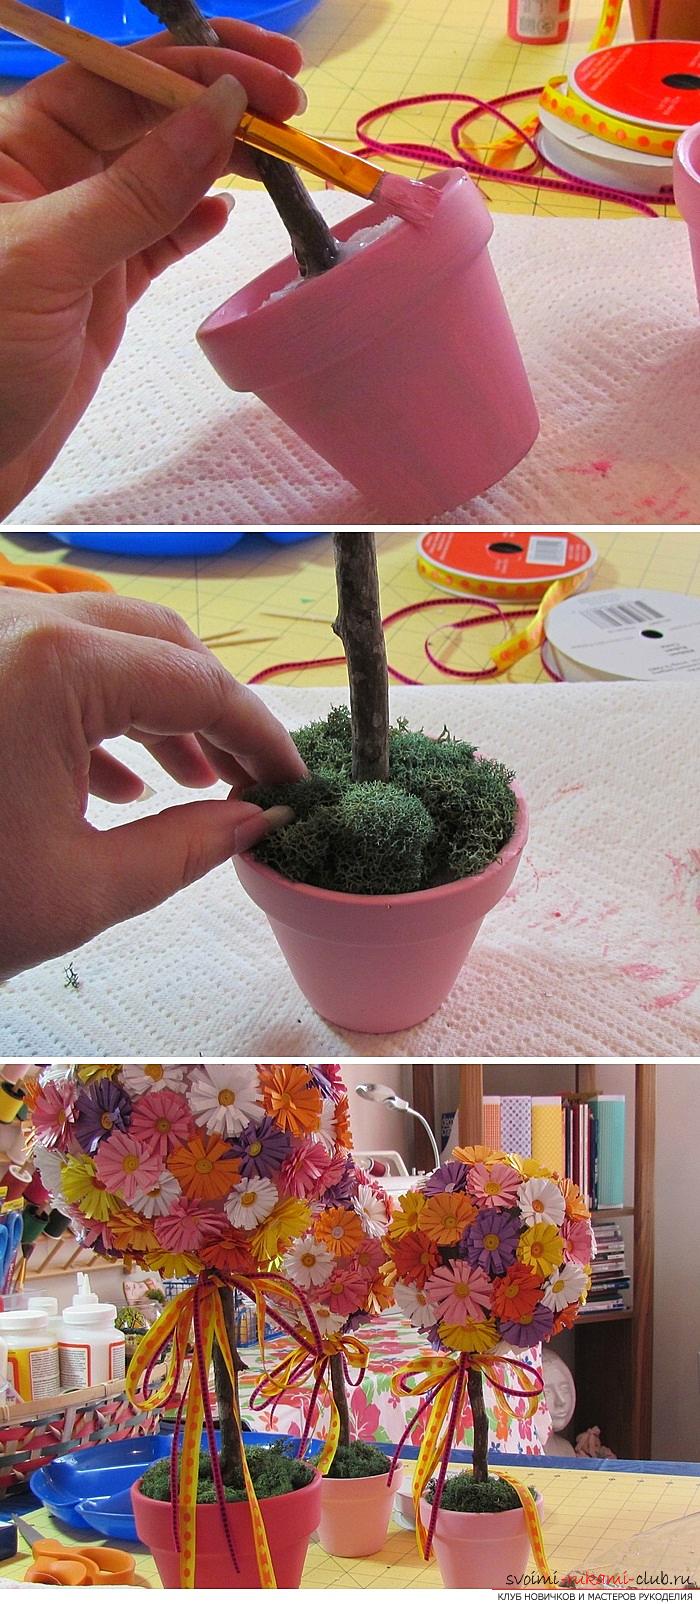 Let's start the decor. To do this, we paint the pot with acrylic paint, decorate the foam with moss in it, and tie the ribbon to the trunk. Of course, you can choose completely different decorations and decor elements. Topiary with pink roses
 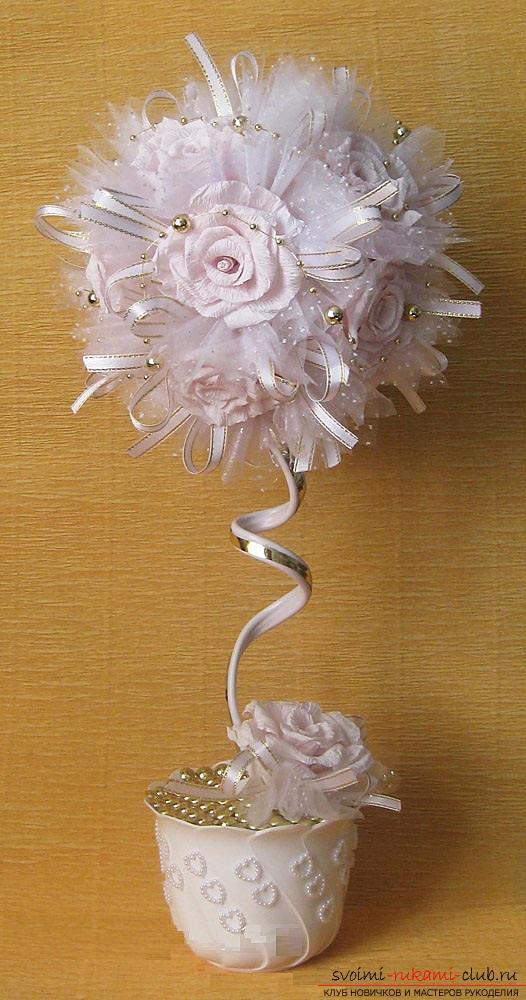 Materials and tools:
- Corrugated paper (light pink, you can take white);
- Ball base;
- Glue gun and hot glue;
- Organza in the tone of paper (in this master class used "snow" and "midge");
- Flat cable 1 cm wide with white insulation;
- A thin wire;
- A pot;
- Satin ribbon of white color with a golden border of 0.5 cm;
- Candle or lighter;
- Toothpicks;
- Golden ribbon 0,7 cm;
- Acrylic paint of white color;
- Alabaster or gypsum;
- Elements of decor (in this master class - hearts of beads, low in gold beads of different sizes and gold half-beads on the canvas).
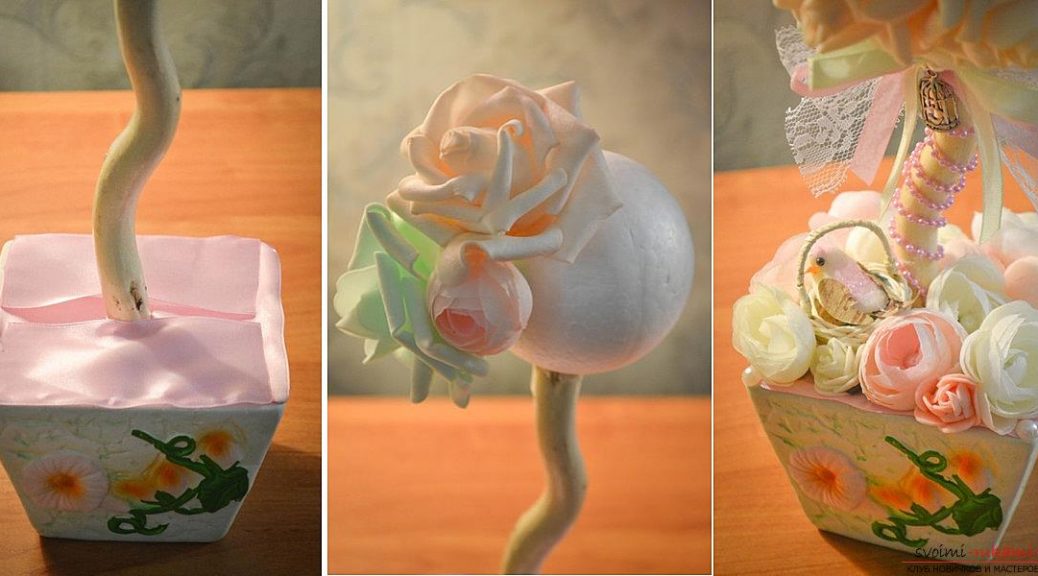
Before starting to create a topiary,you need to make roses from corrugated paper. First, we draw and cut out the temples of the petals. From the proposed in this master class will get a flower about 3 x 6 cm. The photo shows the dimensions of the petals. For convenience and acceleration of the cutting process, you can fold the paper several times. The largest cut out 3 pieces. for one rose, the remaining 5 species for 2 pcs. The upper edges of the smallest petals are twisted with a toothpick on the right and left, as shown in photos 7 and 8. Secondly, we twist the second petals on top once, and then carefully stretch the fingers in the middle, so that the petal becomes a convex concave shape. 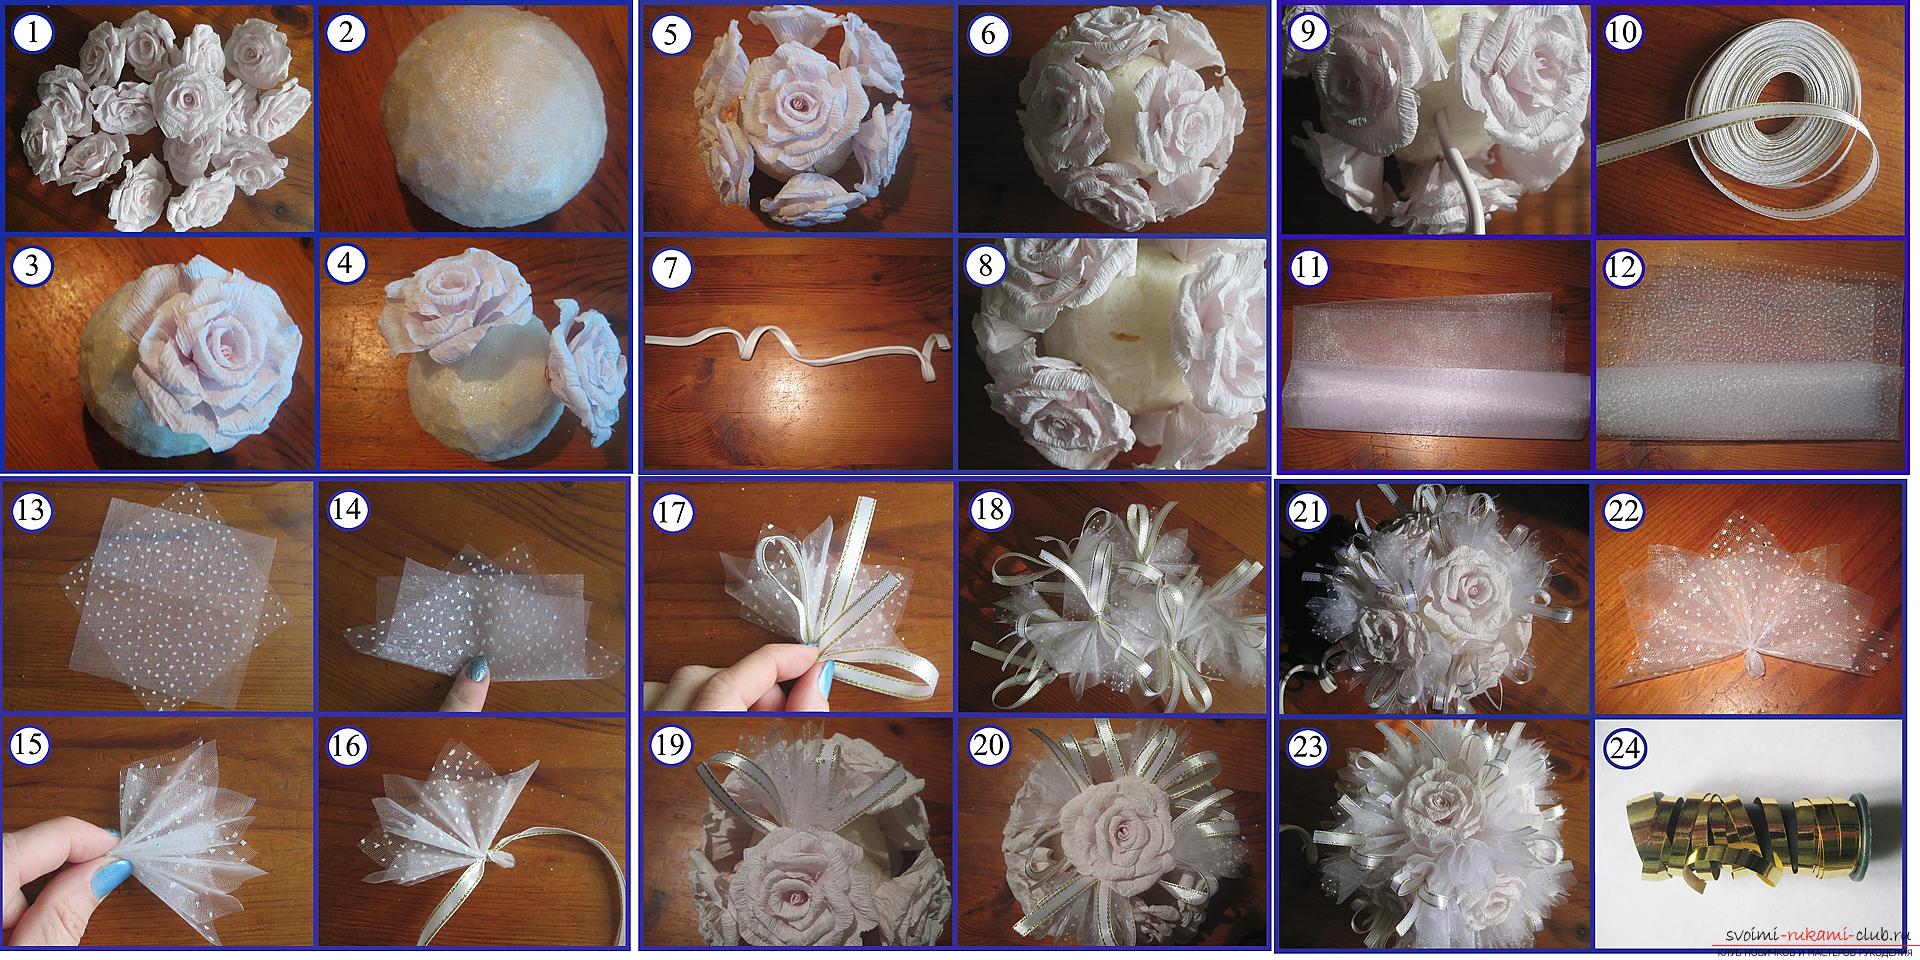 Those petals, in which the upper part is cutthe heart is formed in this way: the parts of the heart are twisted to a toothpick, as in photo 15. In the middle of the petals we spread, while holding the twisted sides with fingers. The photo below shows in detail how to form the largest petals. They will turn out more invoicing. For the core of the flower, you need a piece of wire and trimmed corrugated paper, left from the carving of the petals. Wrap the wire, forming a loop. Take a piece of paper and focusing on photo 19 and arrows on it, wrap the wire. The black point indicates the location of the wire loop. The edges of paper trimming need to be glued so that the core does not turn around. And now the most beautiful stage begins - assembly. It is necessary to apply a little PVA on the edges of the paper. Lapels glued in a checkerboard pattern from small to large. In the photo, the color of the paper is chocolate, while you, following the instructions, will be able to make flowers of any shade. Now, when all the roses are ready, the turn of creation of the topiary begins.
  Based on the need to make small slits,where we will strengthen the flowers and one deeper for the trunk. In these deepenings we put a little hot glue and we insert roses. They must be arranged symmetrically, in staggered order. In order to make the barrel we take a piece of cable in white insulation. At one end, make a loop and unfold it perpendicular to the rest. The second end is fixed with glue in a specially cut hole for this purpose. Now it is necessary to make additional details of decor from organza of two kinds. They will mask the distances and spaces between the colors and enliven the topiary. We cut a thin white tape into pieces about 40 - 45 cm long. We melt the edges over the fire so that they do not swell. It will take more than 40 pieces. Organza of both species is cut into squares. We put the two different pieces together so that the corners do not match. Now it is necessary to fold the workpiece first in half, and then several times, holding the center to make a pound like in the photo. We take a piece of ribbon and fix the middle of the pound. We form from it a bow with several loops. A golden ribbon is glued along the trunk, creating an additional gold accent. To decorate the pot, you need to glue the hearts of the beads in several rows diagonally, following the lines of the pot itself. When all the elements are glued, proceed to the "landing" of the topiary in the pot. To do this, stir the alabaster with water until creamy consistency. We put the topiary in a pot with a loop from the wire down and fill it. We are waiting for the time to freeze, pre-installing the supports, so that the tree does not roll in different directions. After we cover a layer of alabaster with white paint. When it dries, apply the glue on this surface and the round billet from the half-beads. We paste. Now it is necessary to decorate the trunk at the base with a rose, several bows from the ribbon. Finishing touch. We dispose low with golden beads of different size along the perimeter of the topiary crown. We find the most beautiful arrangement and glue some beads to the organza and flowers with droplets of hot glue. Topiary of napkins
 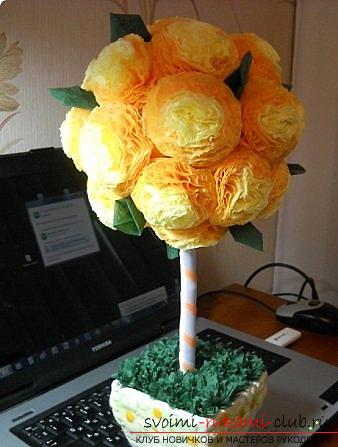 Materials and tools:
- Multi-layer napkins of several shades;
- Stapler;
- A circle of thick paper as a template;
- Scissors;
- Glue;
- Newspaper to create the basis;
- Rod for the trunk;
- A pot;
- Styrofoam;
- Yarn;
- Decor elements (ribbons).
First, we make a spherical basis for the topiary. It's very simple. It is necessary to wrap the newspaper ball with threads so that they hold the form and glue it on top with napkins of the right color. 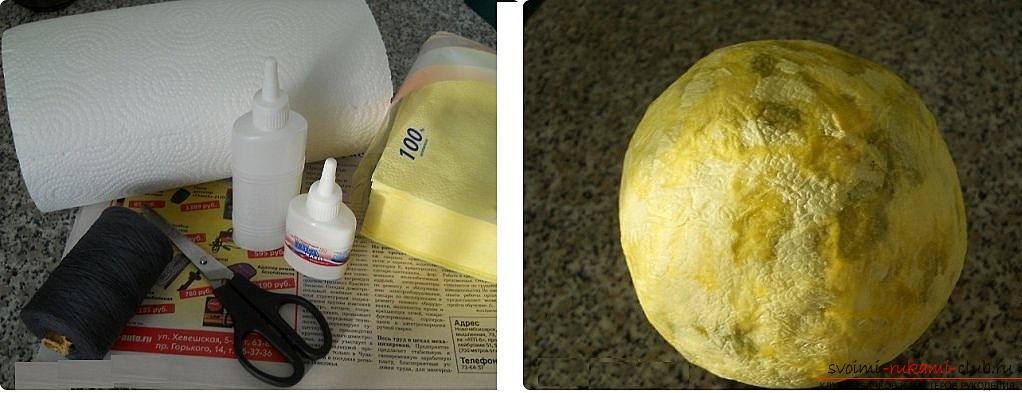 To make the flowers will be need a swipetwo shades - darker and lighter. Fold them in four. The light must be placed on top of the dark ones. We fasten the stapler in the middle. Cut out a circle from our workpiece. You can make a pattern in advance from a tight paper. Now it remains only to layer the napkins upside down. It should look like the photo.
  Now at the heart of the need to make a hole undertrunk. We wrap it with tape and fasten it in the groove. All the rest of the spherical surface is pasted with fluffy flowers. From a green napkin cut a few leaves and paste between the flowers.
 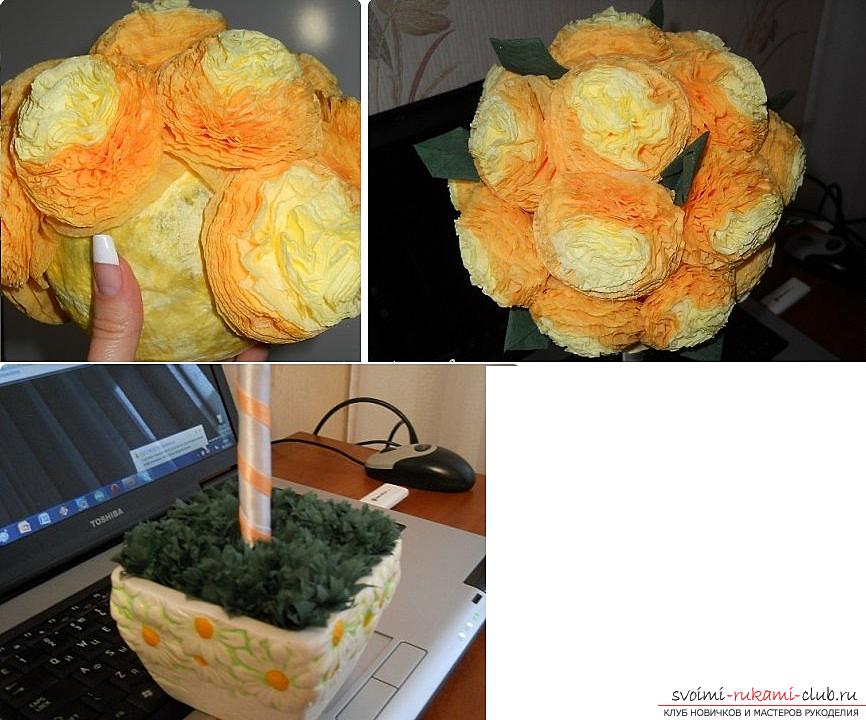 Now you need to cut out the foamThe workpiece is a bit smaller than the pot so that it fits tightly into the container. Glue the foam plastic blank pot. Now we insert and glue the tree into it. From the divided napkin we make the grass approximately the same as the flowers. But cut the edges of napkins zigzag. We glue the grass to the foam plastic. The topiary is ready. Each self-respecting needlewoman and a fan of elegant and original hand-made gadgets monitors the appearance of new materials for creativity. One of them is fameiran. It consists of foamed ethylene vinyl acetate. It is a soft multi-colored sheets with a thickness of 1 mm. The needlewomen appreciate this material for the fact that, after deformation, the foiraman is able to memorize the shape and preserve it. Delicate topiary with flowers from fameirana
 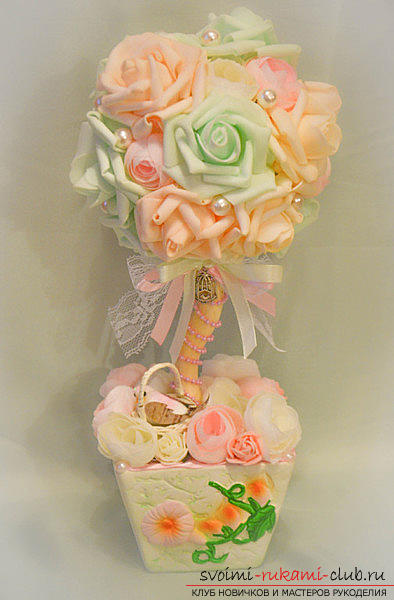 Materials and tools:
- Capacity, where you can "plant" topiary (for example, a flower pot);
- Rod for the trunk;
- Ball-shaped base of foam or penopolx;
- Glue gun and hot glue;
- Foam sheets;
- Pastel;
- Iron;
- Elements of decor (beads, lace, ribbons, roses from silk).
First you need to make roses that aredecorate our topiary. From the plates of foamiran we cut out the blanks of the petals of two sizes. For medium-sized flowers, 10 smaller sizes and 18 larger ones will be needed. When all the petals are cut out, they must be pasted with pastels. If you have a solid pastel, use a damp cloth to apply paint. Simply rub it into the edges of the petals. If you chose a liquid paint, then it is most convenient to apply it with a foam rubber sponge. When all the blanks are painted, we proceed to shape them. We heat the iron and apply petals to it. When its edges start to curl. Now it is necessary to fold the workpiece with an accordion and twist it. Then straighten and slightly bend, make a convex. It should look something like this. 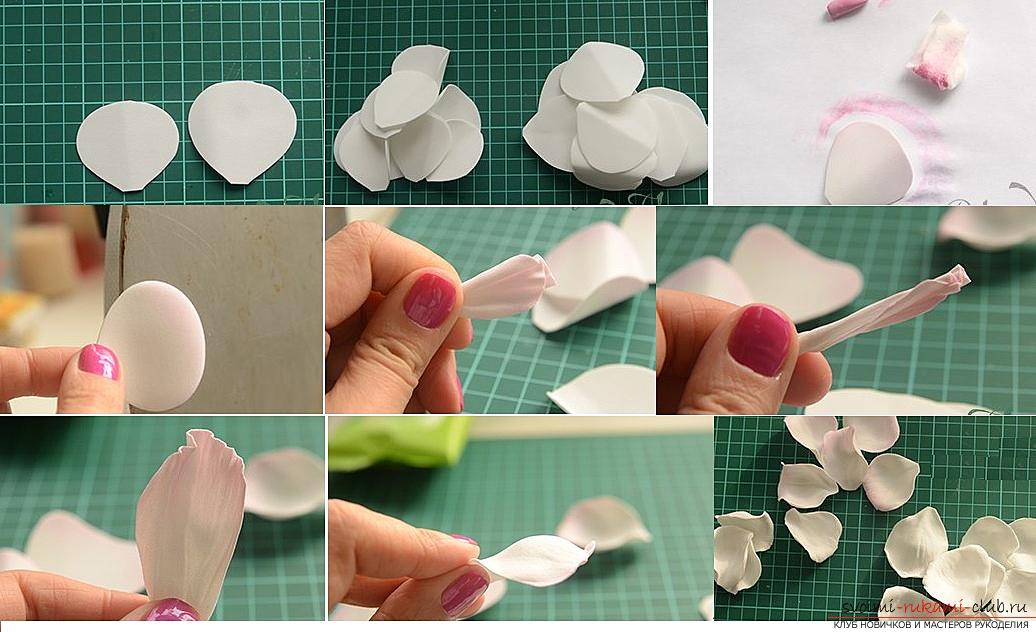 Now take a large bead and wrap it ina square of fomiran. This will be the heart of the rose. Now wrap the first small petal around the bead and fix it with glue. Then start wrapping the core first in small, and then in large petals (see photo). Carefully glue the petals to make a beautiful flower.
  When the required amount is doneroses, we begin to create topiary. Foam plastic ball is glued to the stick. To do this, you can make a deepening in it. The second end of the trunk is fastened in a pot. In order for the stick to hold tight you can use the recommendations from the master classes above. Apply foam or pour more glue.
 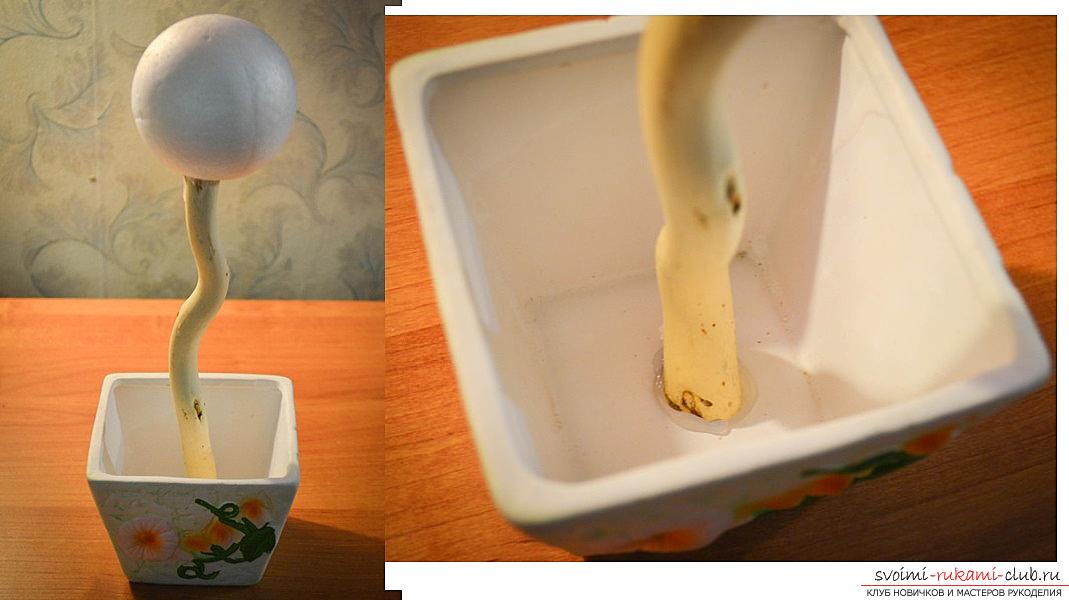 Top of the pot masked with satin ribbons. Now glue the roses to the bowl, abundantly lubricating with hot glue.
 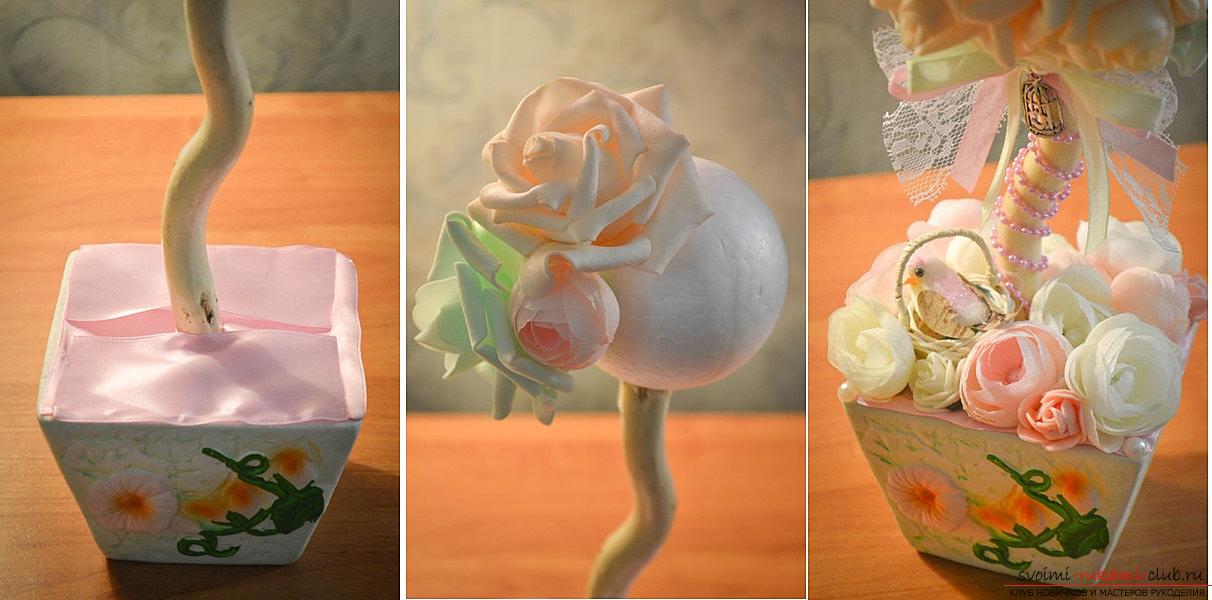 When the whole surface is covered with flowers, decorate the topiary with beads, ribbons, silk flowers and other decorative elements to your taste.
Comments
Related posts:
 How to make original hand-made articles for the spring women's holiday - March 8, step-by-step photo creation frameworks for photos, topiary, crafts in the style of suites design and a bouquet of huge roses from corrugated paper
 How to make flowers from corrugated paper? - An article with a step-by-step solution for creating colors from corrugated paper.
 Flowers with their own hands, how to make a flower from paper with their own hands, flowers from corrugated paper, tips, recommendations, step by step execution instruction.
 How to make a candy bouquet of roses, step-by-step photos and instructions for creating roses from corrugated paper with candy hearts
 How to make a beautiful tree topiari from napkins, step-by-step photos and a detailed description of the work on creating topiary with different colors