
How to make beautiful and original products from various vegetables, step-by-step photos and instructions for creating flowers from onions, mokovi, red cabbage and Peking cabbage, handmade pumpkin in carving technique
If you ask the needlewomen, when exactly theyfor the first time they tried to create something with their own hands, for sure, many will respond that it happened in childhood. Many babies are happy to master crafts made of plasticine, paint with gouache, make beautiful colorings, cut snowflakes from paper. Older children embroider, knit, sew from felt and other fabrics a variety of fun and fun things. But for all these classes, special materials or tools are needed. Of course, they can be found in various handicrafts shops, but there is one direction in creativity that does not require additional costs. Ingredients for making crafts can be vegetables. They are in every house. Bright eggplants, pumpkin, zucchini, onions, potatoes and carrots can be not only useful. Of these, funny and charming items are obtained not only in the form of funny little animals, for example, from a pumpkin you can cut crafts with abstract and vivid patterns. Carving in cooking is a very popular and popular skill in many famous cuisines around the world. This word can be translated as "carved ornament". There are even special tools for creating amazingly beautiful carvings on vegetables and fruits. 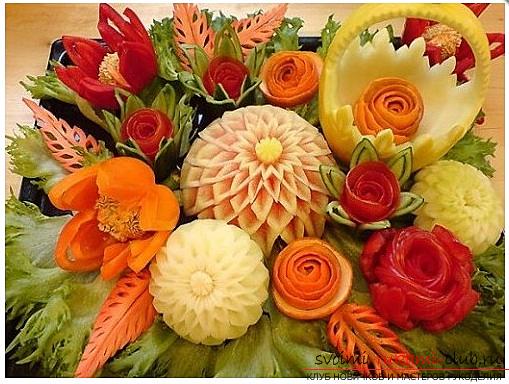 The Art of Cutting Out Vegetables and FruitsCrafts originated several centuries ago in the south-eastern part of Asia. In such a simple and accessible way, the poor tried to diversify their table. Over time, each country has its own characteristics in carving. For China or Japan, dragons, hieroglyphs or cutting battle scenes are characteristic. By the way, from English you can carve and translate - "carving". Cooks in Thailand do not use stencils for their work, in contrast to Chinese or Japanese masters. In creating amazingly openwork flower compositions, they are helped only by sharp, narrow and thin knives. From the restaurants of the East, this art has spread to Europe. Now carved ornaments on vegetables appear on the tables of many famous institutions.
 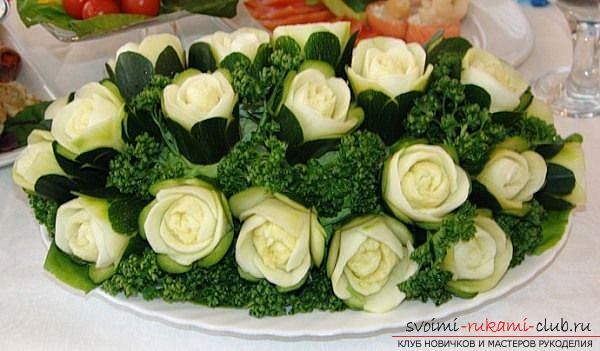 In addition to its main function - the decor of the dishes ontable, crafts using carving techniques can help mothers in feeding babies. Any kid eats a nasty and unloved cereal if it is decorated with a beautiful or funny crafts from a bright vegetable or fruit. In this article, we offer you several master classes with step-by-step photos for creating crafts from vegetables in carving techniques. These simple and affordable lessons will help create stunning decor items, and any table will be festive. Flowers from onions in the technique of carving Lotus onions
 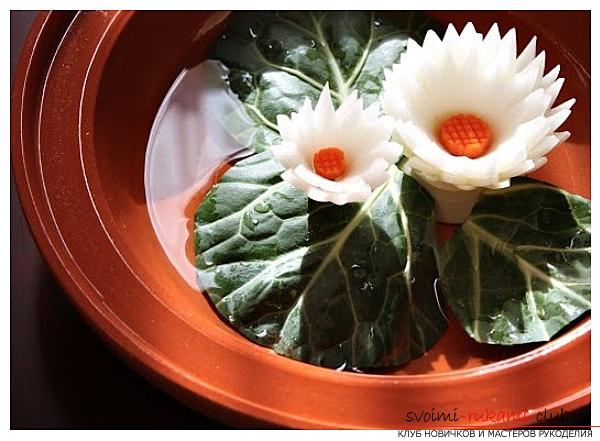 In each house there is a bow. For the first flower - the lotus will need:
- White salad onions;
- A small fork of cabbage (you can take Peking);
- 1 medium-sized carrot;
- A small knife;
- A large flat dish with sides.
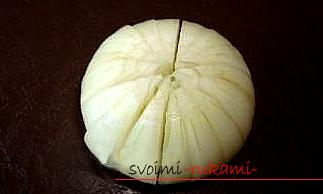
Important! All ingredients for crafts should be dry and clean, and the knives are always sharpened. We divide the cabbage into leaves. You need one flat and flat. He will play the role of a lotus leaf lying on the watery surface. It is better to leave the sheet unchanged, but if there are any too prominent irregularities, then it is possible to trim them neatly. 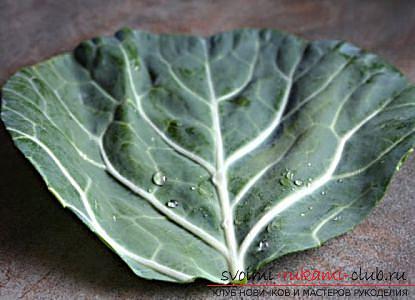 For one - two flowers you will need a halfbulb, cut across. Now it is necessary to cut out the triangular segments in a circle, without touching the bottom part. Cut wider, so that the rest has narrow triangles along the edges (see photo).
 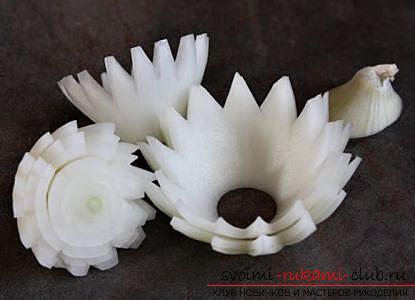 Now you can divide the workpiece into layers andoffset with respect to each other. We got a white lotus flower, but without a heart. For one flower, 2 - 4 layers will suffice. For this we need a carrot. We cut it into rings about 3.5 mm thick. Choose the most beautiful mugs. Cut out of them octagons. Now with the help of small longitudinal and transverse notches on the flat side we draw a "lattice". The angle of intersection of lines is straight.
 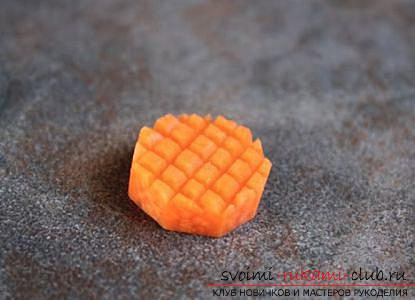 The core of the flowers should have a slightly larger diameter than the hole in the onion lotus.
 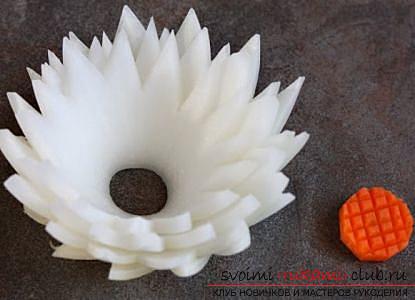 Now in a flat container we pour a little water, put the leaves and top the flowers. 2 pieces will be enough. This hand-made article will adorn the table, but it is not meant for food. Chrysanthemum from onions
 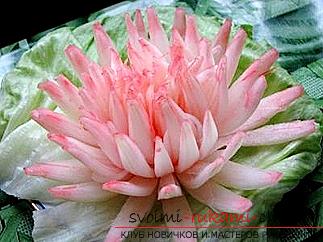 It will take:
- Bulb small in size;
- Water;
- Beets or carrots for painting;
- Knife.
Such chrysanthemums are perfect for decorating meat dishes. The smaller the onions, the more beautiful the flower will be. 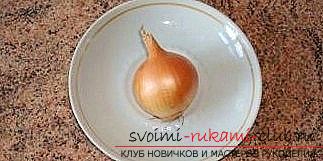 The bulb color does not matter. Simply if you choose a red onion, then in the further painting it will not need. The best option is thin-walled vegetables. The bulb is cleaned and cut from above and from below approximately 5 mm.
 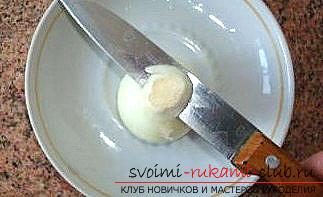 Expand to the top of the side from whichgrowing feather. And we start making incisions, not reaching the end about 5 mm. First cut in half, then into 4 parts, etc. The more parts there are, the more splendid the chrysanthemum will be. The cuttings should be deep enough, but do not damage the bottom part, in this case the flower will simply fall apart.
 Put our workpiece in water at room temperature. It will take from 40 minutes to 2 hours for the flower to "bloom", everything will depend on the bulb variety.
 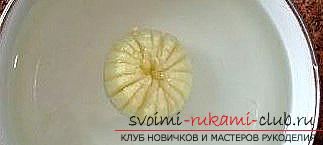 If you make chrysanthemums from white onions, thenyou can further color them. Carrot or beet juice, squeezed from fresh vegetables, is suitable for this. Just dip the ends of the petals into it. Any bright food color may be used as a dye: red wine, saffron solution or turmeric, etc.
 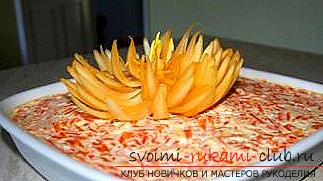 For the next flower, you will not need a regular onion, but a leek.
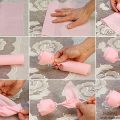
 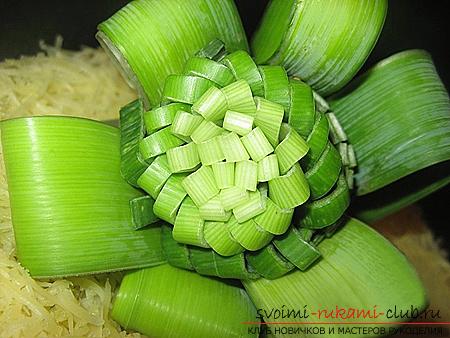 Materials:
- Leek;
- Sharp knife;
- Toothpicks.
One wide sheet is folded in half along and cut one hundred sides of the fold line. We make frequent cuts. 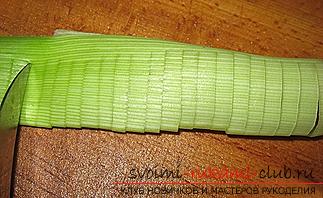 Now it is necessary to fold the tube, arrange the turns a little spirally (see photo).
 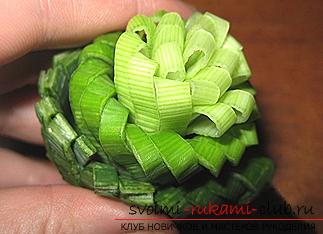 The remaining wide sheets are folded in half across. It will be the petals of the future flower.
 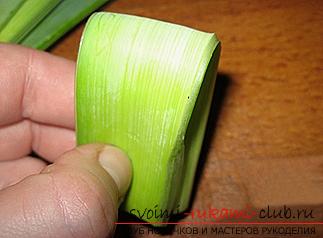 It remains only to put together the toothpicks and petals of the heart. Crafts in the technique carving from carrots From vegetables you can make not only beautiful flowers. Fir cones from carrots
 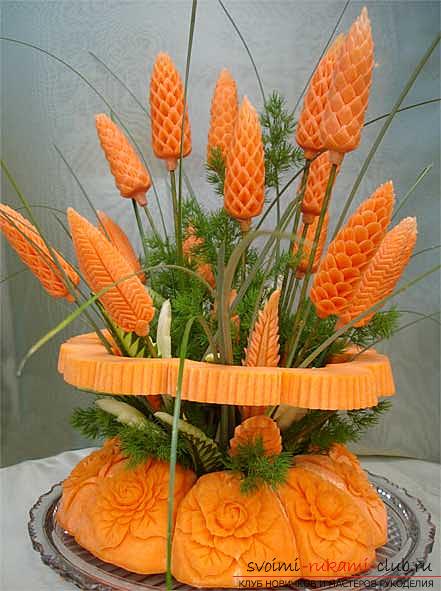 It will take:
- Fruits of carrots with a diameter not less than 3 cm;
- Sharp knife;
- Ice water.
We clean carrots. The length of the workpiece should be about 10 - 12 cm. Cut off excess from a wider base, not touching the sharp tip. We cut out the wide end in the form of a rectangle or a square. Its length will be about 3 - 4 cm. The rest of the carrot is shaped like an elongated cone, like a real cone. 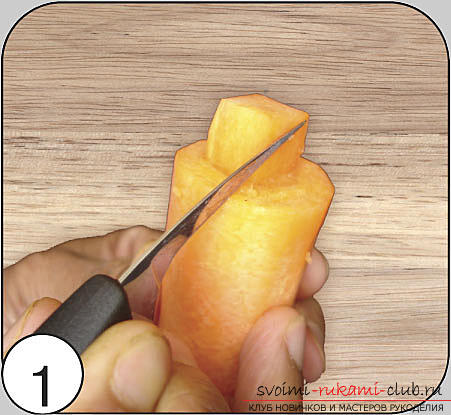 The wide and thick end of the future cone should be rounded, cutting off the sharp edge.
 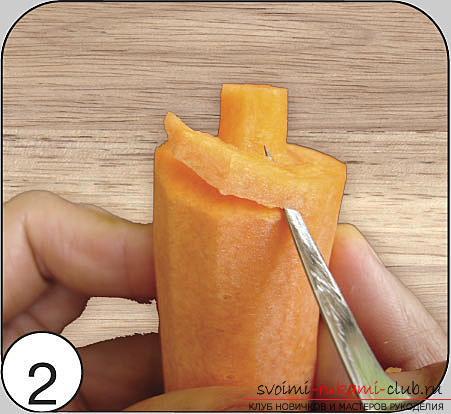 The same thick end is visually divided into sixidentical parts. Carefully cut through the lines of section 6 flakes. Cut to a depth of 2 - 3 mm. That part of the carrot, which is located between the scales, is cut off. The conical triangles are obtained. The knife by scales is deepened by 2 - 3 mm. They will be slightly incised from the sharp edge.
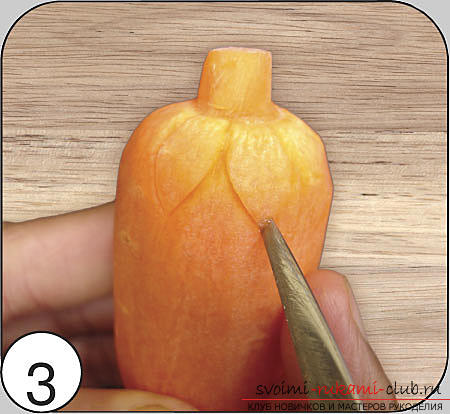
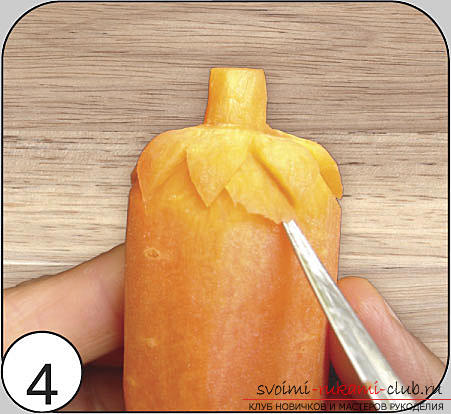 The next circle is cut in a checkerboard pattern with respect to the first one. We cut the scales again, so that in the future they easily opened. So to the end.
 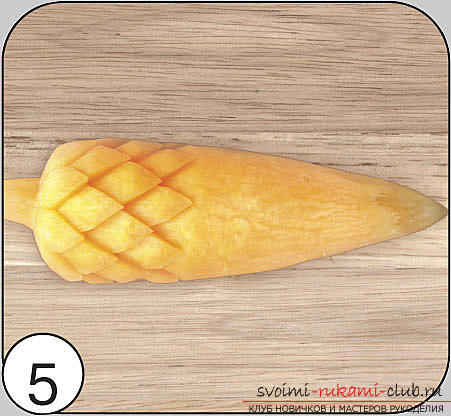 When all the bumps are ready, they should be placed in ice water for about 15 minutes.
 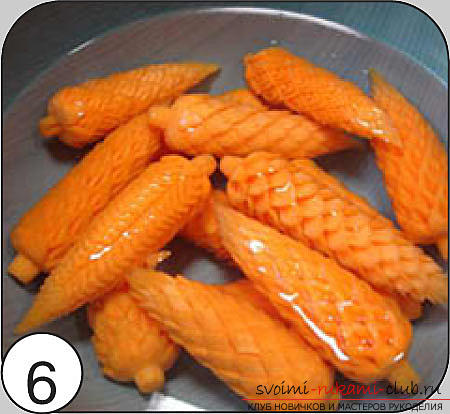 The cones will harden, and the scales will open slightly. Fishing net of carrots
 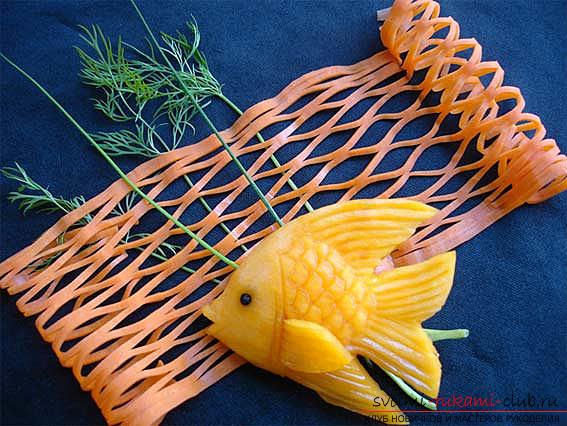 It will take:
- Large carrots;
- Water;
- Wooden skewers;
- Sharp knife;
- Common salt;
- A few sprigs of dill;
- A piece of pumpkin or zucchini.
We clean the carrot. Now it is necessary to give it a cylindrical shape and pierce it in the center along a wooden skewer. Now it is necessary to soak carrots in saline solution for two hours. At 1 tbsp. l. salt will need 1 glass of water. This will make the vegetable soft and not brittle, because in the future it will have to be thinly cut. 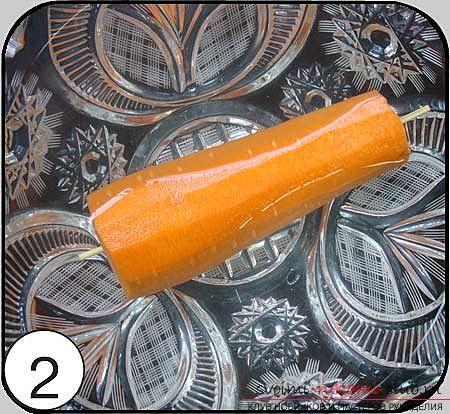 The billet is extracted from the water and divided visually into4 pieces along. Each of their parts has a top and a bottom. With a knife with a step of 5 mm, cuts are made from above, then from the bottom on all 3 parts across. We do not cut the skewers inside the carrot.
 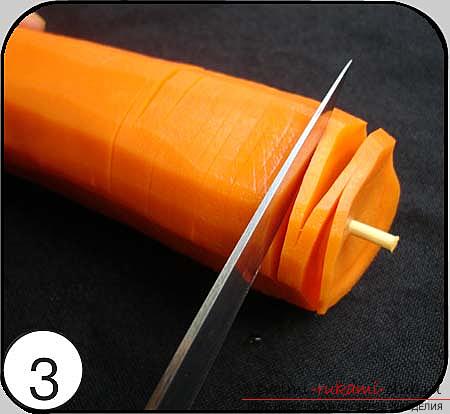 Now, with a sharp knife, cut the carrot thinlycontinuous layer, creating a tape. Start with the uncut side. It turns out a ribbon, similar to a network with oblique cells. Cut the heart with the skewer. The ribbon is straightened.
 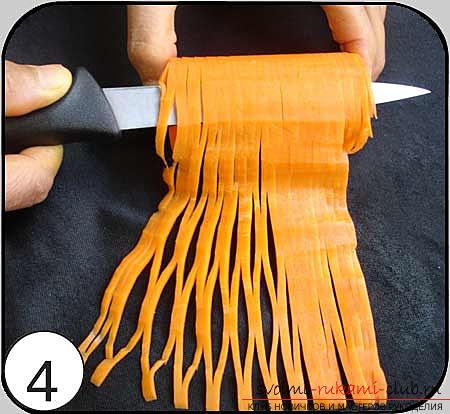 Cut out fish from other vegetables of your choice.
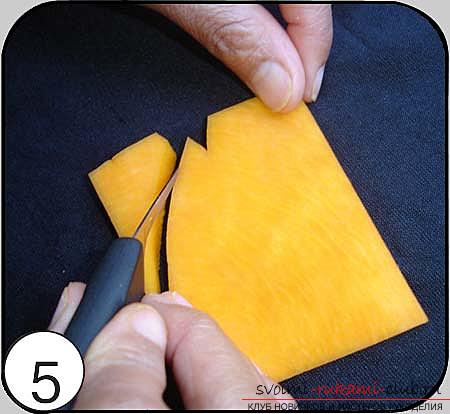
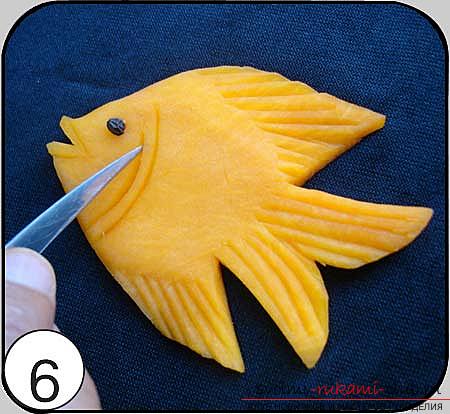 It remains only to artistically arrange the fish, algae from dill and a network thrown into the sea. Flowers of a lily from a carrot
 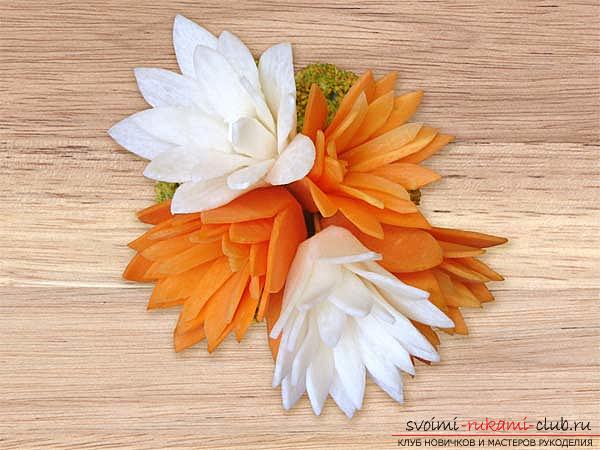 It will take:
- Carrot;
- Sharp knife;
- Scissors.
We give the vegetable the shape of the pentagon in the section. One end must be thicker. He will be the top, we will start work from him. 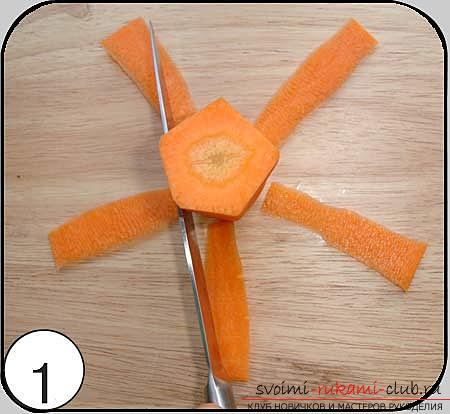 From each side cut off one thin layer.
 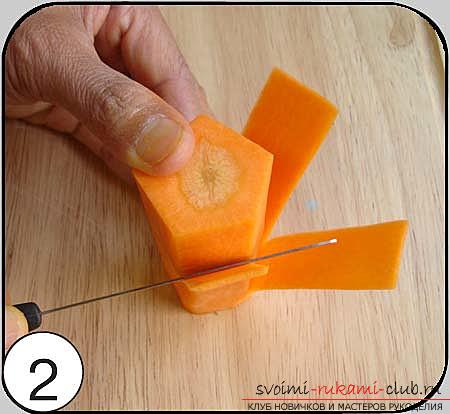 This is the first outer circle of the petals. We attach the shape to them with scissors.
 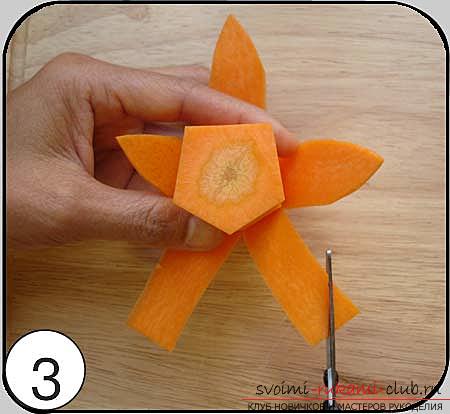 Cut the thin layer of the pentagon, making it thinner, and in the staggered order, make five more petals.
 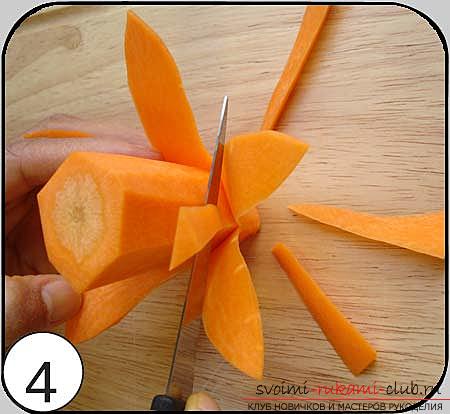 The third row is similar. Seretkinu make a short and give the knife a conical shape with a point up.
  Using a knife, cut this cone into the stamens, and the lily is ready.
 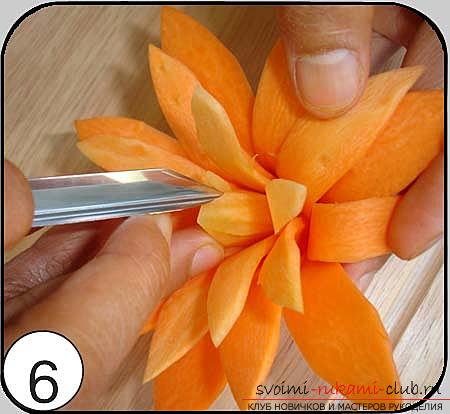 Charming chrysanthemums can be made not only from onions. For these purposes, the Peking cabbage is perfect. Chrysanthemums and roses from cabbage.
 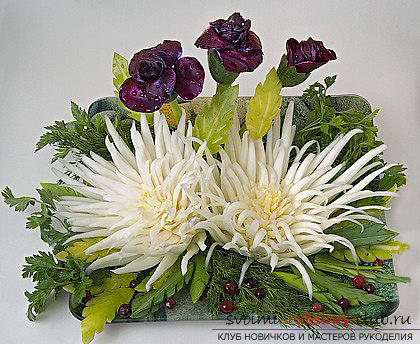 It will take:
- Peking cabbage (one chrysanthemum will require 1 fork);
- Red cabbage for roses;
- The lid from the can (suitable from olives);
- Several thick cucumbers for sepals are roses;
- A sharp knife.
To start, we make chrysanthemums. From the head of the Peking cabbage we cut off the upper part to dense white leaves. 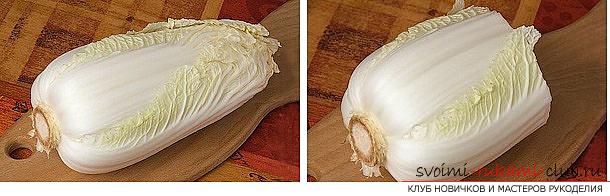 For carving very often specialinstruments. To create such chrysanthemums, you need carving blades that have the shape of a groove. Such tools are not always available. Therefore, the fantasy of needlewomen suggests using improvised means, for example, a lid from a can of olives or pineapple. Bend it in half and get a comfortable groove. Work with such a tool carefully, so as not to cut your fingers with sharp edges. Take the improvised tool, as shown in the photo. And begin to cut the grooves, from the cut edge to the base. At the base, aim the tool deeper than before. Up to the base, do not cut about 2 cm. We pull out the groove and in the same way cut out the next petal on the same leaf. On average, one to three cabbage leaves are placed on one cabbage leaf. This will depend on the size of the plug and the diameter of the groove. Cut out in a circle.
 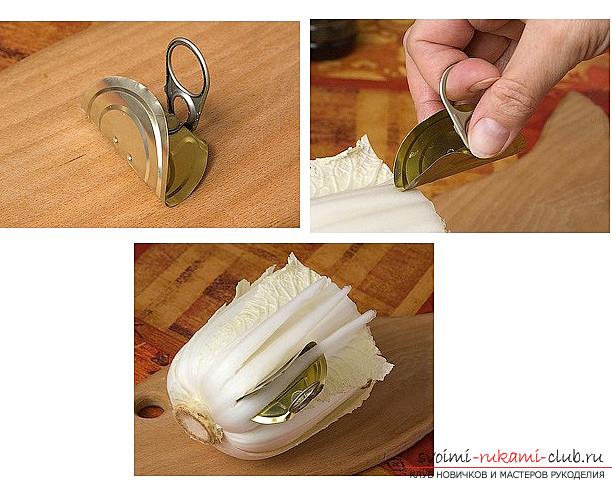 The remaining parts of the leaves are neatly cut off with scissors, if they do not disappear during the creation of the petals.
 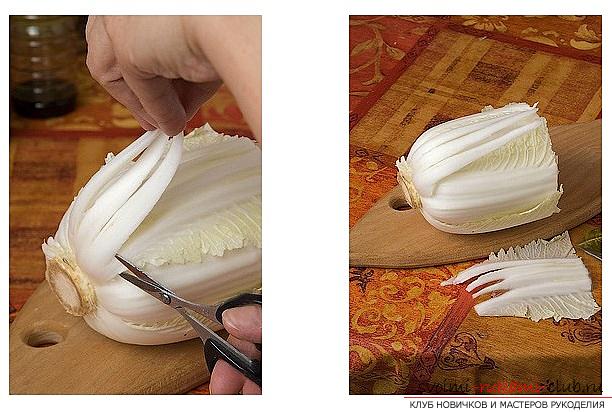 Take the next layer of leaves fork. We continue our work until we reach the core. The first circle of petals should be the longest, the remaining petals in the direction of the core should become shorter.
 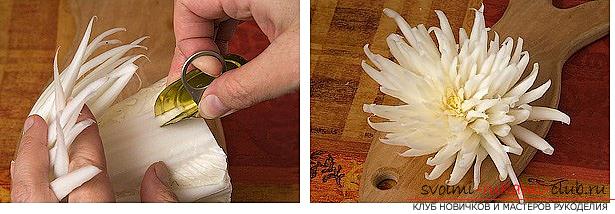 Put the finished flower in cold water for 30 minutes. The flower should open. To speed up the process, it's fashionable to add ice. Chrysanthemums can be done on the eve before serving or even for a couple of days. They are perfectly preserved in the water. Roses from red cabbage. We divide heads into separate sheets. Cut off the edges of the thickness that you planned for the rose petals. Scissors cut out, as shown in the photo. From a large leaf can get 3-4 petals. If cabbage forks are small, you can connect 2 sheets.
 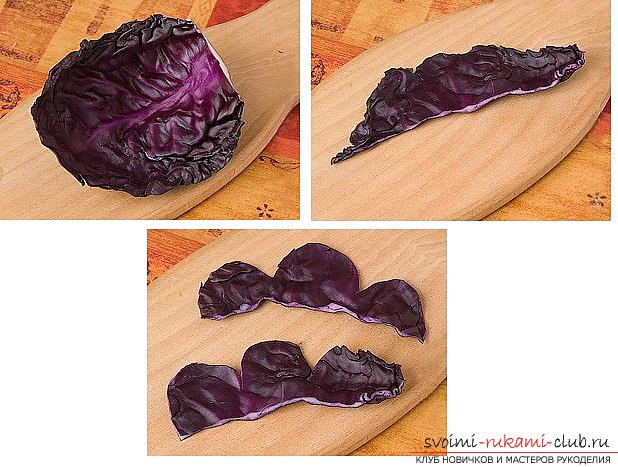 From cucumbers we make sepals for roses. To do this, cut off the ends and remove the flesh. With a sharp knife, we cut out the denticles along the edge of the workpiece.
 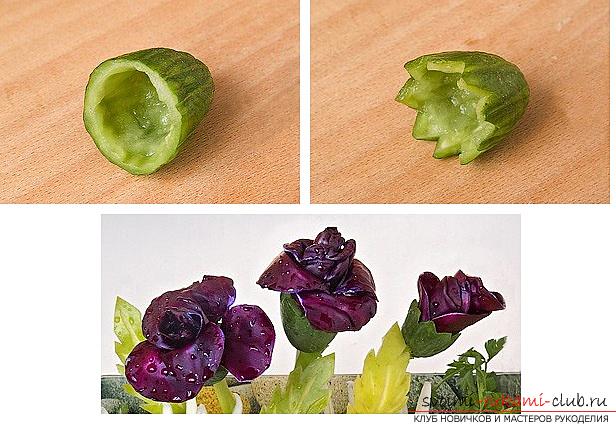 Now just turn the petals into a roll andwe paste into the sepal. We unfold a little petals. In the water, you do not need to insert roses. Cabbage leaves will absorb cucumber juice and beautifully unwind. If you want to make the stems of roses, then take a wooden skewer for shish kebab, put on the onion on it, and then stick into the sepals. To create leaves, a leek or peel of green apples is suitable. Vegetables for crafts usually choose bright, and that will turn out to be more colorful than a sunny orange pumpkin. Poking in the carving technique
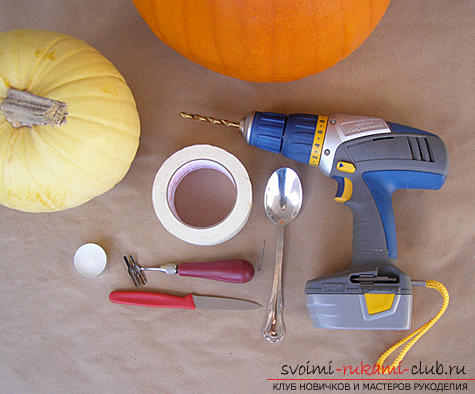
 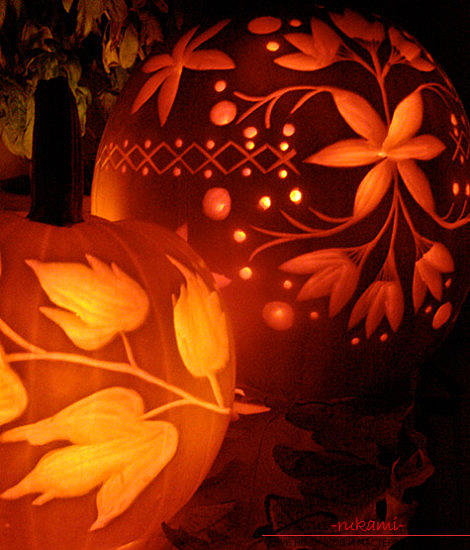 It will take:
- Pumpkin with a hard skin;
- Drill;
- Cutter;
- Knife with a sharp tip;
- Hammer and carnations;
- Spoon with a sharp edge (can be specially sharpened);
- Paper;
- Thin marker;
- Scotch.
 It is necessary using a spoon and a knife to remove the fleshpumpkins, leaving the walls about 2 cm thick. The template can be drawn on paper with a thin marker or printed out ready. Gently attach it to the pumpkin.
 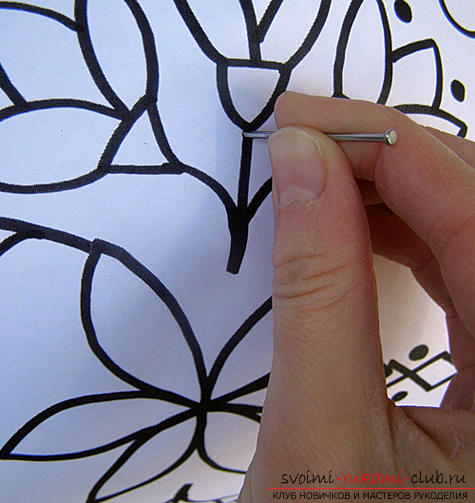 Now we take a thin carnation and a hammer andtemplate puncture the outline of the picture on the pumpkin, as in the photo. We remove the paper pattern, and see a pin pattern on the pumpkin. Using these cutters, use a cutter to remove a thin layer of peel. The remaining layer should not turn out to be thick. Otherwise, the light from the candle, which we put inside, will not be visible.
 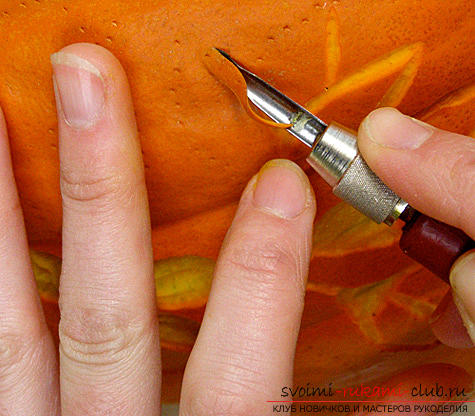 Now you need to cut a thin layer of pumpkin from the inside on the largest patterns of the ornament.
 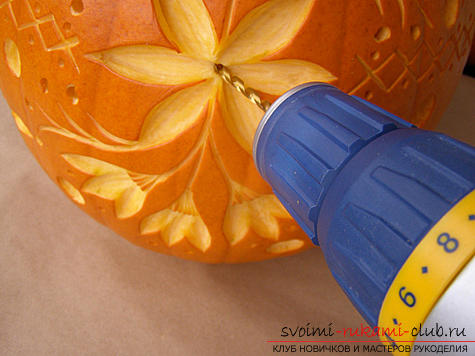 A drill needs to drill several through holes. They not only perform an additional decorative role, but also provide access to oxygen, necessary for burning candles. Now it remains only to wait for the dark timeday, insert a candle in the craft, light it and enjoy an incredible spectacle. If you are going to do this indoors, take care of the fire safety in advance.
Comments
Related posts:
 How to make your own hands beautiful and original crafts using kiwing techniques and others, step-by-step photos and instructions for creating paper crafts
 How to weave from beads gently pink violets, step-by-step photos and detailed instructions of various weaving techniques for creating flowers and violet leaves
 How to make original hand-made articles for the spring women's holiday - March 8, step-by-step photo creation frameworks for photos, topiary, crafts in the style of suites design and a bouquet of huge roses from corrugated paper
 How to make the decoration of the hair ring in the form of turquoise flowers in Kansas technique, free, detailed photos and description
 Make beautiful autumn crafts in school with your own hands from improvised materials with a step-by-step description, photo.