How to make a voluminous Christmas card? A lesson for children - a master class
It's time for New Year holidays to come to our house withthe first snow! It is then that we notice a joyful smile on the face of your child, who anticipates the coming of an early holiday to your house. We begin to prepare for the future celebration, running around the shops in search of the right ingredients for the table, preparing the New Year's celebration in the house. Someone decorates the Christmas tree, and someone prepares for the holiday in their own way.
How to make a voluminous Christmas card? A lesson for children - a master class
Children are very keen to get so much anticipatedgifts and are ready to move themselves to any action in order to achieve results. This is a great time to teach the child simple truths and give a little knowledge. First of all, it should be explained to the kid that not only Grandfather Frost should make gifts, but also the baby himself. Preparation of your own gift can be varied, but the best option for a small non-attendance is to make your own postcard. Fortunately, a technician for creating such masterpieces of art using paper and other materials is more than enough. Today we will try to master some popular needlework lessons that will help the child to develop the skills of perseverance, expand the horizons of his own imagination and undoubtedly learn new techniques! Let's get started.
The first postcard version
The first version of our work iscreating a three-dimensional postcard. A simple postcard version will require you to have the necessary materials and some additions. In case the child is going to issue a New Year's greeting, it will be appropriate to also prepare this element before decorating. Just pick the right wish and make a printout using the printer.
- It will require a thick cardboard, or thick paper on the A4
- Prepare some corrugated paper
- Scissors for paper processing
- Decor elements depending on your preferences or availability
- Scotch tape on two sides
- Adhesive PVA
- The usual version of the pencil (black)
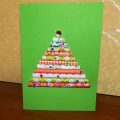
The first work involves the creation of a Christmas tree inattire. Make it easy, but first, you need to prepare the foundation. To do this, you need to take the cardboard, or paper and bend it into two parts. Standard postcard version. Next, we take one half from the postcard and produce a sketch for the future tree in the attire. You can do this with a pair of lines and a regular pencil. Then, we will deal directly with the preparation of corrugated paper. For this we need scissors. It is necessary to take and cut the stripes in height by 1.5 centimeters, and for the length we will select such a value, which we like. Our option is to take a third of the element for the length for the future allowance. Strips should be in different sizes. This is necessary in order for the herringbone to narrow from the base and be in the shape of a triangle - its traditional shape. Thus, the elements of the tree (paper) should be from the shortest to the longest strips. Then, it is necessary to glue strips of corrugated paper to the appropriate places from our markings. It is best to start with the tiers that are the base (bottom). Then, gradually, row after row go up. Use the marks you made earlier to glue each element with glue or double-sided adhesive tape. Then, paste the stripes, collecting them. Get a small version of skirts from the product. Then, when the work is completed, you can make a crown ornament using an asterisk. Also, you should add elements of sparkles, rain and of course, bows. From another paper, you should cut out an arbitrary greeting in the form of a poem or wishes. Paper can also be decorated using several layers for crafts. Thus, Grandfather Frost will definitely be satisfied! The second version of the postcard - New Year in the forest This option cards will be a unique addition to the New Year's gift, or it can be a separate project for your baby. Moreover, it can also be used as an ornament, because the article looks great near the Christmas tree! Connect fantasy and make your own New Year's story with the bulk particles. On the basis of already ready elements, try to come up with a child and add new characters, new items! But, for a start, we'll figure it out with a simple schema creation, work on which will not take you much time
- Prepare a cardboard base (two-sided version of cardboard)
- Cardboard for herringbone
- Cardboard for a snowman
- Adhesive
- Hole pattern for snowflakes
- Satin tape)
- Decorating elements
- Scissors for processing
First of all, it is necessary to lay down the foundationelements of a postcard in order to make a wide version in a big way. We take the same cardboard in order to prepare strips in width by 10-15 millimeters, then - we add the article to two parts. After, you need to bend the end of the strips with different levels to make some kind of birdies. They need to be glued inside our product, as well as shown in the diagram. Strips with different lengths will allow to form a voluminous version of the postcard. It will seem that they are elements closer, while others are a little further away. Cooking snowman We need to prepare three mugs, taking as a basis the usual white cardboard. Then, it is necessary to overlap each of the elements one by one. So we have a version of the snowman. Stylish Christmas trees and snowflakes Preparation of such Christmas trees will also be simple. It is advisable that you have scissors, which can process the edges of the fabric with teeth, they will make the herringbone more alive. But, if not, you can repeat the patterns with ordinary scissors, yourself. It is also necessary to prepare a variant of a variety of snowflakes, to make asterisks using paper. After, the elements of the tree and the snowman should be glued to the stripes. At the top of each Christmas tree you need to glue a snowflake, and on the snowman you need to put on a scarf, using a satin ribbon. Thus, our workpiece is completely done!
Comments
Related posts:
 How to make a New Year card with quilling technique? A lesson for children
 This master class will teach you how to make your own hands a New Year greeting card.
 This master class will teach you how to make a quilling card - valentine - with your own hands.
 How to make a New Year greeting card to a beginner craftsman? Lesson and tips
 Simple technique of painting Snow Maiden on the New Year's card - master-class