How to make a card will show our detailed master-class with a photo. Original greeting cards will always be an appropriate addition to the gift for any holiday.
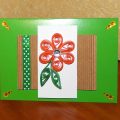
A product made with love with its own hands hasspecial value. If you are wondering about what a surprise to present to your mom, grandmother, friend for any holiday, then a unique card with red roses is a great option. Such an original postcard will also prove to be an appropriate addition to a gift for any holiday, anniversary, event.  It is quite simple, becauserequires special knowledge and the use of complex techniques. On a green background, red roses interlaced through a white lattice look very rich and beautiful. This card will be able to fulfill everyone without using special materials. We present a master class on the execution of a very beautiful and delicate greeting card with roses. For the card you need to prepare:
- A4 cardboard of green color;
- white cardboard;
- foamed double-sided adhesive tape;
- two-color colored paper of two red shades;
- Quilling paper or double-sided colored paper of green color;
- glue;
- knitting needles for thin knitting;
- scissors for small parts;
- a quilling tool or a toothpick.
Green sheet of A4 cardboard bends in half andwe get the ready basis for our postcard. We take white cardboard and cut out strips of it with a thickness of not more than 3 mm and a length of 7.5 cm. Such strips need six pieces.  Foamed Scotch tape on small squareswidth of no more than 3 mm, since white cardboard strips will be attached to it (or we use ready-made squares of foamed tape). At the intersection, we attach the squares of foamed double-sided adhesive tape and fasten the strips together as in the photo.
  It turns out such a window.
  From two-sided colored paper of red shadeswe cut out squares of different sizes (the side of the square should be from 5 to 7 cm). Then use a small pair of scissors to cut out a spiral, the edges of which should be wavy. This is necessary for the rose to look as natural as possible.
  Using the quilling tool, windspiral. If there is no special tool, you can use a conventional toothpick, on which the paper is wound well. We start from the outside of the spiral.
  It turns out the detail as in the photo.
  It must be greased with glue.
  Then, form a beautiful rose shape and securely fix with your fingers, wait a little until it dries. This is necessary to ensure that the rose does not "break up."
  Thus, there should be five roses of different sizes and different shades of red.
  We take a thin needle for knitting and paper forquilling of green color. If there is no quilling paper, you can take the usual two-sided colored paper and cut a strip 3 mm wide and 40 cm long. Strip the green paper strip tightly on the spoke.
  Then, carefully remove the spiral from the spoke.
  We take the finished white window and attach the edge of the green spiral on the reverse side with the help of glue.
  Now pass the green spiral as in the photo.
 In the places of the joint with the window, fix the helix with the glue so that it is securely fixed. From a green strip of paper, we form a roll with a toothpick or a quilling tool.
  Slightly roll out the roll, fix the edge with glue.
  Then we give the ready rolls the shape of a leaf. Such details will need seven pieces. When all the details are ready, proceed to their attachment to the base.
  We glue the finished window from the back side and attach it to the base in the center closer to the top of the base.
  We glue with a rose.
  We fix on the window. You can fasten the roses as in a photo or you can think of another location on the window.
  We glue the part in the form of a leaflet and also attach it.
  In the same way, we fix all the other details.
  Original and very beautiful card with your own hands is ready!

Comments
Related posts:
 This master class will teach you how to make your own beautiful quilling cards.
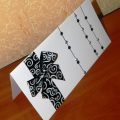 This master class will show you how to make beautiful cards with your own hands.
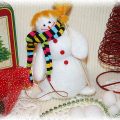 A detailed master-class will show you how to make your own hands a New Year's hand-made snowman
 Greeting cards, creating New Year cards with preschool children, how to make a greeting card with a snowman from napkins.
 Our detailed master-class with a photo of a toy made of rubber bands will show how the smurfs themselves twine by their own hands.