How to make an ornamental paper tree, several master classes to create trees in the technique of killing, topiary made of paper and origami
In this article, you will be asked several wizardsclasses to create trees from paper. In the modern world, gizmos made with their own hands become increasingly popular. Original and original hand made ornaments for home allow to make the interior of the home memorable, cozy and bright. This can be a crocheted tablecloth, polymeric clay napkin rings, a beautiful photo frame or a papier-mache dish. One of the options for home decor will be a topiary. It is one of the most ancient types of landscape design. The first beautifully cropped trees were created by the ancient Egyptians. Then this art was adopted by the Romans. The toparians named special slaves, who were following a separate plot - the topia in the gardens of the rich and noble inhabitants of Rome. The power of the Roman Empire expanded, and the art of figurative cutting of bushes and trees came to Europe. In the Middle Ages and the collapse of Rome, it would seem, and landscape design should have declined. However, an unexpected impetus for the development of topiary was received in the church. Christian monks appreciated the solitude and silence in the garden, so necessary for prayer. Therefore, the art of topiary was preserved and perfected behind the thick walls of monasteries for almost a thousand years. With the advent of the Renaissance period, many antique canons become popular, and the topiary again appears in the gardens of noble and noble people. Another impetus to the revival of landscape design was the change in architecture. In place of the castle moats, high walls and gloomy loopholes come the gardens of Versailles, Hampton Court and Peterhof. Since then, the topiary has remained popular up to the present day. Modern variants also have a figurative, geometrically correct form. However, more and more often design idea creates miniature topiary from improvised means, for example, from paper. For handmade crafts, corrugated paper is often used. It perfectly holds the form and has a rich color palette. You can easily choose the shades that suit exactly to your idea and color solutions in the interior.
European tree of happiness. Topiary made of corrugated paper
Option 1 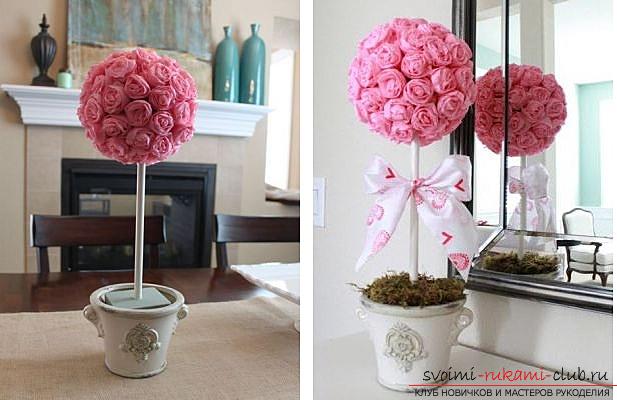 It will take:
- Corrugated paper (the color of your choice);
- Capacity for topiary (suitable flower pot);
- Cylinder with mounting foam;
- A piece of foam plastic;
- Balloon;
- Stick for the trunk;
- Ribbon for the trunk;
- Artificial moss;
- Glue gun with hot glue;
- Scissors and ruler.
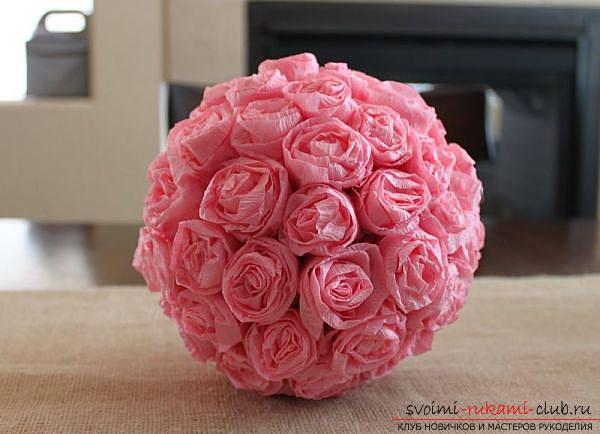
As a basis for the topiary, you can takefoam or penoklekstovye balls. But if there was no one at hand, use the mounting foam. It is necessary to slightly inflate the ball, moisten it with water and attach it to the tube from the balloon. Now fill it with foam to the desired size. Remember, to freeze the foam, moisture is needed from the air, in our case moisture from the ball. When hardened, it usually increases in volume, so take these factors into account when creating a workpiece. Now we must wait. While the foam stiffens. This can take from 5 to 10 hours depending on the size of the future ball.  When the workpiece is frozen, we remove the ball, cuttinghim. We cut the top layer of foam with a knife. This will help to expose the porous structure of the material, in which it is convenient to stick pins and simulate the shape of the future topiary. Suddenly you will want an oval or square variation. While your ball is drying, you can create paper flowers. In this master class we will have roses from corrugated paper. Cut the paper in strips of 3 cm wide across the crimped lines. One of the wide edges is wrapped 2/3 by itself. Now, by bending outwards, we begin to fold the strip into a roll. Inside it it is necessary to fold more tightly, and the last layers a little to weaken. It turned out that such a pretty rose. You just need to fix the end of the paper strip with glue, pre-bending it. Straighten the fingers of the rose to make it look as natural as possible.
 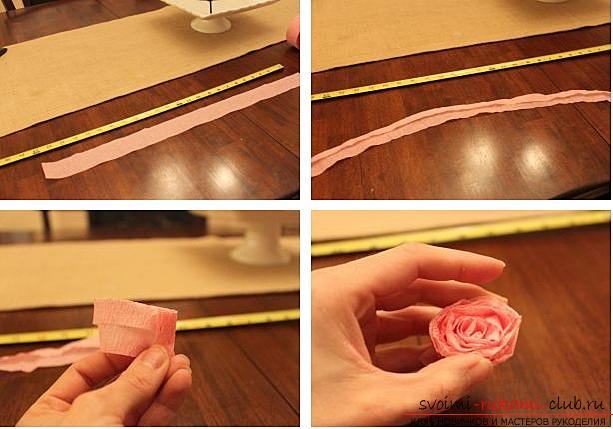 The number of colors will depend on thathow big you made the ball base. A dried and shaped base should be attached to a stick that will act as a trunk. This can be a real tree branch of sufficient thickness, a plastic stick or several pieces of wire fastened together. You just need to cut a small hole in the ball (slightly less than the diameter of the stick), pour hot glue and insert the stem there. When the craft gets cold, we begin to attach the roses. This can be done with the help of pins or hot glue and glue gun. Arrange the flowers tightly so that you can not see the gaps.
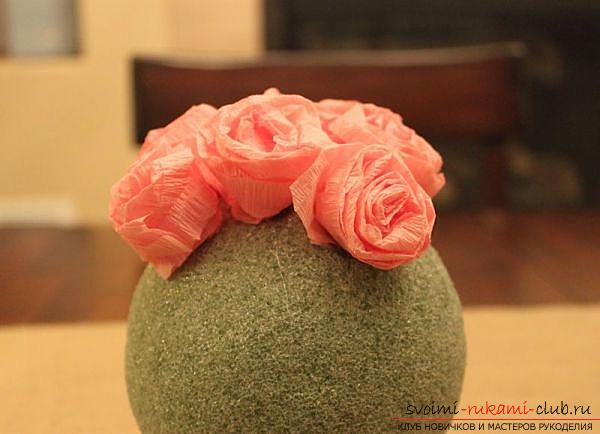
 While glued flowers are frozen, take care ofcapacity, where our topiary will grow. At the bottom of the pot you need to stick a square piece of foam. It can be replaced with a floral sponge, alabaster or all the same mounting foam.
 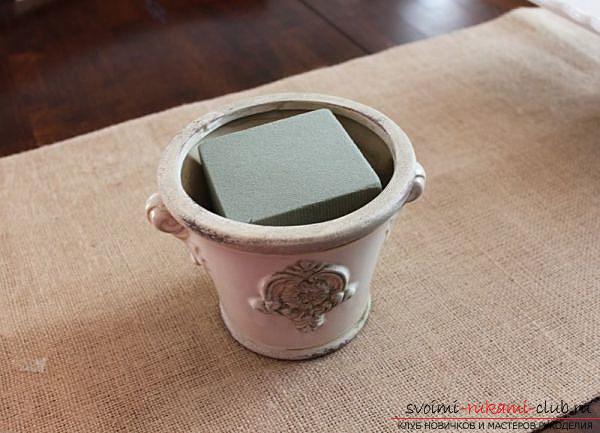 We paste the topiary into the pot. If you use foam plastic pieces. It is necessary to repeat the manipulations, similar to joining the trunk of the topiary crown. If you decide to use alabaster or gypsum, then dilute it with water, install the topiary and fill with the mixture. Before full hardening, he will need to support from different sides, so that the topiary does not tilt. In this lesson, a penoplex is used. When the topiary is fixed in the pot, we proceed to decorating. Mask alabaster, foam or other filler capacity can be using artificial moss, cutting corrugated paper or any other liked elements. Up to the beads, ribbons and beads. It remains only to tie a bow and the corrugated paper tree is ready. Option 2
 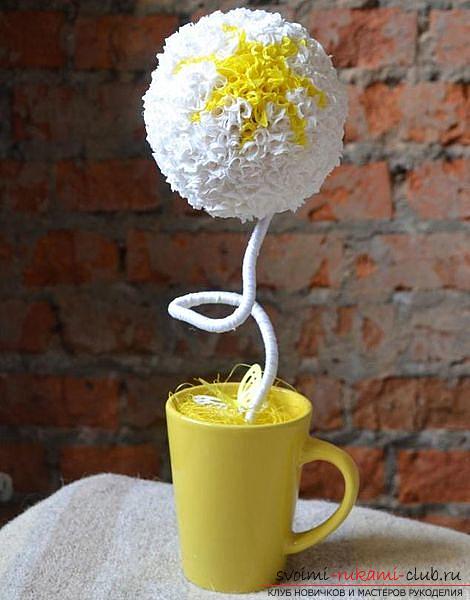 It will take:
- Round base;
- Thick wire for the trunk;
- Hot glue and glue gun;
- Satin ribbon for decor;
- Wooden skewers for shish kebab (thick) or chopsticks for Chinese food;
- Corrugated paper of white and bright yellow color;
- Capacity (in this case a large ceramic cup);
- Elements for decoration (artificial grass).
As a trunk for this topiary, weuse a piece of thick wire. It can be beautifully bent to give the handicraft more originality. One end must be twisted in the loop and unfolded perpendicular to the rest of the trunk so that a stable platform is obtained for further attachment to the bottom of the cup. 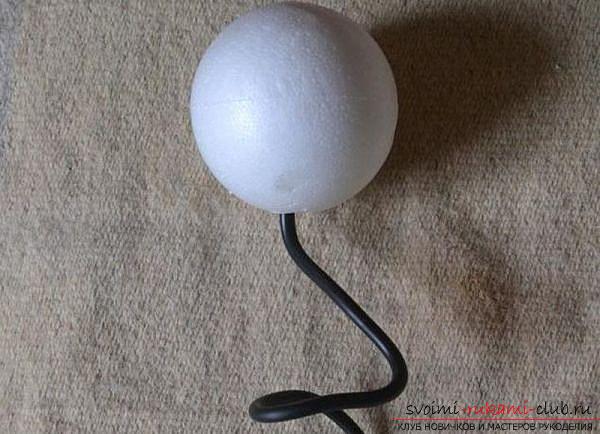
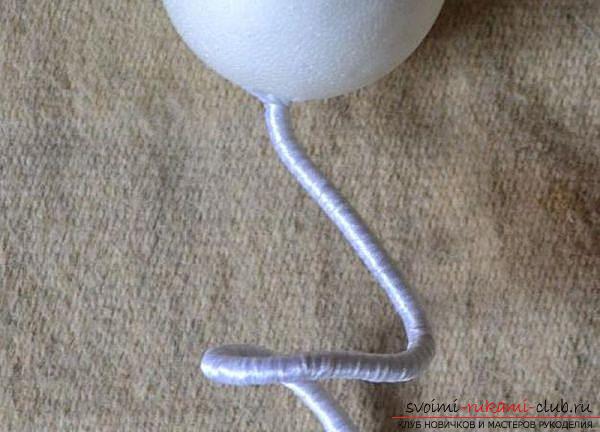 In the round base we cut a hole, fill ithot glue and insert a thick, curved wire. While it freezes, we start to create decorative elements from corrugated paper. It should be cut into squares with a side of 1.5 cm. The next stage of creating blanks can take a lot of time. It is necessary to wind each square on the tip of the wand, as shown in the photo. The blanks are very small, so they will need a lot.
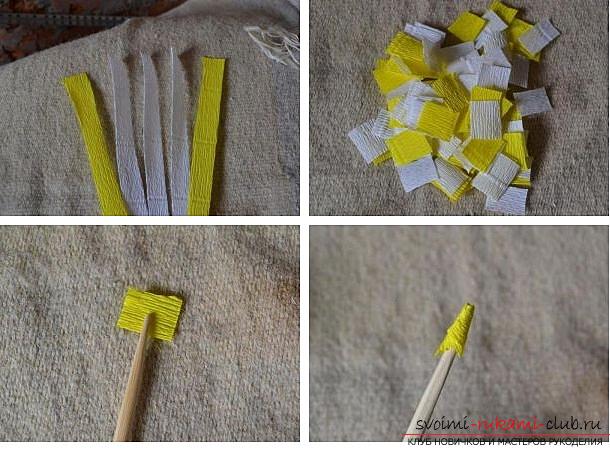
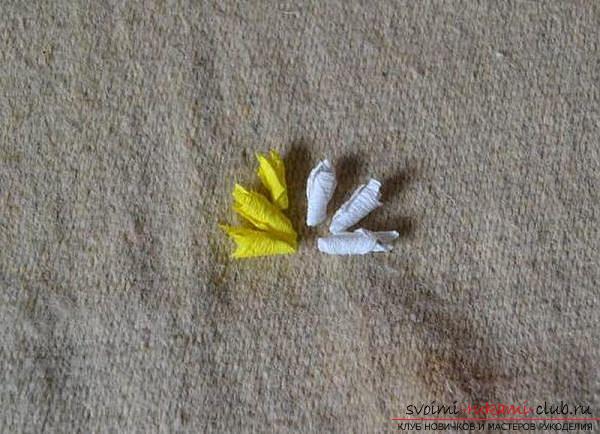 Now glue the rolls all over the surfacebasis. Try not to make gaps and paste everything. Using two colors, you can make a contrast pattern or pattern. Now it remains to stick the topiary in the cup and decorate the base to disguise the place of attachment. It turned out that such a bright and positive tree of happiness from paper. Wood from multi-colored paper
 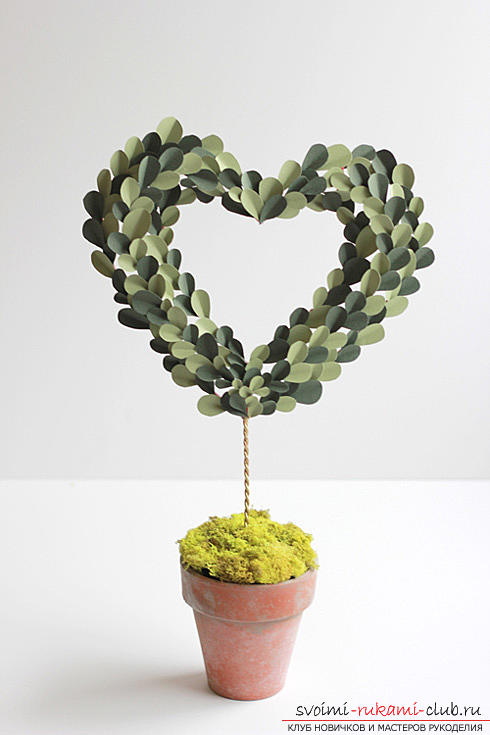 Charming tree from paper of severalshades of greenery in the form of a heart will be an excellent gift for the Day of All Lovers. Or maybe you just want to please your loved ones with a beautiful and original souvenir. Its creation is slightly different from previous master classes. Materials and tools:
- Two-sided colored paper of several shades of greenery;
- Frame. It can be made of wire, metal, plywood or wood;
- Scissors;
- Hot glue and glue gun;
- Green paint in aerosol packaging;
- Wire;
- Capacity for the future tree;
- Elements of decor (artificial or real moss).
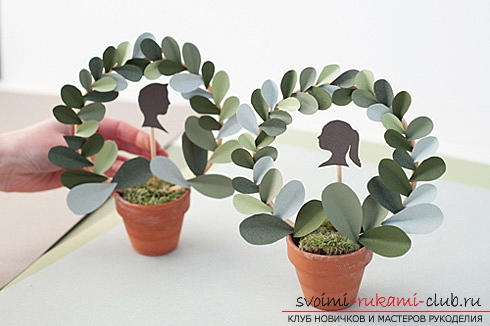
As a basis, you can use ready-mademetal structures, for example, from the New Year's garland in the form of a heart. You just need to cut off the tinsel. It is this kind of use in this master class. 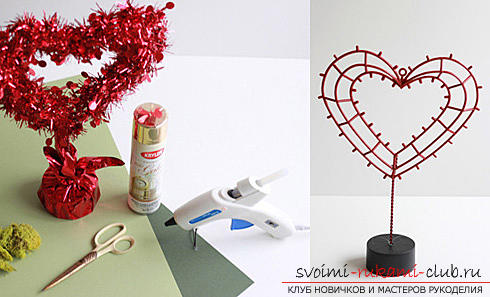 If there is no ready option, you can twist the formfrom a thick wire and fix it with a floristic sponge. For the round crown, the old hoops are perfect. To fix them to the pot, you do not even need a florist sponge or polystyrene. It will be enough just to attach them with wire. Use a crumpled paper to fill an empty space in the pot. And from above attach moss.
 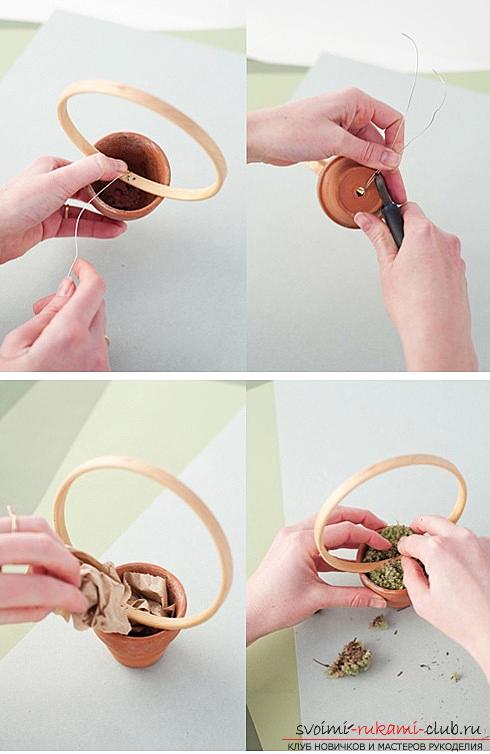 Now from the sheets of green paper we cut out the leaves. We make them of different sizes, but we keep the same shape. It is necessary to bend them along in half. That they become more voluminous.
 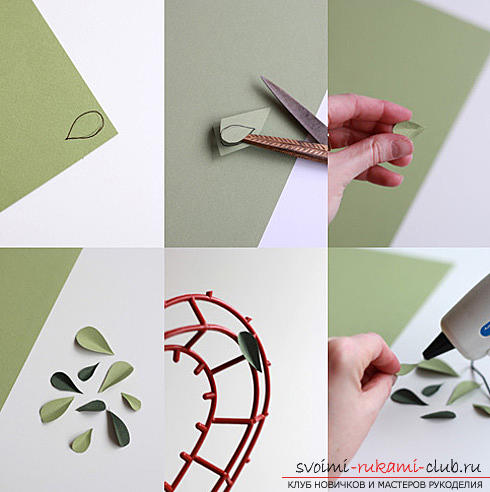 Now, with the help of an adhesive gun, we attach the leaves to the base. Alternate sheets of light and dark shades. Stick them denser, so that the trees are fluffy.
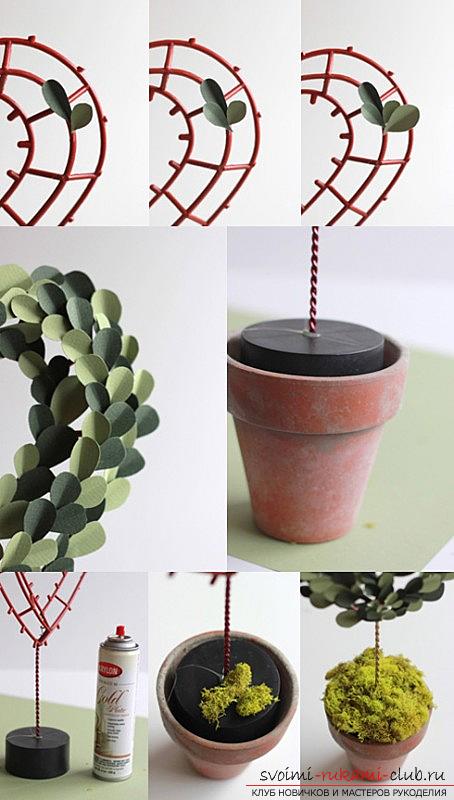 A tree in the form of a heart together with the base must be placed in a pot and decorated with moss, gluing it to the base.
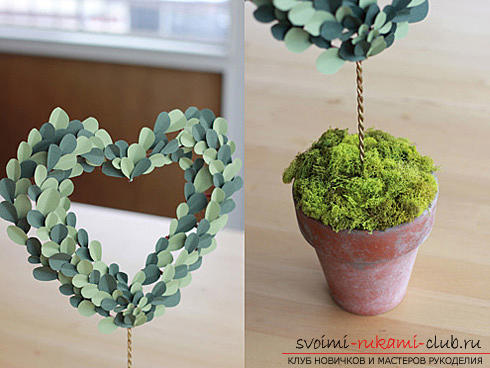
 The next tree of paper we will do inengineering kwing. The history of this arts and crafts is almost as old as the topiary. The paperhole got its name "quilling" - from the "quill", that the "bird's feather" is translated from English. They were used initially to wind up strips of paper. How and when the first artifact originated in the technique of quilling is unknown. There are several versions, some lead from the East to the West, others from the West to the East. According to the first (eastern) theory, paper wrapping was born, as a derivative from the creation of decorations and decor elements made of gold and silver strips. Such jewelry was highly valued, therefore by the 13th century this art became very popular. The Western theory of origin tells us that keving appeared in Europe during the Renaissance. Surprisingly, the authors of these masterpieces were monks. They decorated the folded gilt strips of paper with the salaries of the icons. By the beginning of the 18th century, paper circulation had become very popular among the women of the upper classes. This is understandable, because in those days quality paper was an expensive pleasure. Now the paper is available to everyone who is interested in creating unusual handicrafts in the technique of quilling. They even produce special sets with paper strips. It is these strips that we will use for the next paper tree.
Wood from paper in the technique of tinkering
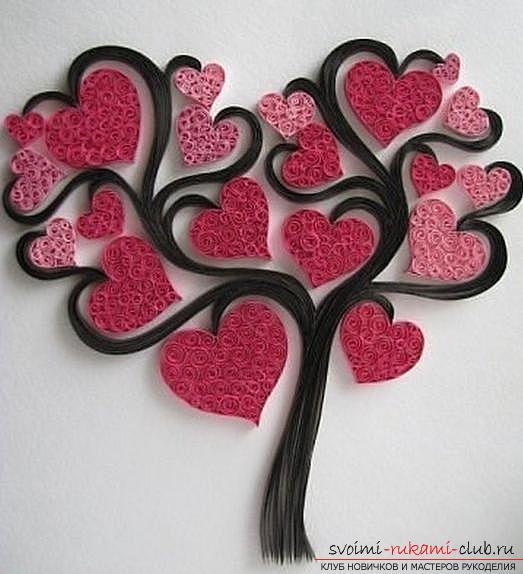 This hand-made article will be an excellent variant of the picture on the shelf or postcard given to your most beloved people. It will take:
- Paper strips for quilling;
- Glue;
- A toothpick or special stack for twisting paper;
- A sheet of white paper for the base.
On the sheet of the base paper of dark color we lay out the branches of the future tree. If desired, you can draw a sketch and paste the strips for quiling on ready-made lines. We attach them by a rib. 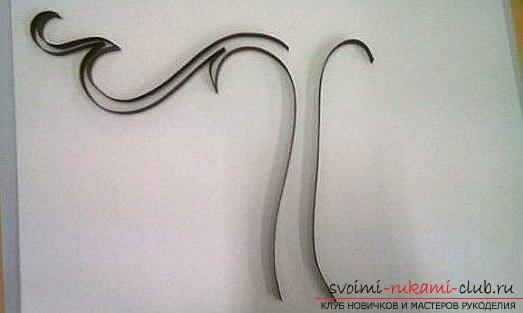 From paper crimson and pink flowers spread out the contours of hearts. The size is arbitrary.
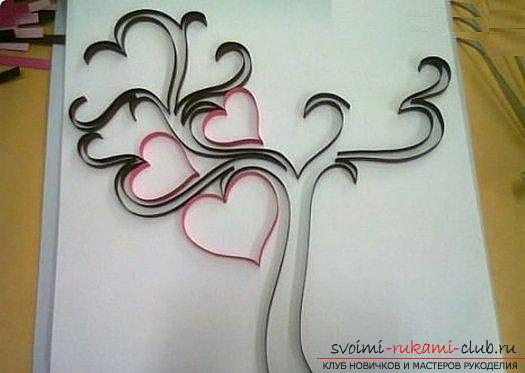
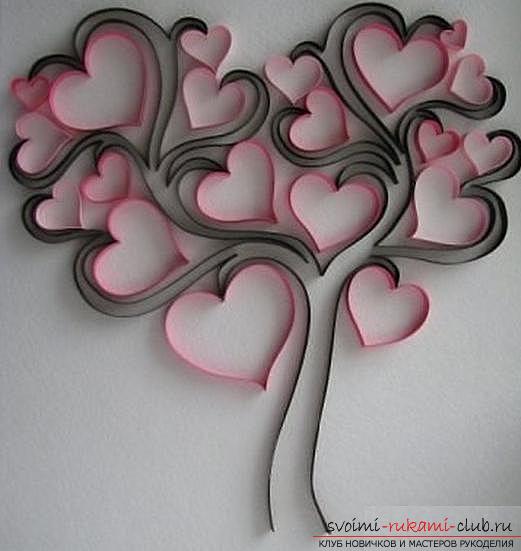 While glued contours dry up, with the help oftoothpicks or a special tool from strips of paper of crimson and pink colors we twist round dense shaybochki. The beauty of this craft is also in the fact that it is not necessary to form additional figures and blanks. The last step remains. Fill out the contours with the corresponding color shades. The contours of the branches are filled with strips of paper of dark color, repeating their bends. Glue it with an edge. Another option for making paper craftswill, of course, origami. The earliest art of making crafts came to us from China, where the world's first paper was created. But its main development, as art origami has received in Japan. The first articles made of paper began to be folded in the form of boxes, which were called sanbo, monks. They put a little food to offer to the gods. For a long time, origami figures accompanied the Japanese in many aspects of life. They participated in religious rituals of Shinto temples, beautiful origami butterflies accompanied the bride and groom on their wedding day. Samurais gave each other graceful crafts before the fight. Because the cost of paper is very expensive, the art of origami has long been the privilege of only rich and noble people. But over time, when paper began to be produced everywhere, the ability to fold various figures from paper conquered all the new countries. After the Second World War, it spread not only to the eastern countries, but also came to Europe and America. In the next master class, we propose to make crafts in this technique.
Herringbone in origami technique
 It will take:
- Two-sided colored paper (green for twigs and brown for stem);
- Scissors;
- Ruler;
- Elements of decoration on request.
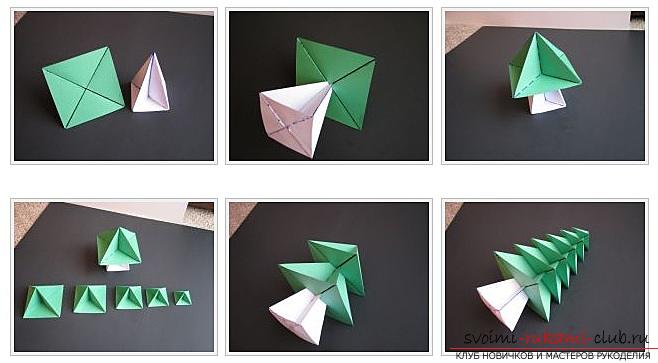
To start, we cut out the squares of the blanks fortrunk and branches. It will take 7 pieces. The largest green square and the barrel blank have a side of 20 cm. The side reduction step will be equal to 2.5 cm. The smallest workpiece will have a side width of 7.5 cm. Of course, you can choose another width of the step, the number of blanks and, as effect, the final dimensions of the herringbone. In this master class, the folding of the trunk is shown on a sheet of white paper so that fold lines can be seen more clearly. We take the biggest green square. We mark with dashed lines those places in which the sheet must be bent and unbent, marking the folds. Wherever solid lines are drawn, we add the paper. This figure is called a "double square". Below is a step-by-step chart.  The resulting blank is ¼ of the initial square, i.e. its side is 5 cm.
 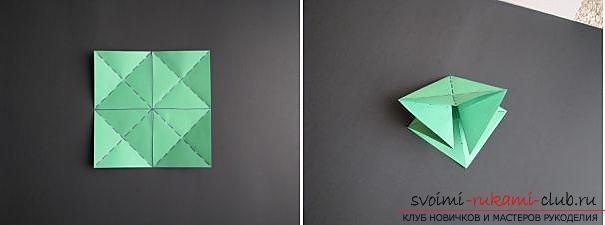 We have a box so that all of itthe free corners looked down. In the photo, the two corners are indicated by asterisks. On the dotted line, bend this layer of paper, taking it by the bottom corner with an asterisk and connecting it with the right one. A small corner must be bent inside the figure.
 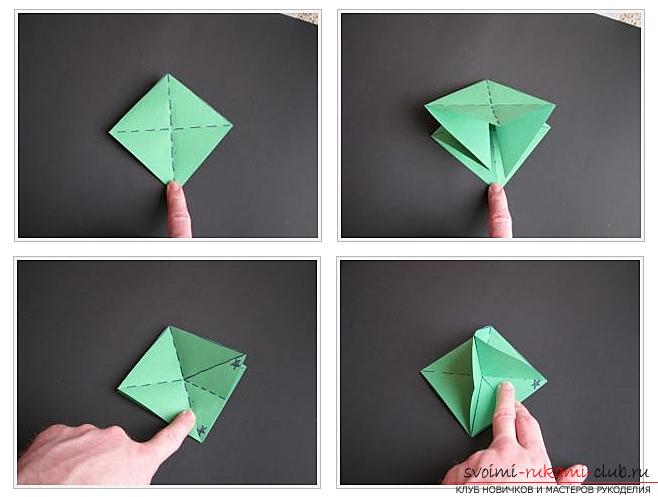 We left a corner of the top layer of paper on the left. It must be aligned along the fold line with the adjacent (left) corner. The resulting small corner, like the right one, is also hidden inside.
 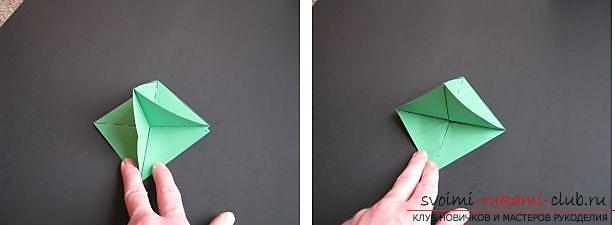 Rotate the shape and do the above steps with the top layer of paper.
 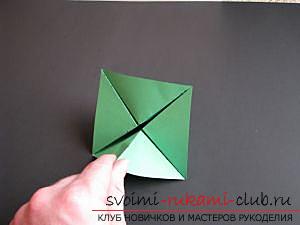 That's what should turn out in the end.
 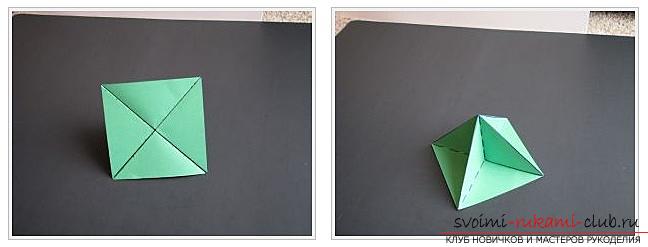 Advice! Practice first on the additional square of paper. We put all green squares in this way and put them aside. Again, add a double square, as in the first steps of the master class.
 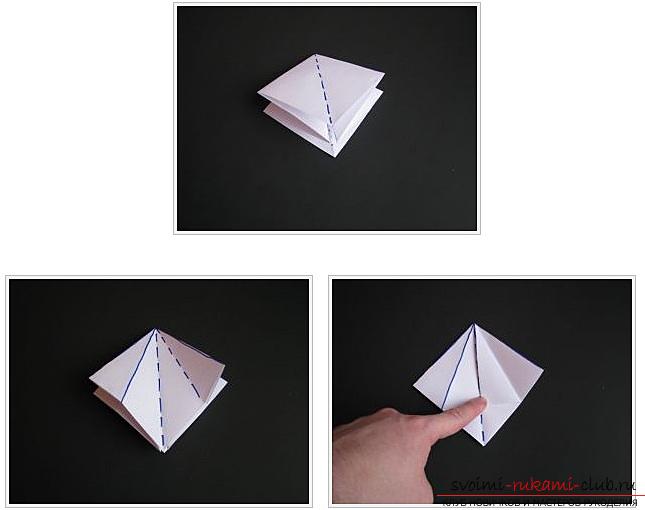 Now you need to fold all the corners, as shown in the photo. Drive in a circle.
 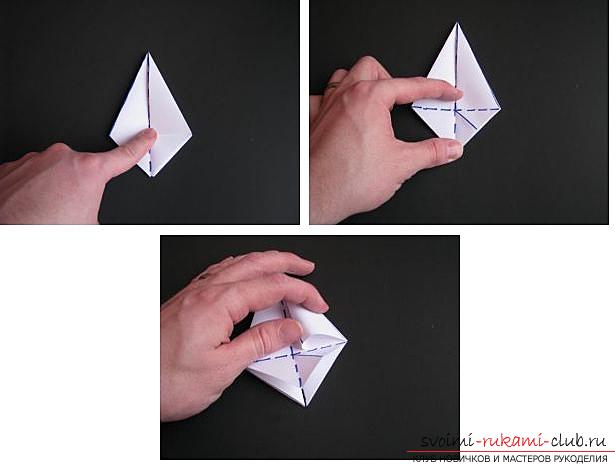 Just follow the step-by-step photos.
 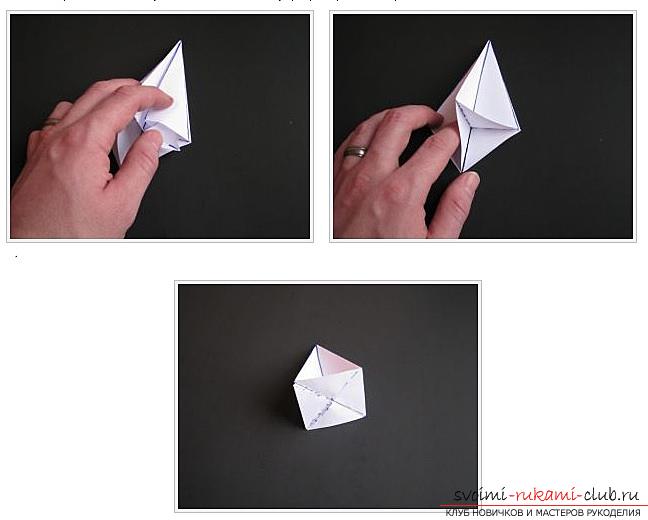 That's what should happen.
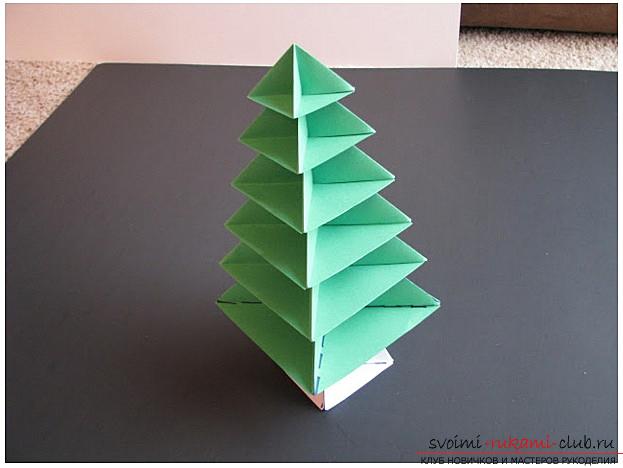
  When all the details are ready, just build a pyramid from the blanks. You can decorate herringbone to your taste.
Comments
Related posts:
 How to make a beautiful tree topiari from napkins, step-by-step photos and a detailed description of the work on creating topiary with different colors
 To make a piece of paper made from origami in origami technique, it takes a few minutes
 This detailed master-class origami for children of 8 years will teach how to make an origami snake made of paper.
 This detailed workshop of origami for children of 8 years will teach how to make an origami-mushroom from paper.
 How to make snowflakes with your own hands made of paper, in the technique of killing, from dough, beads and beads, from tapes in Kansas technique or crochet, turn-based photos and ideas for inspiration