How to make flowers from various ribbons, master classes with step-by-step photos and detailed instructions and advice on how to perform, flowers in Kansas technique
There are countless wonders of nature,and one of the most amazing are the flowers. All sorts of colors from gentle pastel shades to bright and screaming, the amazing variety of shapes of petals and leaves inspired creative people throughout the ages. Artists, sculptors, poets, even blacksmiths reflect the magnificence of flowers in their works. If you have a creative vein, and you know how to see the beautiful, you can safely create your own masterpiece of petals, and instructions and photos will help you. In this article, we propose to make flowers from all sorts of ribbons, in different techniques and variants. Simple single-layered or complex combinations of several tiers, with beads, rhinestones or buttons in the cores, such crafts can become elements of the decor of the room, for example, a bouquet or a wreath. The needlewomen turn these flowers into curtain holders, decorate them with lamps or put them in vases. Elegant products from satin ribbon or organza will become a beautiful piece of hair clip, brooch, part of the belt, ornaments of a handbag or hat. Thanks to the variety of colors and shades of ribbons, you can create flowers from them, both existing in nature, and completely unusual fantasy variants. The main thing is to let your fantasy come true with the help of bright pieces of ribbons. Dense flower of satin ribbon 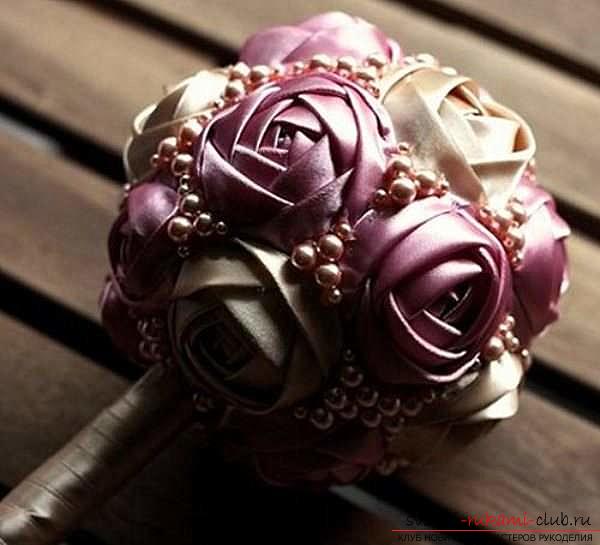 Materials and tools:
- A ribbon made of satin;
- Feather (you can use burlap);
- Pencil;
- Scissors;
- Needle and thread.
To begin with, it is necessary to make a basis forthe future of the flower. Take the felt or burlap and draw a circle on it with a diameter of 6 - 10 cm. Now we designate in this circle a small triangular segment, as in the photo. The size of the base will depend on the height of the base of the flower. The wider it is, the higher the cone we will receive when we cut out the circle. So, cut the circle and the triangular segment from the circle. We fix the ends and get a cone. Now we put a tape on the base. In this variant, it should not be cut on a piece. We will fold from a long ribbon. One end is slightly bent so that the shiny side was outside, and sew, as shown in the photo. Now take the free end of the ribbon near the circle itself and add it so that the fold line lies diagonally across the sewn edge. We follow the step-by-step photos. The end of the ribbon is glued or sewn from the inside.  If you want to create a bouquet-microphone from suchcolors, then you need a round base. This can be a foam ball or a lump of paper wrapped in scotch tape. To the base we attach a stick or several sticks. We glue the flowers to the bowl, add beads or other ornaments. We wind the wand with a ribbon, and the bouquet is ready. Wreath with flowers from satin ribbon
 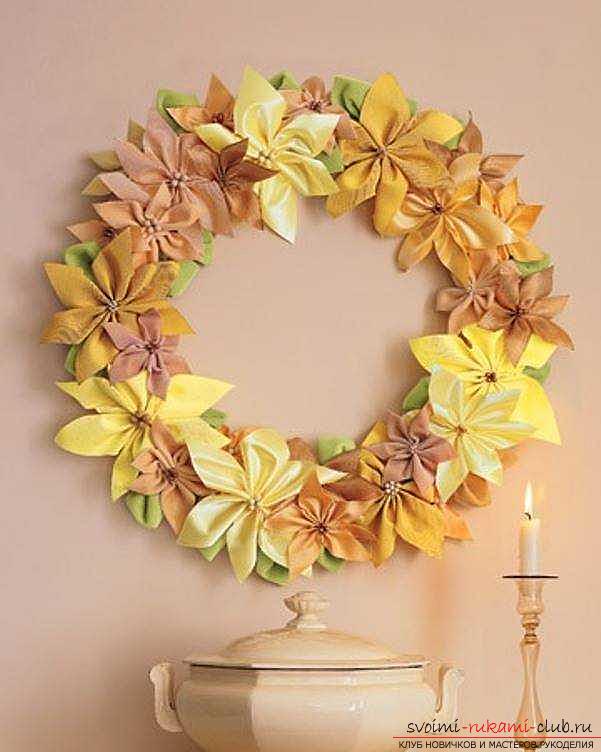 Materials and tools:
- Tape of satin in different colors;
- The base under the wreath;
- Scissors;
- Candle or lighter;
- Pins with beads on the end;
- Pliers;
- Needle and thread in the tone of ribbons.
Flowers. To create the petals we cut the ribbon into elongated rhombs. Now take the needle and thread in the tone of the ribbon and stitch our workpiece with a pair of stitches with a conventional ordinary seam from one corner of the diamond to the other along a short diagonal. We tighten the thread, fix it. Now put our workpiece in half in the place of sewing. We get two petals, located side by side. You can make one more stitch and fix the workpiece in its present form. Pins with beads pierce the center. 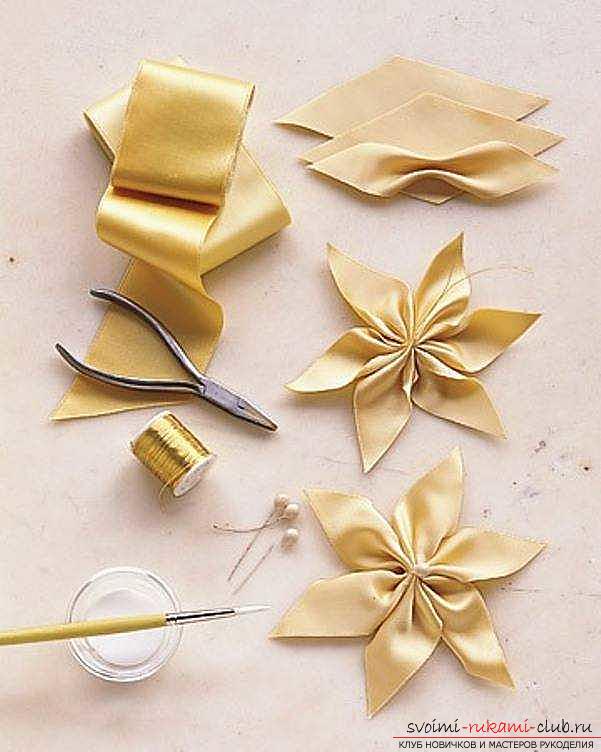 Leaflets do as follows: We put the rectangular piece of ribbon face down and fold it diagonally so that its edges are perpendicular to one another (see photo). Now add the workpiece so that the top becomes triangular, for this we bend the diagonal in half. The lower end of the workpiece is also covered by a conventional seam. We tighten the thread and get a leaf.
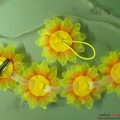
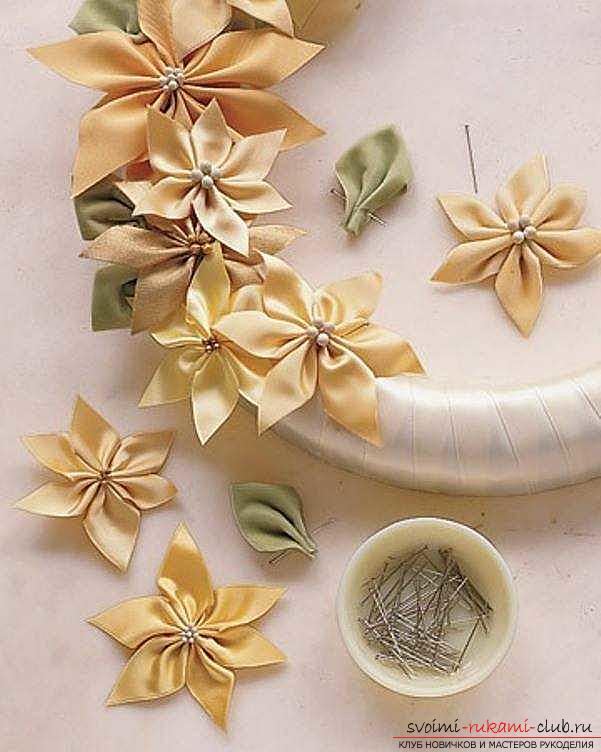 Round base for the wreath is wrapped with a ribbon. We fix the flowers and leaves with the help of pins or glue. You can make flowers with different number of petals and different sizes, so the wreath will turn out even more beautiful. Flower with a button-heart
 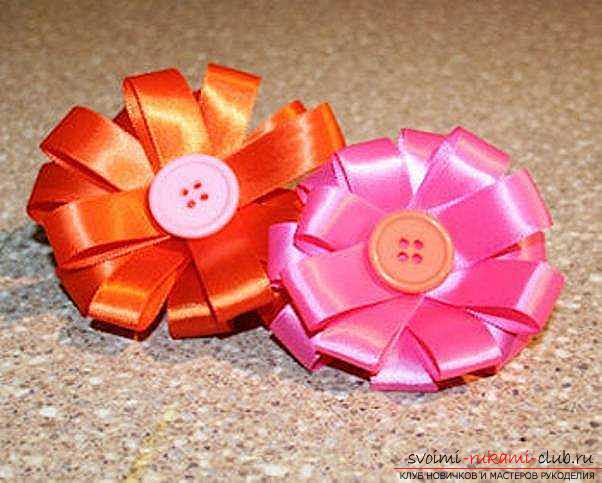 Materials and tools:
- Tape from satin (narrow);
- Pugs;
- Adhesive or glue gun;
- Scissors;
- Candle or lighter.
Petals. For each flower it will be necessary to cut from 6 to 8 ribbon strips. Each petal is one-fourth of a line. 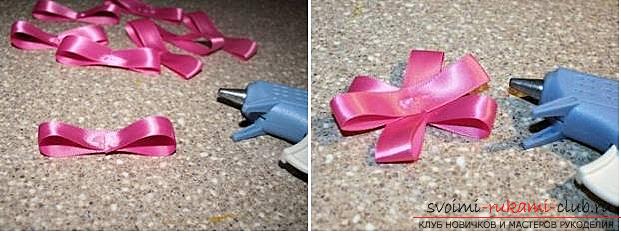 We cut the cut edges of the ribbons over the fire. Now put our piece of shiny side down and glue the ends in the middle. From above put the second piece across and glue the edges in the middle. Then the next piece, etc. in the core we glue the button. It disguises the junction of the tape edges. Instead of a button, you can use a rhinestone or a half-bead. Simple flowers from ribbon
 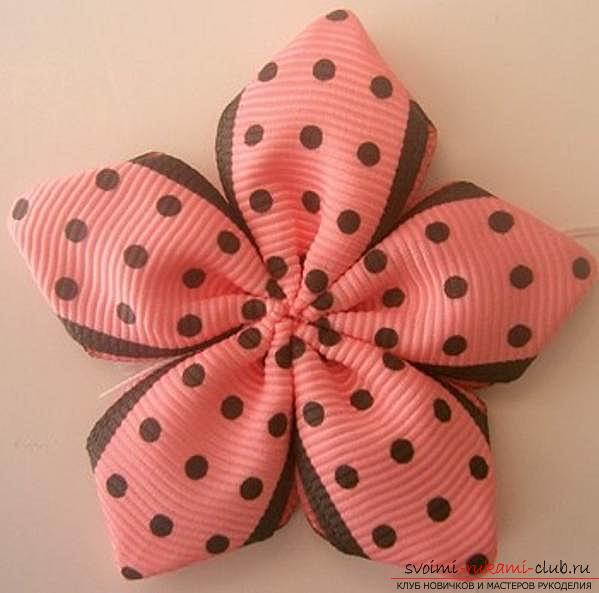 Materials and tools:
- Tape from satin;
- Threads and the needle;
- Glue gun;
- Candle or lighter;
- Scissors.
For each flower cut into 5 rectangularpieces of ribbon. Each petal is the length of a half of the segment. Slices melt over fire. Middle of each strip stitch, capturing the edges of the ribbon. We put a little glue on the sewn part. Now we put the work pieces in half so that we glue the sewn part. 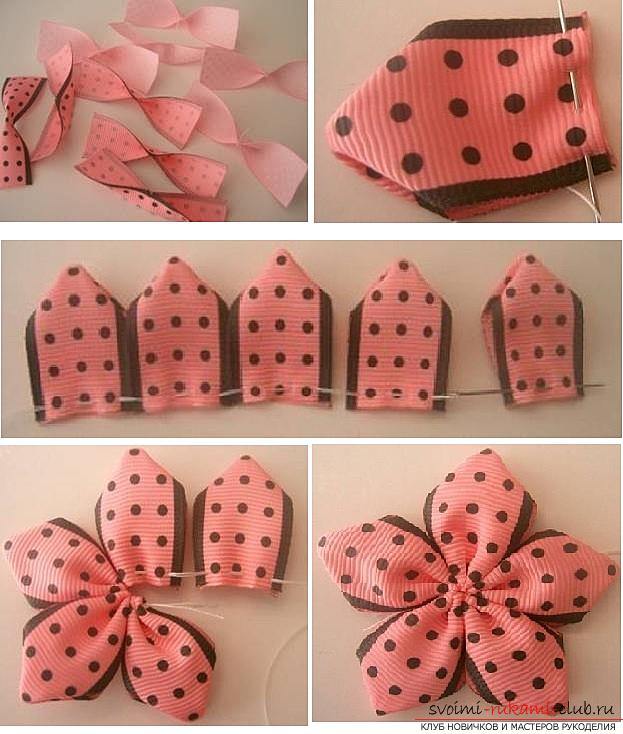 The second edge of the flap is sewn with a suturewithout tearing the thread so that all the petals are assembled into one thread. We close the circle and pull the thread together. The heart of the flower can be decorated with a button or bead. Lush flowers
 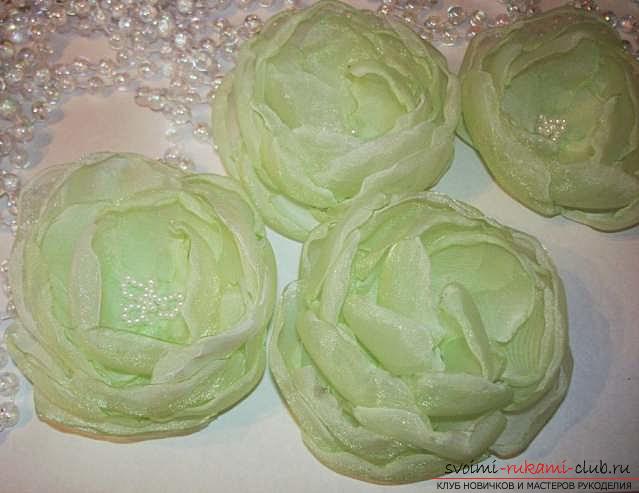 Materials and tools:
- Organza or artificial silk;
- The needle and thread are in the tone of matter;
- Candle or lighter;
- Elements of decor for cores (beads, crystals);
- Heavy paper;
- Pins.
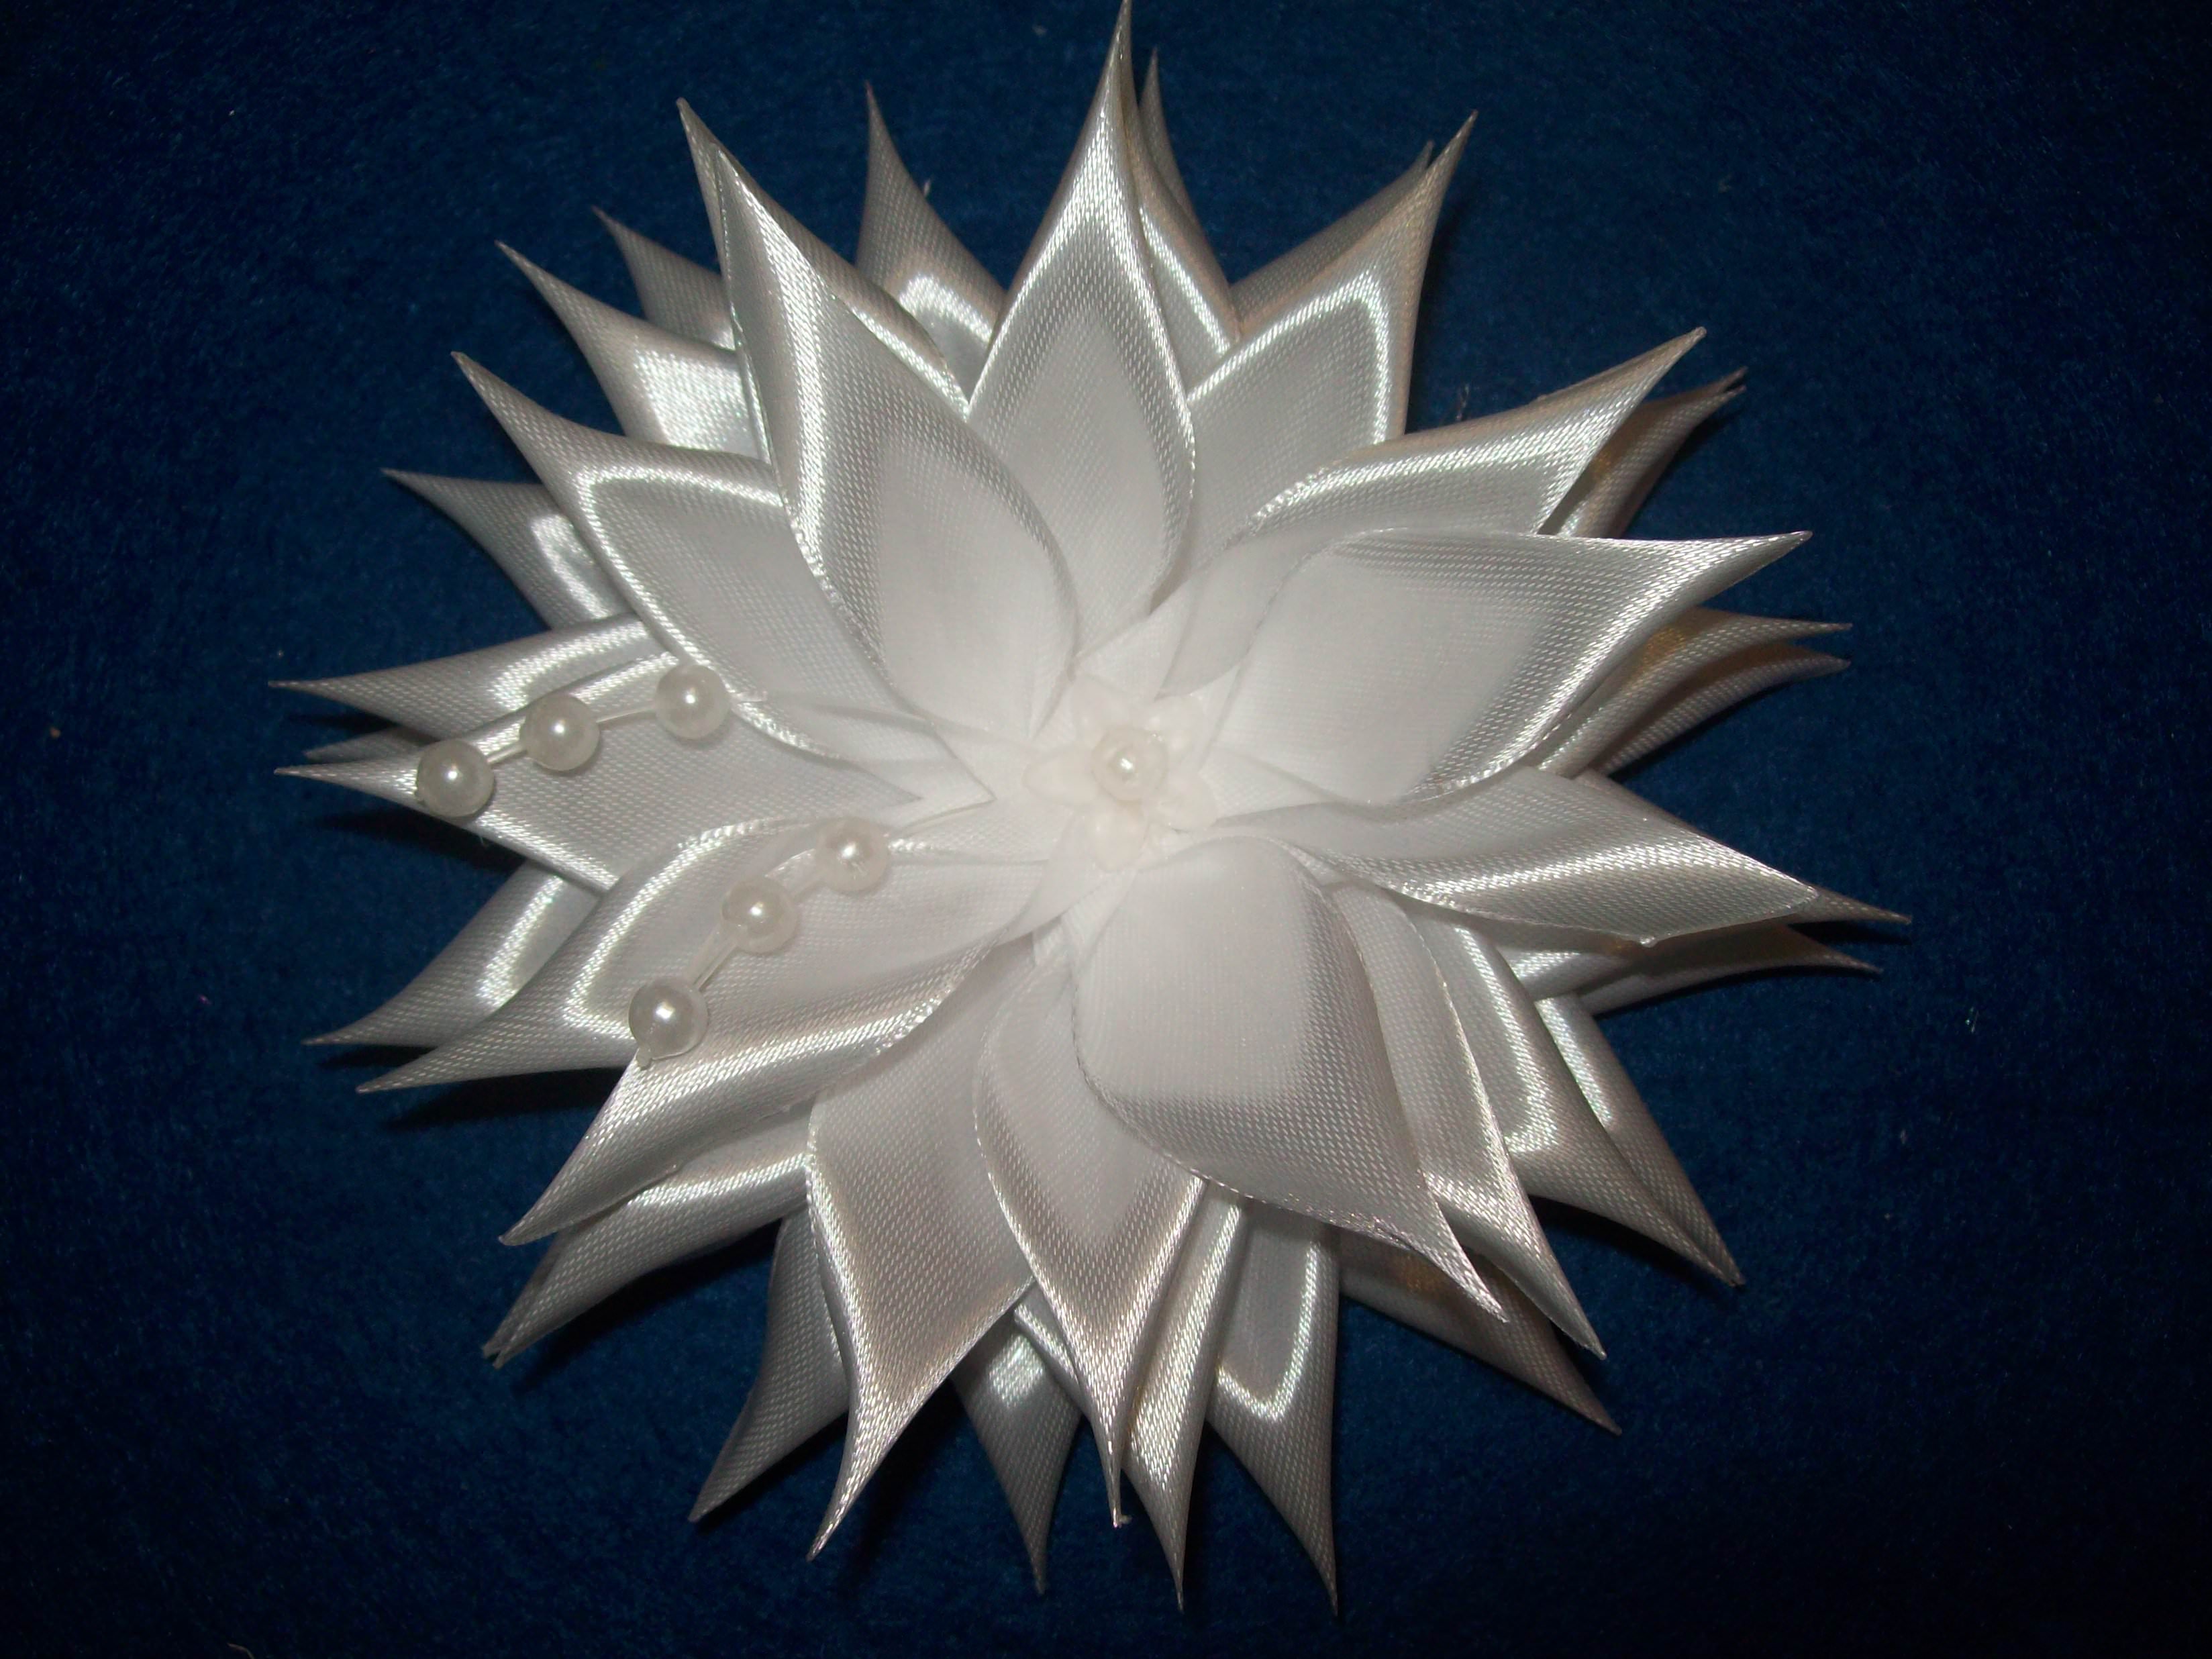
From thick paper cut out two templates similar toeight or glasses with round lenses (see photo). We need a bigger template and a smaller one. For the flower it will be necessary to cut out patterns of 6 - 8 blanks. Very carefully melt the edges over the fire. Organza is very thin and light, do not hold it for long, so as not to spoil it. The edges of the workpiece are slightly curved inwards.  Now we start to collect a flower. First, stack 3 blanks of a larger size with a convex side outward and sew with a pair of stitches. Arrange them in staggered order. Then start spreading and sewing all the other large, and then small, blanks. It remains only to decorate the core with a few beads or beads and a flower is ready. Three-dimensional flower in Kansas technique
  Materials and tools:
- Tapes of satin are of different width;
- Tweezers;
- Candle or lighter;
- Instant glue;
- Needle and thread in tone tapes;
- Elements of decor (beads, rhinestones, buttons, beads);
- Scissors.
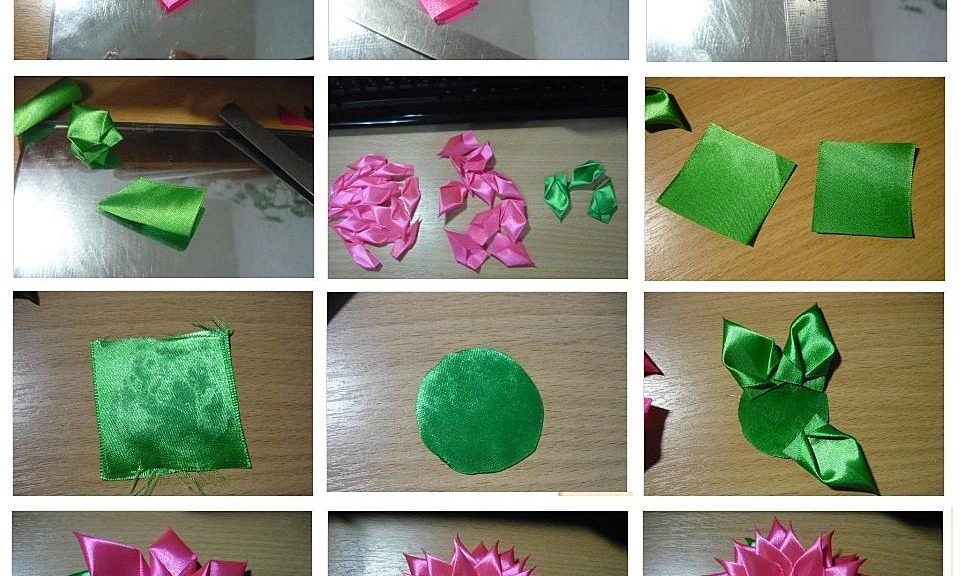
We will make a flower from sharp petals. The number of petals will depend on how lush you want to make a flower. Cut the ribbon into squares. Now it is necessary to fold the square diagonally in half with a shining side outwards. The folding line is on top. It is necessary to fold the workpiece in half again. Just connect the right and left corners of the triangle. Now the bottom of the workpiece is located below. Fold it again. Now all the cut must be melted over the candle or lighter and the sharp petal is ready. 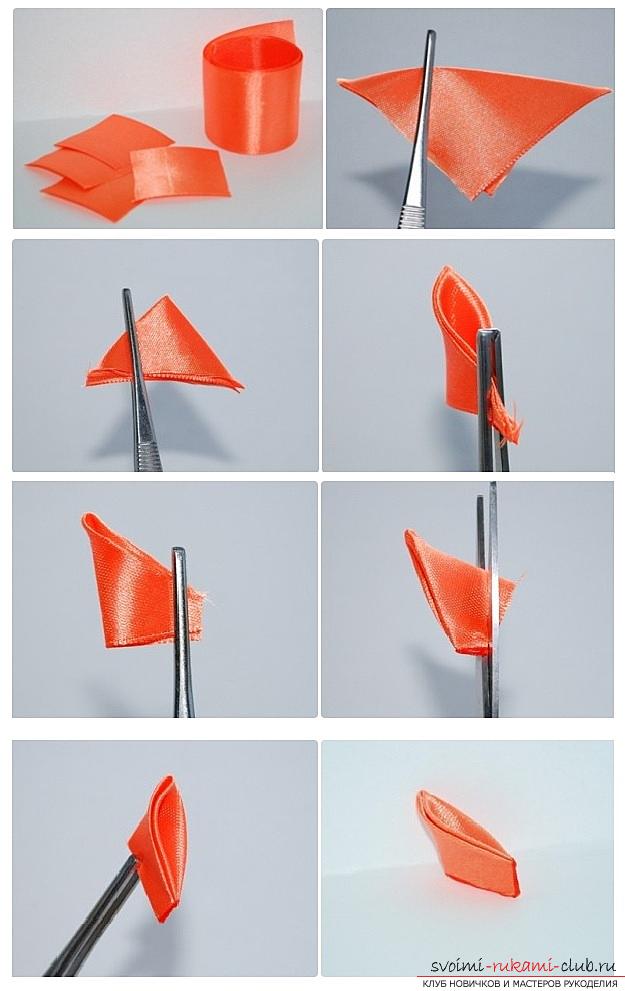 On a thread in a tape, string the selected amountpetals and pull in a circle. If you want to make a flower more lush and voluminous, make it even bigger, smaller and smaller. This is due to wider or narrower tapes. Also string the workpieces and put them in a circle. Arrange in staggered order and decorate the middle with beads, beads or rhinestones. Magnificent scarlet flower of ribbons
 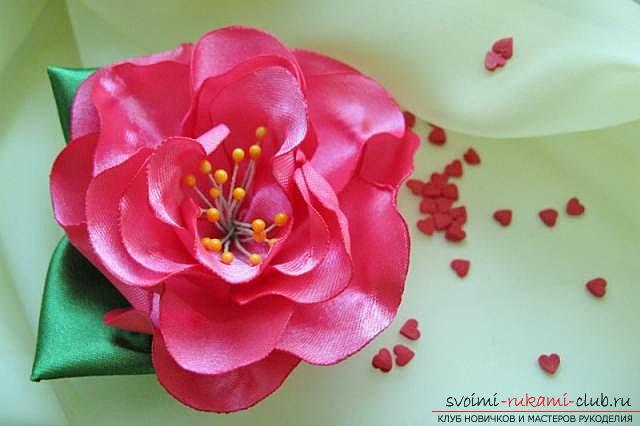 Materials and tools:
- The tape is made of satin green (5 cm wide and 10 cm long);
- Tape of scarlet satin (you, of course, can choose absolutely any for your taste) length of 1 m;
- Thread with a needle;
- Scissors;
- Lighter or candle;
- Details for decor (beads, beads, rhinestones);
- Artificial stamens;
- Paper for templates, preferably in a cage.
 First of all, we draw a pattern. We will have three variants of petals for the flower from the larger to the smaller. The largest petal has a height of 4.8 cm, since the width of the ribbon is only 5 cm. The width of the petals in the narrowest place is 2.5. The photo clearly shows that the tip of the petal has a small notch in the center. Now cut out our template of the biggest lobe and apply it to the ribbon. The narrow edge must coincide with the edge of the tape. This is useful since it will not need to be processed additionally. We need to cut out a few such petals. For convenience and speeding up the process, you can fold the ribbon into several layers. So that it does not move out during the cutting, grind it with pins. For the next petals, a pattern of 5 mm less will be needed, without affecting the base. You can simply trim the excess from the existing pattern or cut out a new template. Again cut out six petals. For the third part of the smallest petals, we must still reduce the pattern. These blanks can not be cut to the top. When we have 3 groups of 6 petals ready, it is necessary to gently cut the edges over the fire. The lower edge of the petals is not touched, because in its role is the edge of the ribbon. After we hold the petals above the flame, they will become a little wavy. Now start to collect our flower. To do this, we weld the lobes a little overlap. Each size separately. It turns out three tiers. in the smallest tier we insert stamens. We pull the thread and sew stamens to the petals. Now we put on the bottom the middle tier and the biggest one. All we pull together and sew. The flower is ready. Leaflet. We need a piece of green ribbon 10 cm long, the edges are neatly melted. The photo shows how to fold and sew the edges. Now it remains only to assemble the flower. To do this, you need a small piece of felt. To him we glue a leaf and on top of it a flower. On the reverse side, you can attach a pin or a hairpin to the felt and decorate the outfit or hairstyle. Dahlia from tapes
 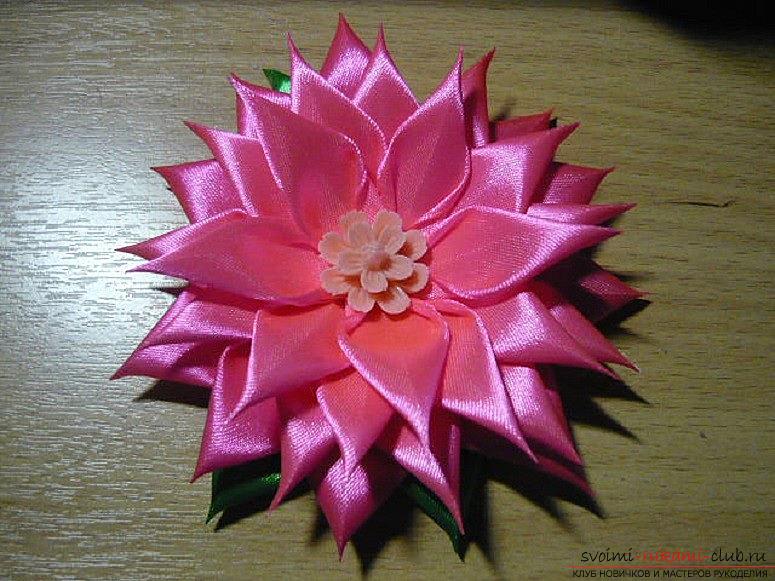 Materials and tools:
- Satin ribbon for the flower is 2.5 cm and 5 cm wide (in the master class there is pink, but you choose the one that you like);
- Satin tape green for leaves 5 cm wide;
- A soldering iron or a burner for wood;
- Ruler;
- Glue;
- Elements of decor for the core;
- Scissors.
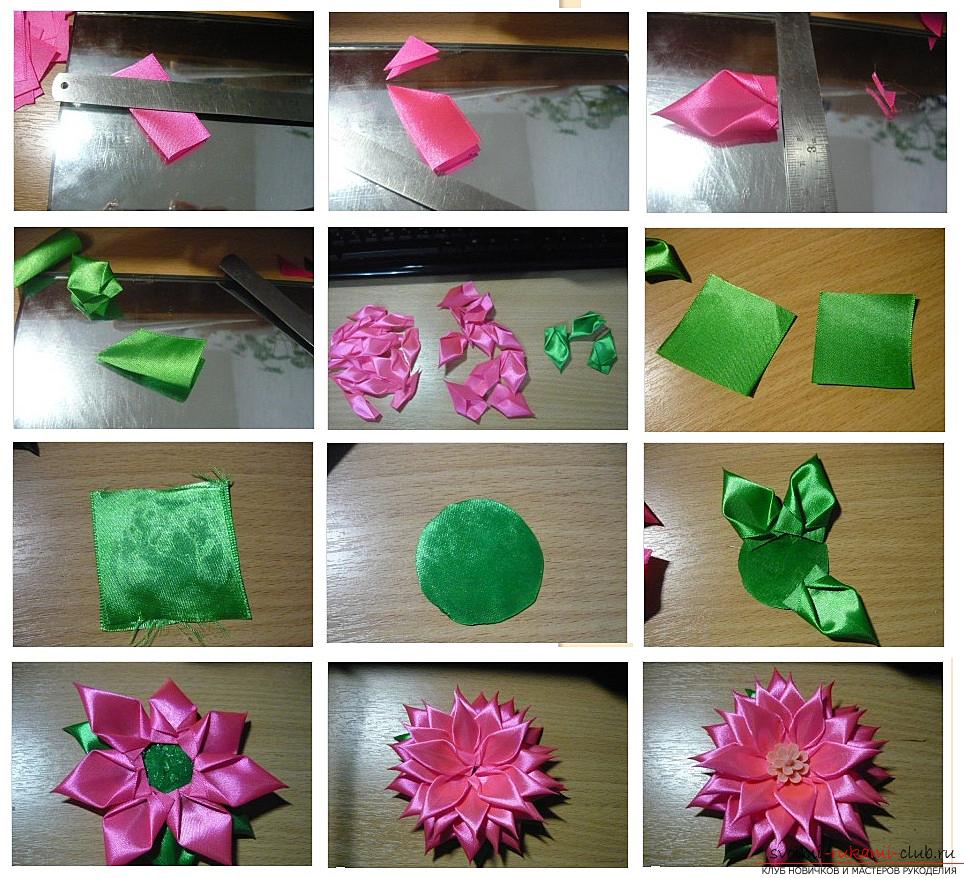 First we cut the ribbons. For leaves, three green blanks 5 cm long are necessary. For the flower you need ten squares length and width of 5 cm and twenty rectangles with a length of 5 cm and a width of 2.5 cm. Let's start creating petals and leaves. We perform from in a uniform technique. It is necessary to fold the ribbon blanks in half along the shining side outward. Now apply the ruler diagonally from the fold line and cut off a piece of ribbon with a soldering iron or burner. The plus of this method is that the edges are immediately melted and glued together. Additional processing is not needed. If you do not have the tools you need at hand, use the usual scissors and flatter the edges over the flame of a candle or lighters. Now we need to turn our workpiece by suture down and wrap the corners on the front side, as shown in the photo. We again conduct a soldering iron or an incinerator, cutting off the lower part. The edges have already been processed. We do the same with all the other blanks of the ribbons. We have green leaves and two kinds of petals. We begin to create the foundation on which we will strengthen our dahlia. We take two pieces of a green ribbon. We glue the underside of one piece with glue and glue so that the shiny sides are external, i.e. the wrong side to each other. Use our burner or soldering iron to cut out a circle. Now you can start assembling the flower. First we glue the green leaves. That side, which with a twist - facial. Kleim leaves from the wrong side to the circle. Then we glue the big petals and small ones. We arrange them in checkerboard order. The heart is adorned with any elements that come to mind: rhinestones, half-beads, beads, etc. On the reverse side, you can attach a jewelry pin and use it as a brooch. Also, such a flower will look great on the hair rim or hairpin.
Comments
Related posts:
 How to make neckties and a bow tie in Kansas technique, detailed master classes with step-by-step photos and a description of the process.
 Master class on creating roses from Atlas in Kansas technique with step-by-step instructions and photo
 How to make Kantashi bows with your own hands, detailed master classes with step-by-step photos
 Master classes for the manufacture of beautiful crafts for the New Year 2016 with their own hands with photos and step by step instructions.
 Flowers of the tapes with their own hands the video and photo workshops