
How to make papier mache in different techniques interior decoration items: vases, plate and frame for photos, a mask in the Venetian style for parties, step-by-step photos and a detailed description of the work
In this article we will discuss one unusual andoriginal techniques for creating hand-made articles - papier-mache. With the help of simple techniques and simple materials, very beautiful things are created - vases, caskets, masks and theatrical props, interior decoration items, such as lamps, dolls, photo frames and much more. With French papier-mâché, you can translate like torn paper. Actually already in the title and the meaning is revealed. All crafts are formed from paper fibers with the addition of various adhesives. Although the name of the technique is French, it came to us from ancient China - the birthplace of paper. At the excavations, archaeologists discovered armor with a multi-layered lacquer coating, dating back to the 3rd century BC. These original products were strong enough, withstood a sliding cutting blow and had a very small weight, which was an advantage in combat. Later this art appeared in Japan and Persia, where they made various crafts for holidays, for example, masks. Since the middle of the 17th century, this technique has become very popular in Europe. For those who only master the crafts of papier-mache, it will be important to find out three ways to create them. To begin with, you will need a foundation for crafts. It can then be removed from under the layers of paper or left. The first method consists in the following: the first layer - wet paper pieces are covered with glue, another layer of paper is applied to it and again covered with glue. Such layers can be more than a hundred. This process is called - machine. Glue can be chosen special, it is sold in handicraft shops or make it yourself from starch, flour and PVA. If the plan needs to be removed, then it must be greased with a greasy cream or petroleum jelly. The second way - the product is created from a pulp mixed with glue. There are several recipes for creating such a mixture. The main principle remains maceration of paper pieces in water and mixing them with glue. The resulting mass can be poured into a mold or applied to the substrate. The form-basis can be wooden, plastic, glass or plastic products. The third option for making papier-mache articles is similar to the production of plywood. The pieces of cardboard are treated with glue and compressed. After drying, the products can be coated with putty, ground, primed and after the final drying, dye, glue various decor elements or paint.
Vases in the papier-mache technique
Such a wonderful element of the decor of the room, asvase, many underestimate and consider them unnecessary. But properly chosen by the color and shape of the vase will necessarily become an elegant touch in the design of the room, will make an additional emphasis on the style of the room. According to the teachings of feng shui, vases accumulate the positive energy of Qi, which has a beneficial effect on the energy of the house. The vase made by own hands, will not only become an ornament of a premise, it will carry in itself a particle of positive creative energy of the creator. Vase papier-mache in the technique of machinery  To create a papier-mache vase you will need:
- Base under the vase (in this master class a glass vase);
- Newspapers;
- Paper bags (you need coarse paper, you can use packaging);
- PVA glue;
- Sharp knife;
- Artificial (synthetic) brush;
- Acrylic paint or primer;
- Paints for final coating;
- A piece of sponge;
- Elements of decor;
- Petrolatum.
So, we proceed. To begin with, it is necessary to lubricate the glass base with petroleum jelly, this will prevent adhesion of the layers to the substrate. Cut the newspaper and paper into pieces. It is possible to break. Now take the glue, if necessary, dilute with water, so as not to be too thick. We cover our base with layers, alternating a layer of newspapers and a layer of wrapping paper. This is to ensure that the coating is uniform. You'll see if you miss the site somewhere. It is necessary to make a minimum of 6 layers. 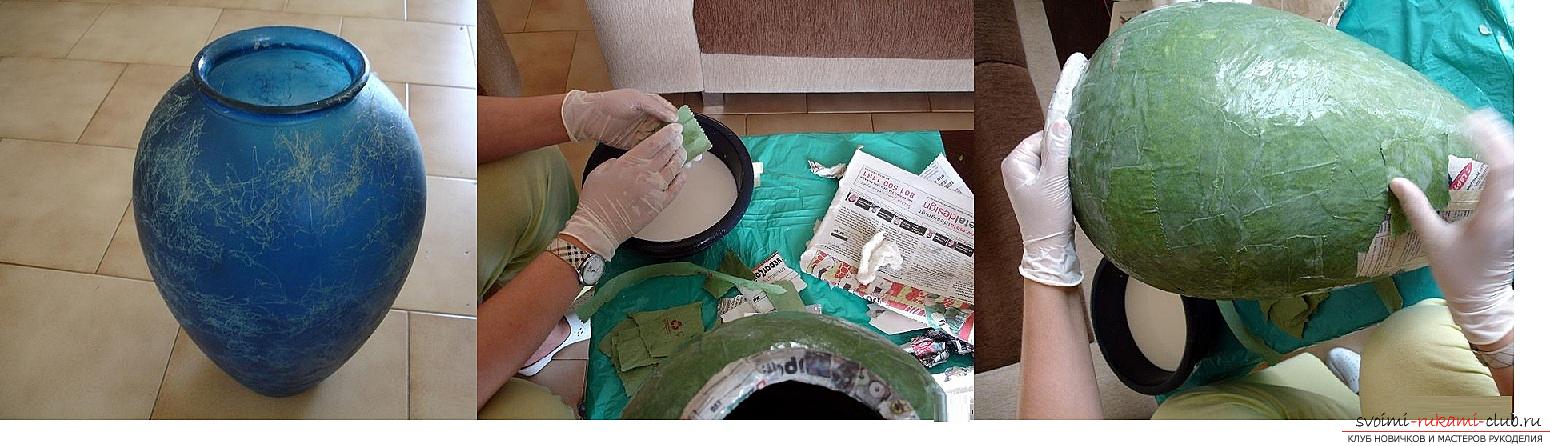 Now we are waiting for the complete drying. Here you need patience - it can dry for a long time. When you finally wait, make several cuts along the workpiece with a knife (see photo).
  Carefully pull out the base from the paper cocoon. Places of cuts are glued together with paint or ordinary tape. Now the workpiece needs to be pasted with paper in one layer and again to wait for complete dryness. Cover with a primer or white paint. When it dries, we paint again, this time in the color that you like, well, or it corresponds to the idea. Dry again.
 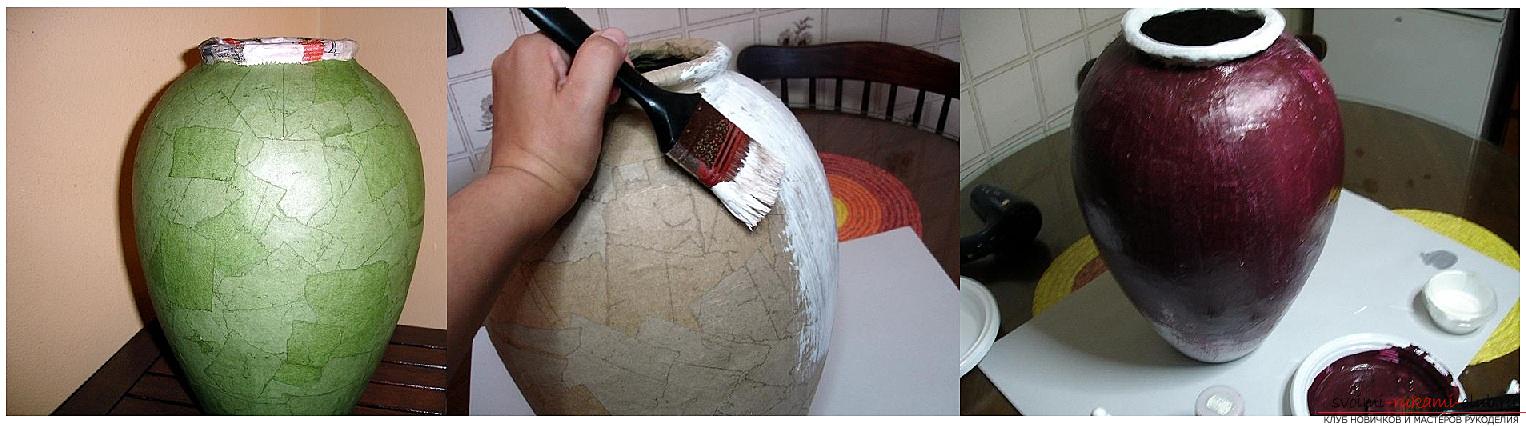 Let's start the decor. In this master class at the vase the lower part is decorated with a coarse rope. Do not forget to glue a part of the vase under the decor.
 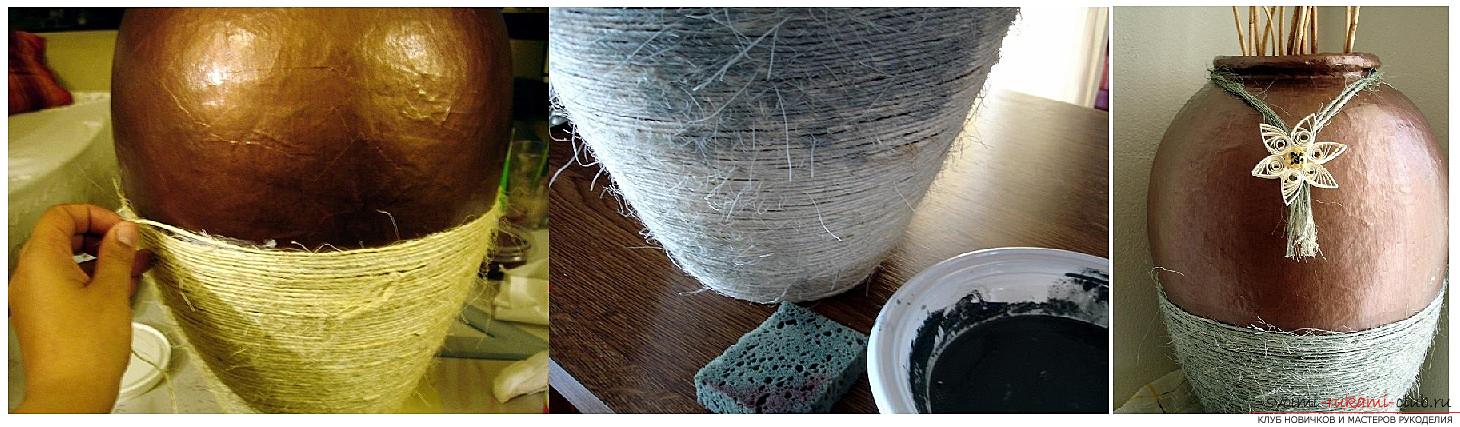 Now the winding of the rope is painted with a sponge. Our vase is ready. Vase papier-mache in clay technique
 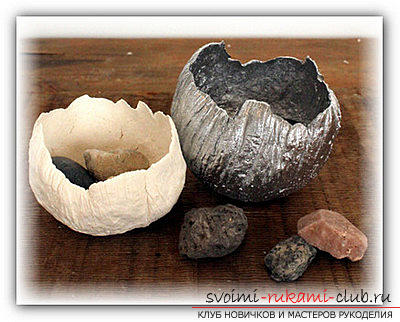 It will take:
- Flour ¾ cup;
- Toilet paper 1 roll;
- PVA glue;
- Mixer;
- Food film;
- Balloons (for the base).
Wash the toilet paper, put it in a container andpour a large amount of water for about 20 minutes. Then merge the water, tear the paper apart. We prepare the adhesive solution. It is necessary to mix 1 part of glue, 3 parts of water (there will be approximately 1 glass) + ¾ cup of flour. Add this to the paper and mix until homogeneous. It is more convenient to use a mixer.  From the received raw material we form a cake. We inflate the ball or fill it with water. Now cover with our cake not less than half. The tail of the ball remains free of mass. Of course, the ball must be lubricated so that the mass does not get stuck tightly to it. Use cream or petroleum jelly.
 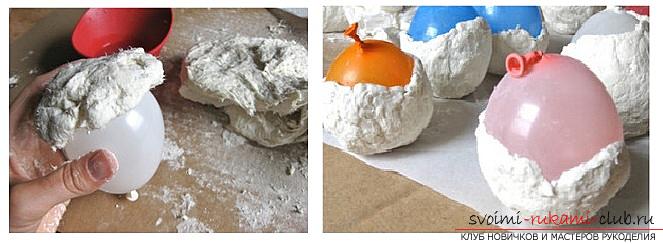 We put our workpiece on a food film and tightly wrap. Now you need to twist the ends of the film. We make the shape more spherical.
 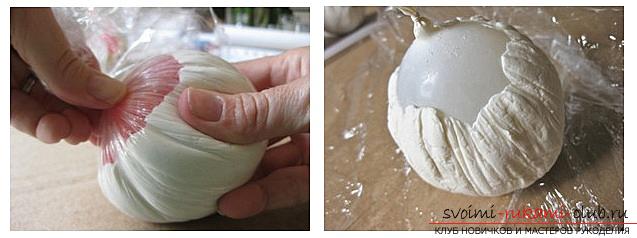 Leave the workpiece until completely dry. Blow off the ball, paint at will and make beautiful compositions with small vases. In the next craft, two types of arts and crafts - papier-mache and decoupage techniques - were combined. A plate of papier-mache
 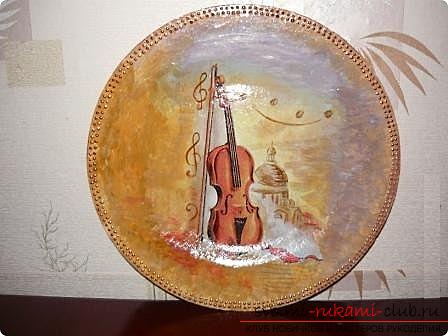 This hand-made article will be an excellent decorative element for the kitchen or dining room. Just select the colors and pictures appropriate to the room's situation. It will take:
- Glass plate base;
- Toilet paper 1 roll;
- Glue PVA and wallpaper (already liquid);
- A piece of gauze;
- Vaseline or something greasy (to lubricate the base);
- Putty;
- White gouache;
- Watercolor paints;
- Napkin with a pattern (for your taste);
- Gel contour of gold color (or any other elements of decor);
- Clear nail polish.
Advice! If you need a filler in your work, it will be cheaper to buy it in a construction shop, rather than in a hand-made shop. We tear the toilet paper into pieces and soak it with warm water. Need a couple of hours. The resulting mass must be thoroughly mixed and filtered from excess liquid. You can use gauze. Add both glues and stir again. For convenience, you can take a mixer. The mass should be very elastic. For the test, roll the ball. If the form is held, then the mass is ready. You can add 1-2 spoons of putty. A plate from the outside is greased with something greasy. Suitable hand cream, petroleum jelly or vegetable oil. Cover the plate with our mass and leave until completely dry. Have enough patience, as it will take quite some time - up to several days. 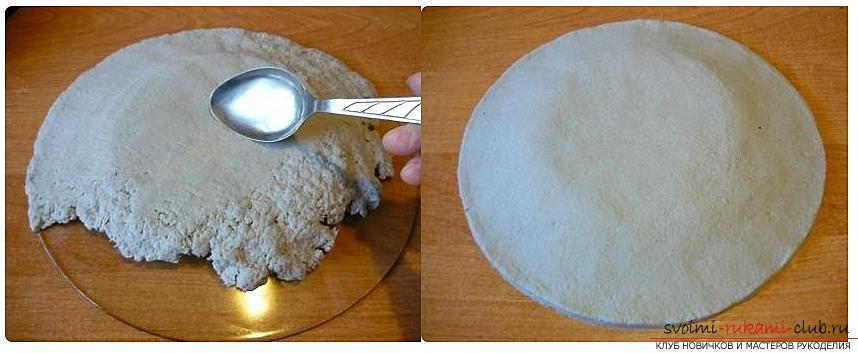 If there are irregularities at the edges after dryingCropped. Shpatemyem our workpiece and again leave until completely dry. We cover with gouache of white color, thanks to this watercolors will better fall. Glue the selected picture from the napkin.
 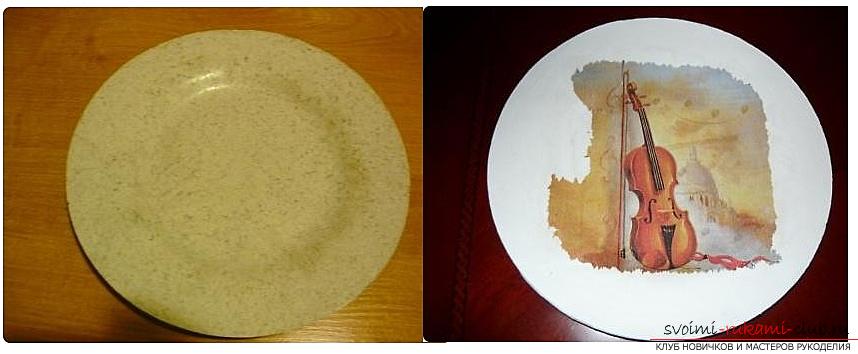 When everything is dry again, we mix the colors with the gouache and color our plate. In this master class on the contour of the plate is a golden patch.
 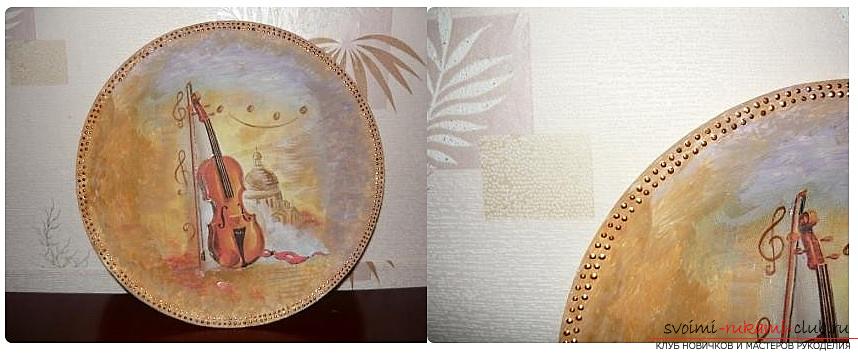 We cover with varnish (use automobile aerosol). The plate is ready. Frame for a photo in the papier-mache technique
 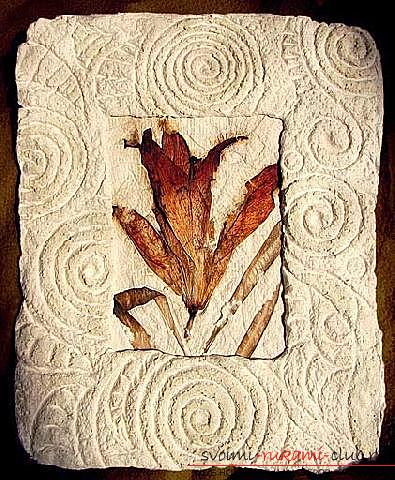 Very often you can find crafts from old automobile tires or plastic bottles. For this beautiful frame, too, garbage is used - carton trays from eggs. It will take:
- Trays from eggs (4 - 5 pcs depending on how large the frame you want);
- PVA glue;
- Foil or food film;
- Board basis (you can take a conventional cutting board);
- Mixer;
- Deep tank;
- Gauze;
- Knife;
- Cutter for internal circuits;
- Laces (for creating invoices);
- Gouache.
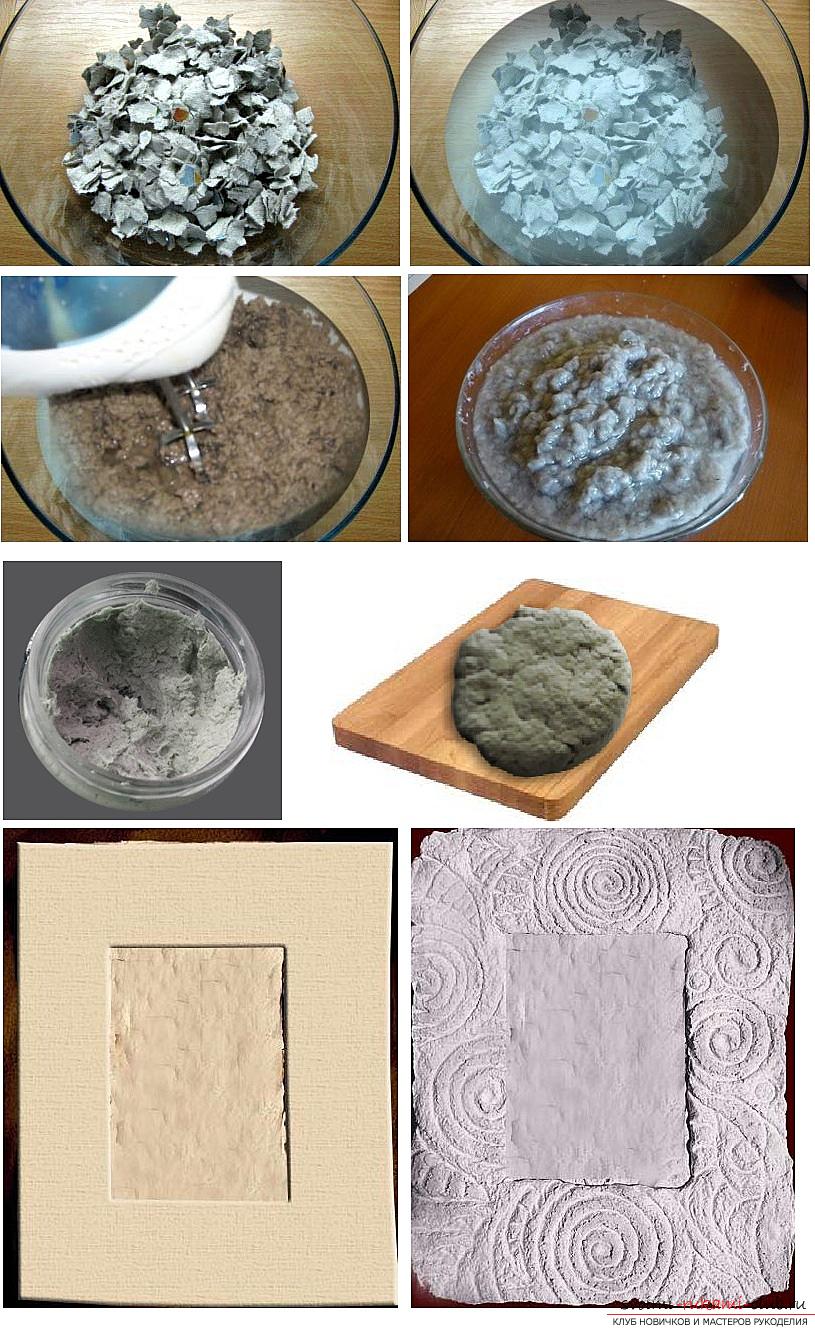 Take our trays and tear them into smallpieces. Fold in a deep bowl and pour boiling water. Water should completely cover paper pieces. Leave to swell until the next day. Of course, the time is relative, since the amount of paper you have may be different. Just after a couple of hours, try, if the pieces creep under your fingers, then the mass is already ready. Half of the liquid is drained. Then take the mixer and mix everything up to homogeneity. The more we spend on mixing, the better the texture will be. If you want a rough structure of the product, beat the mixer for a while. In the process of whipping, add a few tablespoons of PVA glue. We again need to get rid of excess fluid. To do this, put the mass in gauze and put it under the press in a colander. A similar method makes cheese or cottage cheese. To find out if the mass is ready, it is necessary to form a small piece. You can pinch it with your fingers or roll the bun. If the form holds, then it's enough to wring out moisture, you can create a frame. We take our base and cover it with foil or food film. This is to ensure that the mass does not dry out firmly to the board. Roll out a layer about 1 cm. The main thing is that the layer should be equal throughout the surface. We begin to form a framework. In the center, you need to make a groove for the photo. Choose any form that you like. For example, a box of cotton buds. Now put it in the center of the workpiece and gently squeeze it into 2 - 3 mm. Without removing the mold, cut the edges of the frame, you can use a ruler and a sharp knife. Now we need to make our frame textured. To do this, take the lace, fold it and squeeze out the spirals on the frame. The depth is about a couple of millimeters. You can draw strokes with a toothpick or a needle. Now leave it for a while to make the frame dry. As it usually takes from several hours to several days. When the craft is completely dry, we paint it. In order to emphasize texture, it is better to use gouache for painting. When the paint completely dries, it remains only to paste the photo in the center, you can use two-sided adhesive tape. On the reverse side, you can glue the mount-leg. From papier-mache you can make hundreds of different vases, caskets, plates and other elements of the decor of the room. But decorating handicrafts from this raw material can not only room. In the next master class we will offer to make a mask in the spirit of the Venetian carnival. Due to sufficient plasticity and harmlessness of the mass, it is easy to create a mask for oneself, by its standards. Mask papier-mache in the Venetian style
  It will take:
- Toilet paper and newspaper;
- Greasy glue or petroleum jelly;
- PVA glue;
- Acrylic paints;
- Elements for decoration (laces, feathers, rhinestones, beads, beads, etc.).
We cut or tear the newspaper and toilet paper into strips. 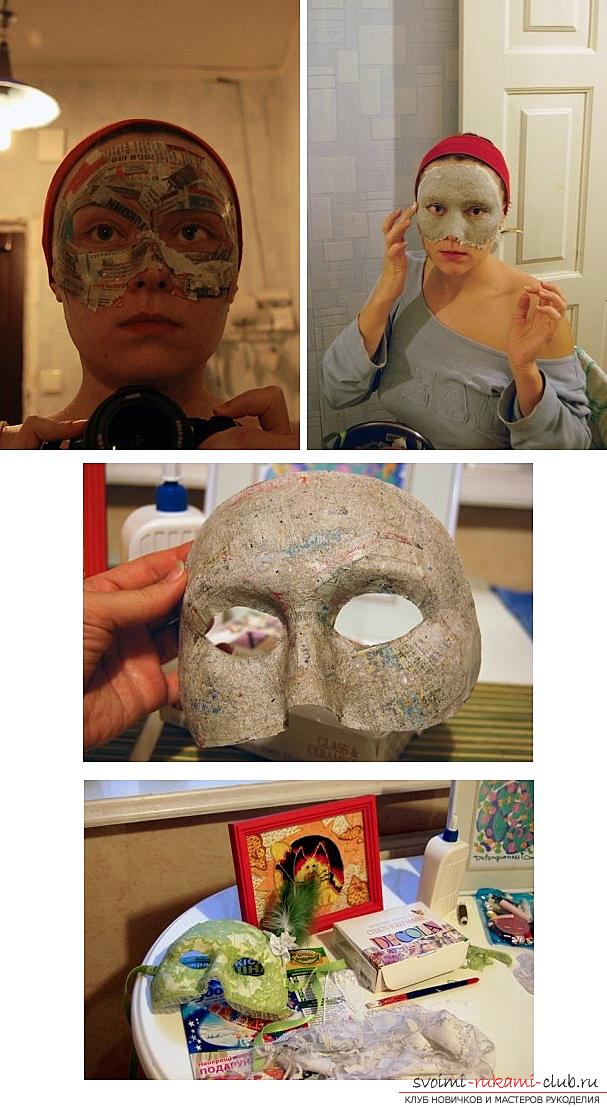 Now the most important thing. The basis for your future mask will be your face. It must be greased with a fat cream or petroleum jelly. In order for the mask to turn out well, it is very necessary not to express emotions on the face - do not move your eyebrows, do not smile. Keep calm. We start to glue a layer of newspaper pieces, greased with glue. If necessary, they can be moistened with water so that they lie as close as possible to the face. Strip a layer of newspaper and a layer of toilet paper. Thanks to this, you will see if you miss a piece somewhere. You need about 5 - 6 layers. Try to immediately spread out the form that you want to get a mask. After finishing with the layers, take the hair dryer and dry the workpiece directly on the face. As soon as the mask dries, remove and dry naturally. Cut the edges carefully with scissors. Place the workpiece with the convex side facing up. Do not forget to make holes for the rubber or other fastening. When the mask is completely dry, cover with acrylic paint on both sides. You can decorate the mask with any details to your taste: feathers, lace, beaded low, crystals or beads.
Comments
Related posts:
 How to make a beautiful mask in the Venetian style for decorating the house, step by step photos and description
 How to make a toy from a polymer clay - a ball, a detailed description and step-by-step photos of the work
 How to make a beautiful tree topiari from napkins, step-by-step photos and a detailed description of the work on creating topiary with different colors
 How to make a peacock in the technique of modular origami, step-by-step photos and a detailed description of the work, color solutions in the execution of peacock feathers with a "little eye"
 How to make from original coffee beans original artifacts in the form of a picture, a panel, a "floating" spill cup, step-by-step photos and a detailed description of the work