How to make a lilac branch of beads, step-by-step photos and a description of several techniques of weaving for beaded floristics
Beautiful time of the year - spring, very oftenis associated in people with blooming flowers. But what if the snow outside the window and the heat is still very far away? Lush brushes of lilac of all shades of lilac, lilac, blue and even white colors that remind you of spring can be made with your own hands, for example, weave from beads. This amazing material seems so bright, fresh and fresh that even thoughts do not arise about the fact that the first glass beads archaeologists discovered during the excavation of Egyptian tombs. Beads, as a material for needlework, are many hundreds of years old. Its history is inextricably linked with the creation of glass, as the main material for tiny beads. Although in ancient times beads were made not only from glass mass, beads were cut from bone, shells, stone, and wood, melted from gold, silver and copper, the Chinese made beads from porcelain. There are many legends about the appearance of glass beads. The Turkmen sad legend says that far in the desert there is a deep cave in which an evil spirit lives. He abducted beautiful girls and hid in it. Captivated beauties bitterly wept, chained to the rock, and their tears became precious beads. Another legend attributes the creation of glass, and, consequently, of glass beads to Phoenician merchants. They say they traveled along the shores of the Mediterranean Sea with a load of natural soda (saltpeter) on board. One evening they moored for the night, but on a deserted shore for the hearth no stones were found, and then the fire was surrounded with soda. In the morning, in a burnt pyre, the merchants found an amazing ingot transparent, like water and hard stone. Of course, legends remain simply beautiful fairy tales. Historical evidence suggests that the very first masters of glassmaking were the Egyptians. Then their skills were adopted by the Greeks and Romans. From Rome, the secrets of creating glass came to Byzantium, and then to Venice. It is this country that for many years has become a monopolist in the production of glass and beads for Europe. The masters preserved the methods of its creation in the strictest secrecy. Beads from Venice were exchanged for exotic rarities, furs, gold and slaves. And yet, with the development of navigation and the discovery of new lands and countries, no longer small workshops began to appear, but whole glassworks. Beads becomes a popular material for creativity.
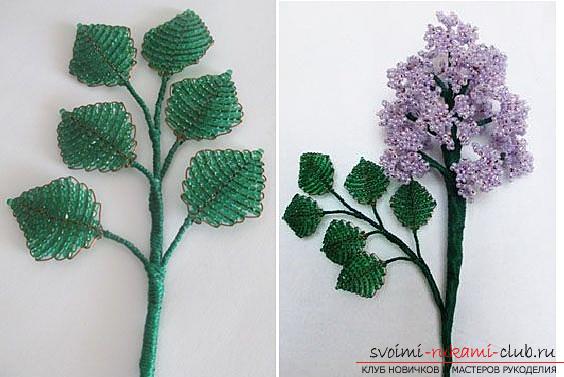
Lilac of beads
Option 1 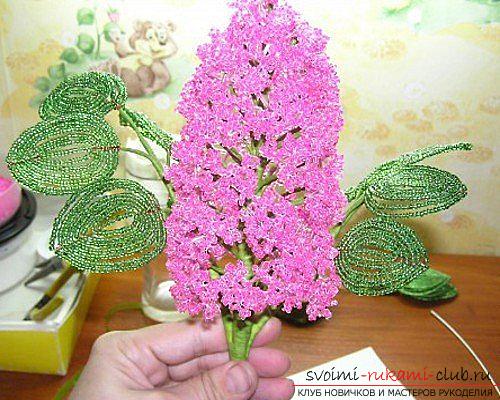 In order for the craft to be neatchoose only well calibrated beads. In this master class, we propose to make one branch of lilac. To create a bouquet, you just need to take more beads. Material and tools:
- Green beads for the leaves.
- Beads lilac, lilac or white for flowers.
- A glass bead in a tone of beads designed for flowers.
- A wire 0,3 mm under color of beads (green for leaves and a suitable color for flowers).
- Floral green ribbon.
- Mulina is green.
- Tools for working with wire (nippers, scissors).
- A little vase.
- Alabaster, if you want to fix the lilac in the vase.
In this master class dark pink is usedbeads for flowers. Flowers On a piece of wire about 50 cm we sew 5 beads. Now you need to push them 9-12 cm from the edge and fold the loop. At the longer end, we put on 5 more beads and turn the second loop close to the first one. It is necessary to add 2 more precisely the same loops. Twisted together wire tails should be located perpendicular to the beaded loops. That's what should happen. Probably everyone looked at the flowers of the lilac closely and know that each flower under the petals has a small "leg". The role of these "legs" will play bugles, so try to pick up beads and bugles of one shade. Now take 1 piece of bugles and pass into it both wire ends. We got one flower.  Exactly the same way you need to weave another 8-9flowers on the same piece of wire. It is necessary to twist them into a bundle, as in the photo. Now we wrap the green flora with tape over the wire. Our first little twig is ready. The more magnificent you want to make your lilac, the more such twigs you need to cook. For one branch there will be enough 30 pieces. Now just collect the twigs, attaching them in a checkerboard pattern, relative to each other. First we wind with threads, and then floristic tape. Probably, in childhood, many believed that if you find a lilac flower with five petals, it will definitely bring good luck. To make this happen for sure, one of the flowers can be made five-fingered and magical. Just add another loop of pink beads.
 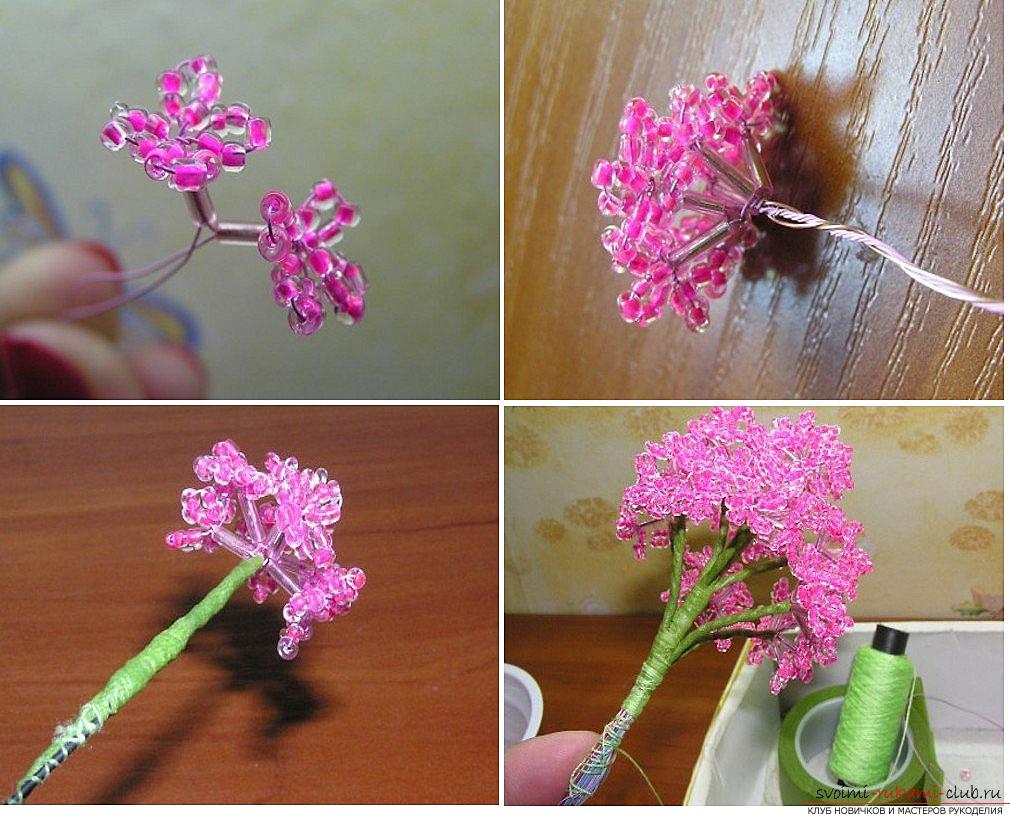 Leaves As for many other beadwork articlesfloristics for the creation of lilac leaves is used French arc technology. For convenience, you can thread the beads on the wire without detaching from the coil. Low will be quite large. Now we remove the beads from the end and fasten a small additional piece of wire by about 12-15 turns. We should have about 5-6 cm of additional wire free. On the axis it is necessary to thread 5 beads of green color. Now start making circles with a working wire (the one on the reel). The leaves are made with the 5th, 6th and 7th pairs of arcs. You can make a pair of leaves with 8 pairs of arcs. The leaves of the lilac are not round, but pointed, so when you make turns with a working wire around the axis from above, you need to place the wire not perpendicular to the axis, but at an angle of about 45 degrees. When the paper is ready, we move the bead low down the coil, the working wire must be at the bottom of the sheet. Cut it off and twist the available tails. The end that remained from the axis, you must carefully fill, passing in a bead more faithful arc.
 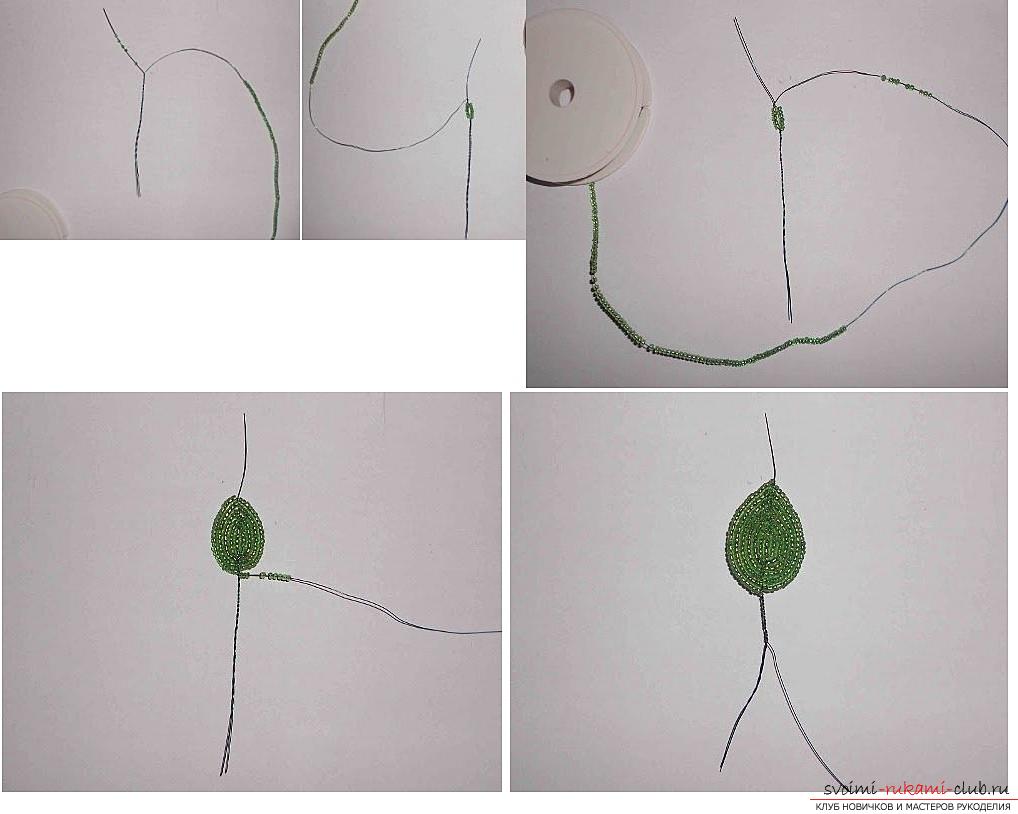 To make the leaf more resistantand we fasten the rigidity to the petiole with one more piece of wire. Then wrap the thread, and from above we mask everything with a floral tape. For one branch, we need about 20 leaves. From 3 to 5 leaflets we form branches. We also have a staggered arrangement, we fasten the threads and mask all the flora with ribbon.
 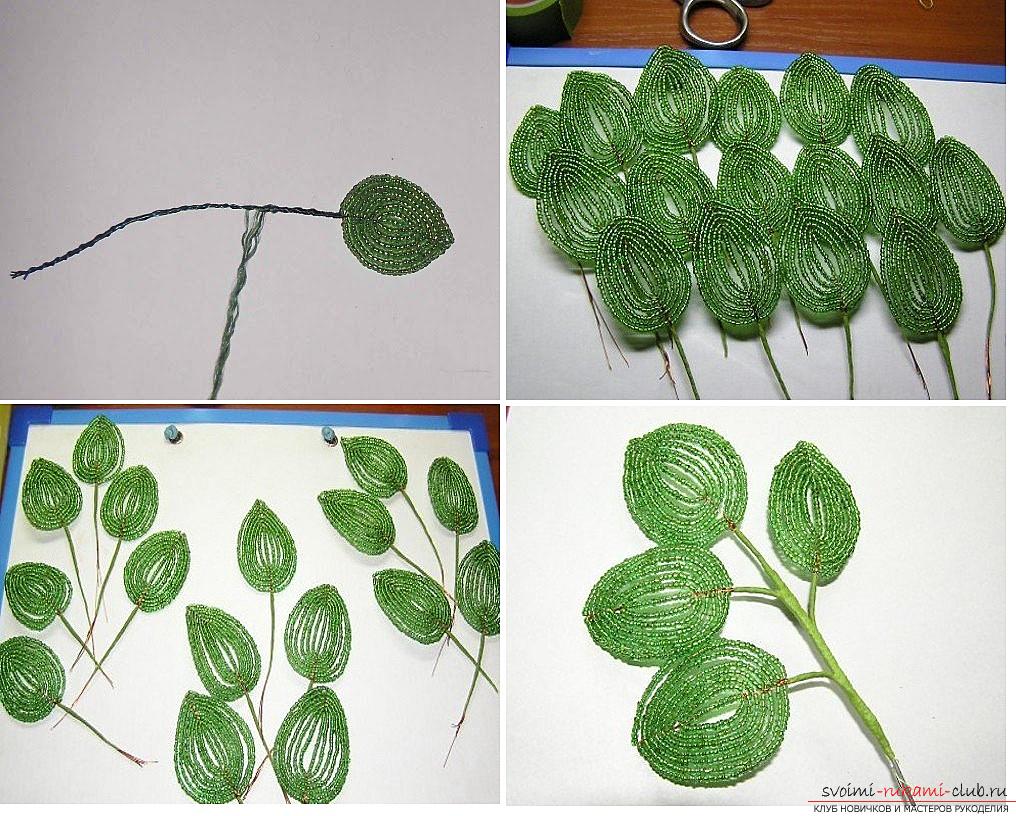 Assembly Now it remains only to fix the first thread, and then floristic tape leaves and a branch with flowers. The branch of the lilac is ready. You can put it in a vase and pour a mixture of alabaster and water or use it at your discretion, as an element of the panel, for example. Option 2
 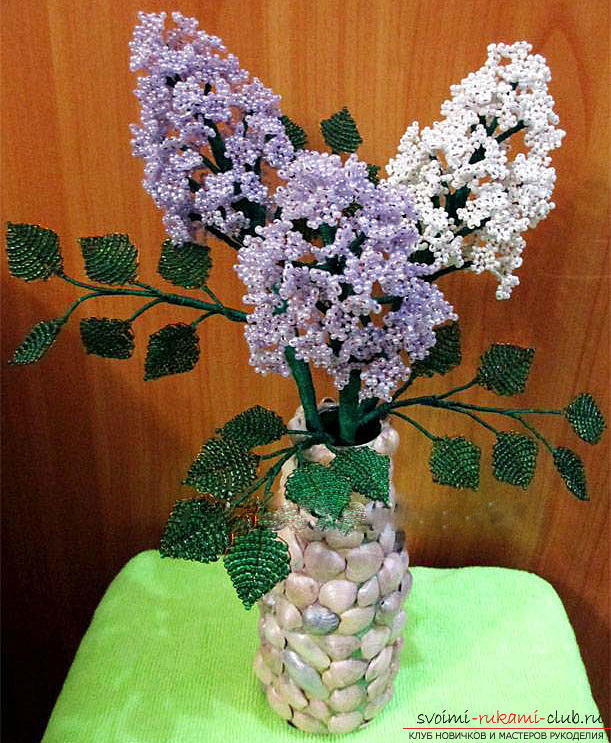 In this lesson on creating lilac branches from beadsa very interesting scheme of weaving leaves will be proposed. They are very durable and dense, thanks to the technique of parallel weaving. Material and tools:
- Beads 10/0 are green for leaves.
- Beads 10/0 lilac and white for flowers.
- Prostolochka 0.3 mm for weaving.
- Wire 2-3 mm for the branches.
- PVA glue.
- Tools for working with wire.
- Vase.
- Threads of a mulina are green.
Flowers Technique for creating flowers - loop,Similar to the previous master class with slight differences. Cut 5 beads into a piece of 32 cm wire. We move them to the middle of the wire and cross in the last bead both ends, i.e. we pass them through a bead in a direction to each other. 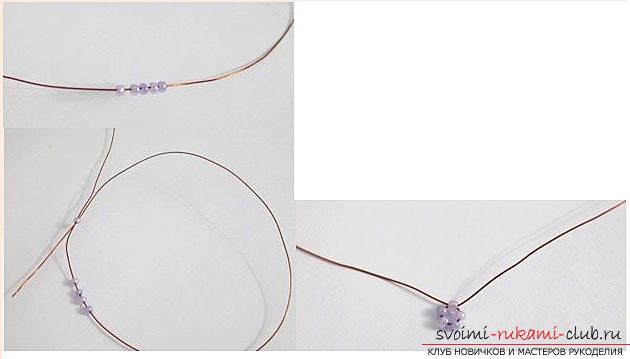 Now on one of the ends of the wire string another5 beads, move to the beaded loop and thread the end of the wire into the first bead is low in the opposite direction. Tighten and get a second loop.
 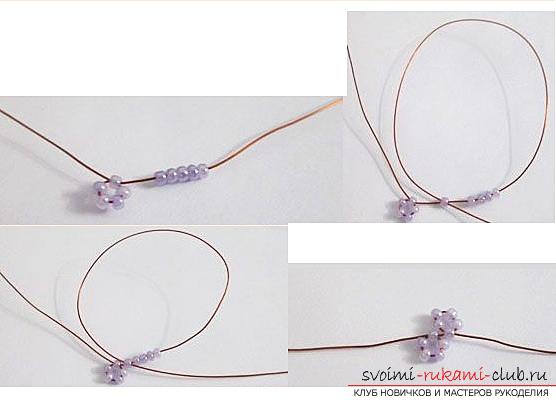 Similarly, we arrive at the second end of the wire. We should already have three loops of five beads each. The last fourth loop can be made on any of the wire ends. That's what should happen.
 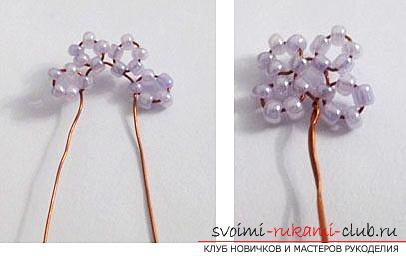 Now we twist the tails of the wire toOur loops are connected in a ring. On the twisted ends thread 4 more beads. Now we move them to the loops and position them so that this "leg" of 4 beads is located perpendicular to the eyelets. We got one flower.
 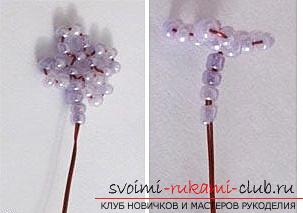 For one cluster of lilacs, about 70-80 such things will be needed.
 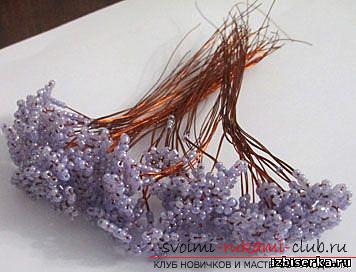 We begin to collect inflorescences of lilac. For this, we twist 6-7 of our blanks into one bundle.
  When all the inflorescences are ready, each of themwrap the threads about 3 cm. Do not forget to glue the wire with glue, on which you will wind the threads. Now choose the most beautiful inflorescence. It will be the tip (or tip) of the bunch. To him in chessboard order we fasten the rest of the inflorescence, combining 4 pieces around. After each such circle we make winding threads 3-4 cm and again make a circle of 4 inflorescences. When it remains to attach one circle of the inflorescences, attach a piece of thick wire, which will serve as a trunk for a branch of lilac. It can be replaced with a knitting needle. Grapes of lilac turn out to be quite heavy, so it is necessary to further strengthen it so that the twig does not bend.
 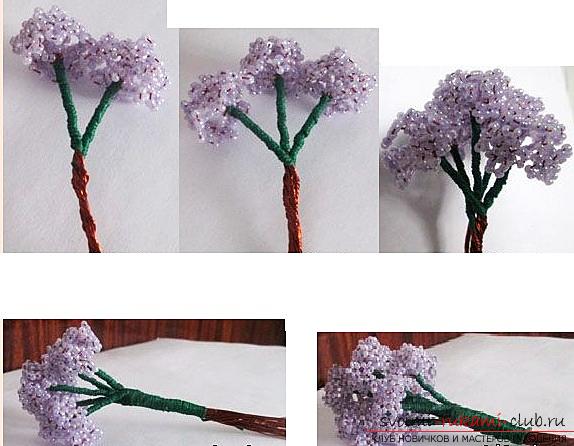 Leaves In this master class, as mentioned above,we will weave the leaves in parallel technique. In order to make the leaves look even and beautiful try to pick well calibrated beads. This technique is characterized by a tight fit of beads in the rows, so if they will vary in size, this will lead to a skewed product. The photo shows an approximate scheme of weaving. You can independently increase or reduce leaflets, changing the number of beads in the rows and the number of rows themselves.
 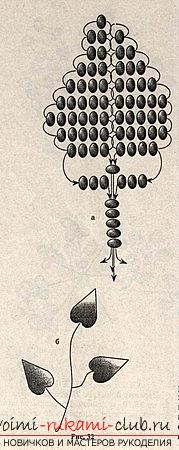 In this master class, copperwire, while the product will look more harmoniously, if you use a multi-colored: green for the leaves and pink, lilac or white for flowers. Such a wire can be found in handicraft shops. The sheet will consist of two halves. We begin to weave the first. At the length of the wire about 40 cm in length we string 3 beads of green color. We move them to the center and cross the ends of the wire in the last two beads. Tighten the wire.
  We got the first and second row of a leaf withone and two beads, respectively. In the third row there will be 3 beads. To do this, we collect them on one end of the wire and pass through them a second end towards the first. Further, the number of beads in the rows will be as follows: 4-5-6-7-6-5-3-1. In total there should be 11 rows.
 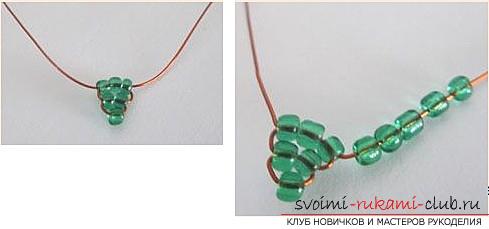 The main feature of weaving the halves of the leaf into string the beads all the time on the same end of the wire. One side of the leaf should turn out convex, and the second one should be flat. It is to her that we will weave the second half of the leaf. We take another piece of wire 40 cm long and pass it to the very first bead on top. We arrange it so that the bead is in the center. At both ends we put on a bead and cross them on the right bead (see photo). Tighten the wire.
 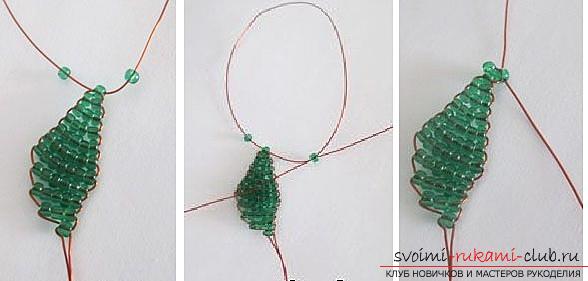 Now you have to string 2 beads on one of the wire tails and cross them in these beads.
 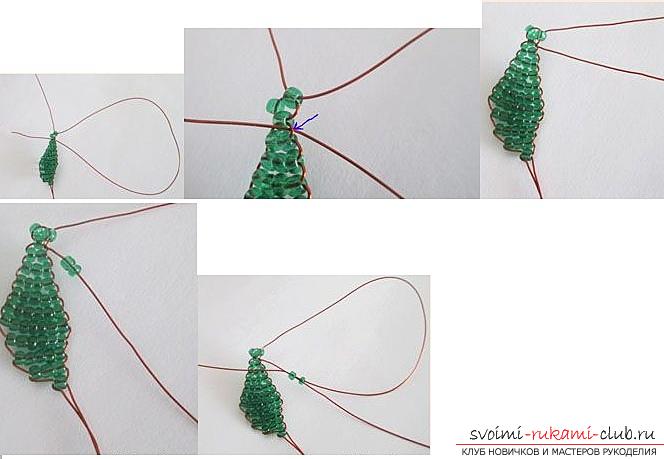 Now the tail of the wire that is closer to the half of the leaf should be passed through the wire loop located between the 2nd and 3rd rows of the first half of the leaf.
 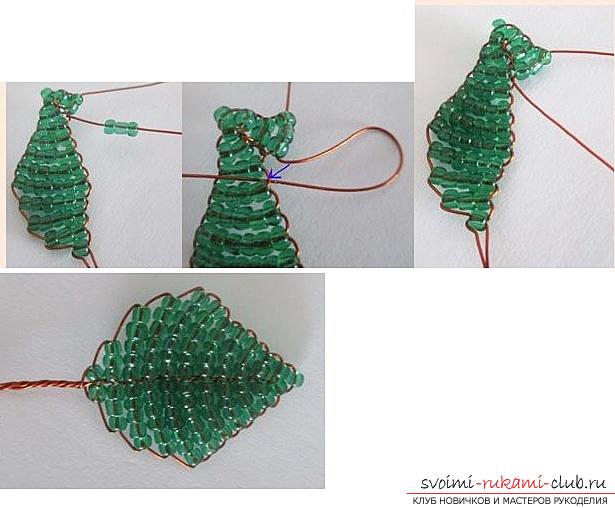 Next, weave by analogy. For the next row, the bottom 3 beads, cross the wire ends in them, and then pass the nearest of them to the wire loop of the first half of the leaf. When the leaf is gossiped a couple of times twist the wire ends to fasten the beads. For each cluster of lilacs we need 6 leaves. Each sheet is wound with threads about 2 cm, maybe slightly more. Now you need to fasten the leaves in one twig and wrap them in threads. Do not forget to carefully lubricate with glue so that the threads do not bloom. It remains only to wind the branch with the leaves tobranch with flowers. For a full bouquet, two more branches were woven in the photo: one lilac and one white. Advice! If you do not want to use thread for the winding, use a special ribbon, which is sold in the shops of floristry or needlework. Another option would be corrugated paper of the appropriate color. Just cut it with strips about 1 cm wide. At the same time, corrugated paper, like threads, will need to be glued.
Comments
Related posts:
 How to weave from beads gently pink violets, step-by-step photos and detailed instructions of various weaving techniques for creating flowers and violet leaves
 Detailed step-by-step photos and description of weaving of bead trees, two master classes.
 How to create a tourniquet from a bead, various techniques of weaving and knitting of plaits, step-by-step photos and a detailed description of the work
 How can we weave a small toy "Red-haired girl" out of multicolored rubber bands? Detailed description of the process of weaving, a list of necessary materials and step-by-step photos
 How to make beads with snowflakes from polymer clay in the technique of cane, step-by-step photos and description