How to make a picture of flowers in Kansas technique, decorating a picture with your own hands with a photo and a description of the work
To decorate himself and his home, man began withthe very birth of civilization. And over the centuries, the number of methods, methods and items for decoration and decoration has become more and more. One of them has been painting for many centuries. They write oil on canvas, spread out with bright enamel mosaic, draw with pencils, embroider with beads, threads and ribbons. Another ancient skill of decoration is Kansas. This kind of decorative and applied art came to us from Japan and represents the creation of colors from ribbons. Initially, bright flowers in the technique of "silk origami" served to decorate hairstyles, but in modern needlework they began to be used more widely. When the imagination and creative impulses of the needlewomen combined these two methods of decoration and decor, colors were produced in the Kansas technique. A wonderful panel can serve not only as an excellent piece of furniture. Such an original gift made by own hands, will necessarily become a subject of pride and needlewoman, and the owner. 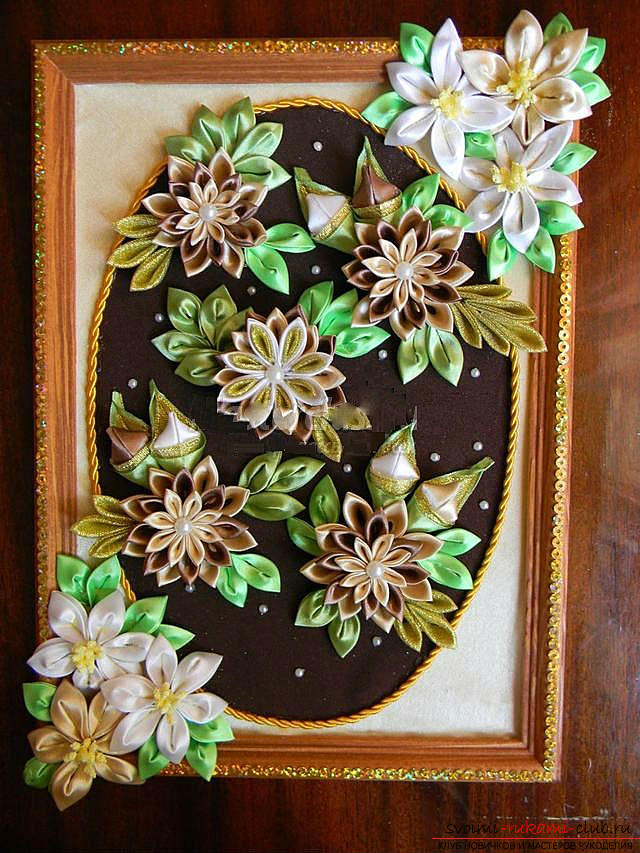 To create such a gentle picture in milky-coffee tones, you will need:
- Frame;
- Fabric base of two colors;
- Satin ribbons of milk, light caramel (cream), coffee, gold and two shades of green;
- Stamens;
- Twisted cord of gold color;
- Pearls, rhinestones and sequins;
- Scissors;
- Transparent glue;
- A piece of cardboard;
- Candle (lighter).
This picture only at first glance seemscomplex, in fact for its creation we need only sharp petals: normal and curved. It is necessary to cut the ribbon into squares. Fold them in the following way: Normal sharp. 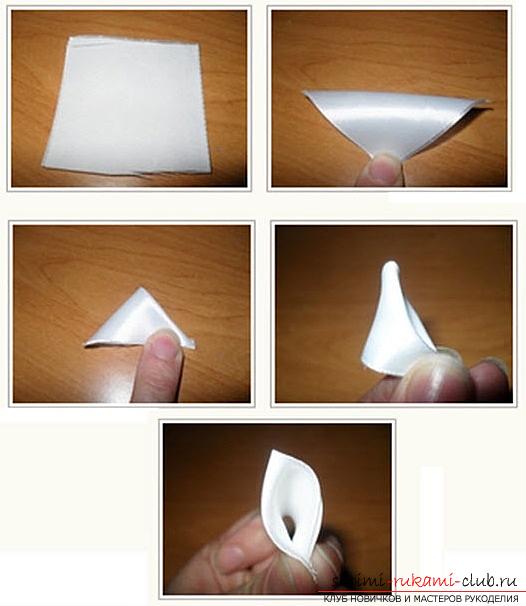 Fold the square diagonally, the fold lineis located on top. The lower corner can be slightly melted over the fire to make it more convenient to work, and it did not open. Then fold the right and left corners again. Cut off the corner and melt over the fire. A sharp petal is ready. In order to make a curved petal, you need to do all the manipulations, as when creating an ordinary sharp one, but at the end to melt not only the tip, but the entire lower edge. And the outer upper corner to bend. The fused cut line will be on the back side.
 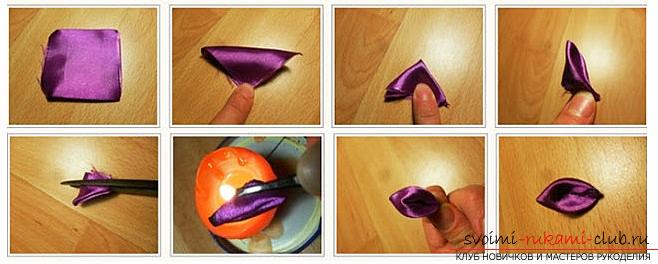 We make usual sharp ones for stacked flowerspetals made of beige and coffee ribbons. For one flower, the dark medium size is 8 pcs., Light - 8 large and 8 small. Now you need to glue 8 large light beige petals on a cardboard board, then 8 chess lobes in a staggered order, and the last tier of 8 small petals. On top decorate with a bead.
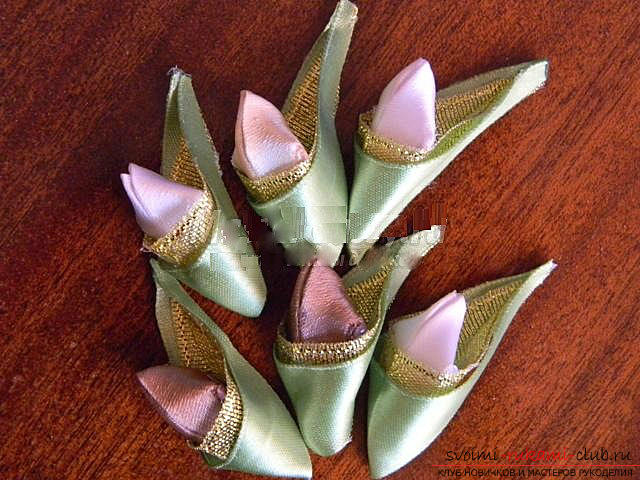
 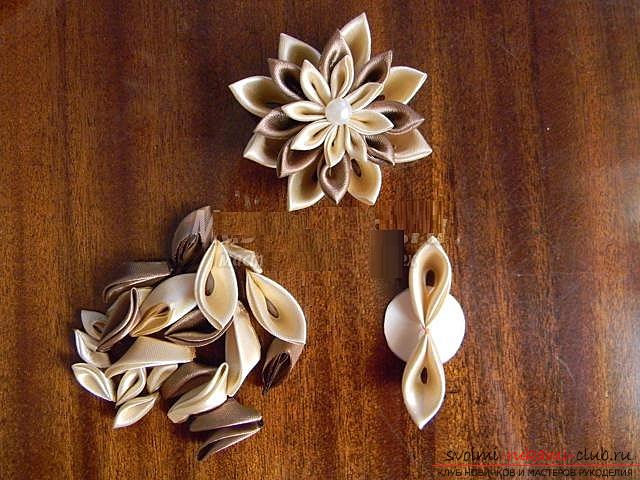 You need 4 such flowers. Single-layer flowers. From the milk-colored tape, you need to make 24 curved petals. From the beige tape you need to make 12 curved petals. In the middle place 6 bunches of stamens folded in half, glue 6 petals around them, cover with glue and sprinkle with glitter. Buds. You need 6 buds. For each you need to make 2 sharp petalsand glue them face to face. Now from the dark green and gold ribbons cut triangles with wide sides. At the golden triangle with the top down, fold the right and left corners in half and fuse with one side (the gluing line will pass along the side of the triangle). It turned out a funnel. In it, insert a workpiece from 2 narrow glued petals so that the line of their connection is centered. Wrap a green triangle over the golden ribbon. And the place of connection of its lateral sides, too, melt. Leaves. From a tape of two shades of green to make leaves - the curved sharp petals. 30 light and 15 dark. It remains to make sharp petals from a golden ribbon - 13 pieces. The central flower. It will need 8 large coffee petals, 8 large beige and 8 double milky-golden ones. To create them you need to fold the milk and gold squares diagonally, the fold line from above. Then fold again, as in a usual sharp petal. Now we need to put gold on the milk stock and fold them both together again, again as in a sharp petal. Edges of singing. Place on the circle of cardboard first the coffee petals, then in checkerboard pattern beige and the last circle is milky-golden. Decorate the center of the flower with a bead. Now you can begin to create the basis for the picture. On the basis of the frame you need to glue a light beige fabric. On it in the center to paste an oval from dark coffee fabric. On the contour of the dark oval, glue the golden twisted cord. Attach the frame and start gluing flowers. You can compose them as suggested in the photo or create your own unique composition. After you arrange all the leaves and flowers you can paste beads or half-beads in the intervals between the colors. When the glue dries, the picture is ready to please. There is one little trick in creating such paintings. Even if you have previously drawn a sketch of the future panel, then in the process of creating it you can still have the idea that a flower needs to be moved. Therefore, the choice of glue is very important here. He should not dry for a few days or grasp immediately and tightly. In the first case, the manufacture of the craft will be stretched for an indefinite period, and in the second case, you will not be able to move the element to a better position. An excellent option will be the glue type Moment Crystal. It dries up for about 2.5 minutes. In this interval, you determine the position of the element, and drying does not take much time.
Comments
Related posts:
 How to make a magnificent bow in Kansas technique for a girl, a detailed step-by-step master class with a photo and a description of the work
 How to make kanzash flowers from ribbons with your own hands with photo and description.
 Crafts in the technique of paper-plastic are very diverse, we suggest making a picture of flowers, and we will make paper flowers by our own hands.
 Making a picture in Kansas style with his own hands with photo and description.
 Make kanzashi from satin ribbons with your own hands with photo and description.