How to make quilling sunflower panels: lessons and notes for beginners
The lesson of quilling the sunflower panel  Summer has already come, and therefore,such crafts that will fully correspond to the general atmosphere, will be able to decorate our dacha or simply, to become an excellent gift for those born in the summer. It is not too difficult to make a sunflower with quilling, if you know what materials you have to work with and what techniques to use. Our article will tell you how to independently design sunflowers with the help of quilling! To begin with, we will need specialized materials that will help in the work. So:
- Yellow strips for quilling
- Black strips for quilling
- A pattern with circles or a ruler with a diameter
- Pins
- Scissors
- Glue
- Paper (color)
- Toothpick (quilling tool)
- wire
- Panno frame
Sunflower petals
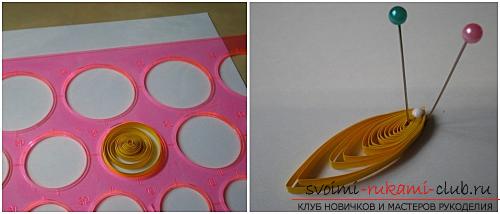 The first thing you should pay attention to,this is on the petals and how they are formed during the work on the sunflower. In our version, there will be two rows of modules. The number of petals can vary from the density of the flower. Maybe 12 to 15 pieces of petals, with which we will work. Let's proceed to create such a leaflet: For this we take a strip in the size of 60 centimeters. If you do not have strips of this size, just glue together the two available. Further, it is necessary to twist the strip with the traditional work of quilling - passing through the opening of the toothpick tool. Next, glue the tip of the strip and then, give an elongated shape for the future sheet. The form of the sheet is a drop. The center of the part must be displaced to one of the edges, in order to obtain the desired form. Next, you need to fix our finished sheet with a pin. At the center of the displacement, we drip glue. The flower should dry up, and then, it is given the form of sharpness, you can use scissors for this work.
Core
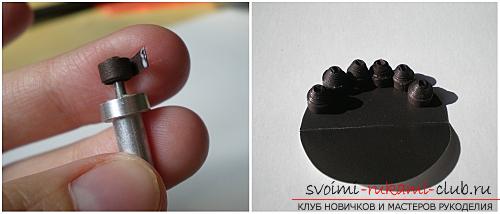 After that, we are working on the form of sunflower and itscore. To do this, you need to cut a circle in the size of three centimeters in diameter, using black paper. On our circle, we harvest black rolls with the help of a quilling tool. It is desirable that the rolls have a convex shape. They will simulate the seed in the sunflower, therefore, fill the entire circle space in your black circle. We are working on the stem of the future sunflower. Here we need a wire of arbitrary length, depending on the length of your craft. Wire should be wrapped with green paper, or floristic tape.
Final work
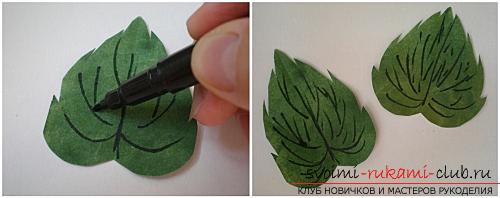
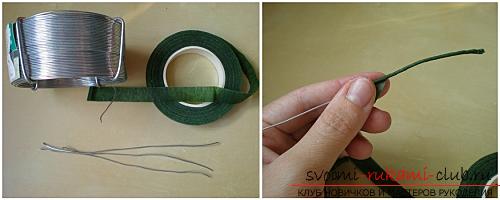 The stems of sunflowers consist of a wire,cut the required length. The wire is wrapped with green material, which can be used as a floral tape. Green leaves are made of black paper and using a black marker. Carefully cut out the necessary shape and then decorate our product. After these actions are done, it is necessary to distribute all objects clearly in the structure of the future composition. For beginners, it is desirable to make your own composition using paper, and then - to superimpose objects on the sketch layer. To fix each element of a sunflower it is possible by means of a glue-pistol. Pre-fix the hand-made article in the picture frame. Your hack is ready. The lesson of the quilling of the sunflower panel is quite understandable, and you can hand it over to your friends and close people.
Comments
Related posts:
 This detailed master class contains a quilling lesson for beginners and will teach you how to make yourself a quilling ballerina.
 How to make a New Year's panel with flowers in the quilling technique? Master Class
 How to weave butterfly beads with our own hands - lessons for beginners and children
 Quilling the New Year's panel with a Christmas tree - Quilling Christmas craft and master class
 Crochet crochet lessons for snuff - knitting patterns for beginners