How to make roses from a ribbon with your own hands, step-by-step photos and instructions for creating a flower, seven variants of roses from a ribbon in the form of buds and blossoming flowers
In this article we will talk about the queen of gardens - a rose. We will offer several master classes on its creation with their own hands from various tapes. An amazingly beautiful flower admires and conquers people for many hundreds of years. About the rose stacked countless legends from different peoples. Greek myths tell us that a white rose appeared from the sea foam that enveloped the body of the goddess Aphrodite, who came to the shore. According to the Iranian legend, all the flowers came to Allah and asked him for a new ruler, instead of a beautiful, but lazy and idle lotus. Allah has listened to their requests, creating a beautiful white rose with sharp spikes. According to Hindu beliefs of a pink bud, the goddess Lakshmi was born - the embodiment of beauty. In the Scandinavian legends it is said that in the spring, from the laughter of the fire god Loki, snow melts and roses blossom. The queen of gardens among many peoples was a very revered flower. In the Roman Empire, wreaths of roses were awarded to the winners of battles. When Cleopatra hosted the commander Mark Antony, his way to the queen's chambers was strewn with rose petals several dozen centimeters high. In Christian mythology, a white rose is considered a flower of the Virgin Mary. Roses were depicted on the arms of many noble families of antiquity. Varieties of roses now there are many, from the usual shades of pink and red flowers, to absolutely extraordinary: emerald green, blue, black and dazzling white. In this article we will make roses from ribbons. Due to the wide variety of ribbons in size, texture and color, roses of them are always different and beautiful. Such crafts will be an excellent decoration for a hat or handbag. Become an original brooch, decorate the hair clip or turn into a charming buttonhole.
Rose of ribbons
 Option 1 A rose made of ribbons 1 cm wide
 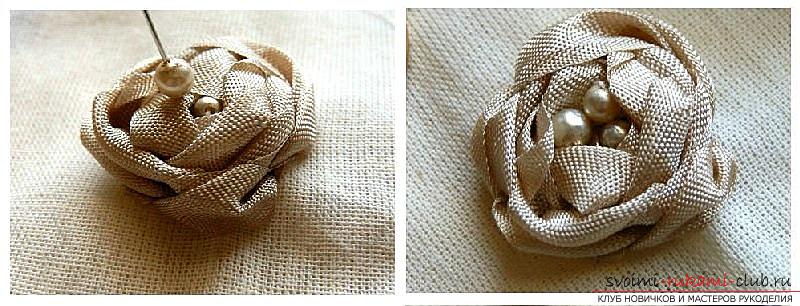 It will take:
- The tape is 1 cm wide (about 75-80 cm);
- Needle and kapron thread in a thin ribbon;
- A large needle with a wide eye;
- Cloth (you can take a napkin);
- hoop;
- Coin;
- Pencil;
- Scissors;
- Elements of decor (lace, pearls) at will.
On the canvas you need to draw a coin outlineand designate five points along the perimeter at an equal distance. Mark the center of the circle. We fix the canvas on the embroidery frame and with a kapron thread in a ribbon we embroider a snowflake with five "rays" intersecting in the center. We fix the thread on the wrong side. 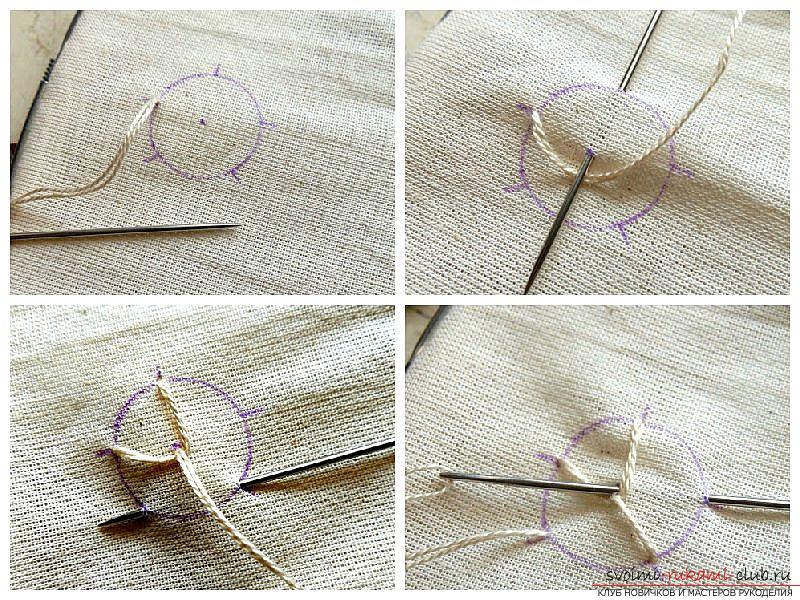
 Now we take the tape and at one end we tie itnodule. The second end is inserted in the eye of the "gypsy" needle. We begin to embroider a rose. We pass with a needle with a tape from the underside of the face in the center of the circle. We have five "rays" of nylon thread. We will pass the tape in a circle, alternately passing the ribbon, then above the "ray, then under it. Twist the ribbon in a spiral. The lushness of the rose will be directly proportional to the number of revolutions of the tape. The tape can not be tightened too much, it can deform the canvas and make the rose petals flat.
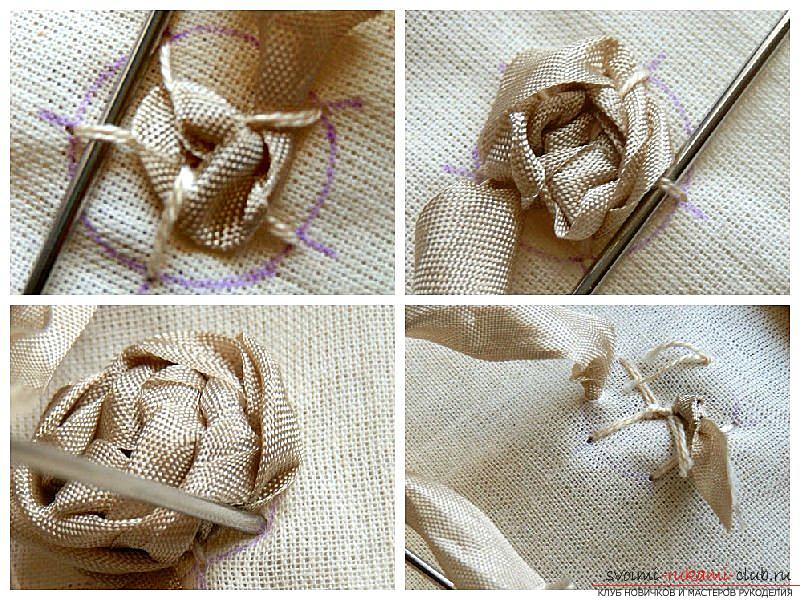 After you have reached the required volumeflower, pull the ribbon to the wrong side and tie a knot similar to the first end of the ribbon. Ribbons are mostly silky enough, and knots may eventually loose. To prevent this from happening, grab both ends of the tape with a pair of three stitches with the usual threads.
 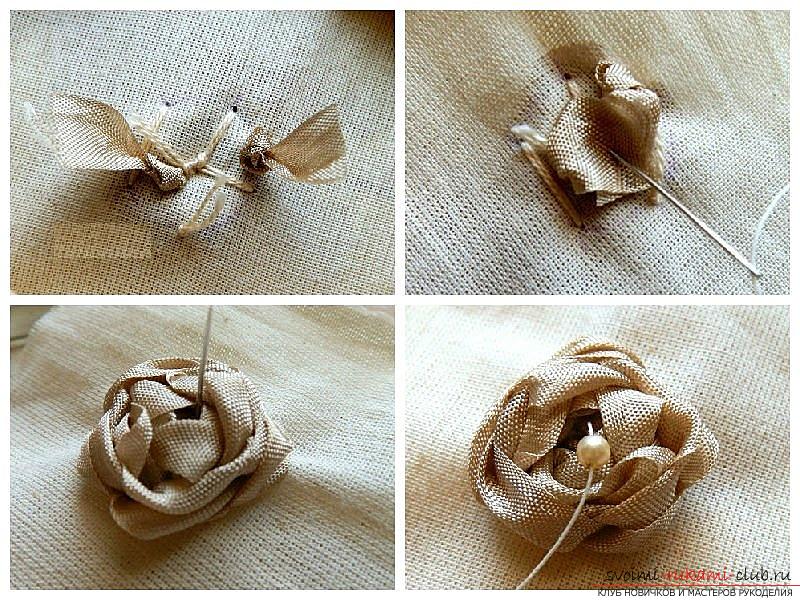 In the core you can sew severalpearl beads. As an additional decorative element, you can use a round lace of small diameter. Simply align its center with the center of the intersection of the "rays" of the snowflake, which serve to fix the tape. Now you can embroider a rose, as mentioned above.
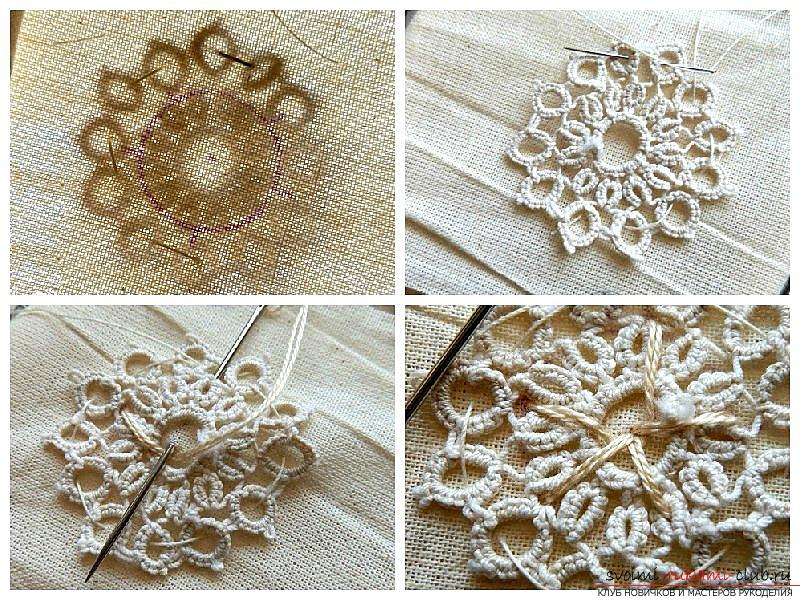
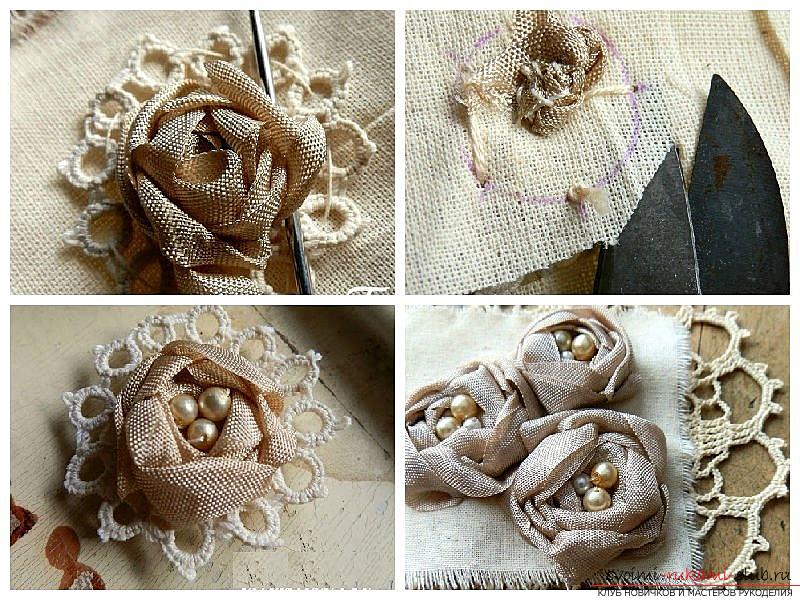 In the end, you need to cut off the excess cloth, leaving the necessary minimum, so that the fastening from the thread does not bloom. Option 2
  It will take:
- The tape is 5 cm wide;
- Needle and thread in the tone of the tape;
- English pins (you can take any pins with heads);
- Candle or lighter;
- Sharp scissors.
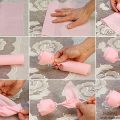
First you need to cut the workpieces forpetals. For one flower roses will need: 8 segments of 10.5 cm in length and 9 segments of 11.5 cm in length. The edges of all blanks must be melted over the flame of candles or lighters, so that they do not crumble. We begin to make the bud of the rose from the stock of a smaller size. Unfold the front side of yourself and bend the right upper corner down, as shown in the photo. We got a small shiny triangle. We fix it with a pin. Now take the lower right corner and wrap it from right to left. We fix it with a thread.  Deflect a small strip of tape along the top edge. On the bottom, make a couple of stitches and fix the bud with a thread.
 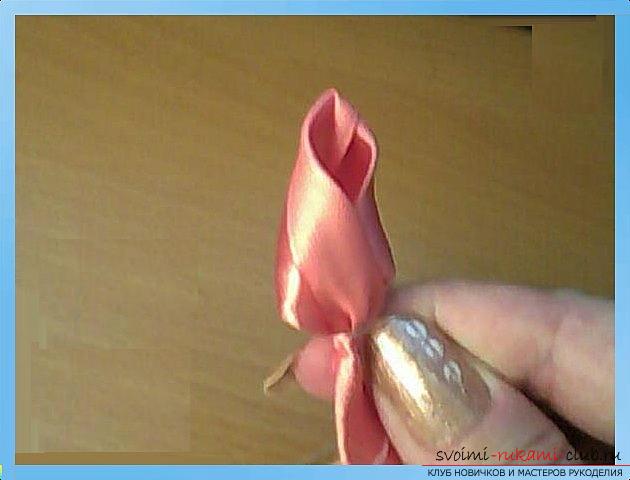 The core of the rose is ready. Next, proceed to create petals. We have ribbons, as before. Bend the upper part of the ribbon by about 7 mm and fix it with pins. Bend the upper corners of the tape down and again secure with pins, as shown in the photo. We pass the inflow stitches along the bottom part of the workpiece and slightly tighten the petal.
 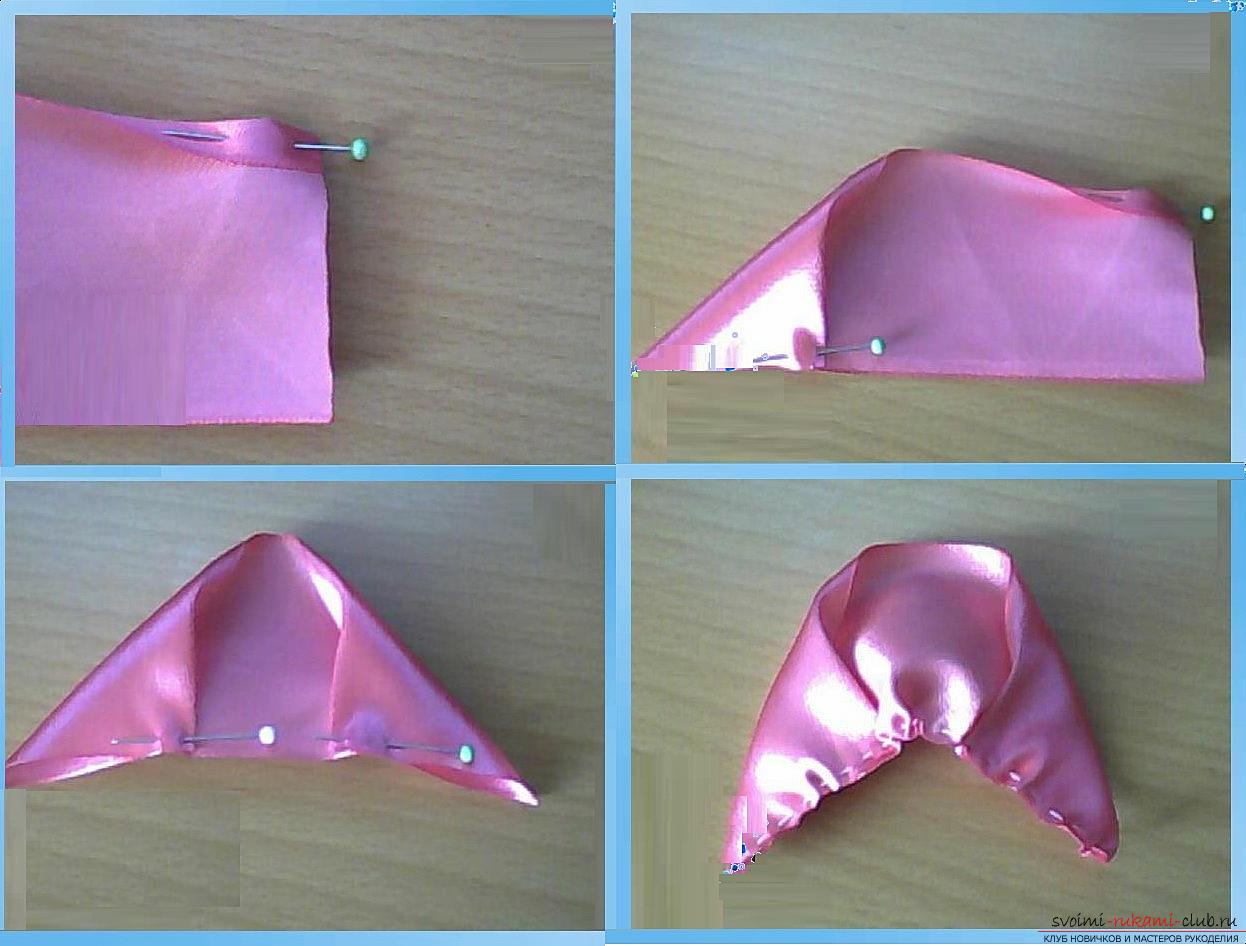 Attach it to the bud, crossed the ends. Sewing.
  Similarly, we perform all other petals of both sizes. Sew them in checkerboard order one by one.
 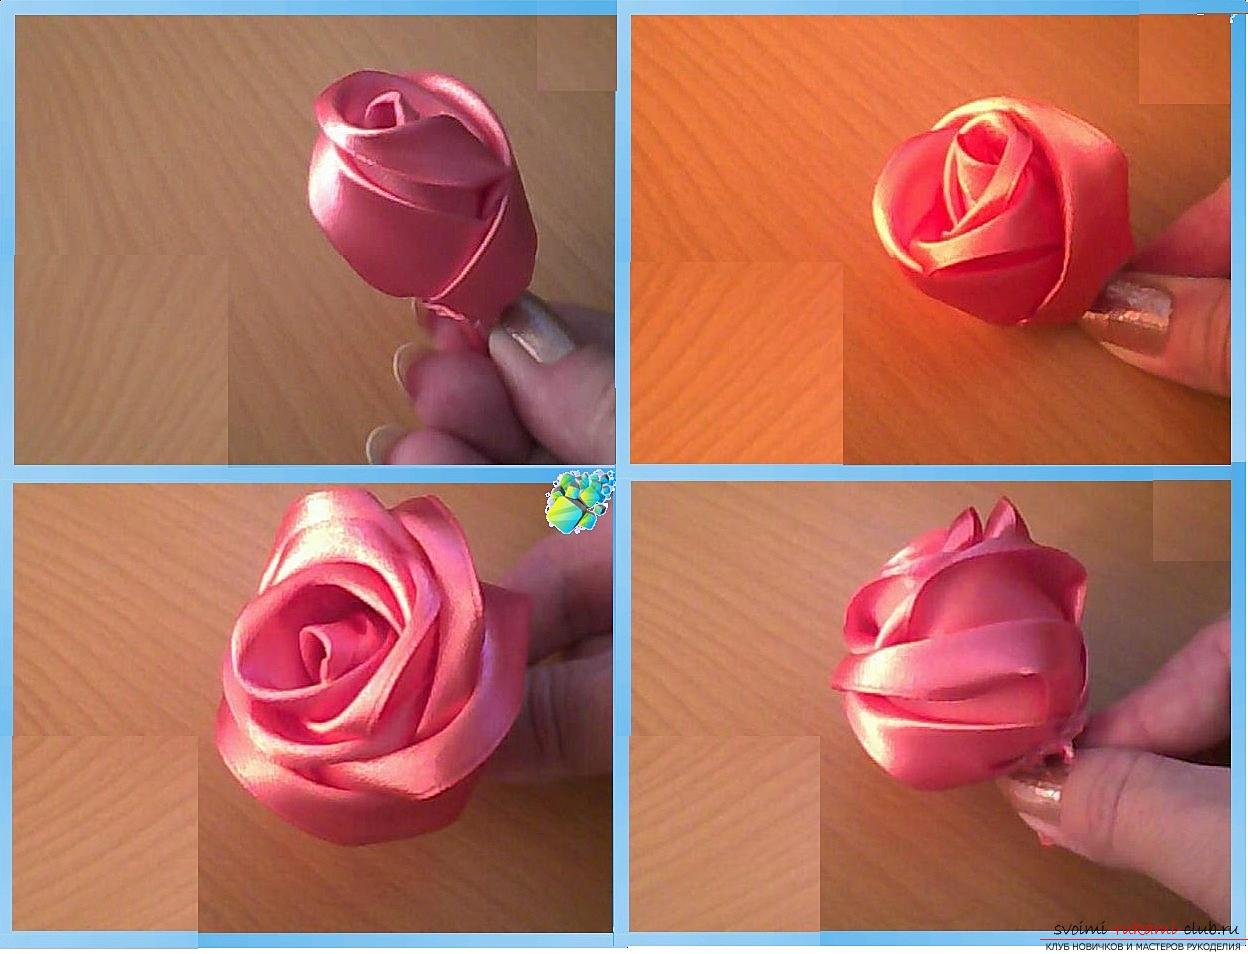 It turns out that such a rose. Option 3 To create the next rose you will need a soldering iron. Thanks to him, there is no need to melt the edges of the tapes and glue the blanks. If you do not have a soldering iron on hand, you can use a wood burner. Sometimes attached to it is a nozzle for the fabric. It will take:
- Satin ribbon 5 cm for petals (choose the color to your taste);
- Satin ribbon is 2.5 cm for green leaves;
- Soldering iron;
- Needle and thread;
- Metal round template for petals;
- Artificial stamens;
- Glue gun and hot glue;
- Tweezers.
As a round metal pattern, you canuse a cap from baby food or pickles. From its diameter will ultimately depend on the size of the flower. Fold the tape width of 5 cm in half shiny side inward. Now it is necessary to cut out circles with a soldering iron, as in a photo, leaving the bottom part not sealed. For each flower, at least 10 such blanks are needed. 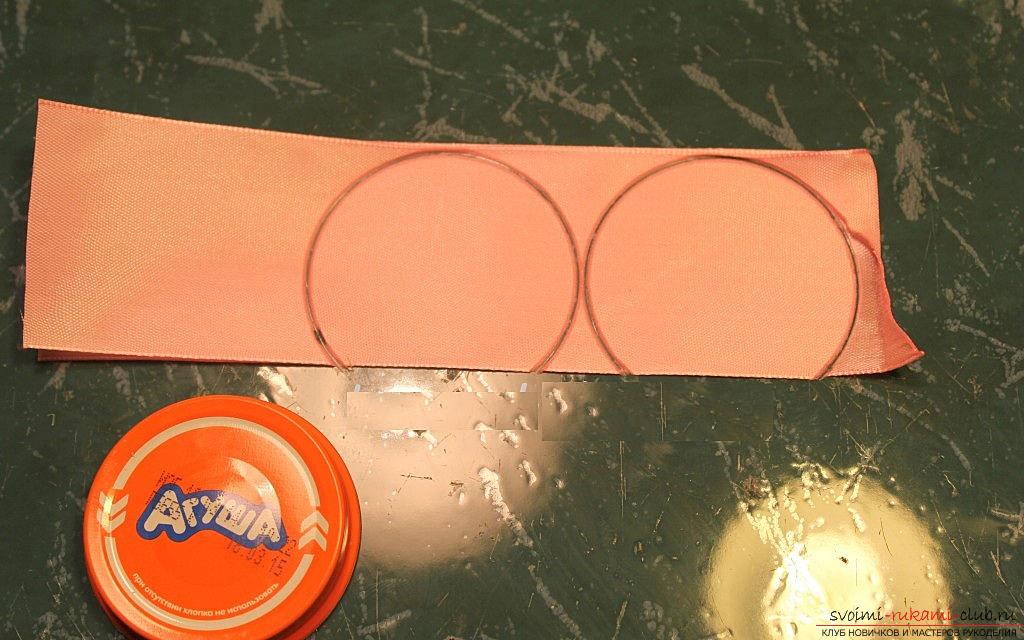 The edges of the petals are tightly fixed with a soldering iron. We turn them shiny side to face. Do not solder the bottom with a seam weld. Thread must be tightened.
 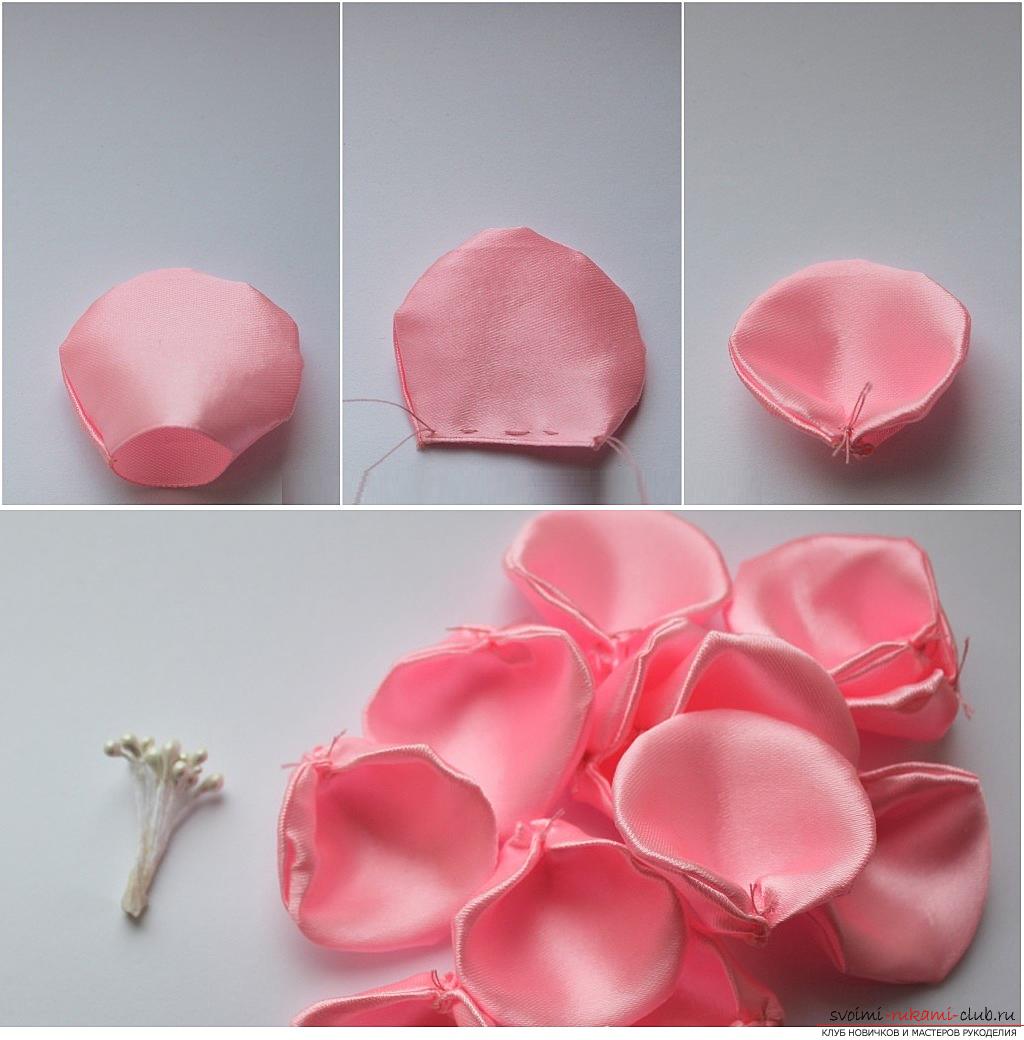 Stamens fold in half. We wrap them in one petal and fix it with hot glue. Next, we begin to glue the remaining lobes overlapping, like a real flower.
 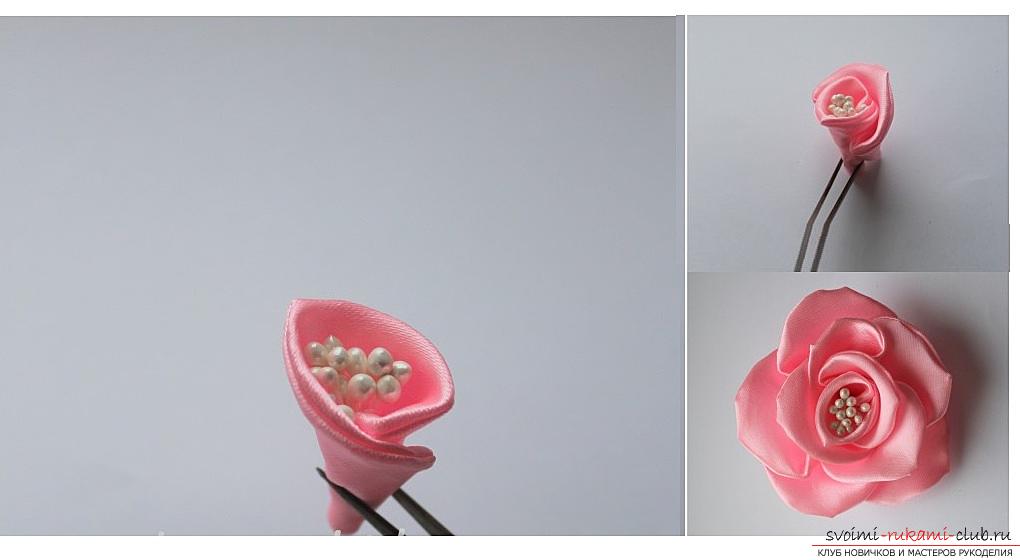 Advice! If you are just starting to try yourself in floristry, and this is your first flower, use Moment Crystal instead of hot glue. The first option is faster and settles in seconds. The second needs a couple of minutes for gluing, and you will have time to arrange the petals in the best positions. To create leaves, you need a piece of green tape about 8 cm in length. We arrange the segment vertically and bend the upper left corner so that the upper half of the ribbon becomes perpendicular to the bottom (see photo). Now add the upper right corner (a) to the bottom left (b). At the received preparation the top in the form of a triangle. We unfold the next leaf with the wrong side on the face. The lower right and left corners are piled together, as in the photo. We cut off the ends a little and we melt over the fire.
 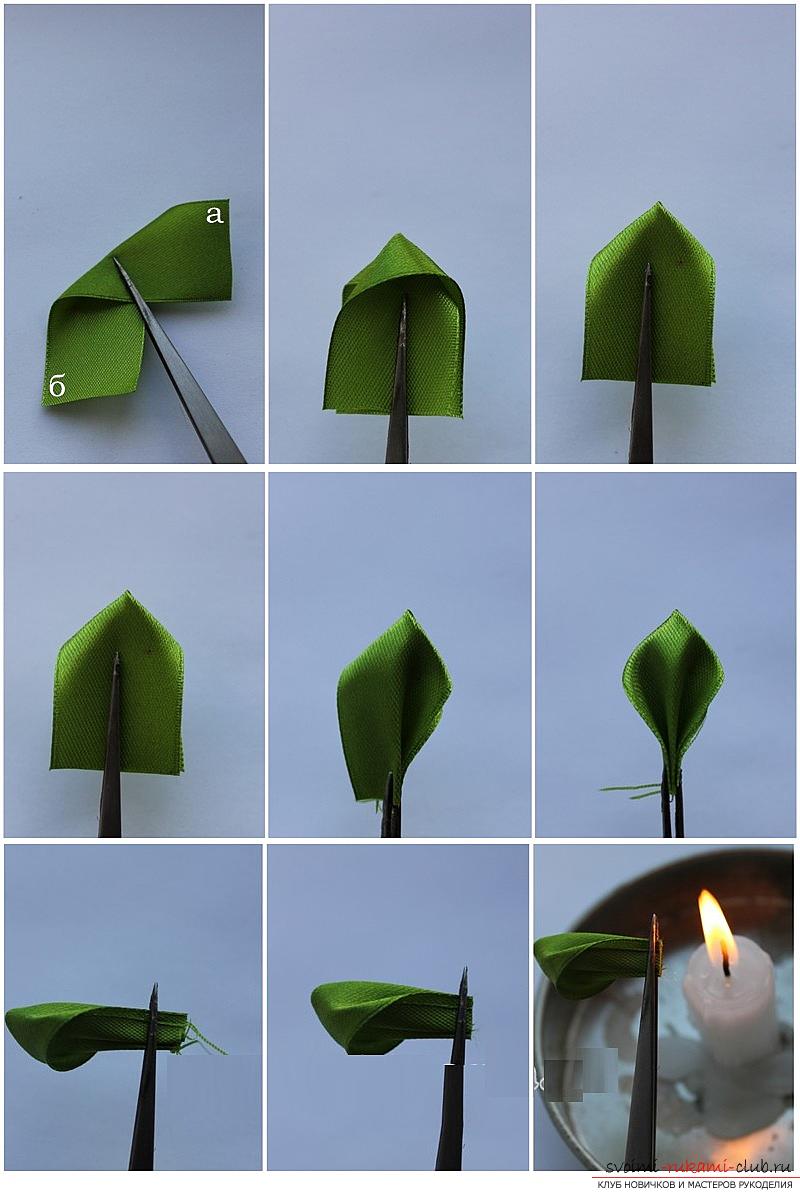 Now it remains only to paste the leaves to the rose. Option 4 A rose of ribbons using Kansas technique
 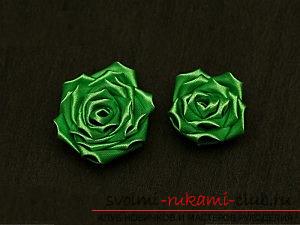 Materials and tools:
- Tape of satin 5 cm wide;
- Needle and thread in the tone of the ribbon;
- Tweezers;
- Scissors;
- Lighter or candle.
The number of lobules will depend on whetherhow much a magnificent rose you want to get in the end. We cut the ribbon into squares of 5 x 5 cm. We sliced the slices over the flame. Now you need to fold the square in half diagonally. The folding line is on top. 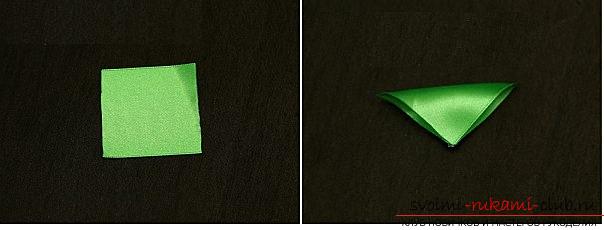 Right and left corners bend to the bottom. Now it is necessary to cut a lower corner of the workpiece in a semicircle and glue it, having melted over the fire. If you have a soldering iron, then you can use it. This tool will allow you to skip the cutting step. After working with the soldering iron, the edges of the petals turn out to be smooth and glued at once.
 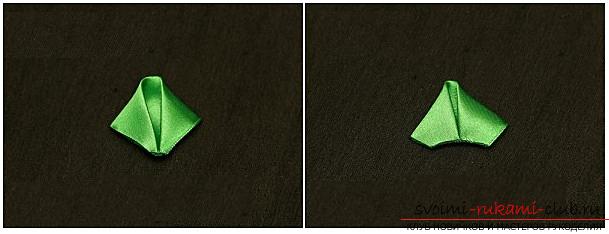 We proceed to the formation of the rose. Fold the first petal into the tube. The side with the folds is out. Turn around the middle of the next petal and sew it. Continue sewing lobes overlap. The side with folds should always be external.
 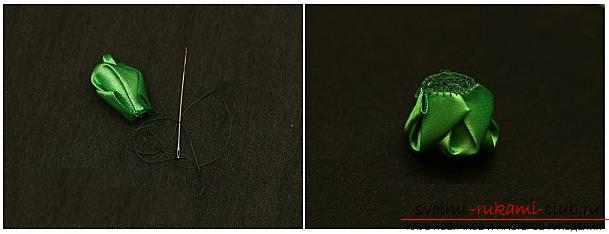 It turned out that such a rose. Option 5 Luxurious lush rose from satin ribbon in champagne color
 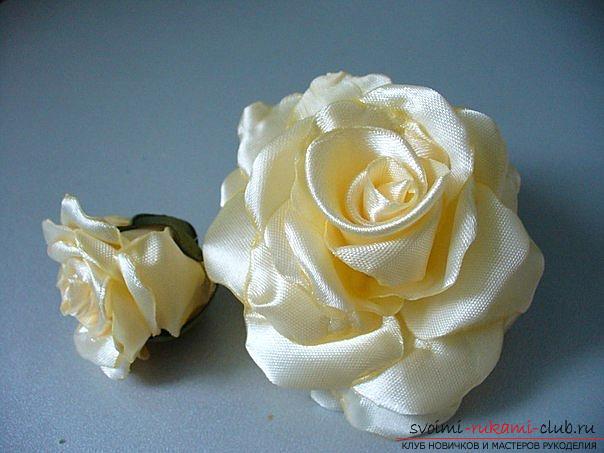 It will take:
- Satin ribbon (wide);
- Candle or lighter;
- Scissors;
- Needle and thread in ribbon color.
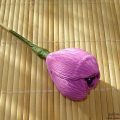
The tape should be cut into square pieces. From them, we cut out the petals of the rose in such a way that one of the processed ends of the ribbon is the bottom of the petals. As a sample, you can take a real petal. We cut the edges of the sections over the fire, unfolding to the flame with the wrong side. After that, the petals will become slightly arched. For one flower, 10 to 15 petals are needed. 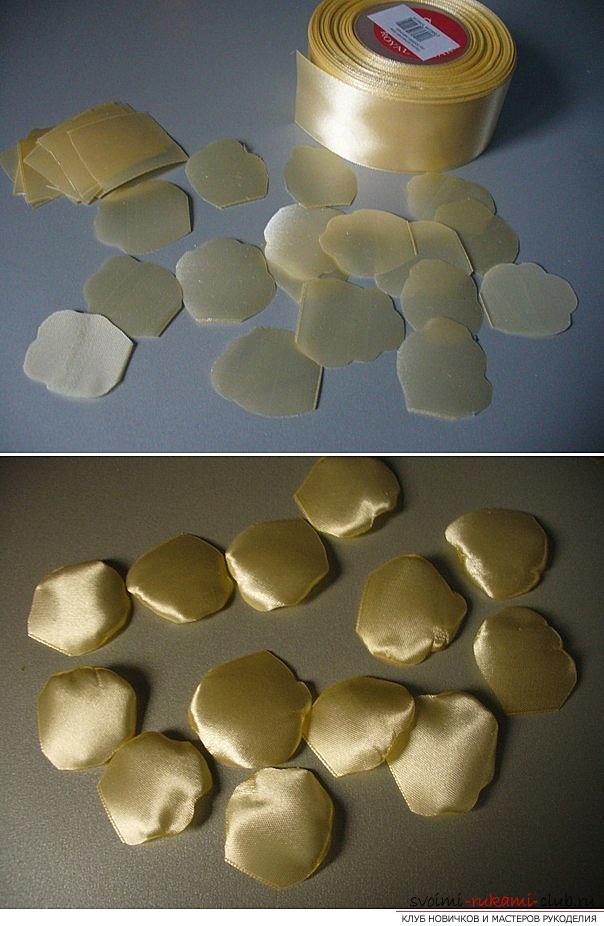 For the core of the flower we twist the bud. Take a rectangular piece of tape and fold it in half along. The folding line is on top. The upper right corner (about 4 cm) is lowered to form a right angle. Now the lower right side of the tucked-in corner is folded once more and fixed with a pair of thread stitches. We do not cut it off, we start to twist the tape around the bundle. After every two to three turns, thread the workpiece. When the bud becomes of sufficient size, the free end of the ribbon is bent downward. We fix it with a thread.
 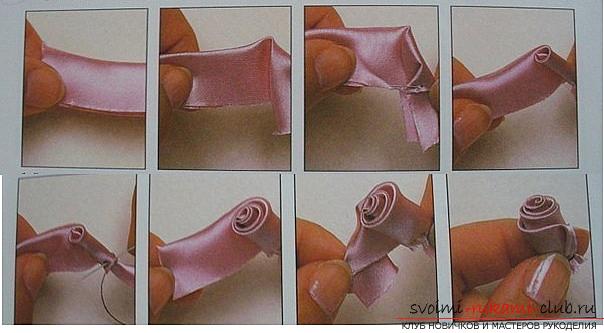 Now it is necessary to sew the petals around the bud. We attach them overlap, as shown in the photo, with a convex shiny face to the bud.
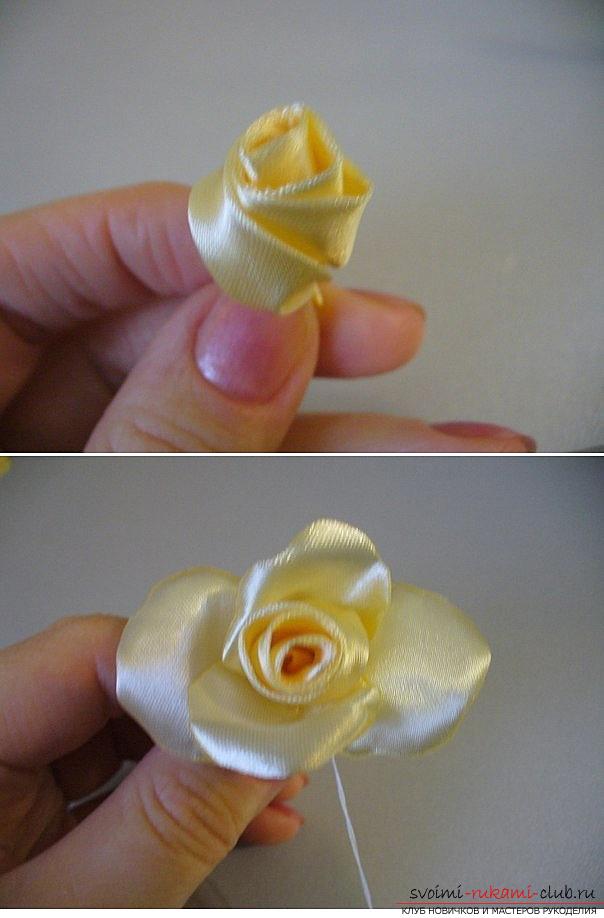
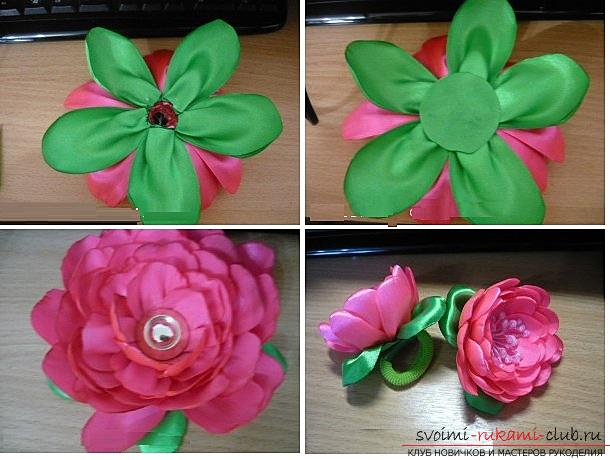
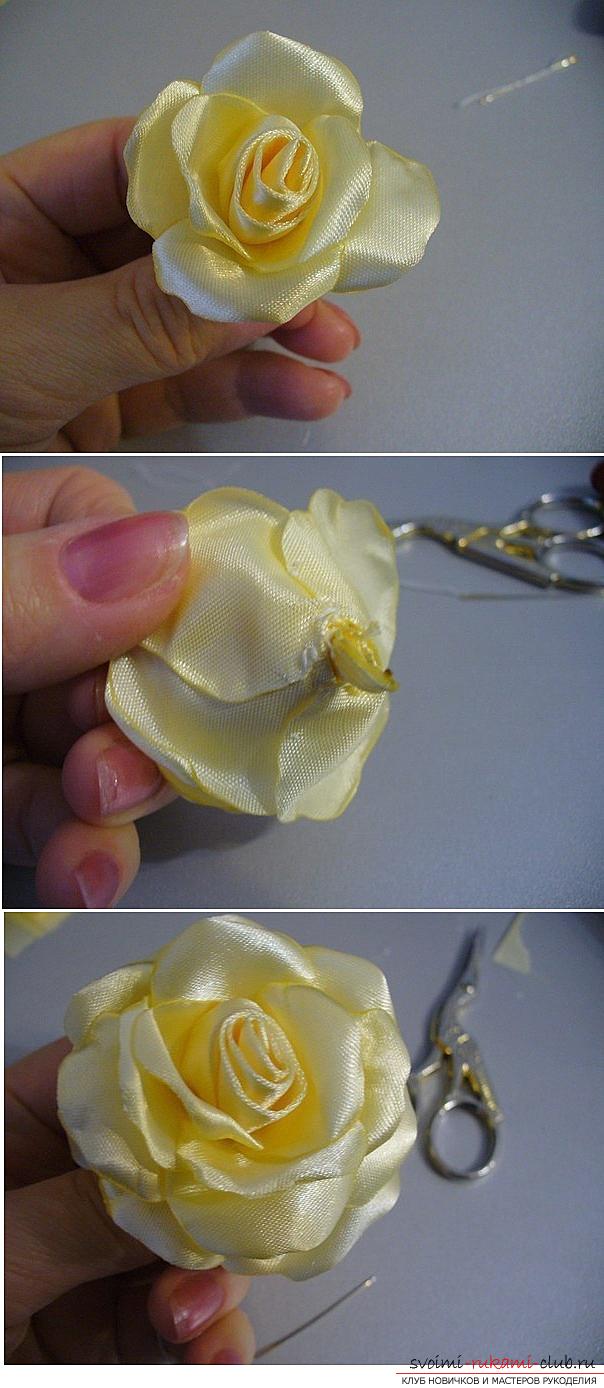 Now you can attach the leaf and the rose is ready. Option 6 Miniature Rosette
 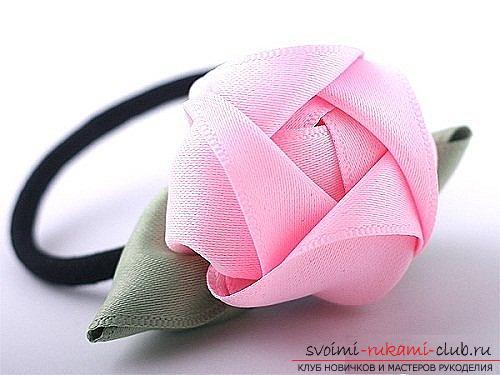 Such a crumb will look great as an ornament of hair gum. It will take:
- Satin ribbon (medium in width) for petals and leaves;
- Safety pins;
- Needle and thread in the tone of the ribbon.
It is necessary to put the ribbon on the table and turn it downfrom left to right about 6 cm. Take this end of the tape and bend it down so that a fold of 45 образо is formed. We fix this place of bending with a pin. The end of the tape is looking down. The other end of the tape is bent up in the same way. The place of bending is also fixed with a pin. That's what should turn out in the end.  If you deploy our workpiece, you will see 4small square. Pins do not take out. We unfold it back and pass it through the perimeter of the workpiece. Now you can remove the pins and tighten the thread a little. We unfold the resulting spherical billet and straighten the petals of the future rose.
 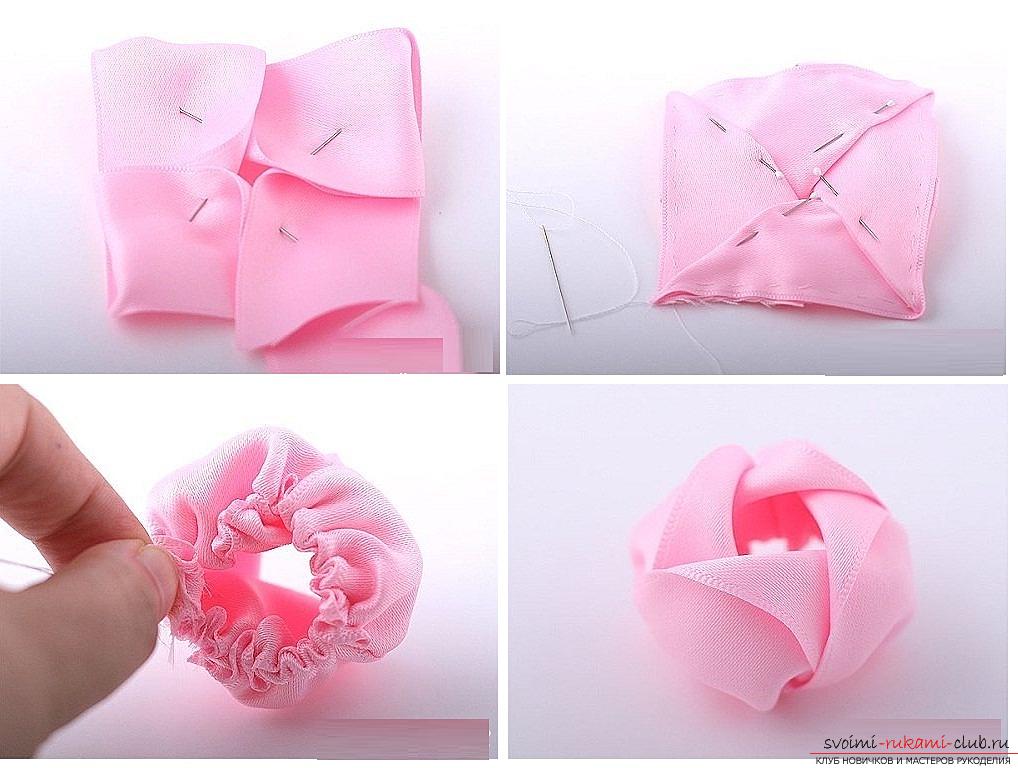 Now we do the core for the flower. This will require one more piece of tape. Its ends fold the cross to the cross so that the upper part forms a loop (see photo). You need to fix the place of intersection of the ends of the tape with the pins. Crop the ends and stitch with a suture, as shown in the photo. The figure resembles a pentagon with sides of different lengths. We tighten the thread and again get a spherical workpiece, but it does not have a hole in the center, like the previous one.
  Now in the greater detail we insert the smaller,thus closing the hole. It turned out that such a pretty little rose. It remains to make her leaves. This will require a green ribbon. At one end, fold the cone, just throwing the edge of the tape (see photo). At the second end, too, you need to make a similar figure. It is necessary to fix the junction of the tape with the pin, and then sew them to the ready-made rosette.
 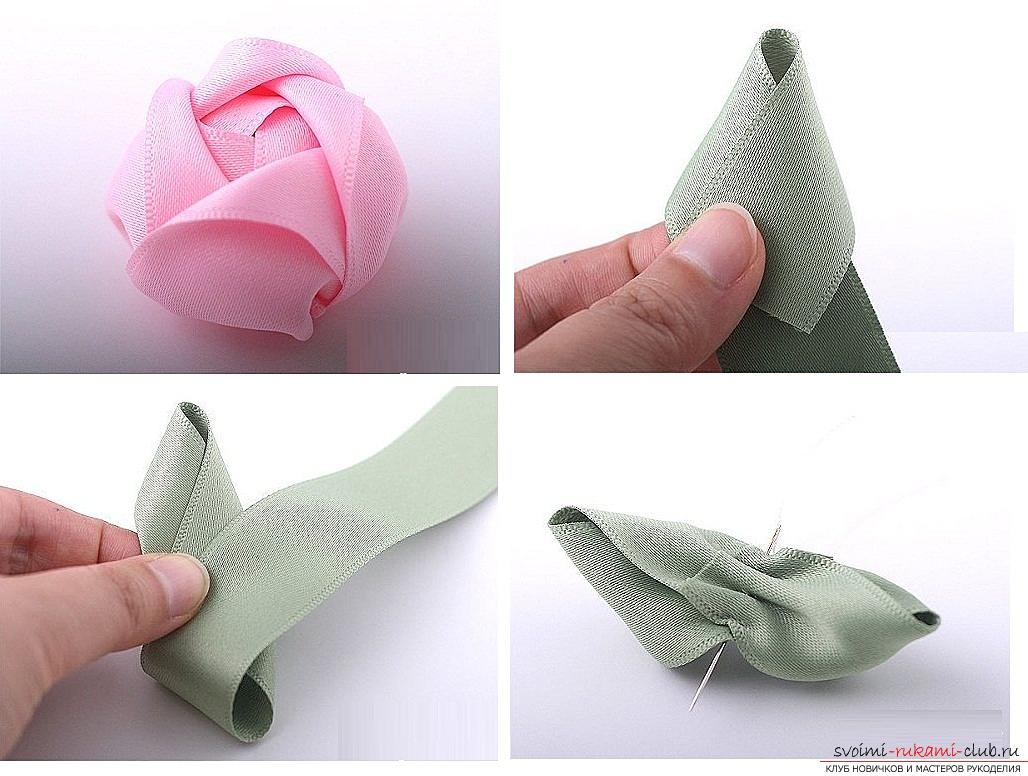 Now you can attach the hand-made to the elastic band or hair clip. Option 7 Opened lush rose from satin ribbon
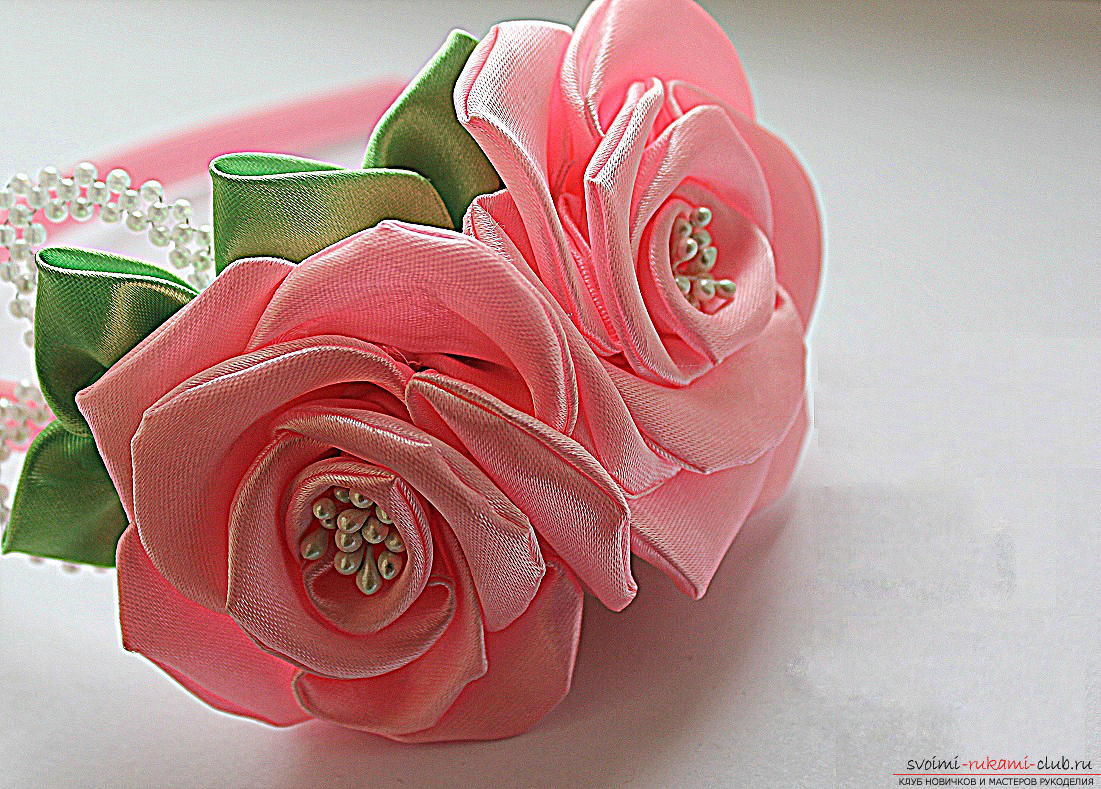
  Materials and tools:
- Tape of satin of two colors (for petals and for leaves) 5 cm wide;
- Glue gun and hot glue;
- Scissors;
- Candle or lighter;
- Element decor for the core (a beautiful button, a large bead or something to your choice).
Cut the ribbon into pieces. For a single flower, roses are needed: 10 pieces 5 x 5 cm, 10 pieces 5 x 6 cm, 10 pieces 5 x 7 cm and 12 pieces 5 x 8 cm. Round the right and left corners on the narrower side. Now you need to melt all the blanks over the fire. Defend a smooth narrow edge, as in the photo. Can be fixed with glue or reflow again. 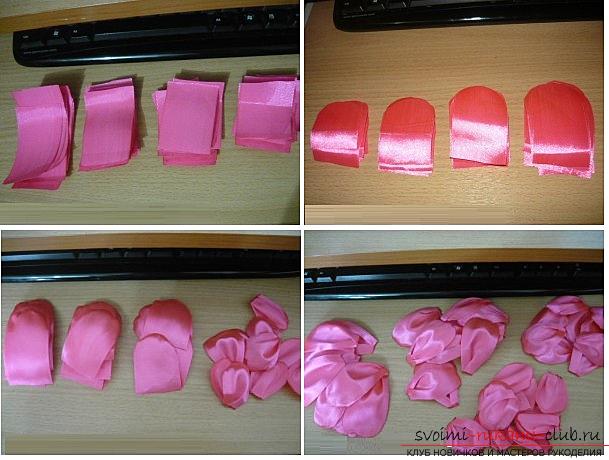 Now it remains to collect with the help of glutinousThe pistol flower begins with the inner circle of the smallest petals. Gluing them overlap. It will take approximately 5 pieces. The next layer and all the subsequent ones will go staggered. In the center we insert a core: a beautiful button, artificial stamens or a bead.
 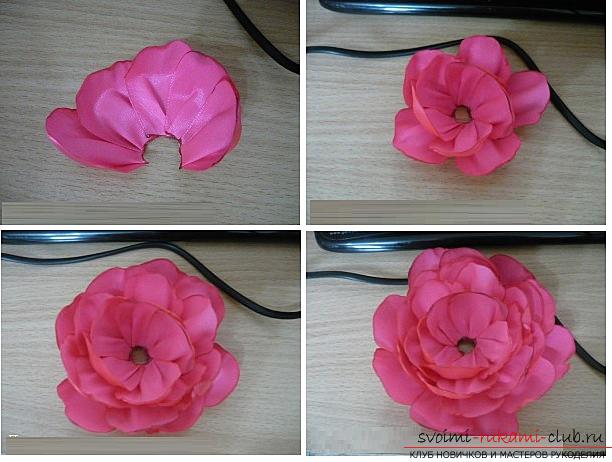 If you want to make leaves, you will need 6 -7 pieces of green tape 5 x 5 cm. Of the five we make exactly the same blanks as the petals. We glue them on the bottom of our flower. From two pieces of a green tape we make a basis for a flower. To do this, glue the glue with the wrong sides and glue together. Cut out a circle from the workpiece. It is necessary to melt the edges over the fire. Now glue the rose with the leaves to this circle and ready. Can be used as a decoration for hair clips and hair bands. Make a brooch, decorate a handbag or a hat. From small roses you can also make a charming and tender topiary - the European tree of happiness. To do this, the crafts must have a flat base. Experiment, create.
Comments
Related posts:
 How to make your own hands beautiful and original crafts using kiwing techniques and others, step-by-step photos and instructions for creating paper crafts
 Instructions on how to make a flower from a ribbon with your own hands, using improvised materials.
 How to make a ring made of polymer clay with a decorative element in the form of an orchid flower, step by step photos and description
 How to make a bouquet of wildflowers in suite design, step-by-step photos of making poppy, chamomile, sunflower, cornflower and crocus
 How to make an original gift by March 8, step-by-step photos and description of creating bouquets of flowers from sweets