
How to make your own hands a necklace of polymer clay with floral elements, step-by-step photos and a description of the work, an image of a finished necklace
People around the world choose the most diversehobby. Someone collects matchboxes and stamps, someone adds puzzles. But among all the fascinating hobbies there are special - needlework. Creative people create with their own hands amazing things, ideas for which draw from their imagination and creative outlook on life. They knit, weave, embroider, mold and make ornaments. And if you combine the last two options, you will get jewelry made of polymer clay. Among the most diverse variants of such ornaments in this article, we will suggest creating a necklace of polymer clay. Very often in women it happens that it is simply impossible to find the appropriate decoration for the dress that you like. This is an inappropriate color, the second has size, and the third does not correspond to the event at all. And then needlework comes to the rescue. Craftsmen with polymeric clay can create a necklace on their own, which will be combined with this dress. We will tell you in detail how to make a flower necklace from plastic. When you learn how to handle polymer clay, you can even create exclusive author's works. 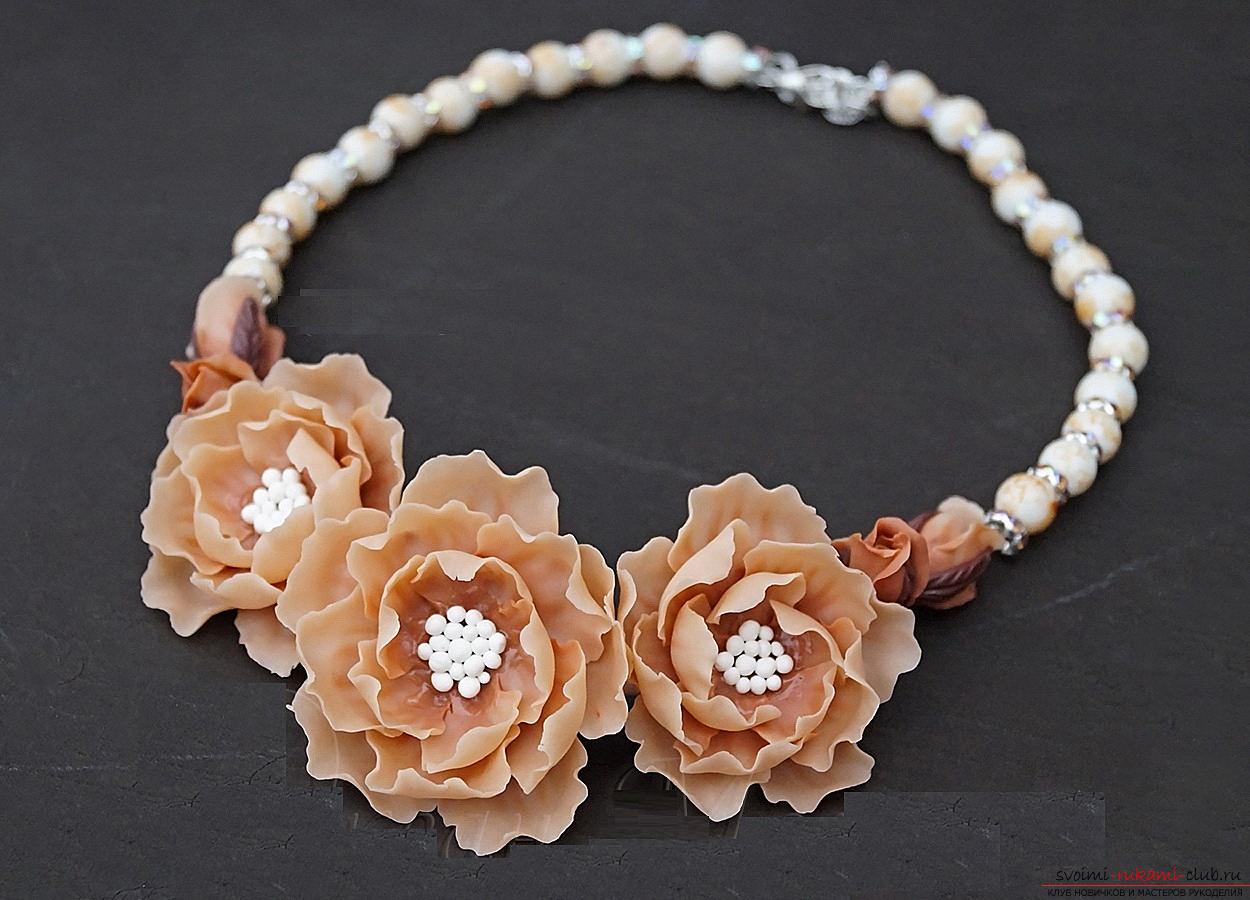 For necklaces, materials will be needed:
- Plastic (beige, white, light and dark chocolate);
- Tool for rolling (paste-machine can be replaced with acrylic or glass rolling-pin);
- Stack with a ball on the end;
- Needle (or toothpick);
- Blade from a clerical knife;
- Blade with a wavy edge;
- Liquid plastic and brush for it;
- Shaped flower and five petals;
- The line;
- Lock-carbine;
- Beige beads + rondeli with beige rhinestones;
- Pins with a hat on the end;
- Wire: 1 mm in diameter;
- White satin ribbon;
- Glue is transparent and fast drying;
- Scissors and round pliers.
Flowers and buds. It is necessary to carefully knead the beige and light chocolate (brown) polymer clay in order to obtain a soft and plastic mass. Now make 2 triangles of these pieces. Beige plastic should be 2 times more. We connect them so that we get a square. Now we roll this square (see photo), using a rolling pin or paste-machine, to get a smooth transition of colors. To do this, the workpiece must be rolled several times, each time folding the resulting layer in half. Now cut the resulting blanks with the blade (on the one hand, brown with the other beige). We cut across the color transition. Strips of about 3 cm in width are necessary.  Now we add these strips one by oneas follows: the first smoothly, the second one 1-2 cm forward, the third one the same way back, and so on. the order of displacement is arbitrary. We form an even rectangle from this workpiece. The edges can be cut off. We squeeze it a little with fingers. Now we cut the workpiece in half across the gradient. We unfold the halves with a cut to ourselves and add them. The resulting rectangular billet should be squeezed into a sausage with a diameter of about 1.5 cm (see photo). Now we cut the resulting cane into thin layers. These are the future petals. The thinner you will cut, the smaller the petals will turn out and vice versa. Since we need a variety of petals, we need to cut at least two options. We flatten each petal (slightly flattened) with fingers. Using a wavy blade, we make the blanks of the petals along the light edge wavy.
  Now put the blank in the palm on the palm,We take a stack with a ball-shaped end and begin to roll out the petals in different directions. We skate only the beige part. The necklace will have 1 large flower (central) and two smaller ones. Big we have in the center precisely because the necklace is different from the necklace is a large central element.
  Each flower will have three tiers of 5petals in each. In the first (lower) tier, place the lobes overlapping. We smooth the middle of the stack with the ball. The next row is formed in a checkerboard pattern. We move the petals closer to the center. Stack with a ball it is necessary to smooth the places of joining the petals in the middle. In each tier the petals move closer to the middle.
  We carefully iron each flowermiddle. It should have a depression, which we smear with a liquid polymer clay. For the cores we roll balls of white plastic. The diameter of the balls is needed from 3 mm to 5 mm. In the liquid core, which is smeared with liquid plastic, we fill the balls.
 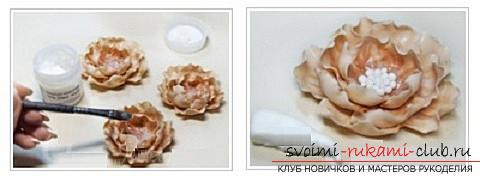 Now we need to bake the blanks. For this, carefully read the instructions on the package with clay. As the baked goods will be fragile and crumble in the very near future. If you over-restrain the plastic in the oven, then harmful substances will be released into the air, and the article itself will be hopelessly spoiled. The room in the baking process is better to ventilate well. While the flowers are baked and cool, we will sculpt the buds. For the core of the bud we will need clipping of clay, which remained from the formation of the rectangle, before we began to squeeze it into a cane. We form droplets. For convenience, they can be strung on a toothpick (sharp droplet horses will be the top of the core). Now we wrap the droplet with two lobes and overlap their edges outwards. For the necklace, you will need 2 large buds, which have a through longitudinal hole and 2 small buds, which have a transverse through hole at the base.
  Now we will prepare bindings for ourflowers from dark chocolate clay. We roll it about 2 mm thick and cut out 12 leaves with a length of about 3 cm. Each leaf will have 3 leaves. We attach them to buds and draw streaks with a needle or toothpick. It is important here to push through the grooves, not to cut through.
  Now proceed to the fasteners for flowers. They are already baked in us. We make them from dark chocolate thermoplastic. We fasten small balls on the wrong side of the flowers. Now you need to roll out a piece of dark chocolate plastic 3 mm thick and cut out the shape of a flower with five petals. We fasten these blanks on top of the balls on the underside of the flowers. Draw streaks, as on buds and make through holes (see photo). Let's start assembling the necklace. On a piece of wire about 20 cm long, thread: 1 large, 1 small buds, a small flower, a large flower again a small flower, a small bud and end up with a large bud. At the ends of the wire to make loops. Now on the line of double addition string alternately beads and rondeli. The ends of the workpiece must be well fixed. Rondeli should be at the ends. In them we insert pins. Cut off the unnecessary and do the ends on the loop. In order that our flowers do not fidget and remain in place, we wrap the satin ribbon blank with flowers and buds. It remains to fix both parts of the workpiece with loops and fasten the clasp for the necklace. You have a wonderful necklace in the flower theme.
Comments
Related posts:
 How to make a brooch made of polymer clay in the form of an oak leaf, step-by-step photos and job description
 How to make a gift to March 8 with your own hands made of polymer clay, step-by-step photos of creating a set of bracelet, earrings and pendants
 How to make a ring made of polymer clay with a decorative element in the form of an orchid flower, step by step photos and description
 We make a gradient of polymer clay with our own hands - a lesson and a master class with a photo
 How to make earrings from polymer clay in the original technique of imitation knitted cloth, step-by-step creation photos