How to build a pattern of the basis of trousers, you will learn from the materials that are posted in our article
How to build a pattern trouser base should knowevery woman who wants to learn how to sew and sew different models of this universal clothing element. This pattern is useful for creating different styles and models of trousers, because it is it that changes, depending on the availability of additional elements, width and so on. In this article, we will try to tell you in detail about the rules for constructing such a pattern-basis. When self-tailoring trousers and lack of sufficient experience it is necessary to use the recommendations for building a pattern of the base. It is worth noting that to create a pattern for the purpose of sewing men's and women's trousers used different techniques for constructing patterns. The construction of the basis of men's trousers is carried out taking into account the lower waistline and seat height. More details on the construction of the basis for tailoring classic, narrowed women's pants. 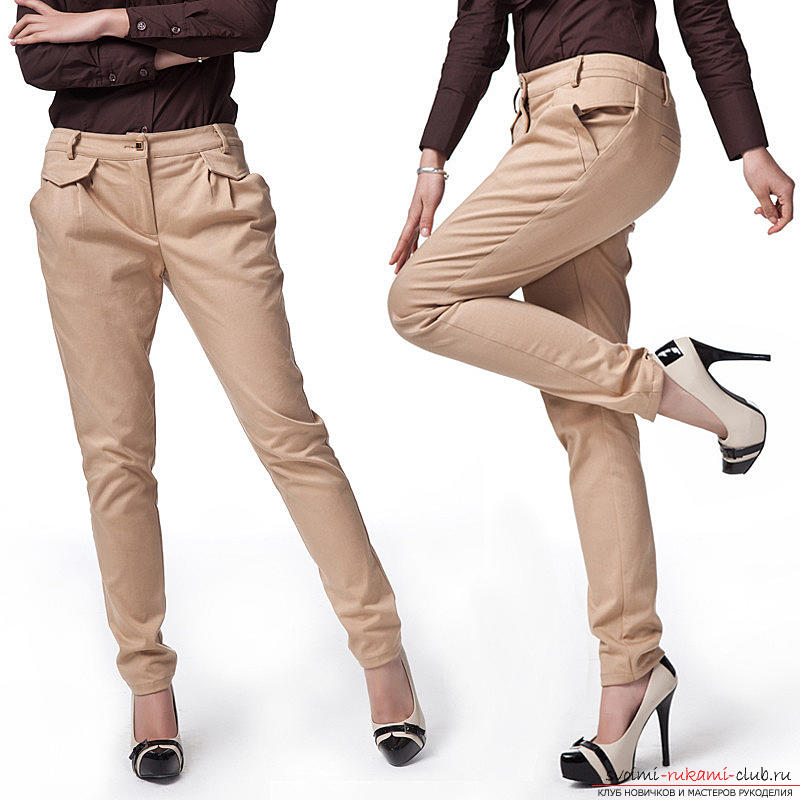 By using one basis and making the necessary adjustments, you can simulate different styles of trousers:
- the summer trouser style on an elastic band;
- model with a belt of a coquette;
- skirt-trousers;
- Pants with different kinds of pockets;
- children's models for girls and boys.
 The basis of the pattern, which will be considered inthis material is suitable for women who do not have deviations in the figure. If there is a non-standard figure, the basis must be adjusted. Therefore, using the base, it is necessary to take into account the distance for large allowances. The first action for building a pattern of a foundation is the creation of a grid drawing on paper with millimeter markings. This manipulation will make it easier to navigate with further construction. So, let's figure it out step by step:
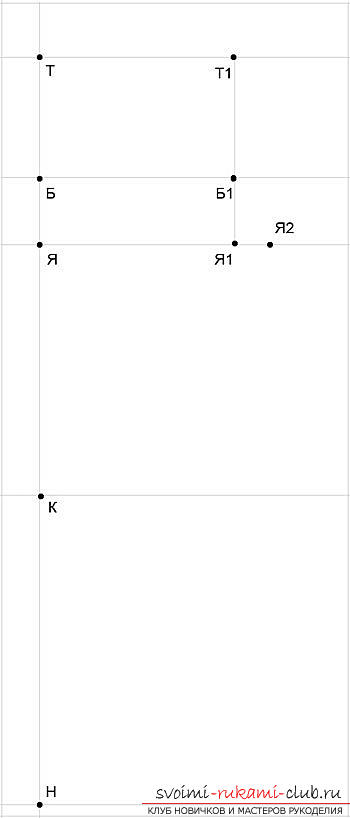
- 1 - at the top of the paper on the left side, mark the point T. The distance from point T to H (in the lower left corner) is a measure of the length in the drawing.
- 2 - mark on the grid the height of the seat from the point Tup to Ya. According to the standard for 44 sizes of clothes this distance does not exceed 25 cm, for 48 sizes it is enough 26cm. However, each figure is individual, so you should accurately calculate the height of the seat (we will stop at this point later). Point I on the grid corresponds to the most prominent place on the buttocks
- 3 - mark on the grid the line of the hips - the point B. To calculate it, you need to divide the distance from T to H by a third.
- 4 - Notes the semi girth of the hips point B1. Through it we draw a vertical line in the drawing. At the intersection of the marked points, we mark new points - T1, H1. Now all major points are marked on the grid
- 5- go to the mark of additional points. From H1 postpone the mark, equal to the tenth part of the sex of the hips. We put the point H2.
- 6 - the line of the knee is marked on the left vertical line by the point K (as a rule, it stands in the middle of the segment BN).
 It's time to return to the right methodmeasuring the height of the seat. Many journals give a special formula. It does not always provide an accurate indicator. To obtain more accurate indicators, there is an effective, practical method of taking measurements. The waist is tied with a lace or an elastic band. The person for whom the pattern is being prepared sits on a flat surface. Measurement is carried out in a straight line, without touching the body, from the waist line, to the plane of the chair. If you make too much allowance for the height of the seat, we get an unaesthetic dangling of the trousers' tunic. The next construction of the basis of the pattern requires attentiveness, since it is necessary to perform complex calculations, make additional lines and notations. To build the front halves of the pattern, you must use a red pencil.
 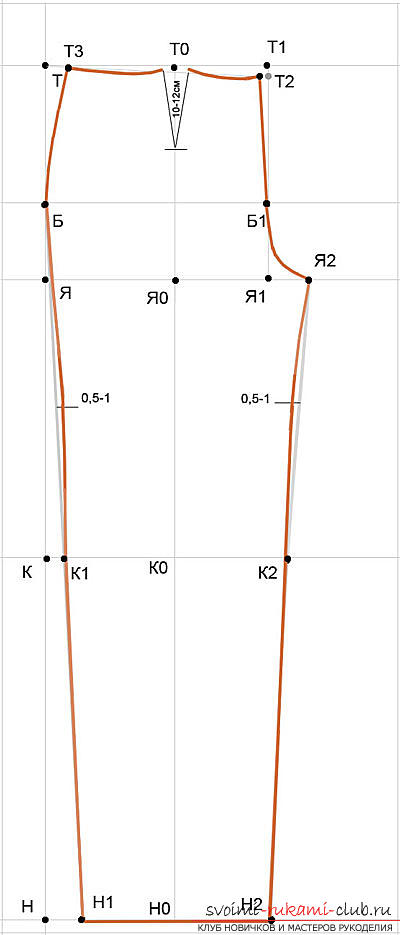 We take the following steps:
- We mark the line of the arrow of the trousers with the point H0, and a groove will pass through it. This point is located in the middle of the segment ЯЯ2.
- From the point of the arrow, the line of the knee K0 is laid down along the vertical line, the waist line T0 is upward.
- If the figure with a protruding tummy, then the waistline drops a little - from T1, we mark T2 lower by 1.5 cm and to the left by 1 cm.
- From the main point T to the right, the pointlateral seam - T3 and denotes a groove, the depth of which should not exceed more than 13cm. The line from the additional points to the undercut is drawn smoothly with the deflection.
- Line kulfika drawn to the eye and adjusts during the fitting, or by drawing, laying the instrument at points D1 and H2.
- Smoothly connect point B and T3.
- On the bottom line of the pattern marks the point H0 - the middle of the segment H1H2. So we will note based on the width of the trousers.
- We also act on the knee line, marking the point K0.
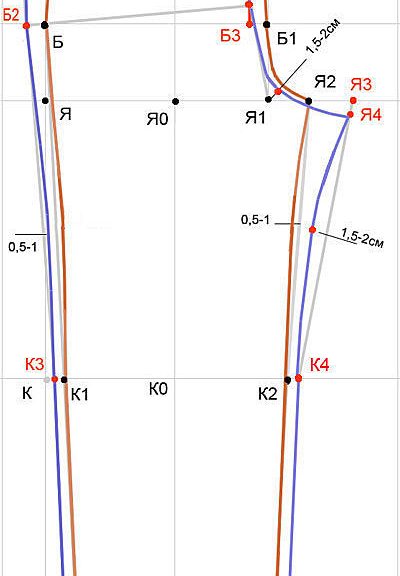
The final touch is the union of the points R and R, R, andK2. To begin with, straight lines are drawn, then it makes an offset of 0.5 cm and a smooth contour is drawn. The front half of the trousers is ready. We build the back of the back half using a blue pencil. 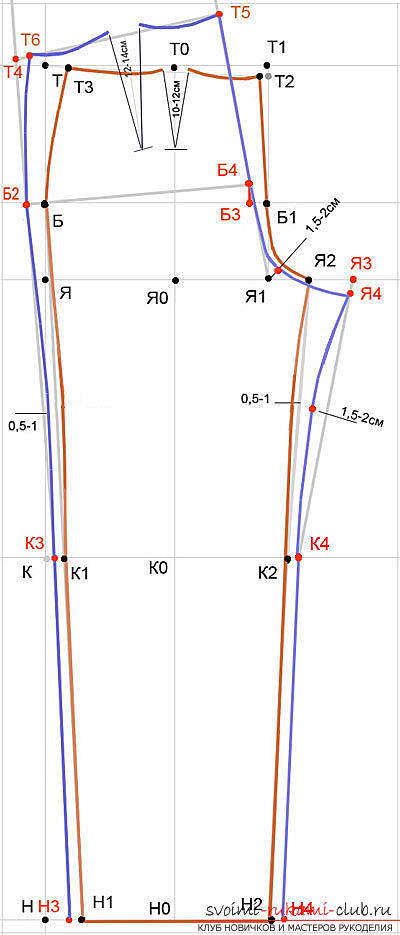 We operate step by step:
- from point B at a distance of 1.5 cm the point B2 is deposited;
- from K1 and K2 at a distance of 2 cm, we lay K3 and K4, similarly we enter points along the grid of the line H, laying H3 and H4;
- we carry out the segments K3B2, H3K3;
- from K3 through B2 draw lines, mark point T4 (above the waist);
- the point B3 is constructed on the hip line, the perpendicular is drawn upwards, at a distance of 5 cm point B4 is placed, it must be connected with H1;
- at the intersection of the line drawn from T4 to the segment K3T4 we obtain the point T5, we lay T6 to the left, we obtain a groove solution;
- The groove is built in the middle of the segment T5T6.
As with the front half pattern, the upperthe contour must have a smooth bend. Completing the bottom of the pattern until completion, it is necessary to connect point K4 to point H3, to draw a segment K4H4. On the segment H3K4 you should find the middle, move inward and mark the point. N4 is the difference in the equalization of the segments H3K4 and H2K2. This essentially ends the construction of the foundation. Of course, the basis requires the introduction of corrective elements, which is determined by the diversity of female figures.
Comments
Related posts:
 How to build a pattern-base of the dress will be interesting to learn absolutely all needlewomen
 How to build a pattern and sew the original, fashionable children's overalls with your own hands. Step-by-step instruction for tailoring children's overalls.
 We make a pattern of men's trousers with our own hands, the result will stun you
 How to sew clothes for a newborn with their own hands? You will find the answers in our article with detailed instructions and photos
 The description and the scheme explaining how correctly to remove measures and to construct a pattern of a waistcoat for a dog.