
How to make a dream catcher? Magic workshop
 What is a dream catcher? This is an amulet of arbitrary size, resembling a web in a ring and, as usual, having a remarkable history. Dream catchers were made by the Indians, attributing to them the ability to protect the sleeper. It is believed that the “web” delays bad dreams — they disappear with the onset of dawn — and skips good ones — they leave a hole in the middle of the weave. But regardless of whether you believe in such things or not, weaving a dream catcher with your own hands is a fascinating occupation, and it will surely become an interior decoration or a great gift to a loved one - such tangible wishes of pleasant dreams. And we will tell how to make this cute souvenir.
Dreamcatcher Traditions
Of course, the amulet on the gift must be madecertainly by hand. After all, only in this case it is possible to meet all the conditions for its implementation - this applies not only and not so much to the technique of performance, as to the mood of the craftswoman herself. It is important that before you start working on the catcher, you are in a good mood and, while working on the talisman, mentally wish the person to whom you intend a gift, healthy rest and pleasant dreams. In the process of weaving, you can even sing funny songs. The Indians performed the talisman exclusively from natural materials. In the role of the skeleton there was a ring woven from willow twigs; the “webs” were made of stern threads or deer veins. The pendants were also meaningful: they used feathers, but not all; so, in the amulet for men were used the feathers of the eagle, and in the female variation - owl. Today it is fashionable to use beads on a web in weaving dream catchers. It is better if they are glass and transparent, imitating dew drops. However, in the classic version of weaving without them at all. It is also believed that in the first row of the web should be 8 shares. If the base ring is of modest size, 8 parts look nice. If the circle is large, the grid turns out to be too large, and the work is not elegant enough. Therefore, let this issue every craftswoman will resolve at its discretion.
Materials and tools you need to make a dream catcher:
metal or wooden ring (in ourcase - with a diameter of 7 cm); threads of suitable thickness (the smaller the ring, the thinner the thread, in our case, the white iris); glass or wooden beads for decoration; feathers for pendants; scissors; needle (optional); crochet hook (completely optional). 
Dreamcatcher do-it-yourself: master class
First of all it is necessary to braid (tiehook or wrap) the ring with a thread so that there are no gaps left. For this purpose, they sometimes use a working thread (which will then be used for weaving a web), folded several times, or a braid or a coarser and thicker rope to speed up the winding process. But according to the site, thin and uniform winding with a working thread looks beautiful. We used a crochet hook, tied a thin base with single crochet columns. After that, without cutting the thread, they continued to knit a chain of air loops 14 cm long - it can be made longer so that, when folded in half, form a comfortable loop for hanging the finished dream catcher at the head of the bed.  Now the resulting chain needs to be folded in half andfasten with a single crochet or just a knot on the ring-base, then pull the thread a meter and a half (depending on the initial size of the ring), wondering how much it will go on weaving the web, and cut it off. Mentally or with the help of a thin thread, we divide our ring into 8 (or more - justification, see above) equal parts. If it turns out unevenly, it will not be very beautiful. On the planned points we lay the first row of a web. To do this, we stretch the thread from the attachment point to the first marked point, lay the thread on top of it, wind up the ring and pass the end into the loop formed between the web thread and the ring. The thread is tightened so that the cobweb lays down smoothly, tightly.
  Here, on the finished web, you can clearly see how the thread is drawn in in a simple way.
 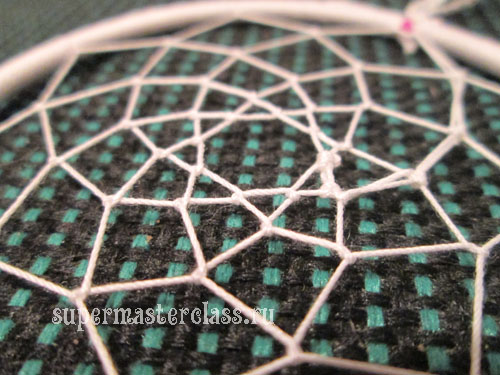 We reach the end of the row, after which we dothe next turn in the same way along the center of the first stretched thread of the previous row. We pass the second row to the end, making loops in the center of the stretched sectors of the first row.
  So we do some more rows,approaching the center. We end the weaving when a small circle is formed inside, through which good dreams regularly, every night will be visited by the owner of your own made dream catcher.
  Now it's up to the decor. For him, we took glass beads and dyed feathers. The feathers wrapped a thread, forming bundles of them, and then wrapped the tips with threads. Then they put beads on the threads and attached the resulting pendants to the finished amulet.


 That's it, your do-it-yourself dream catcherready to perform my pleasant duties. When presenting the presentation, do not forget to instruct the donated person where to hang the talisman. According to the legend, it should be hung up so that it could rotate (that is, not on the wall, but, say, on a chandelier), catching dreams, and so that Eva Casio was somewhere near the head of the bed needlework classes Previous article: Next article:
Comments
Related posts:
 How to make a dream catcher yourself. Scheme.
 The master class will teach you how to make an odd bit of an asterisk of threads with your own hands
 The master class will teach you how to make a toy for your children with your own hands - a rattle tied with a crochet.
 Step-by-step master class will teach you how to make a herringbone of salty dough with your own hands
 How to make a Christmas tree for the New Year with your own hands? A detailed master class with a photo on creating a Christmas tree from the grid will help you learn how to make a new article