How to weave beautiful beads, detailed instructions, description and step-by-step photos for beginners in beadwork
Recently, handmade jewelryare becoming increasingly popular. And absolutely not necessarily that they were made of precious metals and stones. Often very effective accessories make from the most various materials, and one of the popular is the beads. "Buser" or "busra" in translation from Arabic - "fake pearls". This material is very ancient, but it always looks incredible and bright in youth. Little beads have been around for centuries. The very first mention of beads from glass came down to us from ancient Egypt, it was there that the first bead was discovered. There was not only a glass bead, it was dug out of bone, pearls, cast from gold and silver, in China there was even a porcelain version. The art of creating a glass bead at that time was quite difficult, jewelry from it was very highly appreciated. Its history is inextricably linked with glassmaking itself. The art of brewing glass from Egypt came to Rome. It is here that the history of the famous Venetian bead begins. Masters zealously protected the secrets of creating glass, this knowledge passed from generation to generation. For a long time Venetian masters had a complete monopoly on beads. For multi-colored beads gave in exchange precious fabrics, wood and even slaves. With the discovery of new lands, the development of seaworthy business, the monopoly on beads ceased to exist. Whole glassworks are beginning to be built and colorful multicolored beads are available to everyone. Crafts from beads serve not only for beautiful accessories. So, for example, Catherine the Great ordered to decorate all the walls in one of the rooms of the palace with glass beads. In the history of beads, there are a lot of unusual and surprising facts, but in this article it will be about decorations made of beads. In this article we offer beadwork for beginners - simple, beautiful and original. Nobody calls such decorations banal or tasteless. If you have a creative vein, decorations will necessarily be obtained by author's, with the introduction of some of their elements and solutions. Simple necklace from different beads 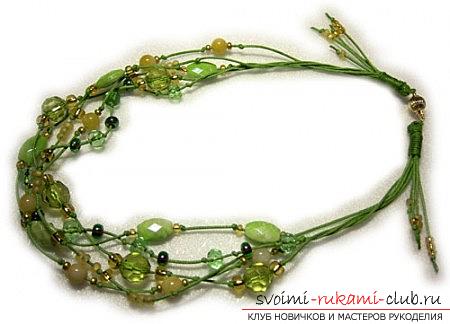 This charming decoration can be made from almost nothing. It will take:
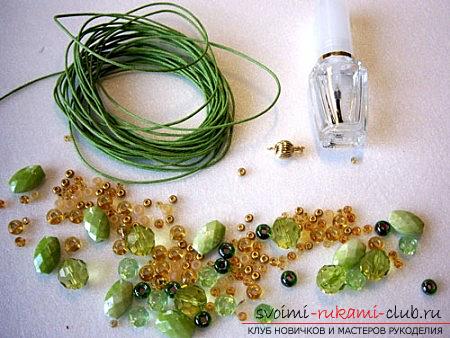
- Beads and beads of different sizes with large holes;
- Waxed cord;
- Clasp for necklaces;
- Transparent nail polish (for fastening).
 For such a necklace you will need a few lowbeads and beads. In this case, the five lengths of the cord are 1 m in length and the sixth section is for fastening. In order to be easy to string beads and beads, the tip of the cord can be varnished and formed with fingers in the form of a point. Now you need to arrange the beads and beads separately on each segment, fixing them with the most common knots. Feel free to rely on the will of imagination. We make all five pieces of the cord and proceed to fixing.
 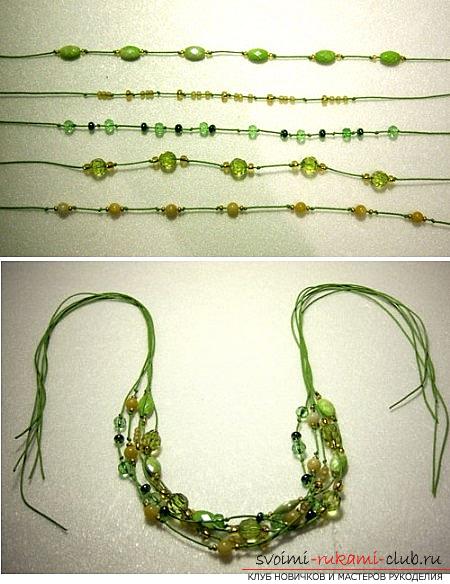 All low must be put together and try on,having determined the necessary length of the necklace. Now take the sixth section of the cord and cut it into two halves. To each of them using a simple nodule attach the clasp part. We attach in such a way that one of the ends is substantially larger than the other. Now we add the lace with the fastener together with the rest and fix it, tying it all low with the usual knot. Tighten as tight as possible. The tail of the lace pieces should be long enough. Now it is necessary to add up so that the knot has turned out on a place of a fold. You can use pliers. Now take that end of the lace, which was left longer when fastening the fastener. It will be necessary to measure from the knot and bend about 1.5 - 2 cm and wrap all the threads with this end towards the fastener. Near the knot, the braids must be fastened, trimmed, and the tip hidden. Those ponytails that remained free decorate with beads and fix them with knots. To the very ends of the cord do not swell, cover them with nail polish. Similarly we do with the winding near the knot with the clasp.
 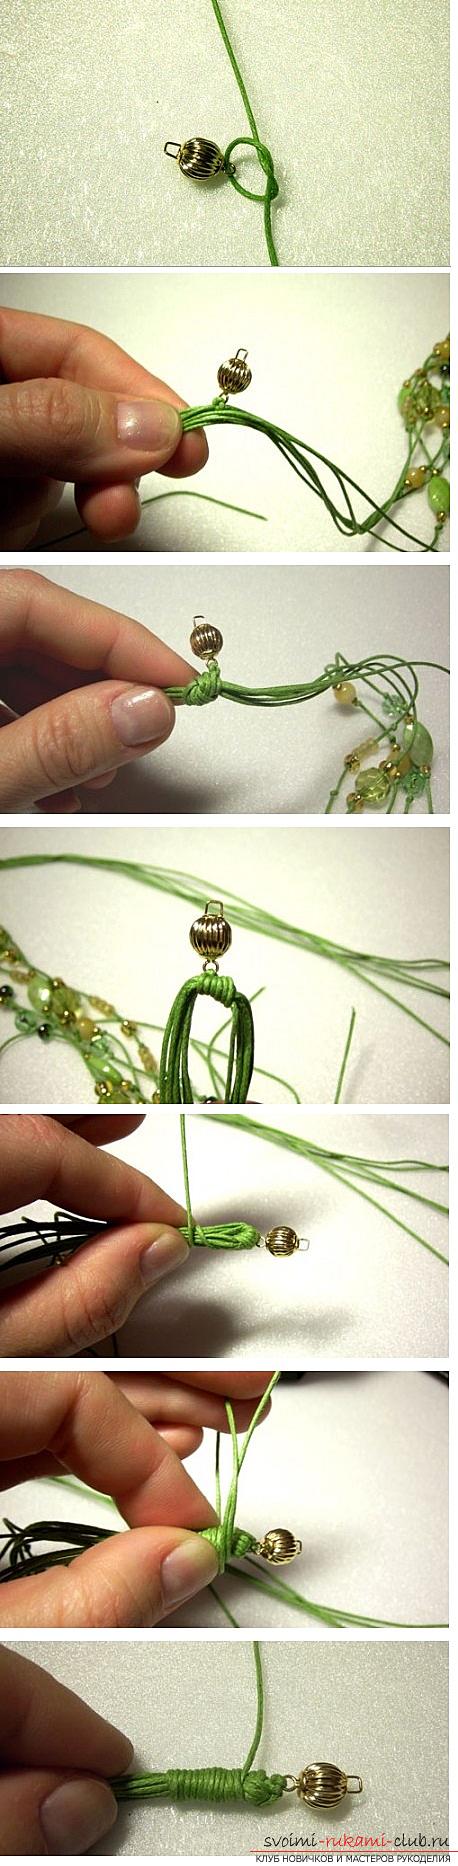 It remains to do similar manipulations with the second part of the clasp and the necklace is ready.
 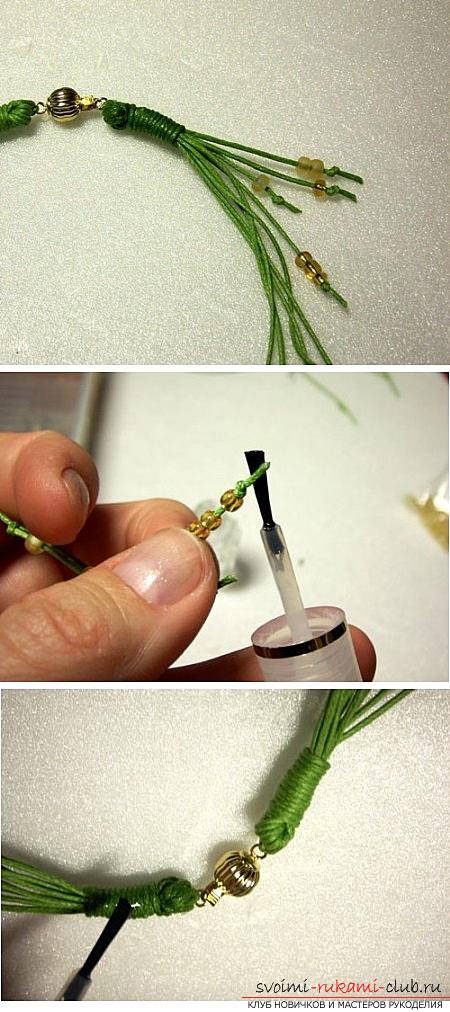 Technician weaving of beads there is enougha lot of. There are complex, for example, ndebele or very simple, such as "cross", which is also called monastic weaving. Even in such a simple technique, you can make a very original decoration. Python beads with monastic weaving
 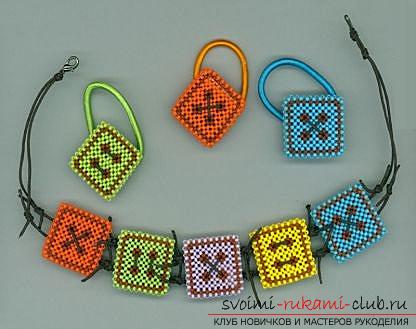 Materials:
- Matte beads (you need bright shades and one contrast, for example, black);
- Waxed lace (thin);
- A line or monofilament.
You will also need the ability to weave a cross. If you are just trying to beadwork, then below is a detailed scheme and description. The work is done in two strands, i.e. You string 1 bead and place it on the center of a line or line. Now it is necessary to string 1 bead on both ends. String another, fourth bead on one of the tails and pass the second end towards the first. Tighten the ends of the line and we get a cross from four beads. Again, thread on both ends of the line with one bead and cross the ends of the line in the next, as before, passing them towards each other. The diagram shows how and in what order the beads of different colors should be located. 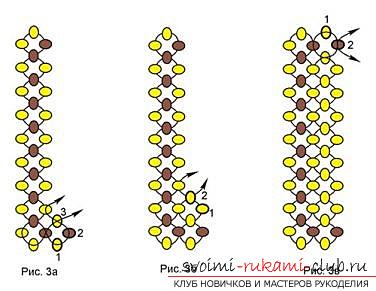 When you do this tightly, you will needfold it in half, and you will have a three-dimensional button. For the connection it is necessary to weave another row of beads. In the figure they are outlined and the line is shown in red.
  When you have a few paging keys readyYou can weave a beautiful and original necklace using a waxed cord. It should simply be threaded into the holes parallel or crossed. We bind the workpieces together with ordinary knots. To short segments from both edges we tie a lace more authentic. The necklace from the buttons is ready. Also, such an article can be used as an ornament for hair clips or hair bands. Make an amusing brooch or apply as a real button. Three-dimensional bracelet from a beaded grid
 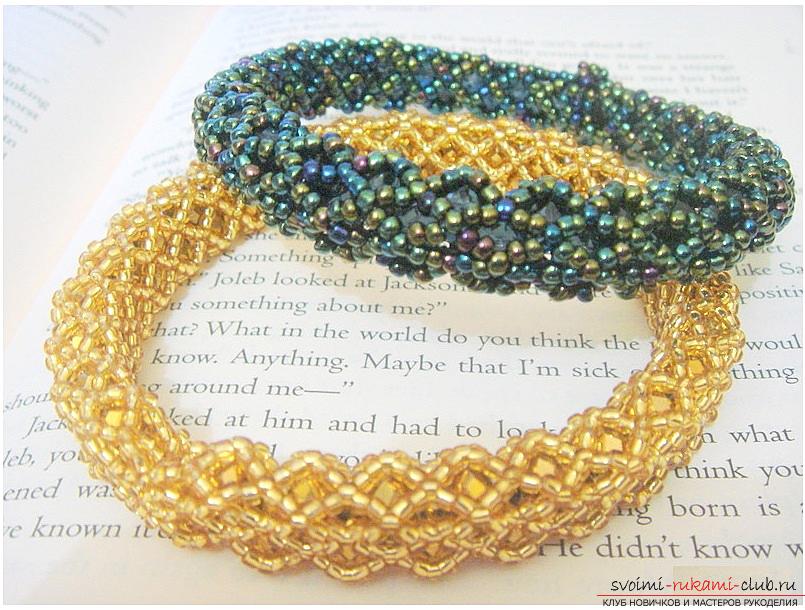 Another simple technique of weaving isbeaded mesh. Simple schemes and the principle of operation allow you to make cells of different sizes, which will allow you to create even more options for jewelry. It will take:
- Beads 11/0 (the "petrol" effect will look very nice);
- Bicones 4 mm;
- Monofilament or fishing line.
Below is a diagram with notations and step-by-stepphoto work. Need to dial the beads on the low. The bracelet will be braided in width, so we determine the length immediately, given that the product will be voluminous. It will take approximately 150 beads. For convenience, you can make a bead-stop. It will keep all the low on the line. In the diagram it is shown in green. The scheme is approximate, so carefully look at the step-by-step photos. The work will take place in one thread. The first row is the initial low of the beads. Counting from the free end of low 5 beads and pass the line in the sixth. Tighten and get an eyelet. This is the beginning of the second row and we will continue to get cells. String on the line five beads and count on the first low five pieces, go to the sixth, again bottom 5 beads and count 5 more at the first low and pass the line to the sixth bead. The plait in this way to the end, leaving 9 beads (given the bead-stop) free. Now string 8 beads and pass the line in the middle (3 of five) bead of those that we dug the second row. String another 5 beads and again we pass into the middle bead of the next half of the cell. 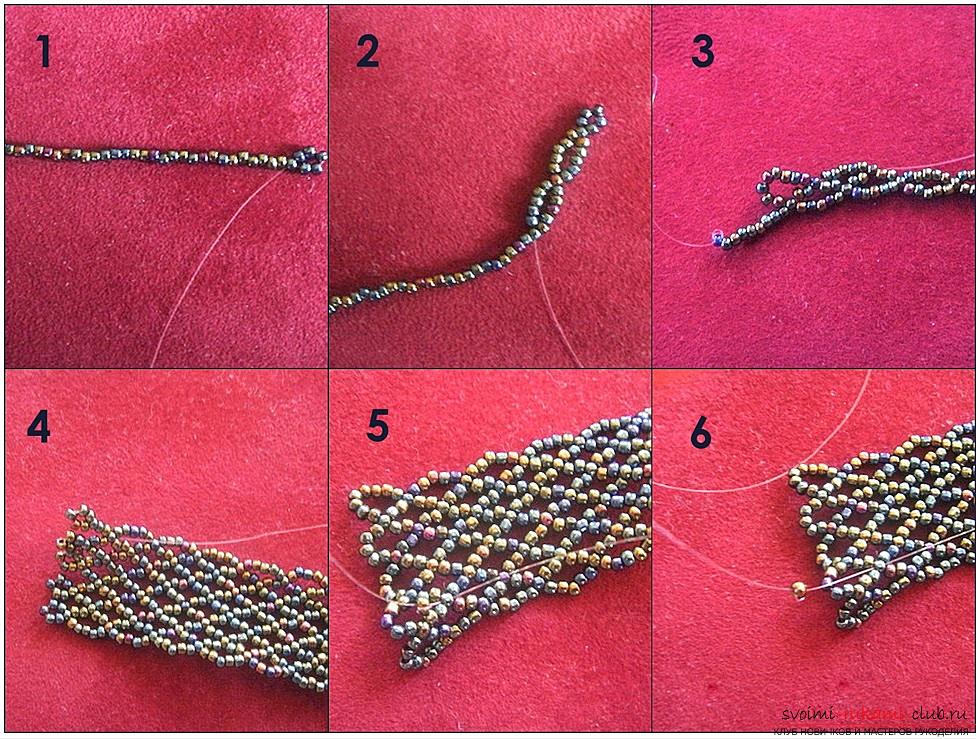 The plait is similar to the 9th row of the grid. Now we will weave the bicones to make the bracelet tight and do not lose shape when we assemble it. The photo shows in detail how and where to attach beads. Two rows will be enough. The arrows show how to fix the edges of the bracelet so that it takes the form of a tube with bicones inside.
 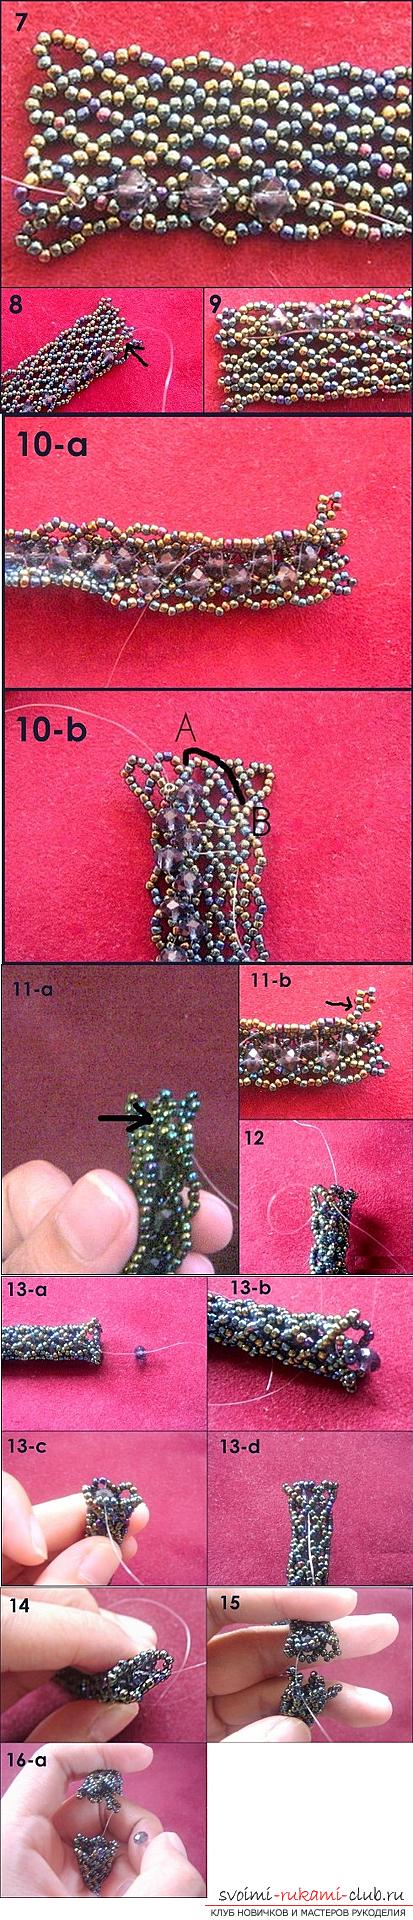 No less charming can be a necklace inthe same technique. The grid here will go for expansion, and the weaving is a bit different, but the principle is preserved. Therefore, if you coped with the bracelet, then the necklace will not be difficult. Necklace and bracelet
 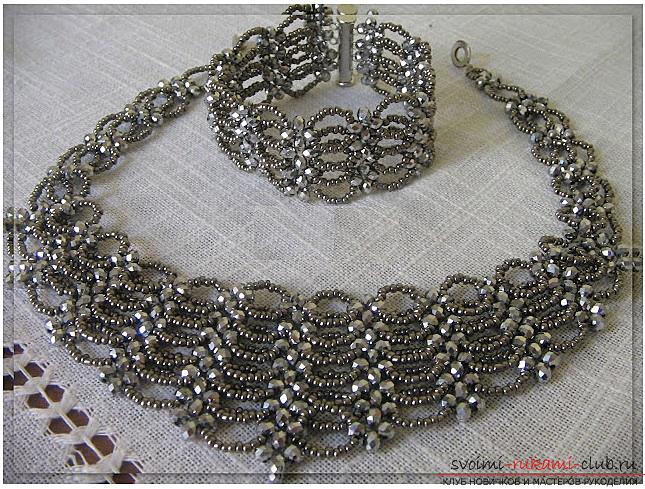 Very beautiful bracelet and necklace of beads andfaceted beads in a silvery range will suit almost anyone along, both together and separately. We can weave these elegant things so easily that even beginners will cope with it. It will take:
- Beads 10/0;
- Faceted beads in tone beads;
- Line or thread;
- Two needles for beads.
The work will go in two strands. We sew 3 beads for a length of a line of convenient length. We shift them to the middle of the line and put one more bead on one end. Now take the second end and pass through the fourth bead in the opposite direction, towards the first end of the line. The result was a cross. Now on both ends of the line we string 10 beads and cross the ends in a faceted bead on one of the tails of a fishing line. We now put 1 bead at each end and cross the line in the next. We have on the line now two crosses from faceted beads and beads between them. 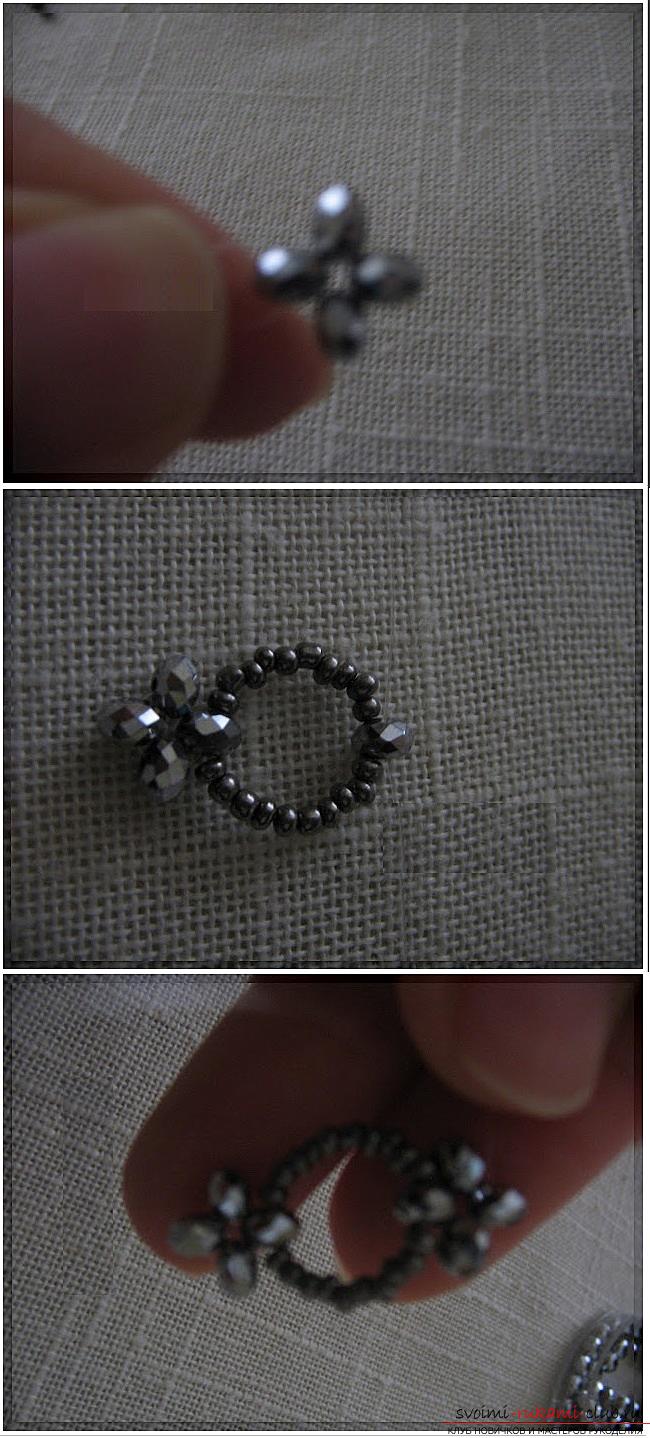 Now again we string 10 beads and tattoosFollow the instructions until the work reaches the desired length. Now we will weave the second row. We take a new piece of fishing line and go through the side bead of the very first cross, string another two beads on this line (the first row bead is located to the left of the work) and cross the ends in the third bead. We got a cross, one of the side beads of which is a side bead of the cross of the first row (see photo). On both ends of the line we string again on ten beads and cross them in a bead, which is worn next to one of the tails. Now again we pass the left end of the line through the side bead of the first row. At the second end we string 1 bead and cross the tails of the line in the next beaded bead.
 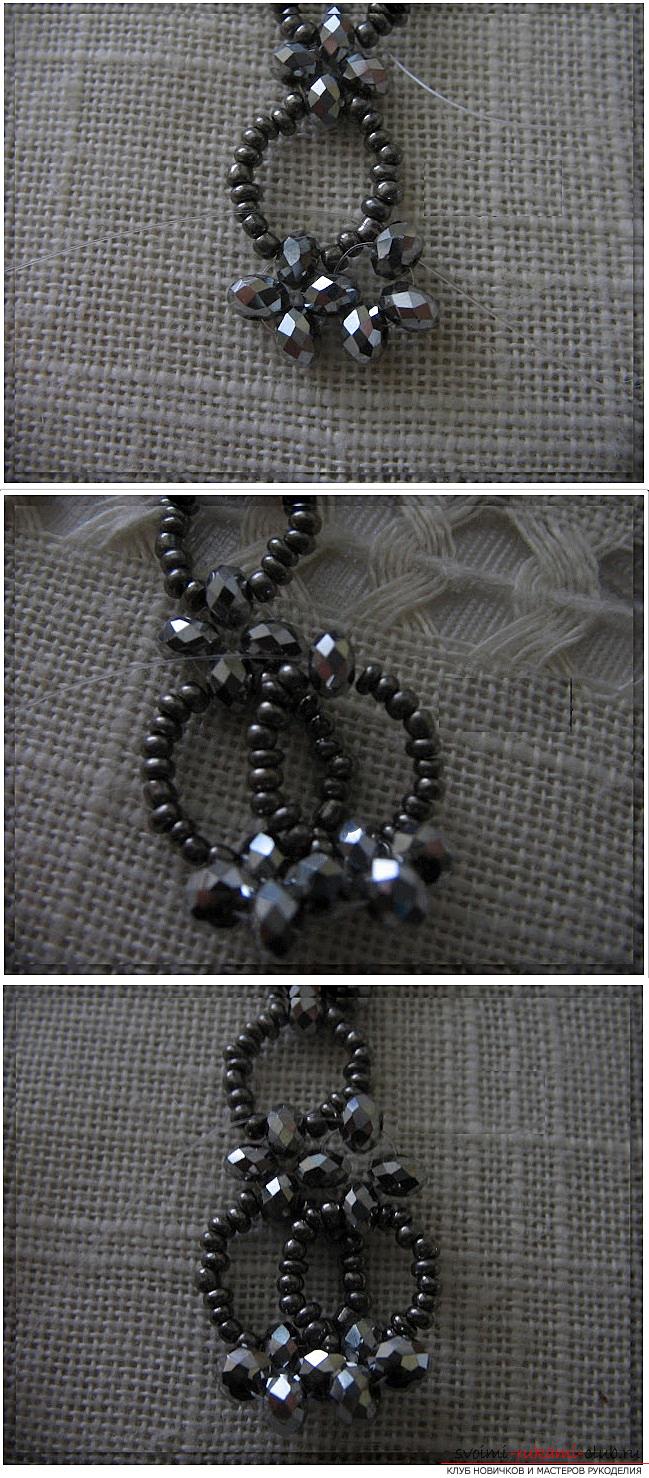 Repeat the procedure as much as possibleis necessary. The cross from the beads always ends the row. You can attach a clasp to it, and we will get an original bracelet or necklace, depending on the length. Very beautiful beaded bracelet and beads.
 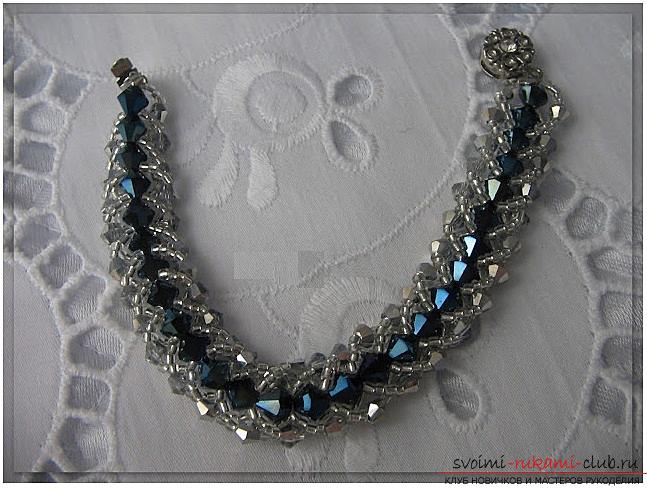 Materials:
- A thin wire;
- Beads 6 mm blue with a large hole and 4 mm silvery;
- Silver beads;
- Line or thread;
- Clasp for bracelet;
- Pliers.
For the basis of the bracelet you will need a wire. One of its ends is fixed on the first part of the fastener. Now string the blue beads. The length will be low depending on the circumference of your wrist. When this task is solved, fix the second end of the wire to the second part of the fastener. We have a base for weaving. We take a convenient line for cutting a line and fix it on one end low with beads. We pass through the first two and thread on the line four beads, one silver bead and four more beads. We take the line and go through these two beads again (see photo). The line leaves in the same place before the third blue bead. Again, the bottom beads and silvery beads and again we pass through these two blue beads so that the line again appeared before the third blue bead. It turned out two semirings on both sides of the low of the blue beads. 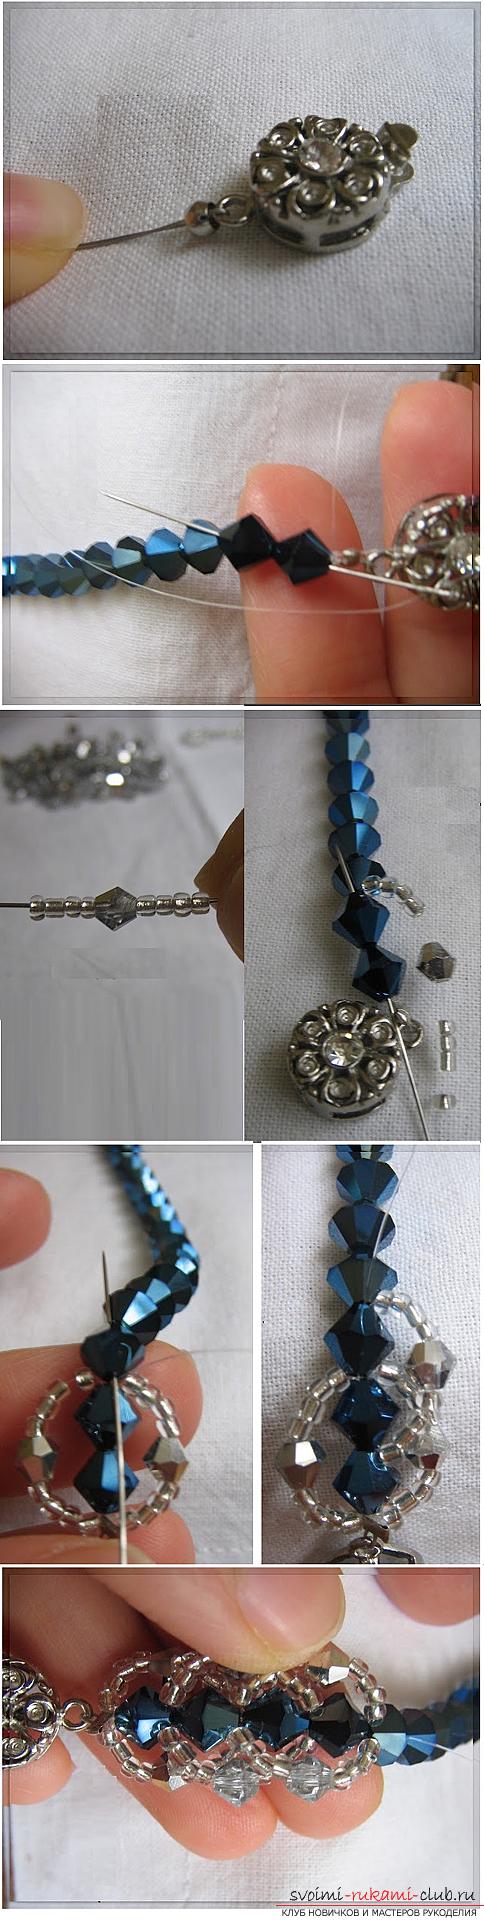 Now we pass the fishing line through the third blue bead. We string four silver beads, one silver bead and again four silver beads. We pass through two blue beads in a line similar to the previous ones. The line again appears now before the fourth blue bead. Again, the bottom of the beads and bead and pass the line, taking it out before the fourth blue bead. Two more semirings were obtained, which are partially superimposed on the first. The shamrock is in this order further. Bracelet from square segments with pearls
  Materials:
- Pearls 6 mm white and green, 4 mm golden and 3 mm golden;
- Bicones 4 mm transparent green;
- The beads are 11/0 golden;
- Line or thread;
- Clasp.
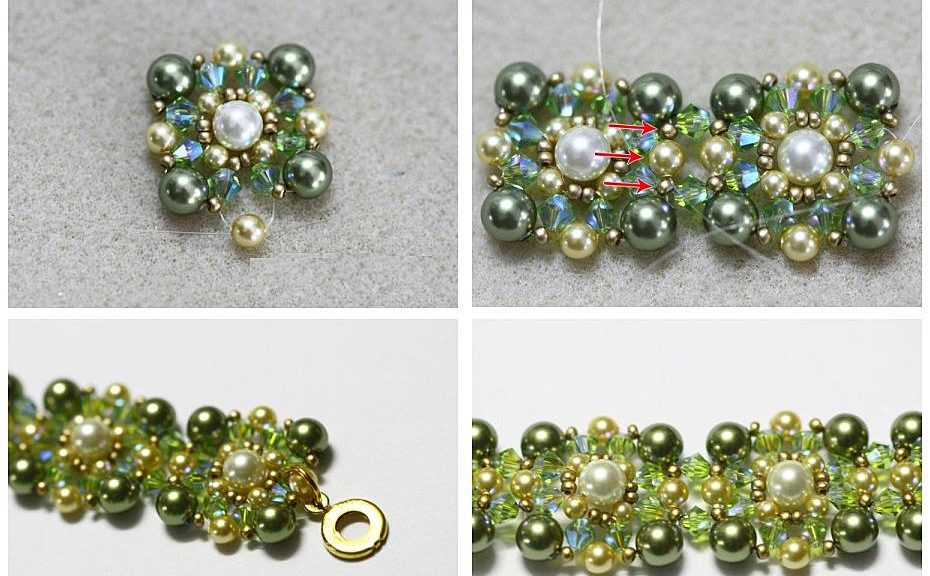
We will work on a piece of fishing line about 80 cm inlength. You need to thread on the line two beads, one golden bead 3 mm and again two beads. The work will take place in two strings, so we shift our low to the center of the line and cross the tails of the line in a large white pearl. The next step is to thread two beads at both ends and cross them in a golden pearl of 3 mm. Now skip the ends of the line through a pair of beads. The left end through the left, right - through the right. String on the tails of 1 golden pearl 3 mm and again pass through the next pair of beads. We got a kind of square with angular golden pearls. Both ends of the line exit, crossing from one golden bead 3 mm. We stringed it first. Now one end of the line (the upper one) is strung one bicon. At the bottom end, we sew one bicones, one bead, one green pearl and another bead and cross the ends of the line in the upper end bicon. In the photo it is indicated by a red arrow. Now, on the left tail of the line, we put on a golden pearl 4 mm, and the right one is threaded into two nearest beads. Both ends are crossed in the biconia that is next to it. In the photo it is indicated by a blue arrow. At the left end of the line we string one bead, one green pearl, again one bead. The right end of the line is passed through the nearest golden pearl 3 mm. Cross the ends again in the bicones. 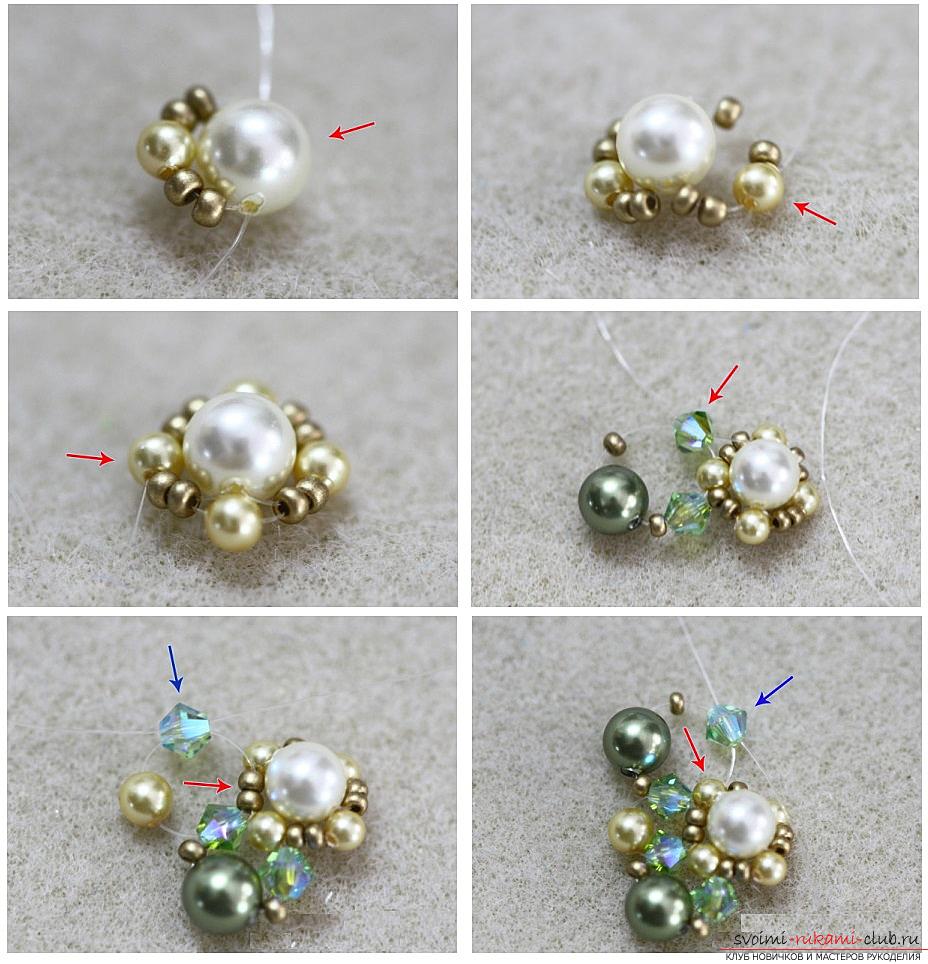 Repeat the steps described above until we get 4 green pearls in the corners of the square. The last in the low is a golden pearl 4 mm.
 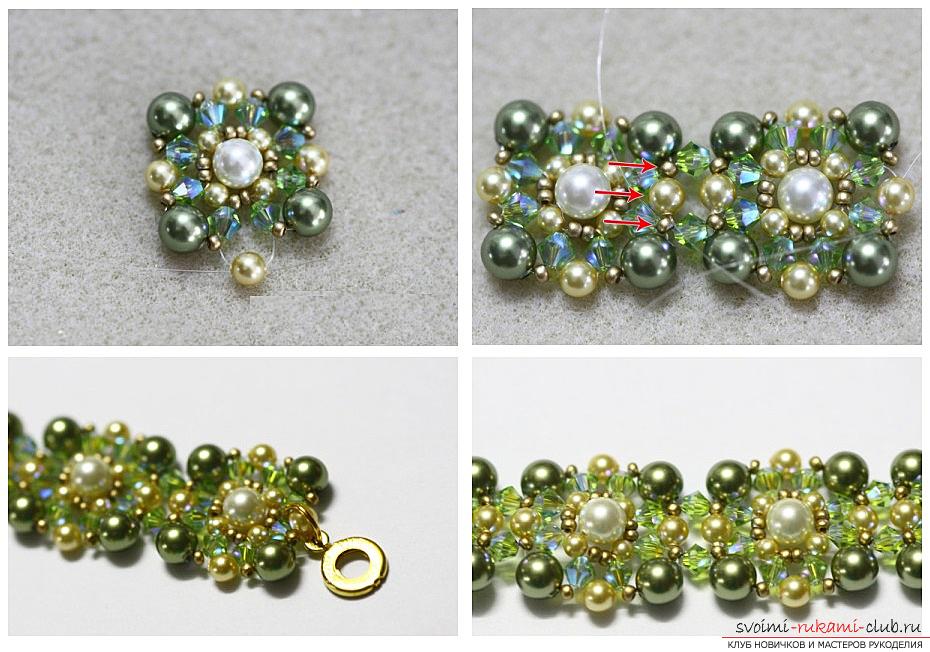 The number of squares will depend on the circumference of your hand. The way to connect the squares in the bracelet is shown in the photo.
Comments
Related posts:
 Detailed step-by-step photos and description of weaving of bead trees, two master classes.
 How to weave from beads and wire a New Year's, snow-covered or decorated Christmas tree with our own hands, step-by-step photos and a detailed description
 How to create a tourniquet from a bead, various techniques of weaving and knitting of plaits, step-by-step photos and a detailed description of the work
 How to weave flowers of poppies, photo and description of weaving a bouquet of poppies
 How to weave lilac from beads, free detailed scheme and description, photo of the finished product