How to weave sakura from beads, detailed master classes with step-by-step photos and descriptions.
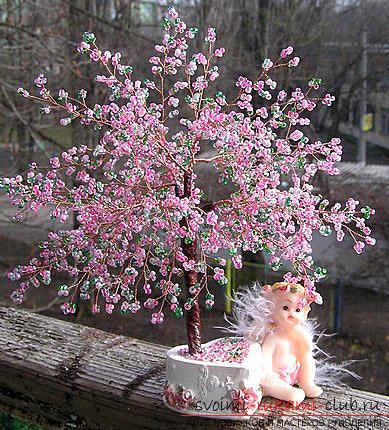
One of the symbols of Japan is sakura. These ornamental trees belong to one of the cherry species of fine-grained. Blossoms this tree in spring for 3 - 5 days. This time in Japan is considered an official holiday of Hanami - it is an ancient custom of admiring flowers, literally meaning "viewing flowers". These days, many people with families and friends come to special parks, bring food and drinks and behold beautiful flowering trees. An ancient Japanese legend says that admiring cherry blossoms can prolong life to 100 years. Therefore, it is very cool that you can create a beautiful miniature cherry blossom with your own hands from beads. It will be not only a wonderful hobby and a gift close, admiring this delicate and beautiful piece of interior decor, you can find out how true the legend is. Below are a few detailed master classes with step-by-step photos. Trees from beads can be created in several ways. In some, the formation of the trunk occurs by twisting twigs, in others the twigs are fastened to a previously created stem. The first beaded cherry blossom.  Required:
- 250 g of beads of pink color;
- 50 g of green beads;
- Thick and thin wire;
- Foil;
- PVA glue;
- Paints, acrylic;
- Gypsum;
- Capacity of a beautiful shape for the stand;
- Paper napkins;
- Pliers and pliers.
Trunk and podstavochka-base. To create a stem, take a thick wire. Cut the pieces into the number of future branches (in this master class of 9 branches) about 50 cm each (the length will depend on how large you want to make cherry). From one side measure about 6 cm and twist a little higher (this will be the roots that are completely in the stand). 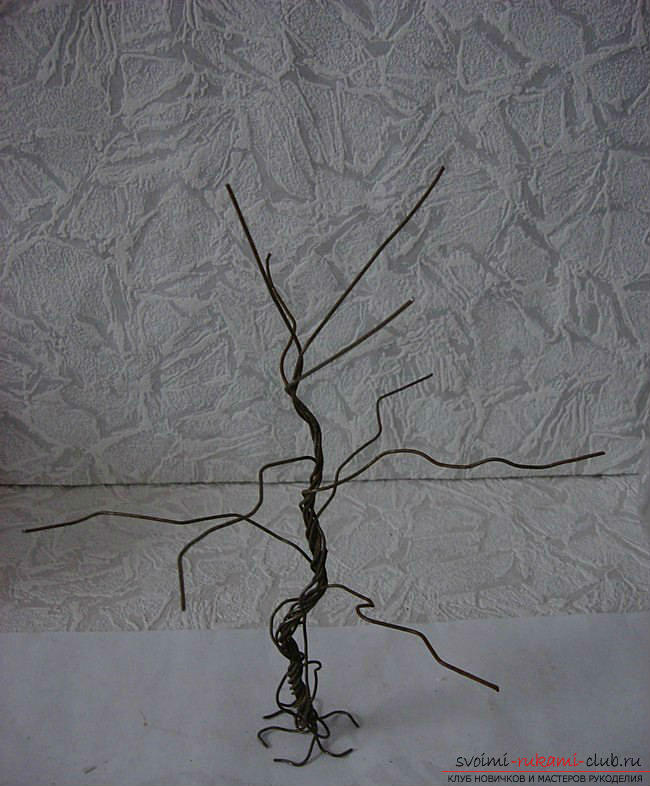 Select 3 wires and twist them around the trunkseveral times, tightly pressing the rest of the bundle of wire segments. After winding several centimeters up, leave one wire (the lower branch). The two remaining ones to wrap the future trunk for another couple see similarly do with the rest of the wires, wrapping first 3, then 2, and then one. With the help of wire cutters make branches of different lengths, forming the crown.
 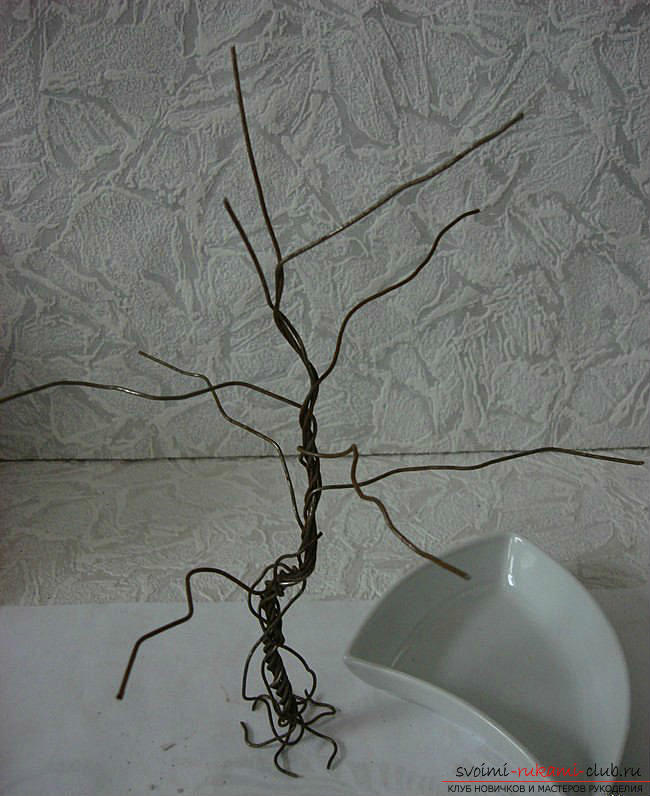 Capacity to cover with foil, stir gypsum withwater, put the barrel in a container and pour it with gypsum. Make a support for the trunk until the gypsum has completely solidified. On the lower part of the trunk also apply plaster to render the relief.
  After drying, paint the podstavochku and trunk with paint.
  Stick green beads very tightly on the podstavochku.
 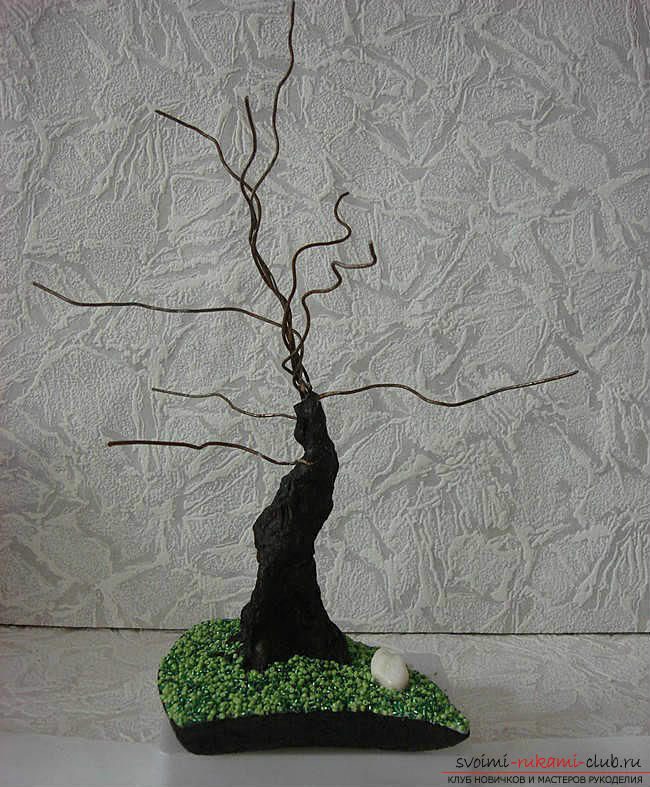 For pieces of fine wire, thread beads of pink hue so that one edge remains free.
 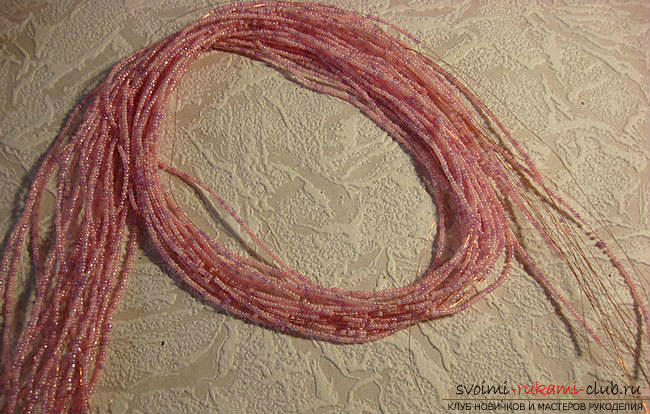 Measure 10 cm of the empty edge of the wire, count 10 pieces. beads. Screw them into the loop and make 4 - 6 wire turns. It turned out a leaf with a leg.
 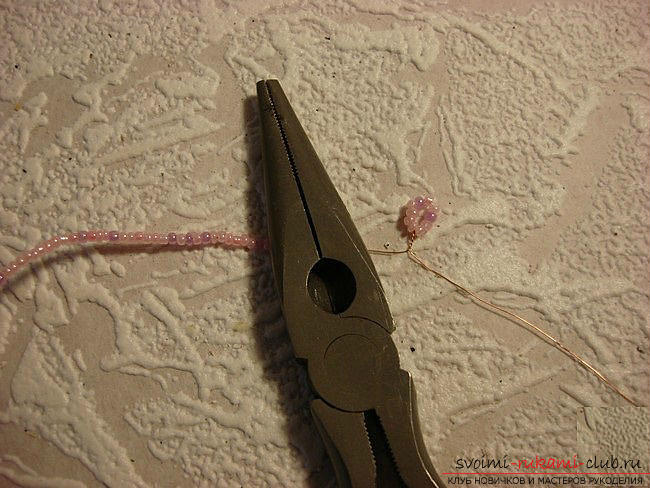 Step back from this leaf 1,5 - 2 cm, count 10 more beads and make another loop. Make 5 of these leaflets.
 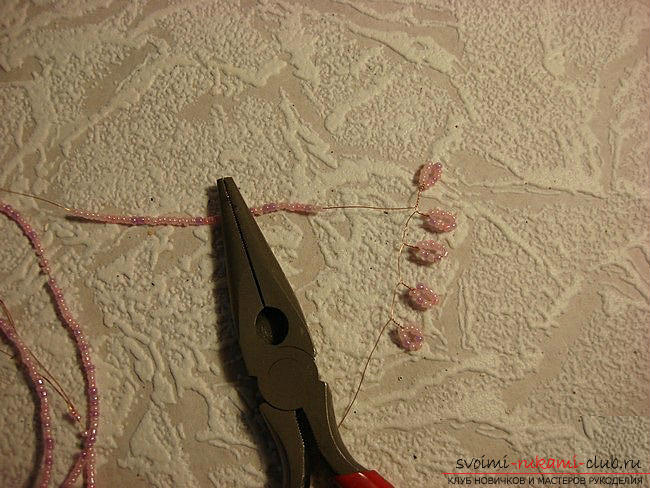 Now you need to make a turn and executeLeaflets on the second side of the branchlets. Having twisted the 6th leaf (the first on the second side of the branch), it is necessary to twist the wire between the sheets. So it turns out a twig.
  The second side is symmetrical. On the twisting, measure another 10 cm of wire and cut the tails.
 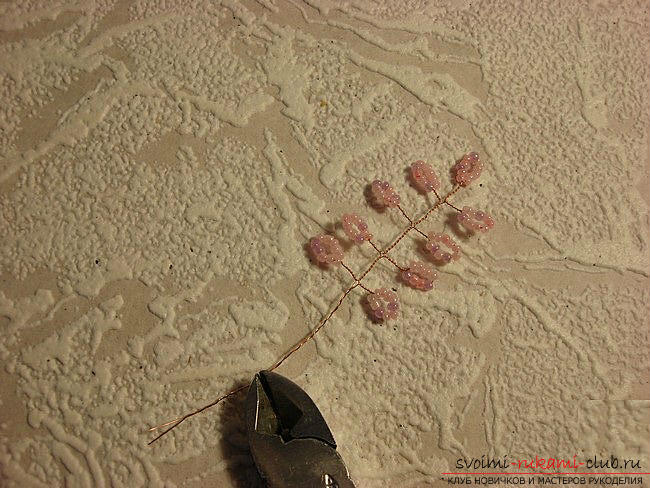 On one branch, 9 leaflets were produced. Required 70 pcs. such twigs.
 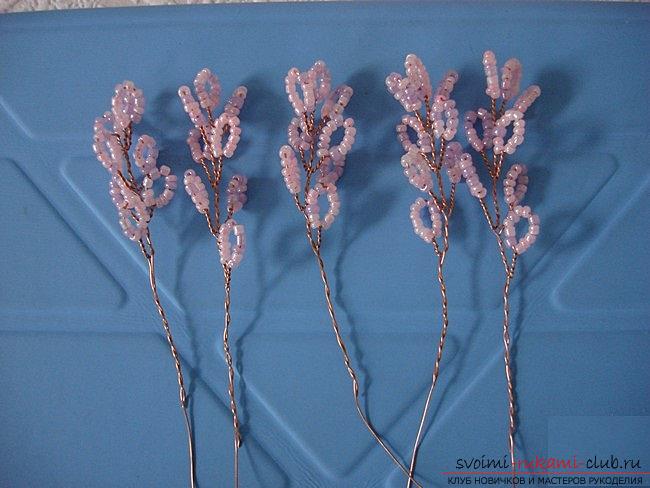 Take 5 of these twigs and twist them into 1 branch. The leaves look up.
 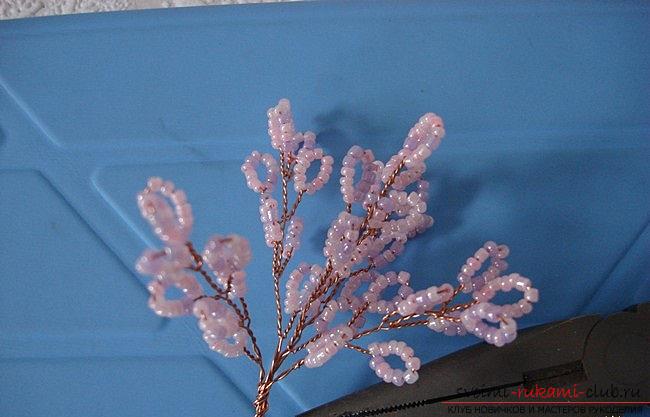 Using a piece of fine wire, thread this fluffy twig on the upper branch of the trunk.
 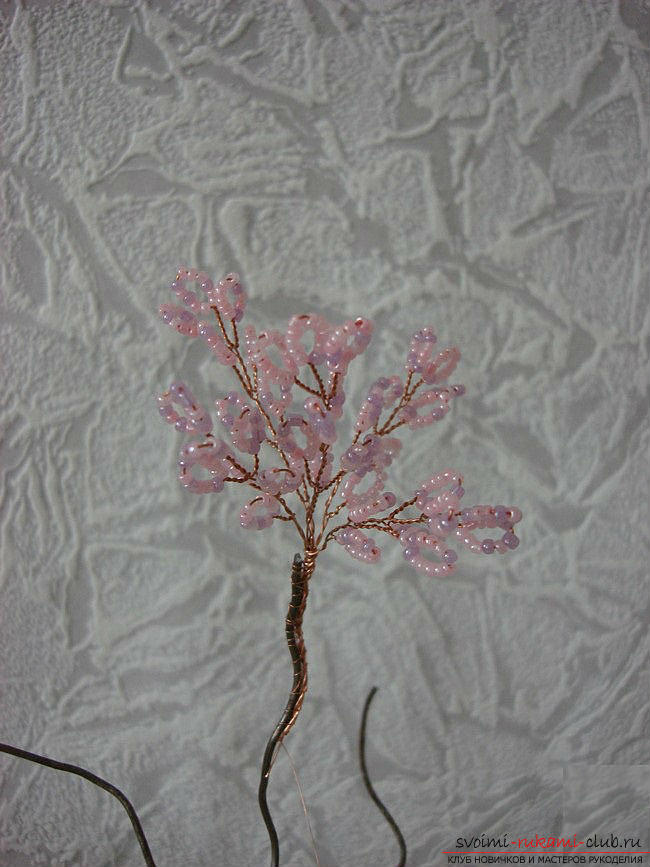 Take 3 more twigs from 9 loops and twist them into one. It will take 6 such half-puffy branches.
 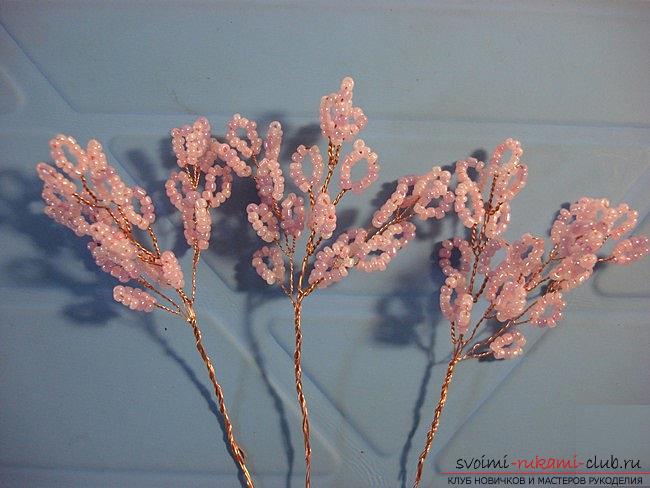 Measure from the top about 2 cm and attach 3 twigs, a couple of centimeters down, attach 3 more twigs. The top of the cherry blossom is ready.
 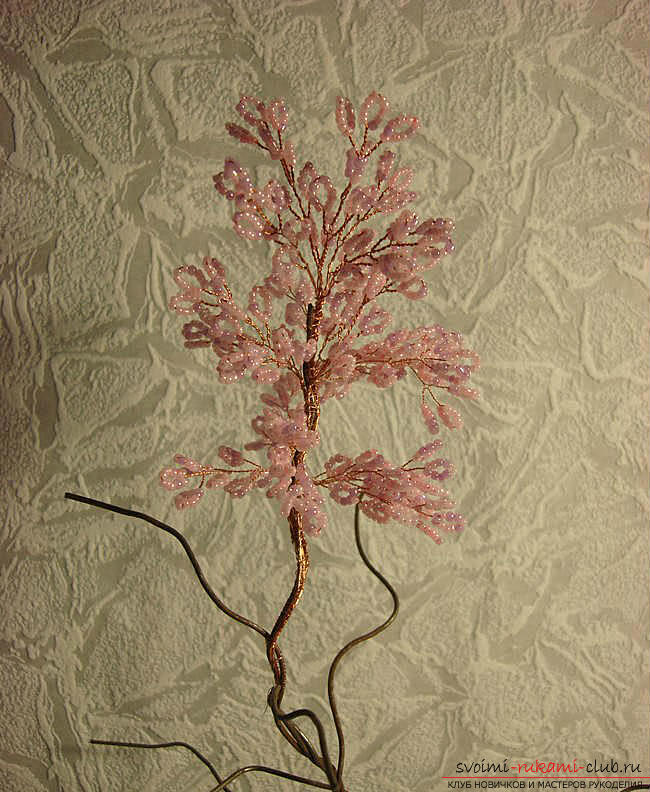 Form 8 more half-bush branches (from 3 branches with 9 loops). Attach to the end of each branch.
 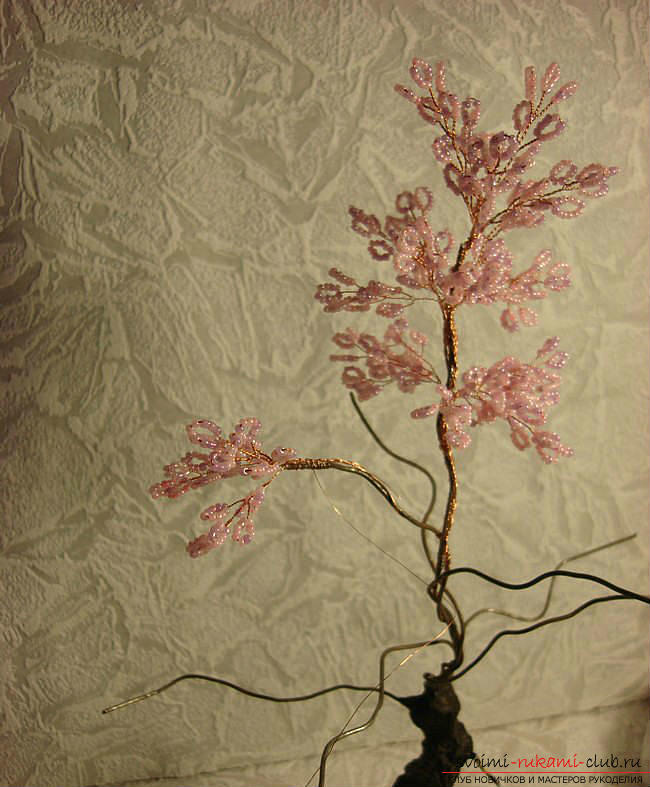 It is necessary to make 90 pieces, consisting of 13 loops.
 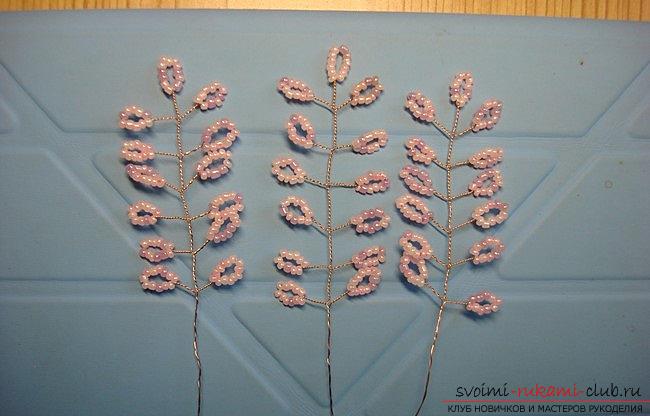 Connect 3 of these blanks into one.
 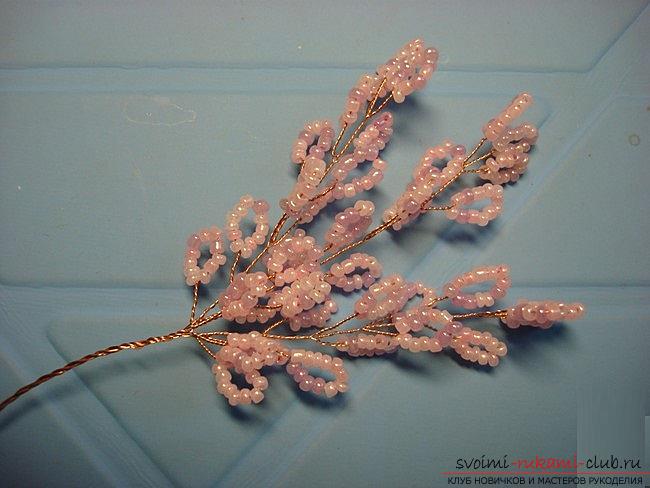 It will take 4 such branches. To retreat from the end of the branch (it already has a half-fluffy twig attached to it) 2 cm and fasten 2 fluffy branches, then retreat from this fastener a couple more centimeters and attach 2 more long long branches.
  Similarly, form two more upper branches.
 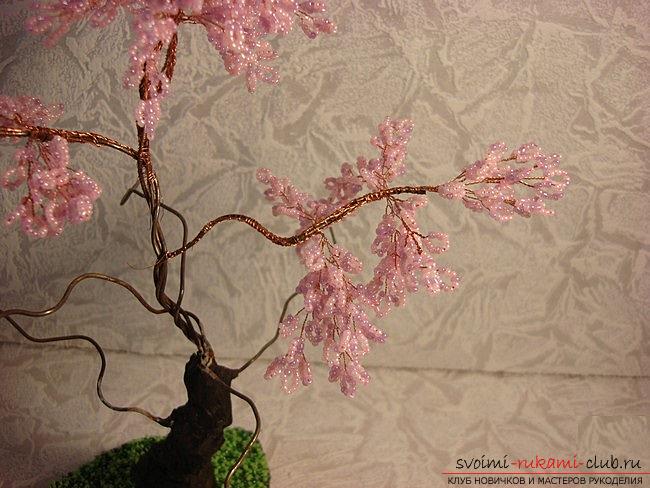 For the lower tier of branches (for each branch)6 long and three-dimensional branches are required. At the ends are already attached half-fluffy branches. Retreat from the attachment of a couple of centimeters, attach two long branches, then again retreat a couple of inches and attach the two following branches, and again retreat two inches and attach the two branches.
 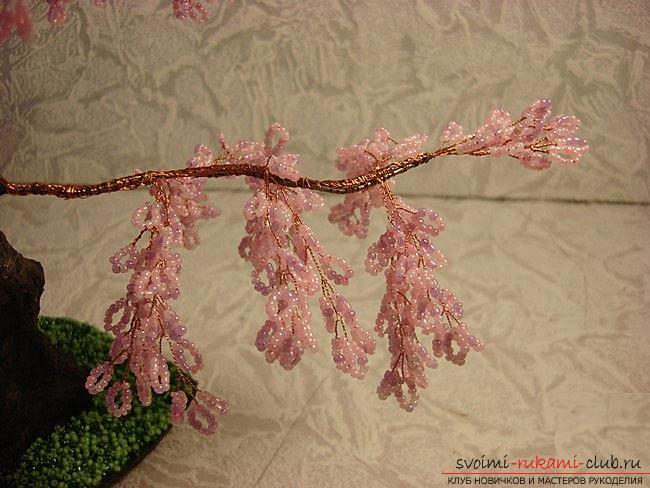 Cut the paper napkins in thin strips and tightly wrap them all the branches. Start at the end. First wind the side branches.
 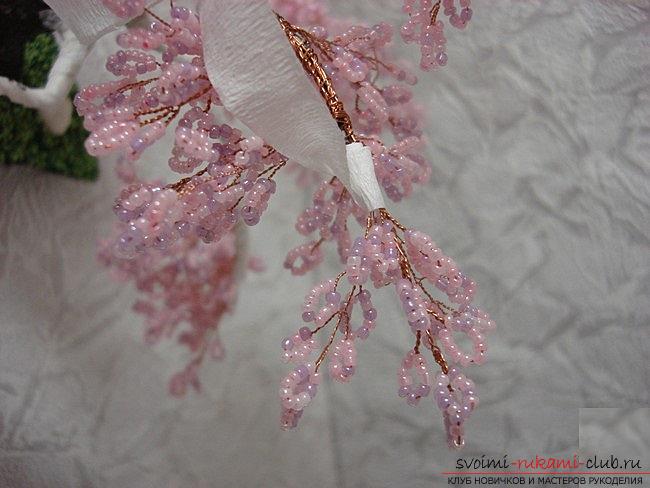 Then wrap the stem, starting from the top.
 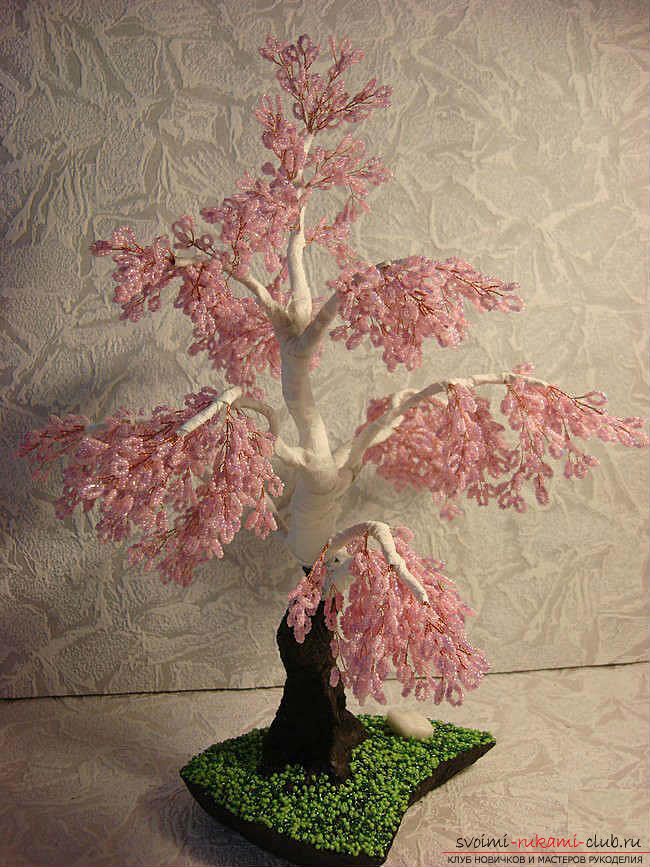 Paint, which has been painted base, mix with water and glue PVA in a proportion of 1: 1: 1. Stain the trunk and twigs wrapped around paper napkins.
 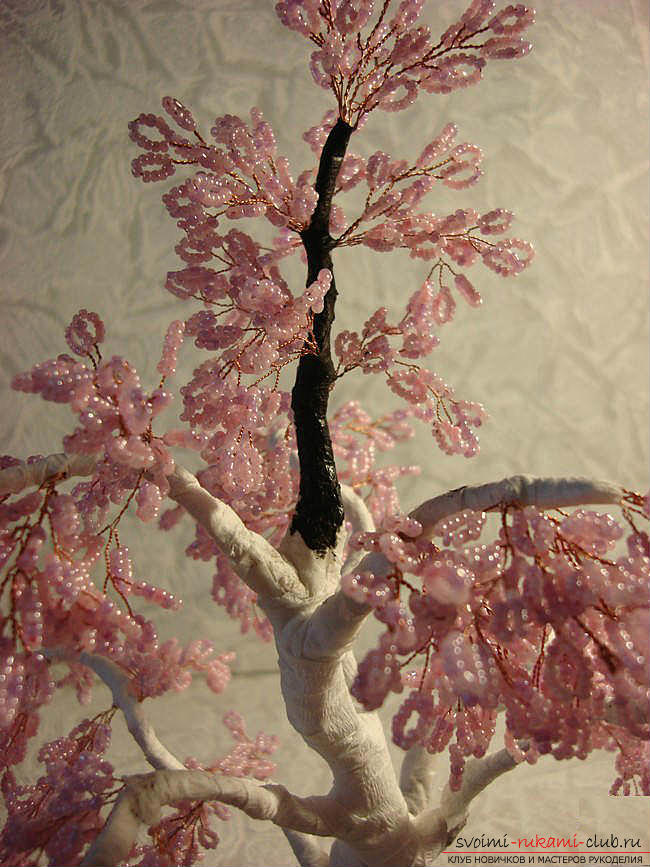 After drying, straighten the branches and the cherry blossom is ready. You can contemplate it and extend your life to a hundred years.
 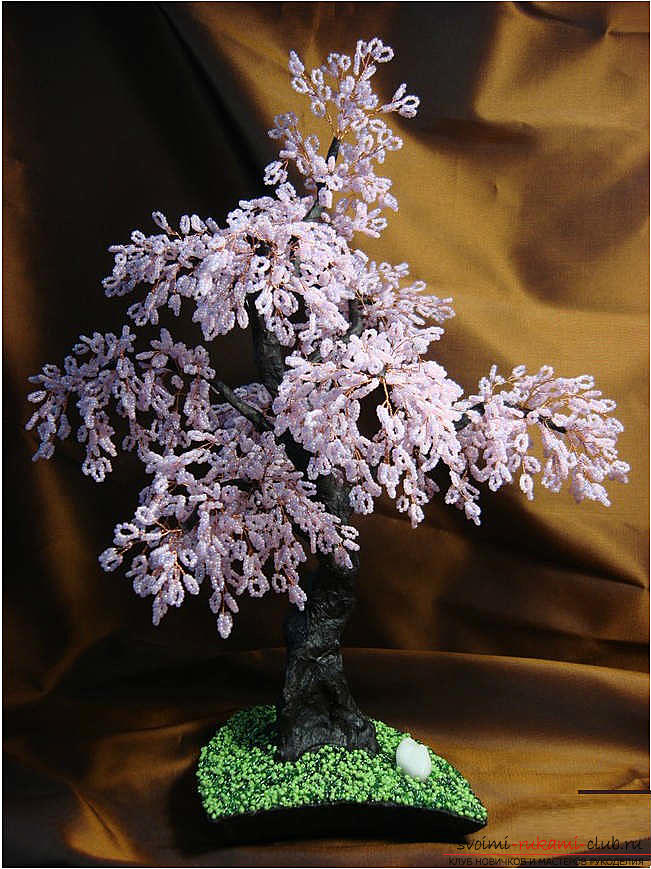 You can try to weave just a branch of cherry blossoms.
 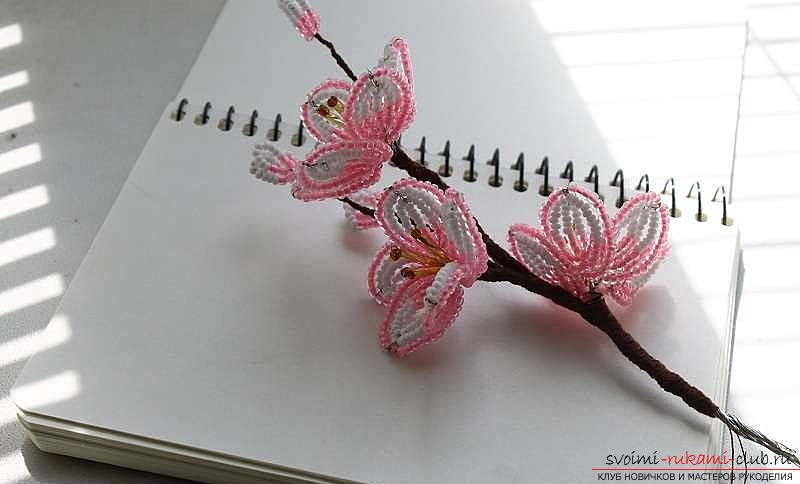 Required:
- Light pink and white beads (petals);
- A golden glass bead and chocolate shades (smaller, stamens);
- Wire;
- Nippers;
- Brown thread for winding.
Petal. Cut 2 pieces of wire (one is shorter, one is longer). A short section is the axis. Twist 2 segments into 2 - 3 cm for a short piece of wire strung 3 pink and 5 white beads. On a long piece of string on a pair of white beads more. A long piece of twist around a short one. Form a symmetrical arc on the second side of the future petal. 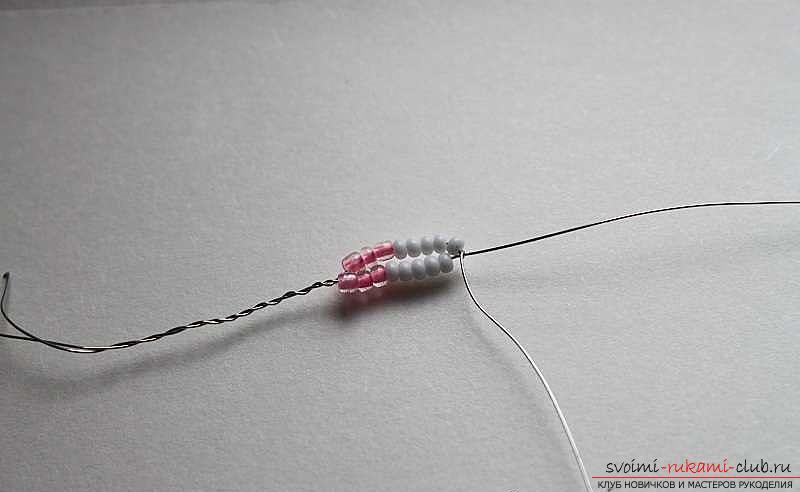
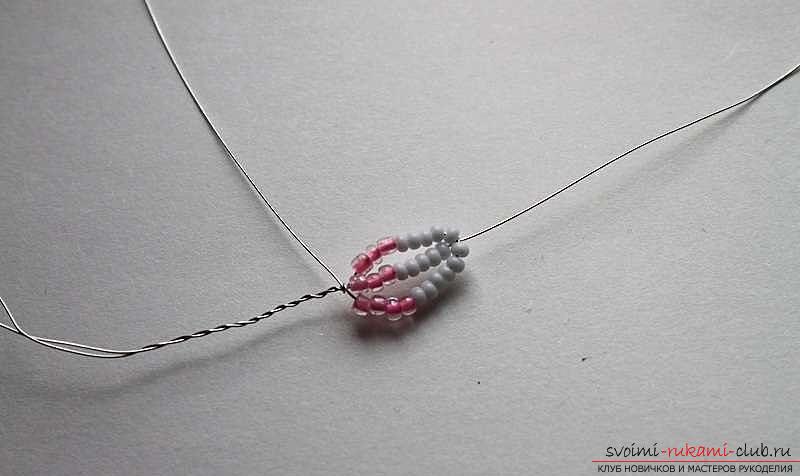 Make 2 more arcs on each side, eachonce adding 2 to 3 beads. The last pair of arcs to make only pink. Tighten the ends of the wire and make the petals a little cup-like (so that a trip to the real petal).
 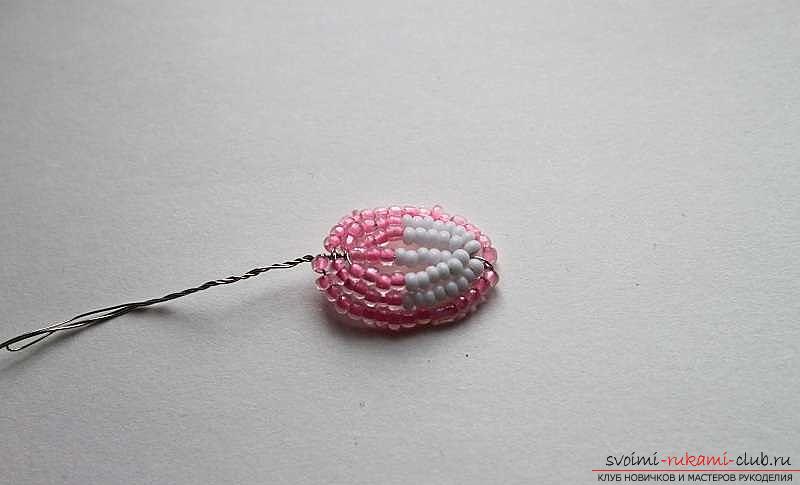 For each flower, 5petals. For stamens, you need to thread 1 brown bead. And then pass both ends of the wire in 1 pc. golden bugles. It can be replaced by a few pieces of small golden beads. For each flower, you need 3 such stamens. Connect three stamens and five petals into one flower. The free ends of the wires twist.
 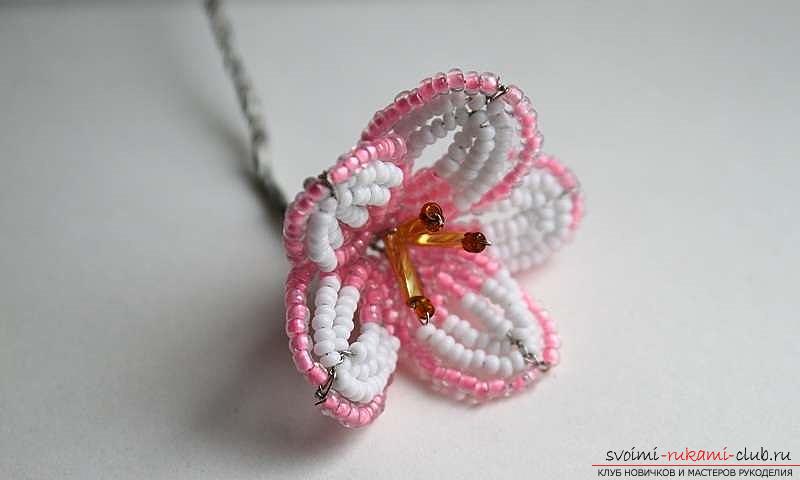 A bud. To create a bud, you need to type in a piece of wire 3 pink, 10 white and 3 pink beads and twist them in a loop, make 2 turns of wire, and make 1 more such a loop, 2 more turns and another 1 beaded loop. Twist the eyebrows together. They must be pointed upwards.
 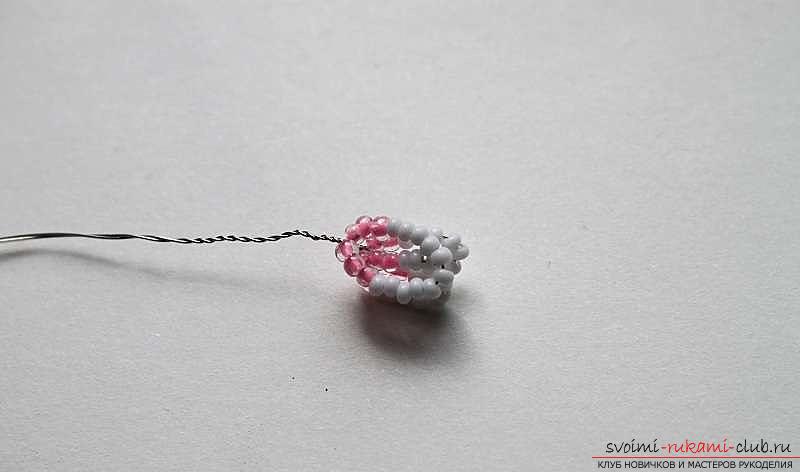 Twist buds with flowers in random order. Carefully wrap the thread with a brown color. She will close the wire and give the twig a more realistic look. Winding must be very tight.
 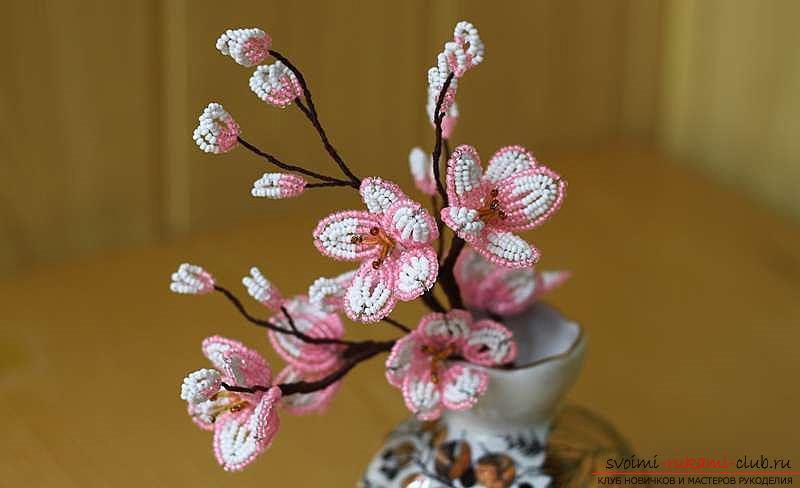 The end of the thread is better fixed with glue, or replacedthread on a special floral tape. Another tree blooming cherry blossom. In this craft the trunk is not created separately, but is formed directly from the branches.
 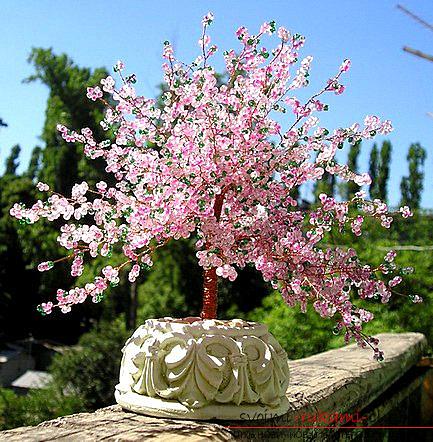 It will take:
- 50 g of beads of two shades of pink;
- 15 g of green beads;
- Wire;
- Threads for winding (can be replaced with floristic tape);
- Gypsum (you can use alabaster);
- PVA glue;
- Paint brown;
- Capacity, where sakura will grow.
Branches. Mix in a convenient container of green and 45 g of pink beads. 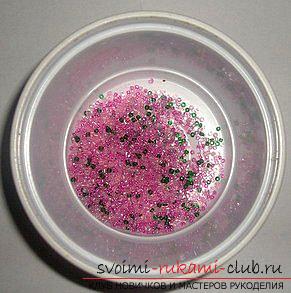 Cut a piece of wire 75 cm long. Make a mark (loop) at a distance of 15 cm from the edge. String beads. Make loops of 5 beads - leaves with 3 - 4 turns of wire each at a distance of 0.5 - 1 cm from each other.
  After reaching the mark at 15 cm from the edge, fold the workpiece in half and twist it.
 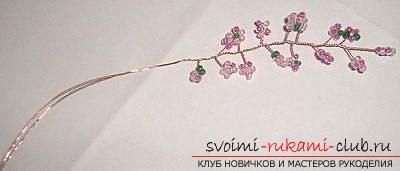 For sakura it is necessary to make 53 such billets of twigs. Twist them for 6 pcs. It will be 9 buns.
 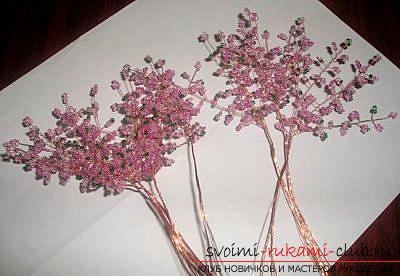 From 3 big buns twist the top.
 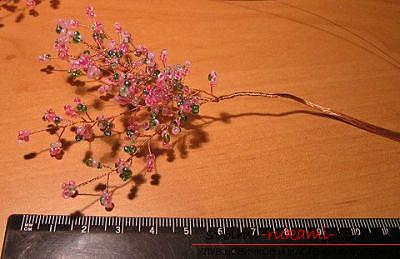 Twist 3 side twigs (2 buns each). Screw side branches to the top one below the other.
  Wind the thread or floristic ribbon twigs and trunk.
  At the end of the tree make a loop of wire. Put the tree in a suitable container and fill it with gypsum. Secure it for stability during hardening of gypsum.
 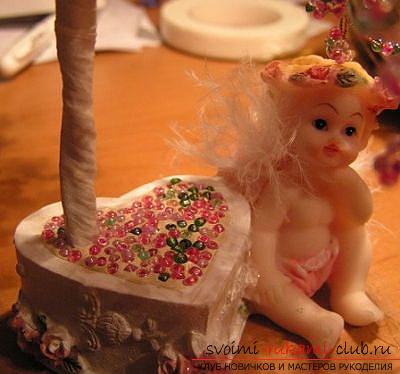 After the gypsum has completely dried uptrunk and twigs brown paint. Gypsum surface is smeared with glue and covered with remains of beads. Spread the twigs, and the cherry blossom is ready to bloom in your house all year round.
Comments
Related posts:
 How to make Kantashi bows with your own hands, detailed master classes with step-by-step photos
 Free master classes with step-by-step photos on weaving earrings from beads.
 Free master classes on modeling crafts from the test with step-by-step photos and job description
 How to weave an orchid of beads, a detailed and step-by-step master class of French axial technique of weaving flowers from beads with a lot of photos and a description of the work
 How to weave white orchid from beads, master class with photo and description.