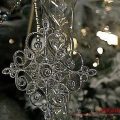
This master class describes in detail the process of crocheting snowflakes, which will be an excellent decoration for the New Year tree.
So the winter came. White woolly snowflakes circling the waltz. In this master class we will learn how to knit a beautiful fishnet snowflake, which you can decorate the house for the New Year. Knit a snowflake is simple and interesting. Changing the colors (white, silver, blue, blue) and the thickness of the thread, you can make a heap of snowflakes. Each time they turn out different, because there are no two identical!  For knitting snowflakes, we only need a thread and a hook. First, we will tie a ring of six loops.
  Then in each loop of the ring we need to tie three posts. The posts will have one cape. For the first group of columns, the initial one is replaced by a chain of three loops.
  Between the groups of columns we will tie three loops together.
  In total, we should have eighteen columns (including the first one, which consists of three air loops) and eighteen loops, divided into six groups.
  Next series we will form the rayssnowflakes. But for the second row, we need to shift the point of the beginning of knitting. Therefore, we will bind one semicolon over each column of the first group. This will allow us to start the second row with arches. Now we connect three loops (the first column of the group) and two more columns with a crochet in the arc from the air loops of the first row.
  We form the ray. To do this, we connect a chain of 14 loops.
  Their seven extreme loops form a ringlet at the tip of the future ray. For this purpose we will fasten a simple column in the seventh from a hook a loop.
  And we'll link 7 more loops. We obtain a ring in the center of the chain from the loops.
  Finish form the ray. To do this, in the same three loops of the first row, we will link three more columns with one crochet.
  In the next three loops we'll make three columns with a single crochet again.
  And we'll tie the remaining five rays of the snowflake.
  Now we will give the azhura to our rays. To do this, we continue knitting with simple bars. We tie a column over each column. And go to the rays. We make 7 bells in the main part of the ray.
  We will type 4 loops.
  Tie in the main part of the ray three more bars.
  The fourth column we tie into a column, forming the tip-eye of the ray.
  In the loop at the top we will link two bars.
  We make a loop of 4 air loops. We will connect the two bars again.
  In total, the top should fit 4 loops and 8 sticks.
  Symmetrically tie the second side of the ray.
  And so five more times.
  The snowflake is ready. It's well worth steaming through gauze or starching. Then it will become hard and can serve as an excellent decoration for the New Year tree.
Comments
Related posts:
 Master class with photo and description will crochet lessons of a small Christmas tree
 Master-class of making by own hands the original New Year tree - Christmas trees from a lace.
According to our master-class crochet, we will tie the mitts and warm collar-scarf crochet.
Master-class of making by own hands the original New Year tree - Christmas trees from a lace.
According to our master-class crochet, we will tie the mitts and warm collar-scarf crochet.
 Master class of quilling of a New Year's snowflake with own hands - a needlework lesson
 The master class will tell in detail about crochet work on an openwork scarf