
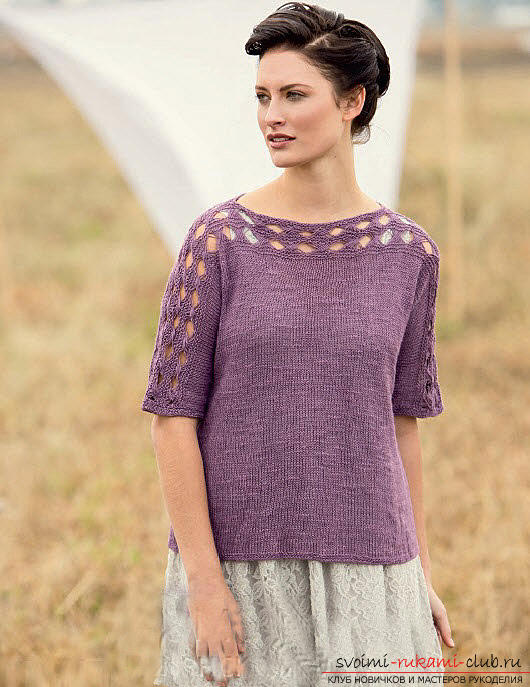
We knit a lightweight summer pullover for a woman with original openwork inserts
Female summer pullover with openwork insertsknitting needles In this article we offer you a model of a fashionable summer pullover for a woman who is decorated on the sides with original openwork inserts. We offer a detailed description of the progress of work for most sizes: 46 (48, 50, 52, 54, 56). The most reliable dimensions of the product you can see in the pattern scheme. 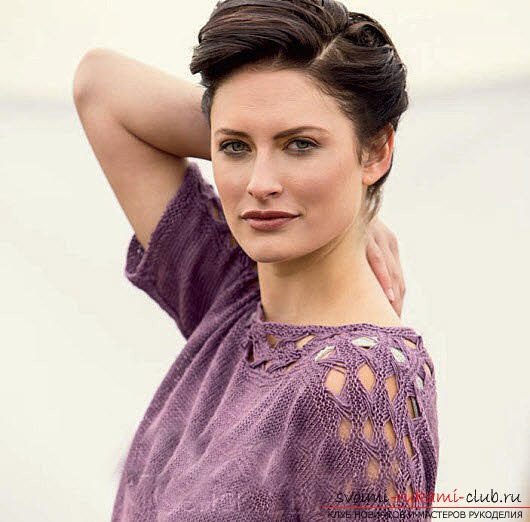 For the manufacture of this pullover, weIt will take six (six, seven, seven, eight, eight) yarn threads; spokes number 4 (circular), the length of which is forty and eighty centimeters, as well as holders for ties and a needle for knitwear. To determine the density of the mating, you need to understand approximately that twenty-one loops in the thirty-one row are equal to ten centimeters of the facial (facial). The product must be manufactured with the help of straight and reverse rows so that it is obtained by a whole cloth, starting from the lower part from the back and to the level of the shoulders and further from the level of the shoulders to the lower part we make the front side. Sleeves are created using a set of additional loops. We knit an openwork pattern, using the downed loops (the number of loops should be a multiple of eight plus two loops).
 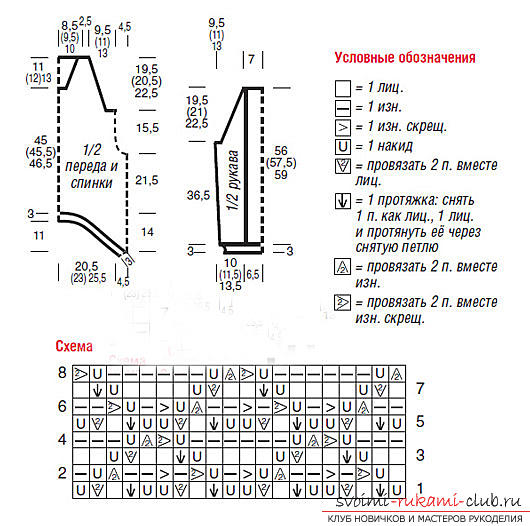 First row (front side): We knit one face loop, make three wraps around the main knitting needle. Then follows the repeating part of the pattern: create one facial, hold four turns of the main thread around the base of the needle. We finish the series by tying one face and three turns of thread about the spoke. The second row (the wrong side): we knit one face loop. Then follows the repeating part of the pattern: we remove eight loops as the backs (the thread is under the needle), we perform a reset of all the loops (eight elongated loops on the right side of the needle), retreat four loops, insert the left spoke into the next four loops, and then insert the loops on the four eyelets of the beginning of the row (in this case we do not perform the reset of the four loops from the left knitting needle). Then we transfer four loops from the right knitting needle to the left knitting needle and we sew eight facial loops. We finish the series by tying one face and dropping the turns.
  From the third to the sixth rows we do a face. Then repeat from the first to the sixth row. Manufacturing the back of the product. We take circular knitting needles, the length of which is eighty centimeters, and we sew one hundred and ten (one hundred and eighteen, one hundred and twenty-six, one hundred and thirty-four, one hundred forty-two, one hundred and fifty) loops. In this case, we do not connect them to the ring. Next, make five rows with the help of the pattern "garter stitch" (facial loops in all rows), complete in a row in the wrong side. Then again we continue to work the facial smoothness (knit the facial and purl loops in the corresponding rows). So do until the canvas in height will not be thirty-seven and a half centimeters from the bottom. We finish with the purl series.
  We form the pullover sleeves. The next row (front side): we sew thirty (twenty six, twenty two, eighteen, eighteen, fourteen) loops, then we finish the row with the help of facial loops (total, one hundred and forty, one hundred and forty four, one hundred and forty-eight, one hundred and fifty-two, one hundred sixty, one hundred sixty-four loops). Next line (front side): we sew thirty (twenty-six, twenty-two, eighteen, eighteen, fourteen) loops, then finish the row with the help of the purl loops (total, one hundred and seventy, one hundred and seventy, one hundred and seventy, one hundred and seventy, one hundred and seventy-eight, one hundred and seventy-eight loops).
  Further work is carried out using a facialsmooth until the canvas in height becomes nine (ten, eleven, nine, ten, eleven) centimeters from the base of the additional loops. Finish the front row. Thus, make five rows of the pattern "garter stitch", complete in a row of the wrong side. Then, again we knit in the type from the first to the sixth series, using the "delicate" pattern with the loops (one, one, one, two, two, two). Next, we knit the first and second rows again. Create the neck The next row (front side): we sew sixty-three (sixty-two, sixty-two, sixty, sixty-four, sixty-three) loops, then transfer the next forty-four (forty-six, fifty, fifty-two) loops to the base of the holder for the neck), and then those loops that remained, you need to transfer to the 2 nd holder (for the creation of the left shoulder of the product). Create the right shoulder of the product. The next row (the wrong side): we knit the eyelets. The next row (front side): we knit the face tabs and do the transfer of these loops to the holder (thus the thread does not need to be cut off). Create the left shoulder of the product. We carry the transfer of sixty-three (sixty-two, sixty-two, sixty, sixty-four, sixty-three) loops from the left shoulder of the base of the holder to the spokes and the front part must be attached to the thread. Follow series (front side): knit facial loops. The next row (the wrong side): we knit the facial loops and cut the thread.
  Create the front part of the product. An additional thread of color, which is the contrast of the main, from the front, create forty-four (forty-six, forty-six, fifty, fifty, fifty-two) loops and make the obverse until the binding is finished on the left shoulder (total, one hundred and seventy loops for everyone, and only for dimensions 54/56 - one hundred seventy eight loops). The next row (the wrong side): we knit the eyelets. Then again we knit in type from the first to the sixth series, using the "delicate" pattern with the loops (two, two, two, three, three, three). After that we knit, using the facial smooth surface, until this piece of the product becomes equal to nine (ten, eleven, nine, ten, eleven) centimeters, we conclude with a purl series. Next, we close the thirty (twenty-six, twenty-two, eighteen, eighteen, fourteen) loops in the beginning of the next rows (total, one hundred and ten, one hundred and eighteen, one hundred and twenty-six, one hundred and thirty-four, one hundred forty-two, one hundred and fifty loops). Then, using the facial smooth surface, we create thirty-five more loops, we finish in the front row. After that we knit five rows with a "plain" pattern and make the closing of all the loops. Completion of work on the product. We take circular knitting needles, the length of which is forty centimeters, raise parallel to the facial smoothness of the sleeve part and we sew nineteen (twenty-two, twenty-six, nineteen, twenty-two, twenty-six) loops. Then follows the repeating part: we raise and make three hinges (one eyelet in all the scars of the "handkerchief" pattern). Next, we hold the right knitting needle with the base of both parts of the elongated loops and we sew one face loop. After we hold the same spoke only under the base of one part of these loops and we sew one facial. So repeat it twice. Then repeat three more times. Then make a rise and make three eyelets (one eyelet in all the scars of the "handkerchief" pattern). Then we knit nineteen (twenty-two, twenty-six, nineteen, twenty-two, twenty-six) loops parallel to the facial smoothness. After that we knit five rows with a "plain" pattern and make the closing of all the loops.
  We make the finish of the neck. We take circular knitting needles, the length of which is forty centimeters, we carry the carrying from the base of the holder forty-four (forty-six, forty-six, fifty, fifty, fifty-two) loops from the throat portion (back). Then gently unfold the additional thread and transfer forty-four (forty-six, forty-six, fifty, fifty, fifty-two) eyelets of the part of the neck (front side). With an additional thread from the front part, create the eye loops of the back of the article, then raise and make one face loop in all the scars of the left shoulder pattern. Then we work with the eyelets in the front side of the product. Then we do a similar lifting and binding in the right shoulder, as in the left one. Finally, place the marker in the initial part and make the closing of the circle. After that, we knit one circle using the backing loops - twice. And then one more circle we knit with the wrong loops and we carry out the closing of all the loops. All! The product is ready!


