Crochet hats as instructed with photos and charts
Crochet a nice hat.lose their relevance to women of fashion for a long time. If you decide to get the same headgear, then tie it up using our simple lesson. To do this, you will also need: 120 grams of yarn of different color shades (light gray, gray-blue, pink, white, light green, lilac and pea), in addition to the crocheting hook No. 3. one button with a diameter of two and a half centimeters; three buttons of 2 centimeters and one -1 diameter of 1 centimeter.  For our beret we will use a drawingknitting without a crochet (RLS) in a strip. The order of changing the shade of yarn will be as follows: white yarn, light gray, pea, light green, gray-blue, turquoise, lilac, pink. First, we recruit 3 VPs from the white yarn (air loops). Next, we fasten the loop to the 6th RNS from the hook. Close the knitting in a circle with a half-thread and cut the thread. We bind the yarn of light gray color and we untying the second row, adding evenly to it 6 RLS. Again, close the row with a half-tube and cut the thread. We bind the yarn of the next shade and tie the next row, adding 6 RLS evenly. Thus, we fix the circle with the pattern in the strip, adding for each row of 6 scs. After the diameter of the circle is equal to 26 centimeters, we knit the 2 rows exactly, and then we start making 6 decrements for each row. Reductions are performed by unfinished columns without a cloak. The process of knitting is completed after the inner edge of our beret along the length is equal to 27 centimeters. At the very end, hold the straps of buttons: a diameter of 2.5 centimeters tied yarn gray-blue color; a diameter of 2 centimeters tied with yarn of turquoise, gray and lilac color; with a diameter of 1 centimeter - a pink color yarn. Tied buttons are sewn on the underside of the beret. Now our headdress is completely ready!
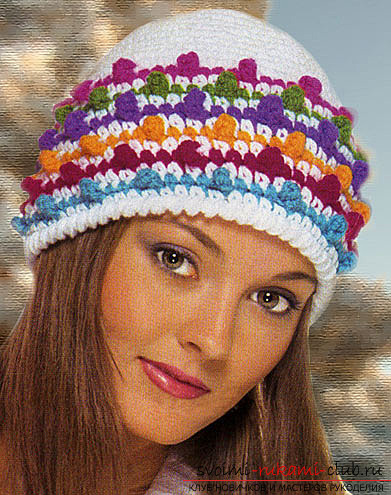
 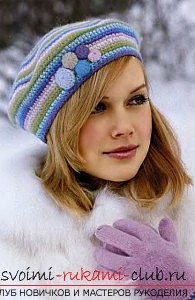 Consider another example of crochetheadgear, this time - a winter variant. Colorful stripes on a white background and an elegant pattern in the form of cones like not only you, but others. The given cap has a remarkable advantage - it is perfectly combined with a scarf and gloves of various color shades due to multicolored strips. You can change the image almost every day, without changing the headdress. Before you start, you should stock up on the following set of tools and materials: yarn white with a density of 92 m / 100 g (0.1 kg); crochet hook number 5; remnants of yarn of different colors. The process of knitting our cap starts from the top. First, we bind a ring of 4 EPs (air loops), after which we continue to knit the pillars without a cape according to the scheme. Next, go to knitting 4 rows, making additions through each row. Then, without adding anything, just one row of white yarns is knit. Knitting of cones is carried out as follows: in a row of colored yarn 3 stitches are not knitted without a crochet, a column with 2 nakidami, then again 3 columns without a crochet and so on. After that, we bind a row of white yarns with columns without a crochet. The subsequent color strip is similarly similar to the previous one, not forgetting to place the cones between the cones of the preceding row, observing the chess order. As a result, there will be 6 bands of different colors. The final stripe of white color is tied with the help of a "step of a horse".
Comments
Related posts:
 To connect an elegant crochet crochet by step-by-step instruction with photos and diagrams
 Crochet the original flower, using step-by-step instructions with photos and diagrams
 Crochet dresses: master classes with step-by-step instruction, photos and charts
 Crochet of beautiful plaids and hats for children up to one year old with diagrams, descriptions and photos.
 Knitting a universal cap on knitting needles. Detailed diagram with photo and description for beginners