Knitting fashionable raglan with knitting needles, turn into a real pleasure if you try our easy and fast method of knitting
To date, many modern journalson knitting variegated various schemes for the production of raglans with their own hands. But most of these methods are complex and inconvenient. They often offer to knit individual parts, and then sew them together. But many do not like this, because needlewomen often are interested in the process of knitting, not assembly.  Let's talk about one remarkable method of knittingraglan with circular knitting needles or five spokes for mittens or socks. Spokes are the main knitter tool. Therefore, it is extremely important to choose them correctly. Circular knitting needles are of the following types:
Knitting needles for socks and mittens:
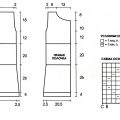
The most difficult thing in the process of knitting raglan is the calculation of loops. But, having understood and not having regretted time, you will be convinced, that this method of knitting is the easiest and simple.  Let's proceed to the calculations. You must link the sample. This is important, since it has practical value when knitting raglan. After you have chosen the yarn, tied the sample, took the knitting needles and counted the number of loops in ten centimeters, then you can start calculating. We measure the neck circumference and calculate the required number of loops. For clarity, we give an example. Be careful! Your product may have a different number of loops. For example, the neck circumference is 36 cm, and in ten centimeters sample 28 loops. It is necessary to type the number of loops that is a multiple of four. With such a neck circumference, we need to collect 92 loops. Draw the diagram. So, there are 4 zones: front, back and 2 zones sleeve.
  Scheme 1 Calculation of loops is as follows: 92:4 = 23, but in the finished product, there are always fewer loops on the sleeves than on the back and in front, so it will be necessary to reduce a number of hinges (for example, 3) of the sleeve, adding them to the front or back. Thus, we got 26 loops per back and before and 20 loops for the sleeve. It should turn out exactly 92 loops. We proceed to the set of loops. First we dial 92 loops, closing them in a circle, the first row is sewed with facial loops. Then select in each zone one central loop, from which we will subsequently add loops. The most expedient thing is to split the zone of the spoke in half and start the series from there. Next, we knit 12 loops, marking the center with a contrasting thread, making a broach or cape before and after it. It's half the back zone. Next, we knit 19 loops and select the central loop using a similar method. This will be the zone of the sleeve. Then we knit 25 loops and all the same manipulations. We obtain the transmission zone. Next, we sew another zone of the sleeve. We knit, as well as the previous one. At the end we make the remaining 13 loops according to the scheme 2.
  Scheme 2 The first product line is ready! To start the series is not lost, it should be noted for its contrasting thread. The second row we sew according to the drawing, making broaches or capes with facial loops. Now we knit them in every second row. Next, we knit in a circle about 20 cm (armhole distance). Then we separate the zones of the sleeves. To do this, we type on the thread or pin of the loop and, without adding, we sew around the circle until the length of the product is reached. Sleeves must be knit separately.
  With this technique, you can perform anypatterns, but it is necessary to remember that purl rows with circular knitting need to be made according to the pattern of the loops. This raglan can be knit and on two spokes. Then you get a product with a clasp. When you read, it all looks complicated, but if you understand, it's easier to find a method! Enjoy your work!
Comments
Related posts:
 Knitting needles for newborns, tips andtricks for knitting clothes for young children, a cap for newborns with their own hands, how to tie booties for newborns, knitting lessons with descriptions, recommendations and master classes.
 Knitting with an elongated waistcoat with a zipper. Our scheme and recommendations will help you to master the knitting of a waistcoat with a pattern of a honeycomb with knitting needles
 Description knitting elegant women's knitting needles with their own hands. You will learn how hard it is not to sew a woman's dress with knitting needles
 Knitted female blouse-sleeveless shirt with her own hands. Knitting pattern with a detailed description
 Knitting pattern of pullover from mohair with knitting needles. We will teach everyone to knit their own mohair pullover