Knitting with the knitting needles of a warm cardigan. Fashionable and stylish cardigan you can link yourself relying on the advice of professionals
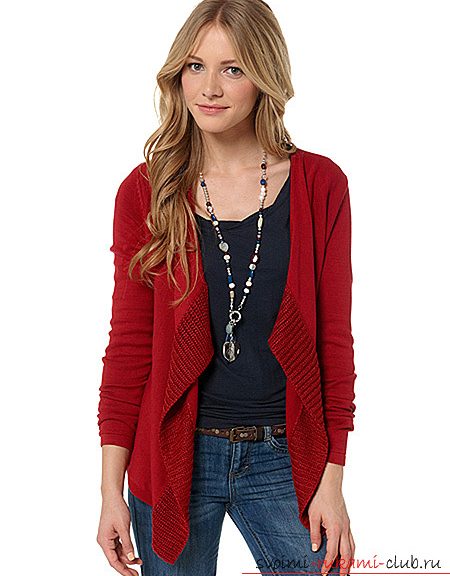
A fashionable part of the modern women's wardrobe forright is a warm and cozy cardigan. In a cardigan you can use woolen, or half-woolen thread, if you want you can use twisted threads. Now the most fashionable cardigans are short, like bolero, or vice versa, long, resembling a coat. To create an elegant and unique appearance, you can add a belt or other decorative elements to the cardigan. Cardigan is a universal element of clothing, so it is great for women of any make.  Today, even a beginner can connect a cardigana handyman in the knitting business. For work, you will need: a kilogram of quality yarn, of course the spokes number 3, 4 and 5 and finally a sewing machine. At the beginning of the work, you need to make a template that you can use to navigate. For a 10 cm by 10 cm template, it is better to use a density of 26 rads of 21 loops. If your size is larger, then you should choose the dimensions of the template yourself. After making the template, you need to choose a cardigan model that you like, since a large number of models can be found on the Internet and magazines.
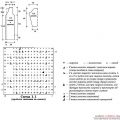
  Knitting the back in size 44-46 should start withset of the first 108 loops and the main pattern. Then, you should close all the necessary parts for the armhole from the first moment of manufacture. On both sides of the workpiece, you need to tie 5 loops through a row, once to tie four loops, once to tie three loops and at the end through a row two loops and one loops. In the end, there should be 78 loops. To get the bevels of the shoulders when knitting with knitting needles, the hinges should be closed at a distance of 90 loops. In addition, in each 2-nd row you need to tie 3 times 4 loops. A cut near the neck of the back is obtained by closing all unnecessary loops. The knitting pattern of a cardigan looks like this:
  You can use the following pattern:
  Shelf on the right side, you can get by typing23 loops with a basic pattern. On the site from the beginning of mating, you need to close the loops on the wrong side to get armholes, like on the back. Then you need to measure 90 cm from the beginning of the mating up to the slant of the shoulder, after which you can close the underside on each 2nd row once making 4 loops, and then 2. In the same order, you need to tie the second side of the cardigan.
  Manufacture of sleeves should begin with 58and continue to knit the main pattern for the next 10 cm. After that, you need to add along the hinge to all sides of the sleeve 3 times every 12 rows and additionally 3 times through 14 rows. In the end, you will get 70 loops. The sleeves should be cut at the beginning of knitting at a level of 45 cm, covering all sides of the sleeve. To do this, you need to associate 1 time 3 loops, then 3 times 2 loops and then 8 times 1 loop and 3 times 2 loops each. At the very end, 1 loop 3 loops are made to complete. so the knitting of the cardigan's sleeve is complete.
  The pocket is made by knitting 26 loops withthe main pattern on the length of 10 cm. Also, do not forget to tie an elastic band 2 by 2 cm. Then you can create the other two elements for the pocket. Making back straps starts with knitting 230 loops along with the main pattern on a length of 15 cm. Then you need Close the hinges and start the 2nd bar. Upon completion of the work, all shoulder and side sections must be sewn by the sewing machine. To create a sleeve, all the elements made have to be folded face down, then sew on the elbow with a machine. At the final stage we stick the sleeves into the floodplain of the cardigan and sew the pocket shelf at a distance of 22 cm to the edges of the cardigan.
  Following this instruction to tie a cardigan is simple enough, as a result, you can get a wonderful thing made by yourself!
Comments
Related posts:
 How to tie a fashionable cardigan with his own hands. Which model of a cardigan to choose and how to link it independently is described in this article
 Knitting a wool cardigan for women with knitting needles. Detailed diagram with photo and description for beginners
 Knitting needles for newborns, tips andtricks for knitting clothes for young children, a cap for newborns with their own hands, how to tie booties for newborns, knitting lessons with descriptions, recommendations and master classes.
 Link your own hands, you can easily use the knitting needles according to the proposed schemes and descriptions
 To connect an interesting gray shirt-front with buttons with your own hands, you can use knitting needles