
We learn how to make jewelry from affordable material - cold porcelain, easily and quickly
 At the beginning of the last century in Argentina came up withA special mixture of cornstarch, glue, oil and glycerin, which was used for artistic modeling. This mixture was called "cold porcelain". "Cold porcelain" for today is absolutely harmless, convenient and rather cheap material for modeling. Because of its very smooth and uniform texture, excellent plasticity, it is very convenient to use. Another plus of "cold porcelain" is that not only adults, but even children can work with it. When hardening, "cold porcelain" acquires firmness, which distinguishes it from plasticine.
  Products in the technique of cold porcelain captivatedthe whole world. And especially the flowers. Because only with the help of this plastic material can you convey the natural beauty. In terms of interior decorations, cold porcelain is now at the height of fashion. Works in this technique are appropriate in any interior, because they are easily combined with all possible styles. At the moment, the most profitable, affordable and environmentally friendly material for the manufacture of various stucco items is cold porcelain. Due to its smooth and homogeneous texture, it is incredibly convenient to work with, and its strength characteristics allow you to use the finished product for an extended period of time. This wonderful material gives unlimited possibilities for creativity, it is possible to dazzle everything from it, even real works of art! The most gentle creatures on the planet are flowers. And they succumbed to the magic of the golden hands. So, in order to start working with cold porcelain and start creating masterpieces of incredible beauty for your interior, you will need such tools:
 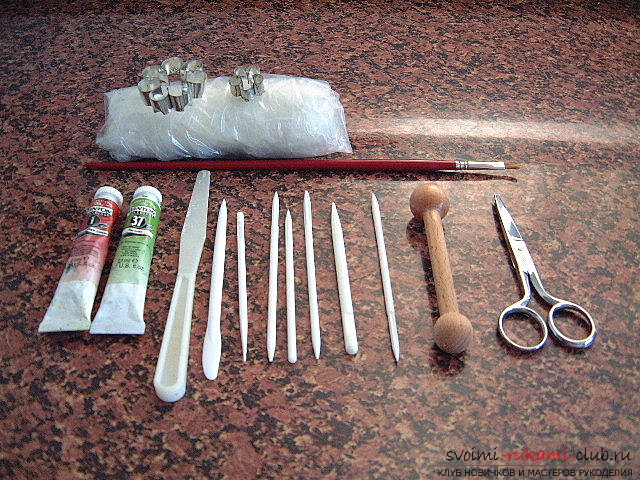 1) Self-curing polymeric clay is smooth(for example, Modena Clay, Modern Clay, Fleur, etc.); 2) Nail scissors with straight and rounded ends; 3) The main stack; 4) Stack with a small ball; 5) Round nose pliers; 6) Mold lilac leaf (or any universal leaf mold); 7) Wire (green) No. 30; 8) Two synthetic brushes №6 (for shading paint); 9) Green tape for the assembly of flowers in the inflorescence; 10) Latex adhesive; 11) Stick for glue (I use a toothpick); 12) Oasis for drying flowers; 13) The base for the brooch or the base for the hair clip (if you are making an accessory); 14) Oil paints on request. And now you can start the first steps. First we make a white lilac, then we apply lilac shades. Raw mass very quickly weathering, remember this. Therefore, having pinched the right amount of cold porcelain for work, the rest is tightly closed. Do not forget about this throughout the whole work.
 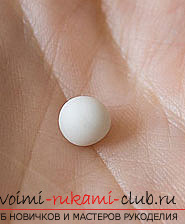 We take a drop of mass the size of a pea.
 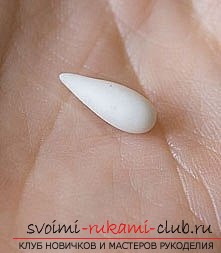 We twist our fingers, pressing and forming. So like a three-dimensional droplet. Now cut the scissors wide side of the droplet. Once and again, cross-wise. Do not cut to the end literally 3-4 mm.
 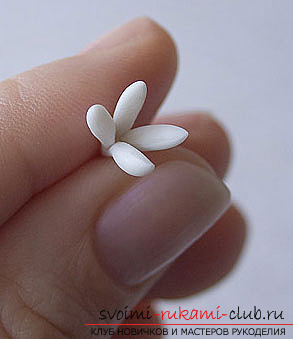 Fingers carefully spread out the petals. The finished flower is obtained in three steps. We make the shape of the petals in the finished flower with tweezers.
 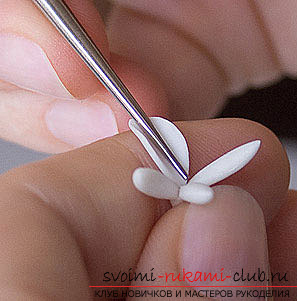 Now we cut the length of the wire by half, twisting it. Fold the muck in PVA, and pierce the middle of the middle of the flower with a sharp end and stretch it to the stop. We put in a glass. We let the glue dry.
 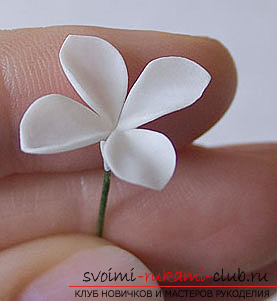 After the glue dries, we remove the petals.
 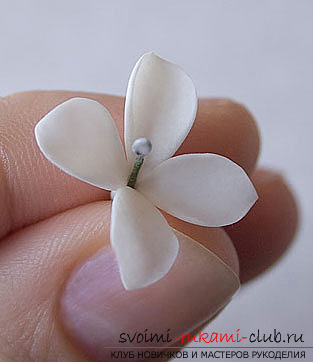 Now we make a flower with pointed petals. We sculpt the same drop, but cut with a scissors is not a wide, but a narrow side.
 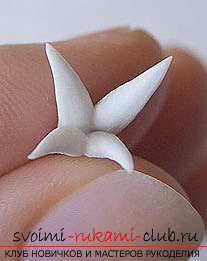 The remaining steps are the same as for the first flower.
 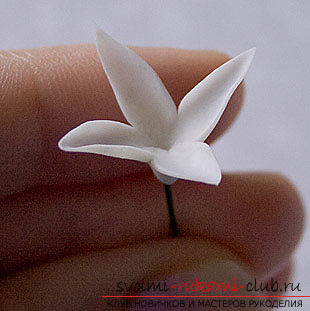 The third kind of lilac flower is unblown. Slightly changes the sequence of steps. Pea masses immediately put on the wire with a drop of glue. And we twist the shape of the droplet when it already sits tightly on the rod. Then cut the scissors with the very tip of the drop. And do not touch her any more. You see how simple and fast. We make as many different colors as patience suffices.
 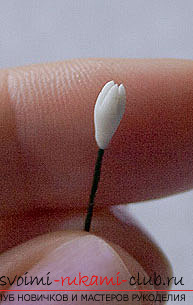 Further, we also make lilac flowers from the coldporcelain. In order to get a lilac beautiful shade, toning the mass in the process of kneading. We pick off a piece, which will approximately go to the desired number of flowers, we form a lozenge. And in the center of it we drip a drop of lilac acrylic. Less is better. Because the excess amount of paint will not absorb, but will only get dirty and dirty. We dripped and kneaded until the color was uniform. Too pale - we are still dripping. Mesim, until the desired effect is achieved.
 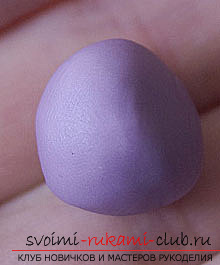 When the nemerenoe number of flowers is done,leave them to dry. Such crumbs do not dry more than a day. It must be remembered that when drying, the part decreases in volume by 20%. And drafts should be avoided, so that there are no unpleasant surprises.
 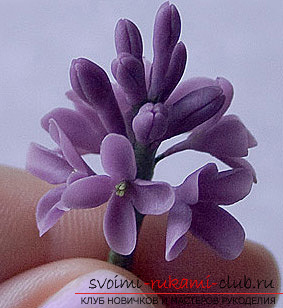 When all the blanks-flowers are dry, we collectinflorescence, twisting the wire. Seredinki painted yellow. We cut out the leaves with scissors from the rolled mass, painted in green. We make sticks with a stack. We passed it in the kindergarten. We fasten and plant on a branch in the same way as flowers.
  We collect the whole bouquet. So our masterpiece is ready. If you suddenly are afraid to start working with cold porcelain due to the fact that you will not succeed, then again, do not waste time on stupid thoughts. With the help of our site you will quickly master your new hobby, which you then do not want to give up for a minute. It's such a pleasant feeling when you create a masterpiece yourself, with your own hands. There is nothing more beautiful than making a decoration with your own hands and giving it to someone for a birthday, an anniversary, an anniversary or just remember. Do not be afraid, create, create beautiful ornaments that will please not only your eyes, but also the look of your guests.
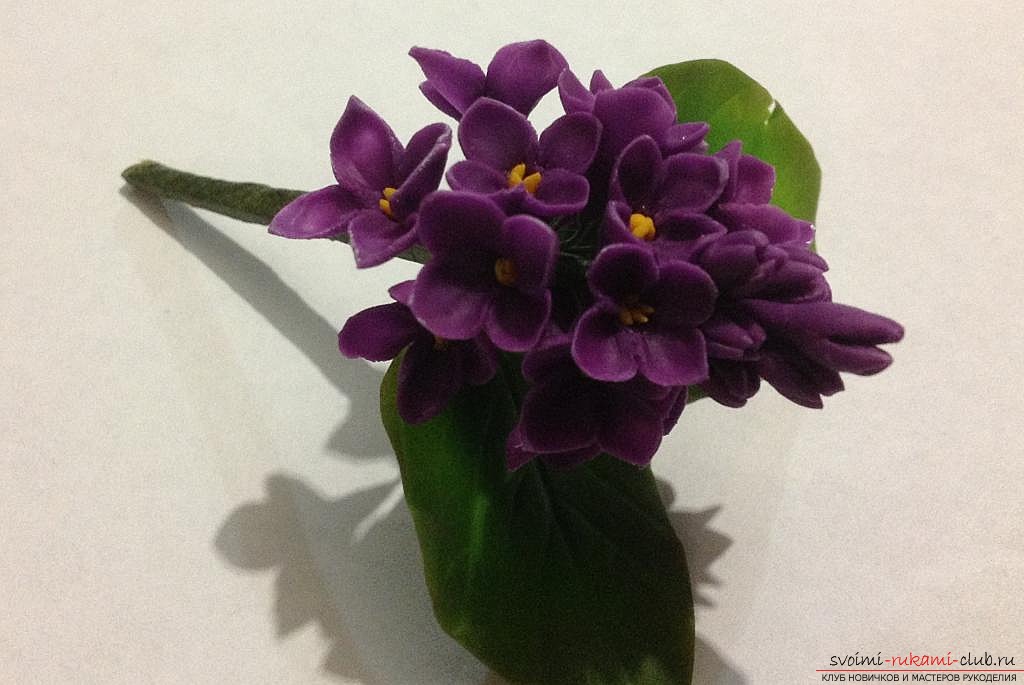
Comments
Related posts:
 We learn how to make jewelry yourself, by our own hands, by felting
 Ornaments from acorns with the help of detailed execution instructions. Crafts made of natural material: we make it quick and easy
 Easily and quickly learn how to create handmade articles for the school. Instruction for schoolchildren.
 How to make a Christmas tree with your own hands from organza? this New Year's craft is easily created from easily material with the help of a stapler and glue, it will perfectly suit the gift of 2016 year.
 Sew a quick and easy original rug from shreds will help you material this article