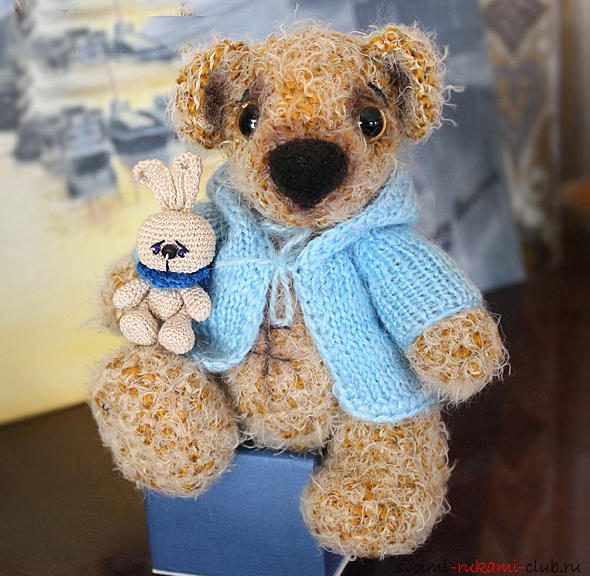
A lesson on knitting teddy bears with their own hands with a step-by-step description and photo.
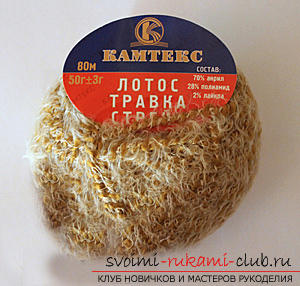
Bears are one of the most favorite toyschildren. Especially kids love bears, which are made by themselves. There is a huge number of ways to make a cub. Very popular can be considered the option, when the bear crochets. At first, it seems to many that such an occupation is very difficult and will take a lot of time. But you just have to try and you will have a wonderful toy in the form of bears. In this master class we will tell you in detail how to create an amigurumi crochet. Our detailed instructions will help even novice craftsmen.  Knitting a bear cub will take place in severalstages. First, you need to link the individual parts, and then pay attention to their assembly. We knit the elements spirally, so there is no need to create air loops. In order to facilitate the calculation of the loop, we recommend marking the beginning of each row with a marker or a standard pin. For work we will need such materials: Yarn for making a bear cub. In our case, these are the lines "Grass Stretch". It is rather difficult to work with such yarn, therefore we recommend that novice needlewomen use less nap material. As for the consumption of yarn, in our case, all the machines were useful. If you are used to creating a not very dense canvas, then stock up with two coils.
- Crochet hook. The tool number will depend on the characteristics of the yarn itself.
- Needle for sewing soft toys. The main criterion for choosing a needle is the width of its "ear". It is important that you have the opportunity to thread the yarn through the eyelet, from which you create the teddy bear.
- To make out the tip of a bear cub, you canuse 2 options: 1st - to make embroidery (threads of black mulina and needle), 2nd - by felting from wool (black hair for felting and needle number forty). We used the second method. And you yourself will decide which way to use
- You can buy teddy bear's eyes in advance.
- As a filler we use cotton wool, sintepon.
- Marker for marking when knitting.
- Scissors.
- Bright yarn to create a blouse.
- 4 knitting needles to tie a jacket for a teddy bear.
 To perform such a toy with your own hands,It is necessary to know the features of knitting columns without a cloak, and also be able to carry out subtractions and increases. Learning to knit a bear's head (one piece) First you need to make a set of two air loops (VP). For those who want to create a toy face in light colors, you need to use a yarn of the appropriate color. Row number 1. Create six columns without holding the crochet in the 2nd loop from the base of our hook (so, you will have six loops). Row number 2. Six times in a row it is necessary to create a crochet such combination: to make an increase in all the loops (so, you will have twelve loops). Row number 3. Six times in a row it is necessary to create a crochet such combination: to hold an increase in combination with a column without a cape (so, you will have eighteen loops).
 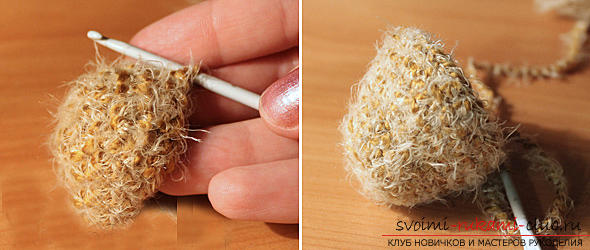 Row number 4 - 5. It is necessary to create crocheted columns without a cape in all the loops (so, you will have eighteen loops). In the event that the beginning of knitting was accompanied by the use of a light-colored yarn, then now is the time to turn to brown color Rows # 6. It is necessary to create a crochet such a combination: four bars without holding a crochet, then - ten additives, then again four bars without holding a crochet (so you will have twenty-eight loops). Row number 7. It is necessary to create a crochet with such a combination: six bars without holding a crochet, then - three extra bills, then ten sticks without holding a crochet, and again - three extra bells, finish with six stitches without holding a crochet (so you will have thirty-four bells). Row No. 8 - 11. It is necessary to create crocheted columns without a cape in all eyelets (so, you will have thirty-four loops). Row number 12. Five times in a row it is necessary to create a crochet such a combination: to tie four bars without holding a crochet in combination with one decrease, to complete the creation of four columns without holding a crochet (so you will have twenty-nine loops).
 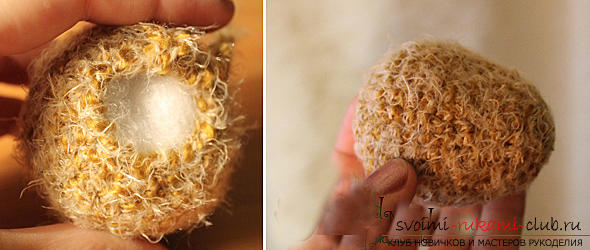 Row number 13. Five times in a row it is necessary to create a crochet such a combination: to tie three bars without holding a crochet in combination with one decrease, to complete the creation of three columns without holding a crochet (so you will have twenty-four loops). Row number 14. Eight times in a row it is necessary to create a crochet such a combination: to tie one bar without holding a crochet in combination with one decrease (so, you will have sixteen loops). Then you need to carefully fill your head with cotton or a synthepon. Carry out adjustments until the hole is closed. Then the thread needs to be cut off, and the tail carefully hidden, using the hook. Learning to knit the torso of a bear cub (one detail) First you need to make a set of two air loops (VP). Row number 1. Create six columns without holding the crochet in the 2nd loop from the base of our hook (so, you will have six loops). Row number 2. Six times in a row it is necessary to create a crochet such combination: to make an increase in all the loops (so, you will have twelve loops). Row number 3. Six times in a row it is necessary to create a crochet such combination: to hold an increase in combination with a column without a cape (so, you will have eighteen loops).
 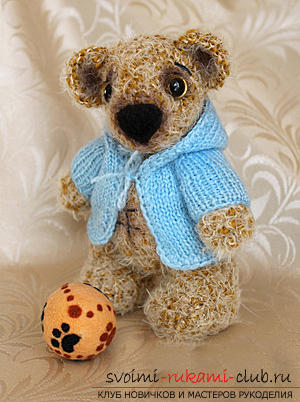 Row number 4. Six times in a row it is necessary to create a crochet such combination: to hold an increase in combination with two columns without a cloak (so, you will have twenty-four loops). Row No. 5. Six times in a row it is necessary to create a crochet such combination: to hold an increase in combination with three columns without a cape (so, you will have thirty loops). Row No. 6. Six times in a row it is necessary to create a crochet such combination: to hold an increase in combination with four posts without a cape (so, you will have thirty-six loops). Row No. 7 - 9. You need to create crocheted columns without a cloak in all the stitches (so, you will have thirty-six loops). Row number 10. Carry out six adjustments, and then eight times in a row it is necessary to create a crochet such combination: a column without a cape in combination with a decrease (so, you will have twenty-two loops). Row number 11 - 12. It is necessary to create crocheted columns without a cloak in all the loops (so, you will have twenty-two loops).
 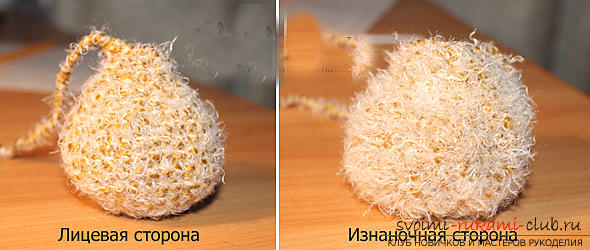 Row number 13. Seven times in a row it is necessary to create a crochet such a combination: we knit one column without a cape in combination with one decrease, and complete the row with one column without a crochet (so you will have fifteen loops). Row No. 14 - 15. You need to create crocheted columns without a cloak in all the loops (so, you will have fifteen loops). Knitting of the trunk is complete. Further, it is not necessary to close the hole yet, leave a long string to later attach the head to the body. Using this type of yarn, you can turn the part on the wrong side, if you want the bear was more fluffy. Then fill with filler. Learning to knit the teddy bear handles (two pieces) First you need to make a set of two air loops (VP). For those who want to create a toy face in light colors, you need to use a yarn of the appropriate color. Row number 1. Create six columns without holding the crochet in the 2nd loop from the base of our hook (so, you will have six loops). Row number 2. Six times in a row it is necessary to create a crochet such combination: to make an increase in all the loops (so, you will have twelve loops).
 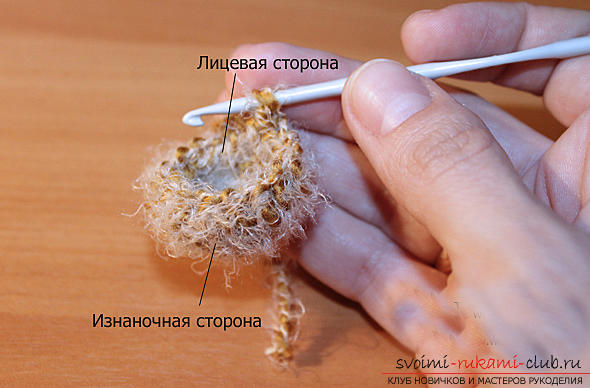 Row number 3. Four times in a row it is necessary to create a crochet such a combination: two bars without a cape to tie in a combination with an increase (so, you will have sixteen loops). Mating should be done so that the front side is inside. Row No. 4 - 6. It is necessary to create crocheted columns without a cloak in all the loops (so, you will have sixteen loops). Row number 7. Four times in a row it is necessary to create a crochet such a combination: two bars without a cape to tie in combination with a decrease (so, you will have twelve loops).
 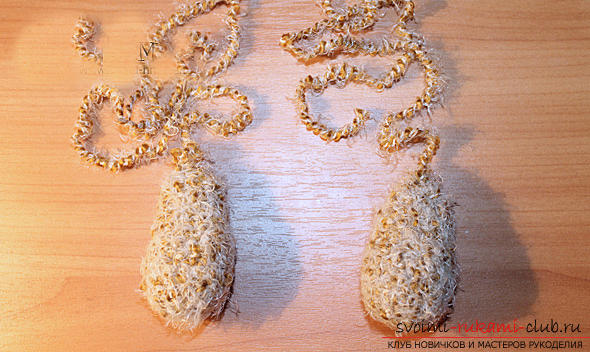 Row number 8 - 10. It is necessary to create crocheted columns without a cloak in all the loops (so, you will have twelve loops). Row number 11. Four times in a row you need to create a crochet combination: a reduction in combination with a column without a cape (so, you will have eight loops). Lightly fill the parts with a sintepon. Carry out adjustments until you close the hole. Learning to knit the legs of a bear cub (two pieces) Row No. 1. First you need to make a set of five air loops (VP). Then you need to dial one air loop to make the climb and create one RLS in the 1st loop (out of 5), then make three columns without a cape, then 2 spins, again three columns without a cloak, then one whisk (so, you will have fourteen loops). Row number 2. It is necessary to create a crochet such combination: to hold two increases, to tie four RLSs, to make four increases, to tie four RLSs, to hold two increases (so, you will have twenty loops). Row No. 3 - 4. You need to create crocheted columns without a cape in all the loops of the previous row (so, you will have twenty loops).
 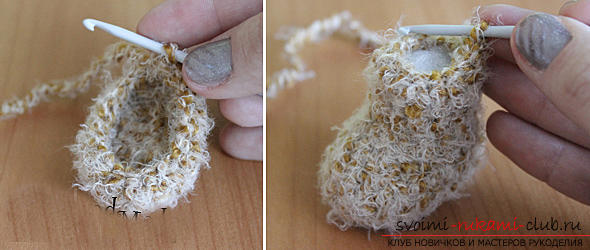 Row number 5. It is necessary to create a crochet such a combination: five bars without a cape to tie in combination with a decrease, then we knit two columns without a cape to tie in combination with a decrease, again - we knit two columns without a cloak in combination with a decrease, at the end - five bars without a cape , you will have seventeen loops). Row number 6. It is necessary to create a crochet such combination: six bars without a cape to tie in a combination with a decrease, then we knit one column without a cape to tie in a combination with a decrease, in the end - six columns without a cape (so, you will have fifteen loops).
 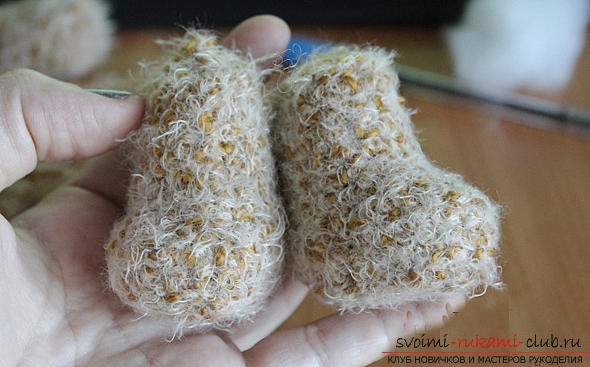 Row number 7 - 11. It is necessary to create crocheted columns without a cape in all the loops of the preceding row (so, you will have fifteen loops). After you need to fill the legs with filler. Carry out adjustments until you close the hole.
 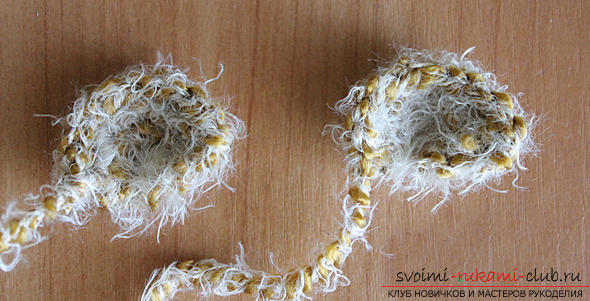 Make the decoration of bear's facestage we will carry out not less important actions which will help to form all uniqueness of a toy. We take a needle, designed to create soft toys, we thread a thread in it, which was used when mating the bears. The thread has a length of about thirty centimeters. Next, the face must be pulled together in such a way that grooves appear under the eyes.
 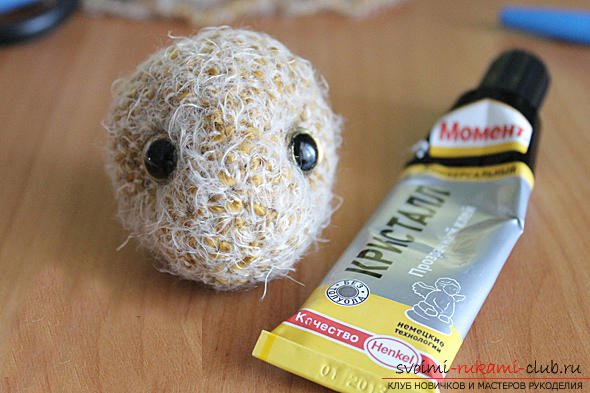 In our case, the eyes did not have a loop, forwhich we could attach them to. Therefore, they had to be attached with glue. If you envisage eyelets, then just prick up your eyes while tightening. So the eyes are decorated. We pass in work on a spout.
  It can be welded or embroidered using black threads. Then you should attach the head to the body. Then - handles and legs. We will form the crooks.
  Now we suggest you tie an interesting blousefor your bears, to emphasize its originality. We will knit it with knitting needles. We perform a set of thirty-four loops. Binding is carried out according to this principle: in the front rows we create face loops, in purl, respectively, purl. Row number 1. We knit 5 facial loops, then we proceed to create one cape. Next we knit one facial loops, again - a cape, we knit 5 facial loops, then we proceed to create one cape, then we knit 1 facial loop, again - a cape, perform ten facial loops, then proceed to create one cape, after which we knit one the facial loop, again - the cape, we knit 5 facial loops, then we proceed to create the 1st cape, after which we perform one facial loop, again - the cape. Finish with five face loops.
  Row number 2. We make the viscous with the back stitches. Row number 3. We knit 6 facial loops, then proceed to create one cape, then we knit 1 facial loop, again - a cape, we knit 7 facial loops, then we create 1 cape, then we perform one facial loop, again - a cape, we knit twelve facial loop, then perform one cape, then create one facial loop, again - a cape, we knit 7 facial loops, then create one cape, then we knit 1 facial loop, again - a cape. Finish with 6 facial loops. Row number 4. We make the viscose with the back stitches. Row number 5. We knit 7 facial loops, then we perform one cape, then we knit 1 facial loop, again - a cape, we knit 9 facial loops, then we perform 1 cape, then we knit 1 facial loop, again - a cape, we knit fourteen facial loops, then we perform 1 cape , then we perform one facial loop, again - the cape, we knit 9 facial loops, then we make 1 cape, then we knit 1 facial loop, again - the cape. Finish with 7 face tabs.
 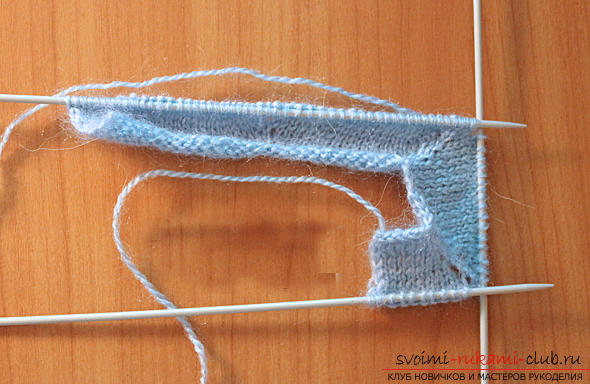 Ryadochek number 6. The viscous should be carried out using the back straps. Ridge 7. We make 8 facial loops, then create 1 cape, then we sew 1 facial loop, again - the cape, we knit eleven face loops, then we proceed to create one cape, then we need to perform 1 facial loop, again - the cape, we knit sixteen facial loops , then we make one cake, then we need to create one facial loops, again - a cape, we knit eleven face loops, then we make one cape, then we knit one facial loops, again - a cape. Finish with eight face loops. Row number 8. We make the viscose with the back stitches.
 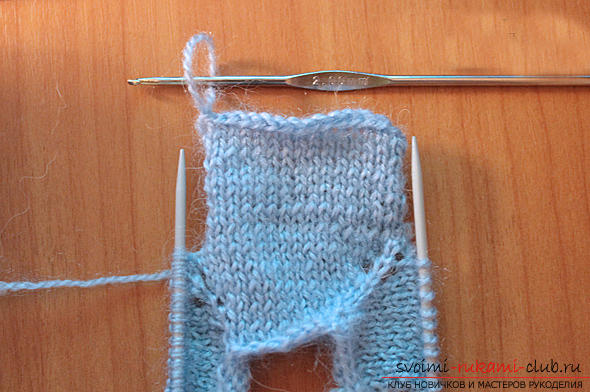 Row number 9. We knit 9 facial loops, then we perform 1 cape, then we create one facial loop, again - a cape, we knit thirteen face loops, then we perform 1 cape, then we knit one facial loop, again - a cape, we knit eighteen face loops, then we make 1 nakid, then you should create one facial loops, again - a cape, knit thirteen facial loops, then make 1 cape, then perform one facial loop, again - a cape. Finish with 9 facial loops. Row number 10. We make the viscose with the back stitches. Row number 11. We knit ten facial loops, then we perform one cape, then we knit one facial loop, again - a cape, we knit fifteen facial loops, then we perform one cape, then we perform one facial loop, again - a cape, we knit twenty facial loops, then go to create one cape, then we knit 1 facial loop, again - a cape, we knit fifteen facial loops, then we perform 1 cape, then we knit 1-ou face loop, again - a cape. Finish with 10 facial loops.
 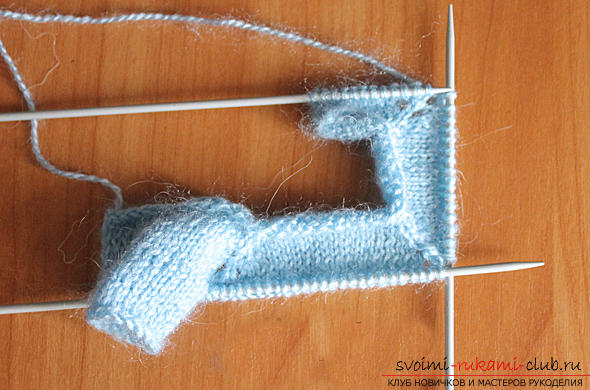 Row number 12. We make the viscose with the back stitches. Next, you need to tie ten facial loops. So you create a shelf. Then you can proceed to knit sleeves. For this we need an additional spoke. Face regalia should be created in the sleeve (seventeen loops). Then we should tie the six rows of the sleeve with the front surface, then we hold the closure of the loops. In the final loop, it is necessary to insert the hook and to fasten, thus, the sleeve.
 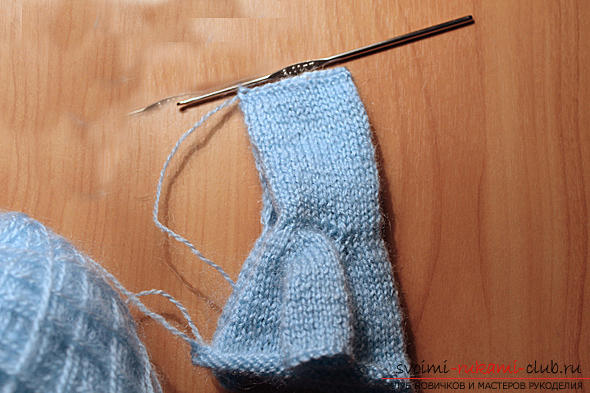 With the first needle, tie backjackets. We pass to the second sleeve. He should knit as well as the first. After the sleeve is completed, then you need to tie ten facial loops. Then we should tie the six rows of the sleeve with the front surface, then we hold the closure of the loops. In the final loop, it is necessary to insert the hook and to fasten, thus, the sleeve. Loops close. Next, go to the mating of the hood. The eyelets in the neck area should be caught on the spoke.
 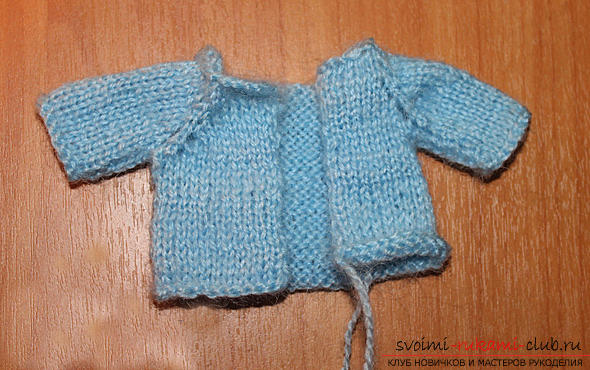 We carry out the mating using the face surface, up toof the desired length. At the end of the loop should be closed. Using the hook, you need to create a RLS to the hood center, and then connect the parts. The thread should not be cut off, and the edges of the product are tied with columns without a cloak. And then the thread is neatly cut off. We hide the tip.
 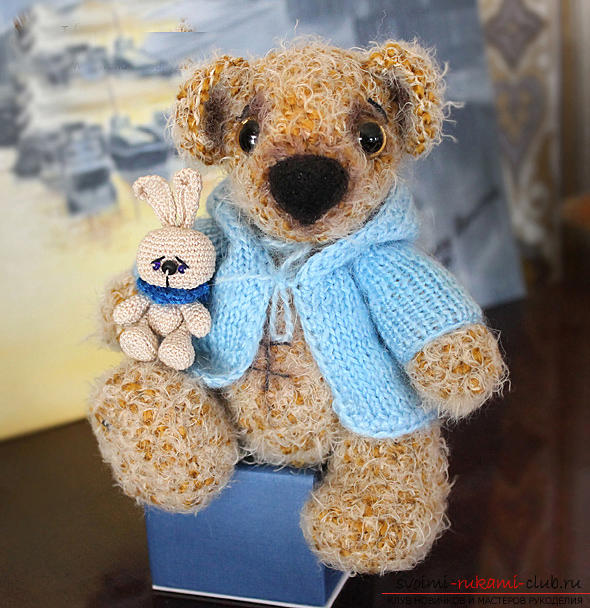 And the clothes for our cub are ready.
Comments
Related posts:
 Master class on knitting monkey amigurumi crochet with their own hands with step-by-step description and photo.
 Master class on knitting monkeys with amigurum crochet for beginners with step-by-step description and photo.
 A summer cap for a girl crocheted with her own hands. Crochet lesson with step-by-step description and photo
 Master class on crochet summer dresses for girls from 3 years with their own hands with a step-by-step description and photo.
 How to tie a horse amigurumi crochet with his hands with a step-by-step description and photo.