Lessons in crocheting with photos and diagrams, having familiarized with which you will quickly master this kind of needlework.
Learning the basics of crochet This lesson for those,who decided to master the skill of crocheting. You will get acquainted with the basic methods of crocheting how to properly hold the hook in your hands. Having studied the basics of crochet basics, you can try to connect something not complicated, for example, a scarf or hat, napkin or tack. 1. First you need to learn how to properly hold the hook in your hands. There are two methods. The first method is called a pencil, that is, you hold the hook, as well as a pen or pencil. The second method is called a knife, that is, we take a hook, like a knife. The tip of the crochet hook should be tilted slightly down. Which method will be convenient for you, choose yourself. 2. Air loop A braid from the air loops serves as the beginning of any product that crochets. Step 1. At the very beginning, you should create a node called a sliding node. Create a loop of threads and put it on the hook. Hook the thread and pull it along with the hook. A knot and a loop on the crochet hook were made. Tighten the knot by pulling two yarn strands. Step 2. We take the hook in the right hand, and the working thread in the left hand. We pull the thread crochet, directing to ourselves, and pull the thread with the hook through the loop (photo 3). 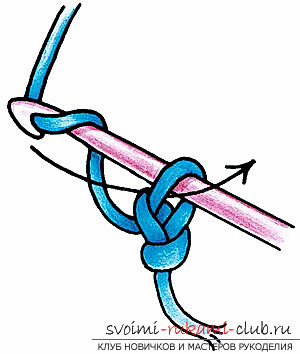 Step 3. Reproduce step 2 until the pigtail from the loops is the desired length (Photo 4).
 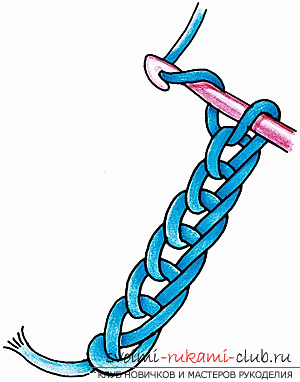 Having finished the pigtail, we cut the working thread so thatthere was a tail. Pull the tail out of the last loop of the braids and tighten. 3. Column (loop) without a crochet A corner of the articles connected by a hook or spokes form without a crochet. The edges are dense and do not bulge. Step 1. We introduce the hook into the loop of the base. We hook the work thread with a crochet and pull it towards us, again we catch the thread and stretch it into the loop that was made on the hook (Photo 5).
 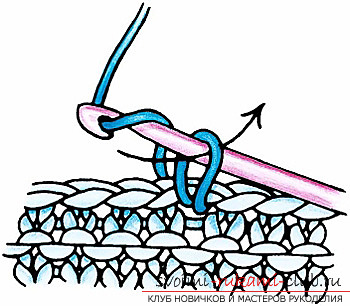 Step 2. Insert the hook into the subsequent loop of the base (Photo 6), we hook the working thread and pull the thread with the hook on ourselves. There were two loops on the hook.
  Step 3. Again we catch the thread and draw it now through the two resulting loops. On the hook, you get one loop (Photo 7).
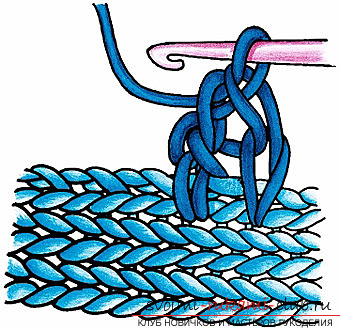
 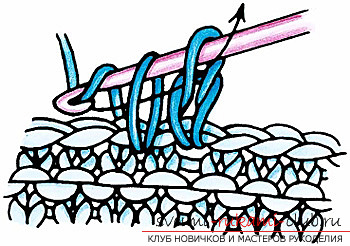 Step 4. Repeat the same way until you connect the desired number of loops. 4. Column (loop) with a crochet Such loops knit from above the braids from the air loops or from the previous row of loops without the crochet, or along the edge of the product, knitted or crocheted. Step 1. We introduce a hook into the loop of the base, we will hook the thread, pulling it towards us. Again we catch the thread, stretching it already into the resulting loop. We will sketch the working thread on the hook and insert it into the subsequent loop of the base (photo 8), we catch the thread, taking it out on ourselves. We get three loops on the hook.
 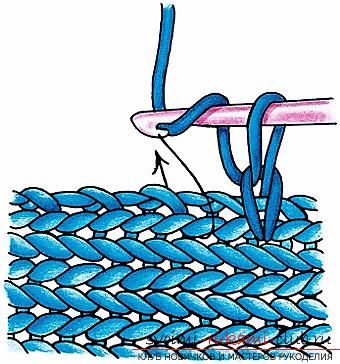 Step 2. We catch the working thread, stretching it in the first two bars (Photo 9). Again we catch the thread and let it pass through the other two loops (Photo 10).
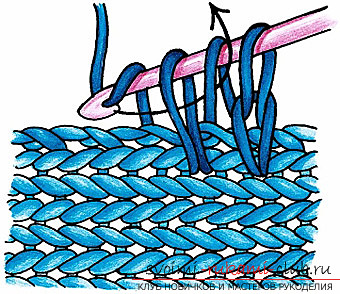
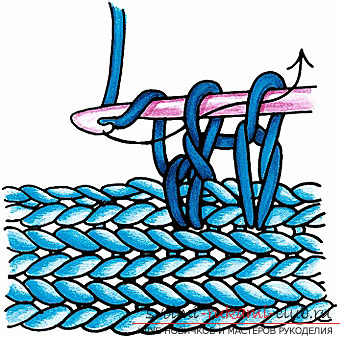 A loop with one cuff was made and a loop was made on the hook (Photo 11). Step 3. We will thread the thread on the hook and introduce it into the subsequent loop of the base. We hook the thread, bringing it to us. There were three loops on the hook. We re-attach the working thread, let it pass through the initial two loops. Again we hook the thread, stretching it in the last two loops. You got the second column with one crochet. On the crocheting hook was again 1 loop. Thus, we will bind the required number of columns. To complete the end loop, cut the thread, pull it out of the loop, and tighten it. We wish you good luck in your endeavors!
Comments
Related posts:
 We learn crochet crochet by step-by-step instructions with photos and diagrams
 Master class on knitting a bright jacket for beginners according to the instructions with photos and diagrams
 Detailed lessons of crochet wipes for beginners on detailed instructions with photos and diagrams
 This master class on crochet will teach you how to create a beautiful frame for your photos.
 This master class will teach crochet toys, you can create a cat crochet.