Lessons of weaving from beads by the method of hand weaving, the scheme of work with a canvas, the description of various nuances of weaving
It is said that weaving originated about 30,000years BC. even before the first spun threads appeared. The prototype of the woven fabric was products woven from narrow strips of birch bark, leather or twigs. The first woven crafts were baskets, bast shoes, litter. The first plant used for weaving was nettles. After weaving from linen, hemp and cotton. Now, in the era of high technology, there is no need to create heavy wooden looms and work hard to create one single thing. At the same time, hand weaving found its niche - the creation of hand-made articles from beads. If you want to make a picture or an original decoration in an ethno style, then this article is for you. Hand weaving, it is also called rustic weaving or fabric without a machine - a special kind of beadwork. In hand-woven crafts, beads are placed in strict parallel and perpendicular lines. In terms of their location, the drawing of the notebook's notebook is reminiscent of a cell.  For a better understanding, you can imaginea square with tiny cells, beads are located at the intersection points of perpendicular lines. It turns out a very dense and sturdy construction, because through each bead the fishing line can pass up to 6 times. In this kind of beadwork, you can even apply beads not of the highest quality and calibration. Provided that you will use the forest in two additions. In any case, the bead cloth will be durable and reliable. The conceived area may be with varying degrees of complexity, but weaving is always performed identically in any variant. Preliminary it is necessary to draw the selected area in full size. To hide the end faces of the beaded rows, you can use the beaded lines to outline. This is not necessary. When creating a canvas with bypass lines it will slightly increase in size. During the weaving, it is necessary periodically to check the product with a pattern in order to make adjustments and additions or finish the weaving in time. For convenience and ease of operation, note the number of beads of each row. In this case, check with the pattern-drawing need will not be.
  The scheme should be divided vertically in half, ifbeads an odd number, then the axis will not pass between the bead rows, but directly along one of them. If even, then in the aisle. (see Figure 12). On each side of the axis is the same number of beads. In this example, five rows have 7 beads each. The formula for the drawing will look like this: (3 + 5 + 7x5 + 5 + 3). In this case, does not sign that in five rows of 7 beads in the form (7 + 7 + 7 + 7 + 7). By this formula, it is necessary to make all the following similar details. They will all have 3 beads in the first row, in the second for 5, in the next five for 7, and so on. If you find a site with a complex configuration, you can break it into separate constituent parts and already for them to record the number of beads in a row. Any canvas has expansion and contraction. Figure 13 shows the step-by-step expansion of the canvas.
- In order for the canvas to be tight and dense,it is necessary to fix the 1st bead with high quality. You need to go through the 1st bead three times (see Figure 13a). Then string four more beads and again pass the fishing line or thread in the 2nd and 3rd from the beginning of the bead weaving. Now tighten the working thread (fishing line).
- To pass a line in the 4th and 5th beads, string the 6th. Again, pass the line through the 1st, 2nd, 3rd beads. Output the line (see Figure 13 b).
- It is necessary for the line to come out of the second row. It is worth fixing the canvas. After the 3rd bead, pass the line to the 4th, 5th and 6th and pull out the line (see Figure 13c).
- For the third row, thread the 7th and 8th beads (see Figure 13d). In the direction to yourself, pass the line in the 5th and 6th beads. Remove the line.
- Now you can proceed to increase the area of the bead cloth. String the 9th and 10th beads and pass the fishing line in the direction from yourself through the 7th and 8th beads (see Figure 13d).
- Focusing on Figure 13 e strung 11-th bead. In a direction to itself to pass through 4, 5, 8 and 11 beads.
- According to Figure 13, we can immediately dial the 12th and 13thbeads. Pass the fishing line towards yourself through the 4th and 5th beads. Now pass the line in the direction from yourself through the 8th, 11th and 12th beads. Remove the line. You managed to increase the second row for 5 beads. And in the third row also at 5. Before us is the task to increase the number of beads to 7 pieces. Carefully consider figure 13 з.
- So, in the third row we got 5 beads. The fourth row begins with a set of 14th and 15th beads. Direction of recruitment from yourself. Pass the line through the 11th and 12th beads (this is the edge of the third row).
- Referring to Figure 13 and, thread the 16th and17 beads. To pass a line in the 14th and 15th beads. Then on the 11th, 12th and 16th. Now in the third row there are already six beads. There is one missing at the second end of the row. In order to attach it, you first need to increase the number of beads of the fourth row to 6 pieces (see Figure 13).
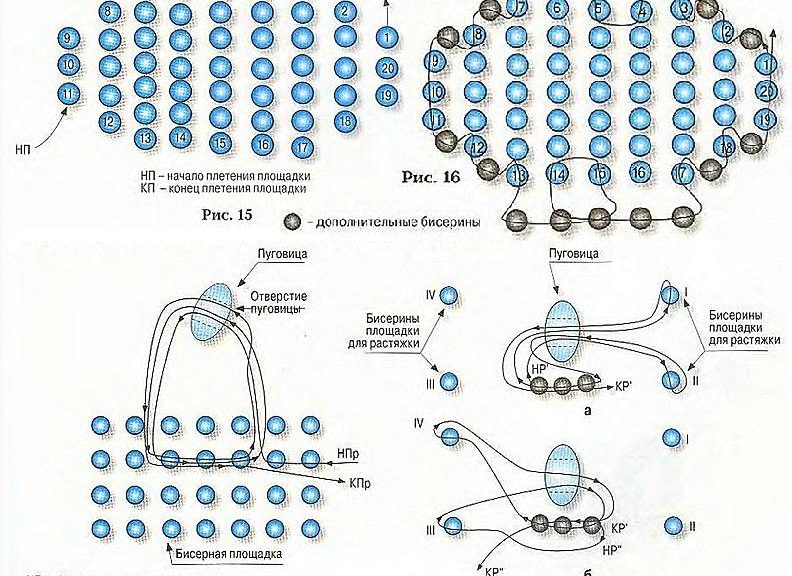
To be guided on figures 13 to, 13 l and 13 m, forset of the fourth row. After fixing the 20th bead, strung on the 21st and 22nd, focusing on Figure 13 n. They need to be fixed and go to the weave according to the drawing of 13 о. On it the 23rd and 24th beads begin the descent of the fifth row. After completing drawings from 13 o to 13 tons, thread a 28-bead. Fasten the 29th also. The fifth row is completed. According to the scheme, there are five rows of 7 beads. Look at the pictures from 13 to 13 tons. You will get an even beaded cloth, the ends of which will not be closed. Now that you have learned how to expand the beaded area, consider the options for narrowing it. With this, everything is simpler. You can narrow the series by starting the weaving of a new row not from the edge, but from the place where you are planning a narrowed new row. Refer to Figure 14. One important aspect of the beaded fabric is the edging. 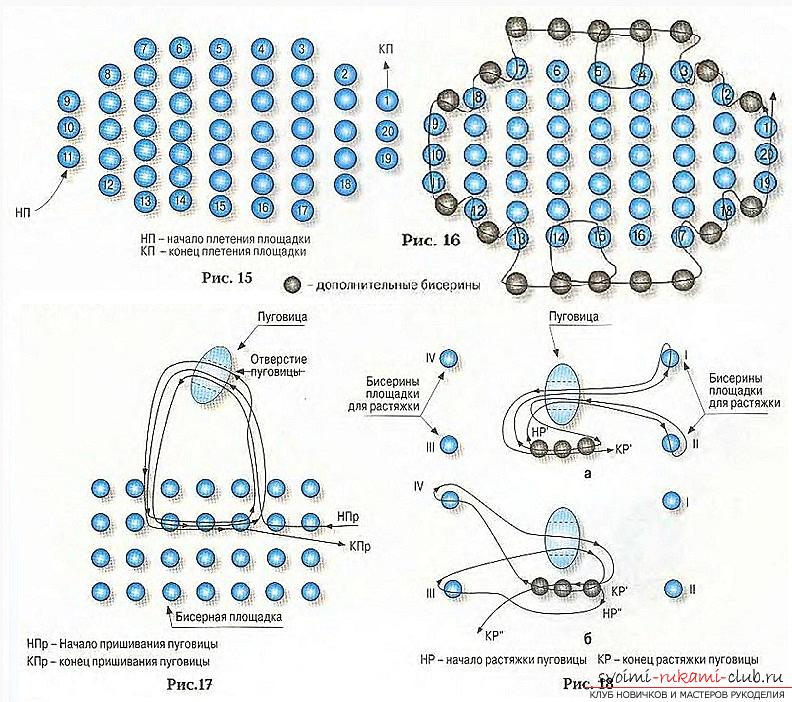 Usually the weaving of the beaded cloth ends inrow, with the smallest number of beads. For example, a canvas (3 + 5 + 7x5 + 5 + 3) is taken (see Figure 15). It is necessary to distinguish extreme beads along its perimeter. It turned out 20 beads. They are grouped, starting from their characteristics:
- (3 + 4 + 5 + 6 + 7) and (13 + 14 + 15 + 16 + 17). These beads are located on the ends of the canvas. You can see the line and their holes.
- (9 + 10 + 11) and (19 + 20 + 1). These beads = the smallest rows of the canvas. The line and holes of the beads are visible only at the beginning and end of the rows. This is the first and the ninth series. They look like a tube. Denote them respectively "tubes".
- The transition from one row to the next is like a "step". They are in our sample 4.
Now all the beads of the bezel are divided intoend, "tubes" and "stupenechki." The trimming techniques for each are their own (see Figure 16). After completing the work, the line comes out of the 1st bead. String one bead and from it to pass into the 2nd bead from below-upwards. Now you need to string another 1 bead and pass the line through the 3rd bead in the direction from the bottom to the top. String 3 beads and pass the line through the 5th bead from top to bottom and exit it. Now pass the line in the 4th in the direction from the bottom-up. The strung three additional beads formed an uneven line. Now you need to align and strengthen it. Numbering of beads for convenience from right to left 1, 2 and 3. Pass the line to the 2nd and 3rd (it is to the left) and tighten more tightly. String 2-3 beads. To pass a line in the 7th bead from top to bottom. Remove the line. String another bead and pass the line through the 8th bead. String another bead and go to the "tube" of the 9th, 10th and 11th beads. String additional bead and pass the line through the 12th bead from top to bottom. Remove the line. String another bead and pass the line through the 13th bead from top to bottom. String three beads, skip the line from the bottom-up through the 15th. Return to the 14th bead from top to bottom. Now you need to enter and exit into the middle and right beads of a number of edging. Again string 2-3 beads. To pass the line from the top down to the 17th bead. String another 1 bead. Skip the line from the bottom up to the 18th bead (this is a "step"). String another bead and pass the line to the 19th, 20th and 1st beads (this is a "tube"). You can also go out in its center, without passing a line to the 1st bead, only in the 19th and 20th. Now you can fix it with a knot and start attaching rhinestones, buttons, etc. If you want not only to make a beautiful and smooth edging, but to turn it into an additional decorative element, use the scheme proposed in Figure 7. Provided that you made a line according to figure 16, then the edging should be collected on it. In order to avoid undulation, several beads must be passed on the straight parts of the canvas. Let this number be X. Where there will be convex sections we need to weave X-1, on concave X + 2. If the bead work on figure 16 was not carried out, then the fringing should be fixed in the same way as the beaded line. If desired, the beaded cloth is woven either monophonic or multicolored. Single-color options are created in most cases as a background. For this option, you can use even beads, slightly different in size, because its flaws will not be noticeable. If you have the opportunity to weave from a quality and beautiful beads, then it can not be expanded after the interlacing of the sites. From small fragments, for example, you can make a very beautiful necklace. If you want a multicolor canvas and look for variants of images, use the sketches for cross stitching. For colored woven fabrics you will definitely need high quality beads. It is desirable to immediately acquire the necessary amount of beads of one shade and diameter, from one manufacturer, so that there is no difference in size or color. To weave a picture of beads by hand is easier than embroidering on canvas. The method of hand weaving produces very beautiful straps for watch, belt, clutches and even caskets. For decoration, rhinestones are often used in needlework. Let's look at the methods of securing strasses in a beaded canvas. Rhinestones must have a hole, where you can pass a needle with a fishing line. The easiest method is to sew the rhinestones to the desired bead. However, this can not always happen, because the entire hole of the desired bead can be occupied by several passes of the line (as you remember, it can pass into one bead up to 6 times). Therefore, you can attach the rhinestones to the lines of the line, and not to a particular bead. Select the place where you need to attach the rhinestone. Thread the needle with a fishing line into its hole. Pass the line to the interval A and pull the line to the wrong side. Pass the line to the front side in the interval B. Cut the fishing line, it should click. From the interval B, you can make a stitch in the interval C, with lines less on it. Sometimes in the weaving can happen fastening even to one line of the line. It is important not to break it in the canvas. Remove the line and thread on it 2 beads. To pass a fishing line through a bead, a rhinestone and a cloth. Remove the line. The second bead, standing upright, holds a rhinestone. The first bead is located horizontally. She closed the hole of the rhinestone. Now you need to circle the rhinestone beaded lace. When you get to the opening of the rhinestones on the other hand, you need to fix it with two more beads. Lesku 2 times to go into the first bead and once in the second, then in the rhinestone and then into the canvas. Now the hole of the rhinestone is closed on both sides. Now you need to thread the second part of the beaded lace around the second half of the rhinestone. The beginning and end of the rhinestones are connected. In addition to the rhinestones to the beaded canvas, you can attach buttons. In the shops of needlework, a lot of beautiful buttons are sold. They can be sewn to a canvas, having spent from 3 to 5 times through the holes of the button itself, and on the canvas, through a row of beads. The sewing scheme is shown in Figure 17. The line passes a couple of times through 2-4 beads in a row ("tube"). Now you need to stretch the button on the 4 points of the canvas (see Figure 18). For clarity, one stretch line is shown (see Figure 18a and 18b). Fix better for the beads of the canvas. Important. The button will rotate after each stretching. Hold firmly with your left hand a button and a beaded cloth when pulling the line so that they do not move. Like rhinestones, it is impossible to fasten buttons to the line between beads. Working line should not go beyond the button more than 1 mm. This 1 mm can be masked with lace braiding. We hope our advice will help you to weave yourself a beautiful beaded jewelry and please yourself and your loved ones.
Comments
Related posts:
 Animals from beads: lessons and patterns of weaving with their own hands (video)
 Free schemes of weaving roses from beads, master classes with photo and description of work.
 Master classes on weaving various Christmas decorations, photos, charts, description
 How to create a gerbera flower from beads in the technique of parallel weaving, step by step photos and description
 How to create a tourniquet from a bead, various techniques of weaving and knitting of plaits, step-by-step photos and a detailed description of the work