
Make your child an excellent gift. The pattern of cute dresses for girls will not take you much time. Instructions and photos
Which girl, at least once in her life, did not dream ofbecome the same as their favorite fairy-tale characters, and not get on a real ball. And do not just be on such a ball, but also be in a real dress, worthy of any of the fairy princesses. And that the hairdo was delicious, and the shoes are smart and lightly neat makeup. And let your young fashionista wear this dress only once in a lifetime - the most important thing is for your child to get this fairy tale and remember it for a long time. Presented pattern of a cute dress for girls will help you turn your little beauty into a real princess. Thanks to simple methods, like changing the length of the skirt, the coloring of the fabric and its texture, it can very easily transform into a light snowflake, a mysterious fairy and other fairy-tale characters. This basic pattern will help you create unique and original images for your child. Also you can show very little imagination, and decorate the girl's dress with ruches, bows, rhinestones and other accessories. A small clutch and diadem complete the image perfectly. It is important, this pattern is presented without allowances for seams. The dress skirt consists of several layers. The lower layer is a fabric that supports the shape, and the top layer is a chiffon or soft organza. The presented dress can be used for a variety of children's parties and events. This is a very simple model that is perfect for a child of any size. This pattern is designed for a girl 98 centimeters. The main fabric is a chintz, and the additional upper tier of the skirt is decorated with lace. You will need two and a half meters of lace braid for sewing, as well as 3 flower bows, a thin braid with rhinestones, about two meters long. At your discretion, you can add or remove the sleeves on the dress. Patterns for the trunk to the waist should be done in duplicate, so that the print does not shine through. Also, the dress will look more neat. After that, you need to sew all the details to get two patterns of dress to the waist. Stitch the neck, the cut for the head, and then turn the product to the front. 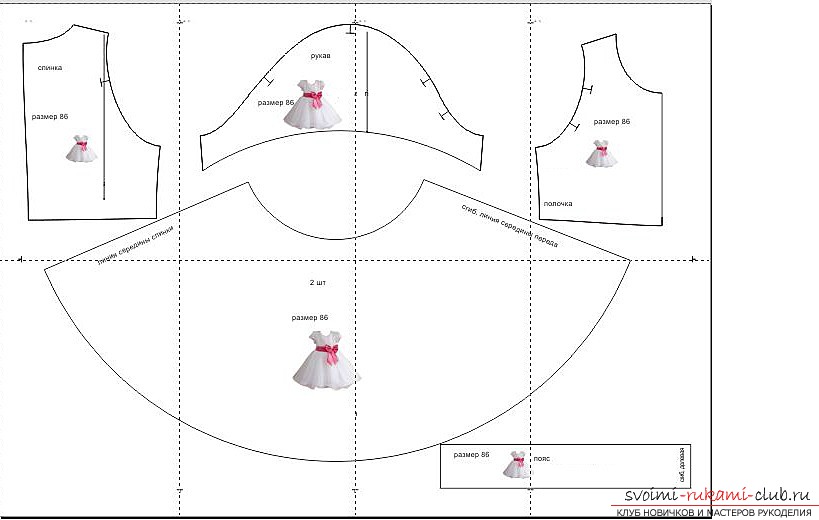 Now you can stitch the front side of the armhole,Before this, bend the ends, and also let the thin laces at the seams. Then they will be less noticeable. The top part of the dress is almost ready. It is important to note that the pattern was made to the size of 98 centimeters and additional allowances for seams were not made. When the dress is finally ready, it will sit on the girl back to back. So, if you will sew a dress in its own size, then you need to make several allowances so that the girl feels comfortable in it. In addition, you can make more throat, then sew zipper or fix small buttons behind. In order for the girl's head to pass without difficulty, it is necessary to make sure that both halves of the back are sewn together only at the very bottom, leaving a deep incision.
 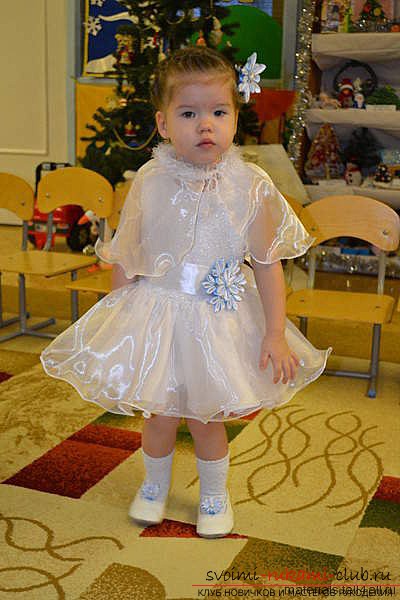 Then you can begin to pattern the bottom. Lower layer cut exactly on the pattern. In the end, it will come out very elegant. Lower the lace layer with tape. To hide the thread, you can grind a thin line. Lower layer of dress obtachayte lace. Combine the top and bottom of the dress from the wrong side with the machine. You can, at your discretion, decorate and complement the dress to make it more elegant and airy. Another option for sewing a dress will be the presented pattern. This is the basis of the outfit for a preschool girl, which means that you can make various models of different styles on it. To create a pattern of dresses for a girl it is necessary to remove such measurements:
- The length of the back to the waist is 26 centimeters;
- The total length is 50 centimeters;
- The length of the shoulder is 9 centimeters;
- Half-neck of neck - 13.5 centimeters;
- Half-girth of the chest - 30 centimeters;
- The length of the sleeve is 36 centimeters;
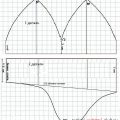
The first step in building a pattern of dress. First, draw a rectangle ABCD. The dress length is the sides AD and BC, which are equal to 56 centimeters. 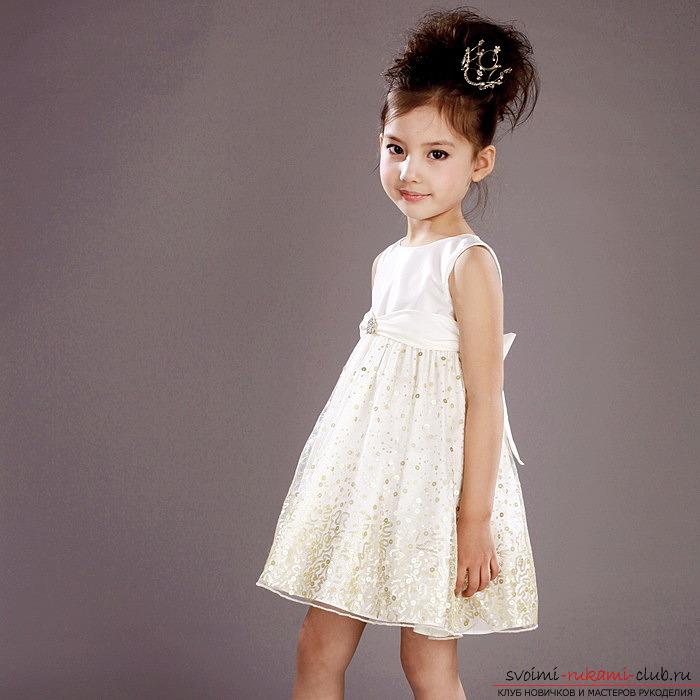 The width of the dress is the sides AB and CD, equal to 34centimeters. This is a half-chest of the chest plus four additional centimeters on the allowance. With this allowance, the dress will be very loose. If you want to get a more fitting model, make an increase of 2-3 cm less. To determine the depth of the armhole it is necessary to postpone from A 16 centimeters. Put a point D. This is the third half of the chest + 6 centimeters. From Γ, draw a straight line to the right of BC. This is the point T1. Down from A postpone 26 centimeters. We get the point T. This is the length of the back by measure. To the right of T, draw a horizontal line to BC. We put T1. The second step is to build a dress pattern. Next we find the value of the side line. To do this, GG1 is divided in half. We put G4. From it we conduct a line of sides to DC. This point is H. We denote the point of intersection with TT1 as T2. To measure the width of the armhole arm, you need to lay half the width of the armhole on both sides of the G4. These are the points of Γ2 and Γ3. The width will be 9.5 centimeters. One-fourth of the half-chest + 2 centimeters. From Γ2 and Γ3 upwards we draw the lines to AB, the points Π1 and Π are obtained. The third step is the construction of the dress pattern. To determine the size of the lifting of the shelf, from B and P1 we debug up 2 centimeters. These are points P2 and P3. We connect two new points together. For the auxiliary lines of the shoulder and armhole, the PG2 should be divided into two, and P1G3 divided into three parts.
 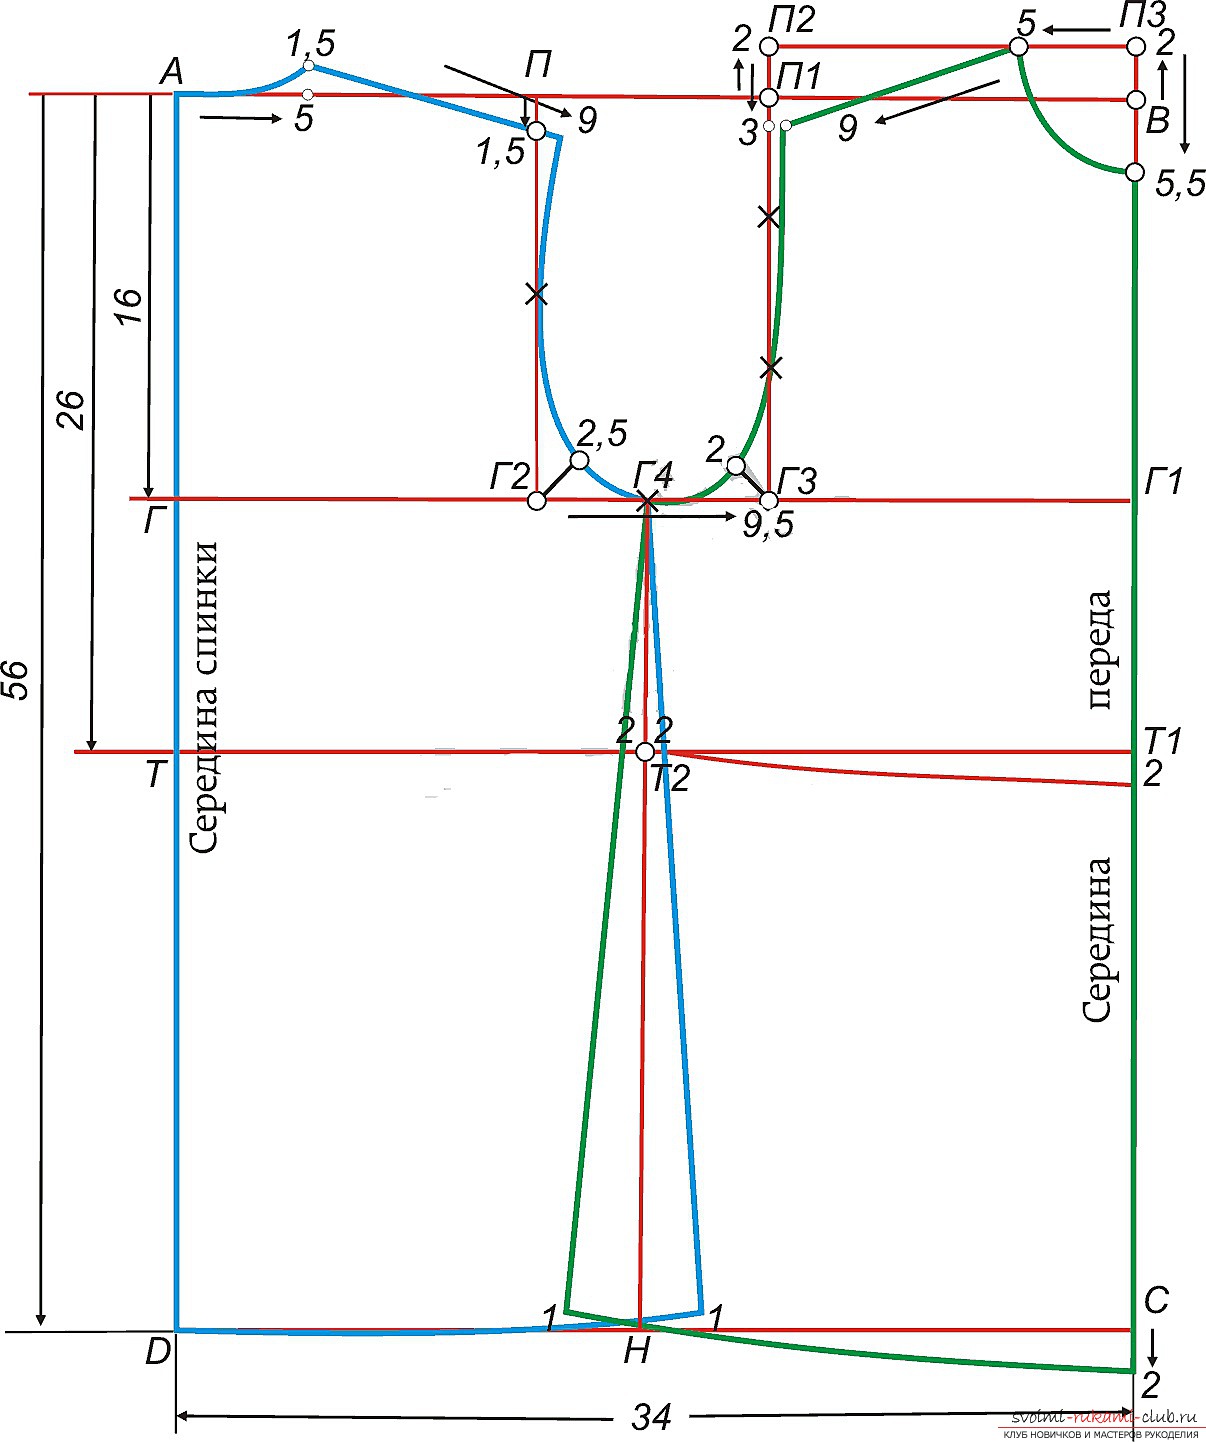 The fourth step is to build a pattern of dress. The cutout of the neck is counted: from A to the right, set aside 5 centimeters. This is the third half of the neck + 0.5 centimeters. From this place, put aside one and a half centimeters, and connect with A, after passing a slightly concave line. From P we will postpone one and a half centimeters. From point 1.5, the neck of the back, through point 1.5, the inclination of the shoulder, draw the shoulder line. Length - 9 centimeters, according to the length of the shoulder by the standards. From the point T2, dividing the angle in half, debug 2.5 centimeters. The armhole line will be drawn from 9 through the points of division of PG2 and 2.5 to the point F4. The fifth step is to build a pattern of dress. Next, from the point T2, set aside 2 centimeters to the right. Line the side seam from G4 through 2 to the DC line, but do not reach it centimeter. Cut the DH cut in half, and divide point smoothly with 1. The sixth step in the construction of the dress pattern. From point P3 down lay 5.5 centimeters. This is the third of the neck half-grasping + 1 centimeter. From P3 to the left, draw 5 centimeters. This is the third half of the neck + 0.5 centimeters. Points 5,5 and 5 connect the concave line. From P2, set aside 3 centimeters. From point 5, the neck is passed, towards point 3, the shoulder inclination, draw the shoulder line. The length is 9 centimeters. The seventh step is to build a pattern of dress. From G3, we spend 2 centimeters, dividing the angle in half. The armhole line will be drawn from point 9, through the point of division of straight line П1Г3, and also point 2 to point Г4. From point T2 it is necessary to spend to the left 2 centimeters. The line of the side seam should be drawn from G4, through point 2 and to the DC line, do not reach 1 cm. From T1 down, lay 2 centimeters, then connect to point 2 on the side seam. From the point C, the segment BC will be extended by 2 centimeters, we connect points 2 with 1 on the bottom.
Comments
Related posts:
 Make your child an excellent gift. The pattern of a bright Barbie dress will not take you long. Instructions and photos
 New and original ideas for the design of children's clothing. Original and simple solutions that will help you make an excellent gift to your child. Simple instructions and photos
 Pattern and sewing body for a newborn baby, described in this article, will not take long
 New ideas for the design of a cute baby cap. Original and simple schemes that will help you make a good gift to your child. Simple instructions and photos
 Give your child a real treat. Colorful and original costumes make it so easy and fun. Photos and instructions