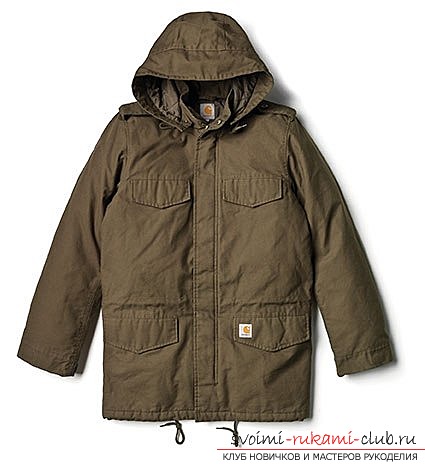
Pattern of men's jacket with their own hands. With the help of simple photos and instructions we create beautiful and stylish outfits for men
To create a really high-quality patternmale jackets, you need to put a little effort and patience, and then everything will turn out! To build a circuit, you will need to remove all measurements from a particular model. What parameters are needed?
Once all the measurements are taken, you can proceed to a direct drawing of the pattern. All parameters on patterns are given without allowance for allowances for seams! 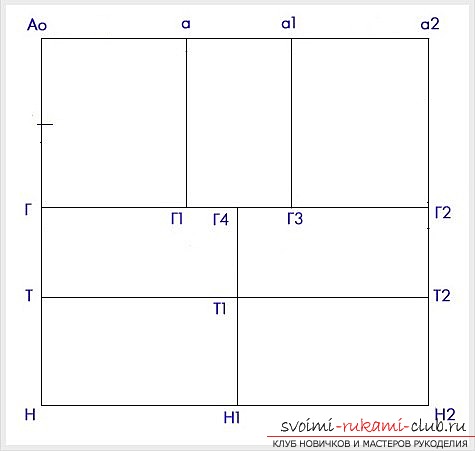
- First, we look at the corner of the Ao vertex.
- Correctly build the width of the grid. To do this, it is required to measure the segment, which is equal to the width of the product along the thoracic line, in other words A0 a2 = Cr + P2. The equation is deciphered, as the half-chest of the chest is added to the free fit (about 9 centimeters).
- Now we build the length of the grid. From the point A0 down we measure the length of the article according to the following formula: Di + 2.5 + 3 centimeters per gum, and denote the resulting value of H. From a2 draw the line to H down and call the point H2. From H to the right we draw a horizontal line to the segment a2 H2 and call H2. Now the scheme consists of three elements - back, shelf and armhole.
- Now measure the width of the back of the pattern. From Ao we measure such a value on the right-hand side A0 a = Rc + Pr (3 centimeters).
- Let's measure the width of the shelf. From a2 to the left, we set off the value a2 a1 = Mn + Pr (2 centimeters).
- Then we build the depth of the armhole. By the formula it is not necessary to cheat, it is simply accepted to take values from 20 centimeters. From Ao down we plot in a straight line 20 centimeters and call the point D. From Γ we lay off the horizontal line in the right side and call it Γ2. From a and a1, we draw down vertical lines that bound the region of the armhole in width and call the points Γ1 Γ3. Next, Γ1 and Γ3 are divided into two parts and we denote the segment by the point Γ4. Then from it we separate the segment H H2 from the straight line, and call the point H1.
- We build a waist line. From the level Ao, we lay down the segment A ^ + 2.5 and denote T. From T to the right side we lay off the horizontal line and denote the segment T1 T2.
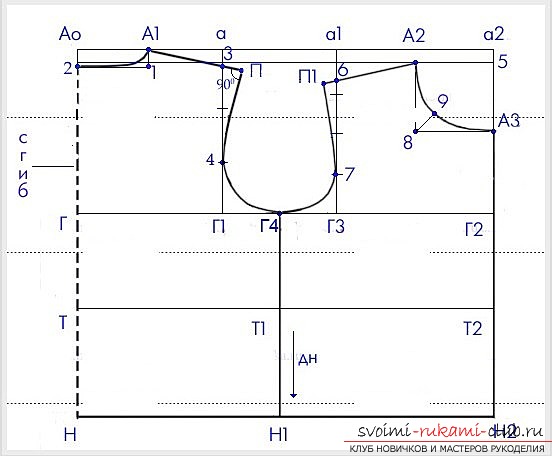
- We build the back, and start with the neck. From Ao to the right side, we lay off the segment: Cm: 3 + Nmount (1 centimeter), and denote by A1. From A1 to the bottom we draw a straight line, which is 2.5 centimeters and we call 1. From 1 to the left side we draw a horizontal line to AoH and denote 2. A1 and 2 are connected by a smooth line.
- We now turn to the construction of the shoulder. From a to the bottom side we measure 3 centimeters and we designate 3. From A1 in 3 we measure the segment about the formula: Wn (shoulder width) + 1 centimeter, and the answer is denoted by P.
- Now go to the armhole. To begin with, find the level 4, for this we divide the interval a1 into 3 parts. We join the points Π 4 Γ4 by a line.
- We pass to the construction of the neck. From a2 down we measure 2 centimeters and call 5. From 5 to the left we measure the segment according to the following formula: Cm: 3 + 2 centimeters, and the answer is denoted A2. This is the width of the armhole. Now let's calculate the depth. From 5 down we postpone a segment according to the following formula: 5 А3 = а2 А2 - 1 centimeter. The points A2 A3 are connected by a line. If it is difficult to draw the right line by hand, then draw a right angle A2 8 A3, and divide the level 8 into two parts and designate 9.
- We now turn to the construction of the shoulder. From the level a1 down we lay 5 centimeters and call 6. From A2 through 6 measure the width of the shoulder (Шп) and name п1.
- Armhole. The level a1 of T3 is divided into four parts, and the bottom is denoted by 7. By a smooth line we connect P1, 7, G4.
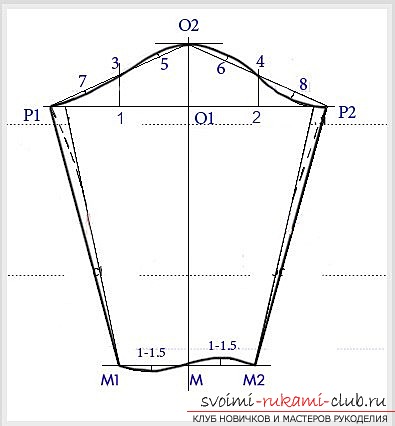
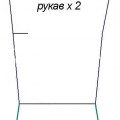
- We start drawing the sleeves. What is the difference between a sleeve of a shirt cut and a vintage one? It has a larger width and a smaller height. The height of the pellet is related to the degree of depth of the armhole directly. The larger the shape of the product itself, the higher the height of the pellet will be. For initial works, it is necessary to draw perpendicular lines, with the center at point O1.
Calculate the height of the pellet. This will be a segment of O1 O2, and it will be determined in different ways, it all depends on the shape of the jacket:
- Now calculate the width of the sleeve. From O2 (the radius is half the length of the armhole) we make a notch on the line that passes through O1, and denote them by P1 P2. Consider the segments O1 P1 and O2 P2. We divide them in half and draw perpendiculars. We determine the auxiliary points that will be needed for sewing the pellet of the sleeve: 3,4, 5, 6, 7, 8. We divide the segments: P1 3, 3 O2, O2 4, 4 P2 in half and construct perpendiculars from the points obtained. From 5 and 6 to 1 centimeter, and from 7 to 0.5 centimeters, from 8 to 1.5 centimeters. We draw the line of the pellet through P1 3 O2 P2.
- We measure the length of the sleeve. From O2 down we lay O2 M + 3 (per elastic band) = Sleeve length.
- We measure the width of the sleeve along the bottom. From the point m along the horizontal line, we lay the width of the sleeve M M1 = M M2.
 Now we will work on the cuff under the elastic band. It is necessary to draw a rectangle whose length is equal to the bottom of the sleeve, and the width to the width of the gum (if the elastic band is worn with the cuff, if not, then add a half centimeter).
 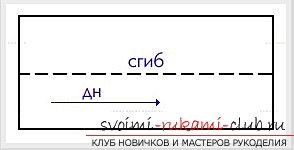 Let us turn to the construction of the collar. Draw a pattern simply, you just need to draw a rectangle whose length = the length of the neck and back. Choose your own height. The top of the collar needs to be slightly expanded.
 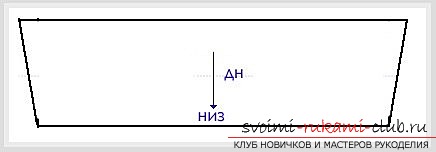 We proceed to build pockets. The model shows the pockets of a slotted zipper with leaves. We draw a rectangle (leaf) 19 centimeters long and 3 centimeters wide. There are two leaves for each pocket. Draw a burlap pocket of any shape, but with an entrance length equal to the length of the leaf.
 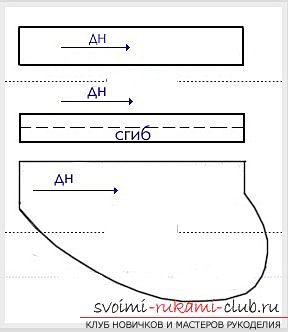 Draw the bar. The model shows a scheme of arbitrary shape. Draw a rectangle whose length is equal to the length of the shelf in the center + the height of the gate (figure a). Planck consists of only 1 part. Do you want rounded ends? Then round them as shown in picture b, but remember that when cutting, you need 2 such details.
 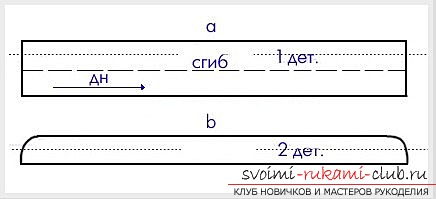 On this the design of the male jacket can be considered complete. However, before you lay out all the details on the fabric, you should check their total number of parts.
Comments
Related posts:
 We create stylish summer outfits from simple silk handkerchiefs with our own hands. Such a summer outfit can be done without needles, threads and even scissors
 Pattern of overalls for the terrier own hands. Using simple schemes and methods, create a unique suit for walking your favorite pet
 We make new clothes in our summer wardrobe with our own hands. The pattern of the original tselnokroenogo dress without difficulty. Instructions and photos
 We make new clothes in our summer wardrobe with our own hands. Pattern of a fashionable dress with a smell without difficulty. Instructions and photos
 We make new clothes in our summer wardrobe with our own hands. Pattern elegant festive dress without difficulty. Instructions and photos