
Master class Christmas elf for the holidays - New Year's toys with their own hands
What does our holidays consist of and why?prepare for them to recreate the necessary atmosphere? In any case, in order to make any celebration, it is necessary to embody the symbols of this festive event. New Year and Christmas are holidays that are rich in events and therefore have a number of special, unique and unique properties, as well as special symbols, through which we believe in miracles, magic.
Master class Christmas elf for the holidays - New Year's toys with their own hands
 The New Year's elf is a popular character,which helps Santa Claus in the performance of all our cherished desires. Many children know that Santa is one, but to invent and deliver gifts is not too easy alone. Therefore, he has friends - little elves, who differ in their diligence. Many adults and children on the eve of the holiday are preparing to arrange their home, make unique gifts for loved ones. New Year's elf from clay - materials for work
 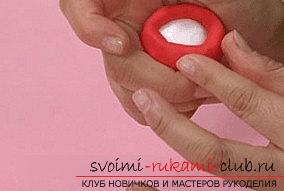 Registration of a New Year's elf can occurthanks to many techniques, but recently more and more popularity is gaining the needlework scheme associated with polymer clay. Using this flexible material, we have the opportunity to create a simple and convenient method for implementing your favorite characters. This lesson will tell you how you can make a beautiful and unique version of the toy. For this, special materials and tools will be needed, they will help to process and improve the properties of the future toy for the New Year.
- Take the polymer clay of white color
- Also clay red
- Clay of a corporal color
- Clay green
- It will take a ball of foam
- Also need a toothpick
- Stack type acute
- Paints made of acrylic
- Thin type brush
- Adhesive PVA
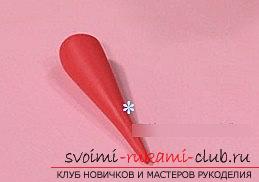
The form of the New Year's elf Using red clay, we mustform a drop element. We use an acute angle in order to produce a twist in a spiral shape. For the opposite particle, it is necessary to form a small version of the heel, as well as the shape of the foot. Use white clay to form the legs of our character. To do this, we use the sausage shape, which we zauzim from one end, and then, make a bend in the middle using an angle of 45 degrees. We make a molding of two parts. Our legs are ready. We attach them to shoes! Further, using clay of green color, we form grass and a sub-form. The texture of the grass is given with the help of a toothpick device, or needles. After, we form the body for the future elf. For this, you need to take and roll out clay in red. After that, wrap them in a styrofoam ball. Also, as an alternative to such a ball, an ideal version of food foil is ideally suited. We run the material on all sides so that there are no variations in the seam. We get rid of the forms of unevenness, we form a pear. Next, we make a connection with the legs of the character. The components of the New Year's craft of the elf 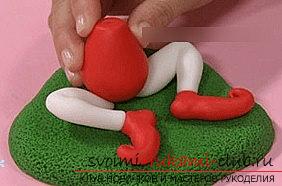 After, we continue to shape our hero, doinghis hands. White clay rolled to the shape of the sausage and then cut into two pieces. Next, we also work with green clay on thin rolling to cut it into strips. After, it is necessary to wrap the sausage in white and bend using the middle in the approximate range at 90 degrees. On the one hand sausages produce a narrow side. We use clay of flesh color to fix the brush (two of them) and then, to support them to the hand. After that, we glue our hands with the help of the trunk. We use a stable form for the head by fixing the toothpick. We also close with a white collar. It will remain to make a head for an elf. The body clay is formed into a sphere. For the center of the head molds a small ball, then, flattened. We form the nose of the hero. We use the stack to form the nostril and the oral cavity. Then, we use a thin brush to draw eyes with acrylic paints. Ears are rolled by droplets and clamped on both sides. Using the stack, we form a depression. The ears are glued to the head. Connection of Elf particles
 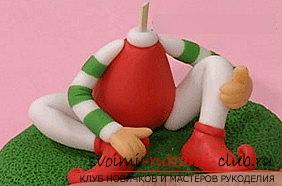 After that, we attach the hat to the elf. To do this, roll a drop using red color. A droplet from the end on the blunt side is pressed with fingers on the inner part. Thus, it will sit well in the character's head. The opposite ends of the edges are stretched slightly, we get the shape of the ears. Then, the cap is glued to the character's head and attached to the final shape. The head is planted on the body through a toothpick. Glue to the body of the button is green. We make a sign for the elf, we attach it to the stand! That's all, our workpiece is ready!
Comments
Related posts:
 New Year snowflakes and Christmas toys with their own hands - master class origami
 This master class toys will teach you how to tie a zebra crochet
 A master class with a photo is devoted to weaving a toy made of rubber bands, it will be a parrot with our own hands.
The master class will teach you how to create knitted toys with your own hands, the hare crochets.
Master-class of making their own toys for decorating a Christmas tree - Christmas ribbons made of ribbons.
A master class with a photo is devoted to weaving a toy made of rubber bands, it will be a parrot with our own hands.
The master class will teach you how to create knitted toys with your own hands, the hare crochets.
Master-class of making their own toys for decorating a Christmas tree - Christmas ribbons made of ribbons.