A master class with a description and a step-by-step photo of a toy made by oneself - a crocheted monkey crochet.
The symbol of 2016 is a cheerful and provocative monkey. It so happened that in each house the toy representative of the fauna settles in, who patronizes the new year in the Chinese calendar. It can be a souvenir bought or a gift from friends. But more and more often mistresses prefer to do it with their own hands. And here the limit of fancy needlewomen does not exist ... In my master class I want to show how to tie a nice and kind monkey. She will sit on the shelf and protect the house from trouble the next year.  For a knitted monkey it is necessary: - Threads of light brown and white flowers. In the MC used acrylic 100%, thread length 25 meters in 40 g. 120 g of brown and about 20-30 g of white were used for work. The monkey was 44 cm tall; - hook number 5; - wadding or sintepon for packing; - Two black beads for the eyes; - two large black beads for the nose; - a little red thread for the mouth and lacing; - a needle; - wire for pens and a tail. The number of loops and dimensions in cm are given precisely for these threads and monkeys of this size. If you need a larger or smaller size, then change the number of loops, following the principle of knitting. The same with the thickness of the thread. Let's start knitting our monkey from the limbs - legs, hands, tail. For the leg we will tie a chain of 8 air loops.
  We connect the eyelets to the ringlet.
  And we will fasten in a ring 8 simple columns, without nakidy.
  Next we will knit in a spiral, without lifting loops.
  This is knitting. The leg will slightly curl.
  Having connected 17 sm, we finish our leg. We knit exactly the same.
  Similarly knit pens and tail. BUT! knit knits on 7 loops and the same length as the legs, and the tail on 5 loops and a little longer.
  Next, we begin knitting the torso of our monkey. We dial a chain of 40 air loops and close it in a ringlet.
  Knit the torso of the monkey, we will also be spiraling, not marking the beginning of the series. We knit so 20 rows (the rows are easy to count, the beginning is not important).
  After that, we start decreasing. We impose together every 10 and 11 loops. And we reduce it until there are 24 loops left.
  Then we start knitting the head. We make a ringlet of 4 air loops.
  Tie in a ringlet in the first row 6, and in the second - 12 loops.
  Further we will make increases to make ita circle. To do this, divide all the loops by 6. And add at the end of each sector. That is, there are 12 loops in the circle. Divide by 6 - we get 2. We sew one column unchanged, in the second we make an increase - from one column we untie 2. In the next row, the number of loops is 18. Divide by 6 - it turns out 3. So we knit two columns unchanged, and in third we make increases. We get 24 loops.
  And so we knit in a circle.
 While the number of loops does not reach 48 pieces.
  Further we will tie 10 rows without changes and we will beginmake a decrease. Losses do exactly the same. The initial quantity is 48. We divide by 6 = 8. That is, we sew 7 and 8 loops together. We obtain a series of 42 loops. But with a reduction one row is subtracted, the second we leave unchanged. Thus, we get a more gradual decrease. We subtract until the number of loops becomes 24.
  Now we'll tie the ears. Ears will consist of 4 parts, which we will bind in pairs. 2 white patches and two brown ones. Let's start with 6 air loops.
  Further we will fasten a ring 9-th simple columns. But you need to do it so that you get more oval than the circle.
  Knitting is unfolded. We tie one loop to raise the row and in the first column we'll fasten another simple column. Next, we knit the column three times. In the fourth column - the top of the ear - we sew 3 simple posts. Then again three times a column in a column. In the last column we sew two simple posts.
 Again unfold knitting. This series is knitted in the same way, with increments in the beginning, middle and end of the row. Knitting is finished.
  So tied 4 identical parts.
  Now a thread of brown color we will tie together the details in pairs - white and beige.
  We tie in a circle - the bottom must also be tied. Here is the ear should be.
  We knit similarly to the second eyelet.
  Now we proceed to the muzzle. Her we will knit white. To begin with, we will type four air loops and connect them into a ring.
  In the ring we will connect six simple columns.
  Muzzle will knit in a circle, making increases in each row. We will add two loops at a time, then we will get a convex muzzle.
  In order to get an oval, and not a circle, we will always make increments in the same places - on the sides. From one side.
  And from the other, exactly opposite the first.
  Five rows is enough. Finish the series and proceed to the eyes.
  To do this, we will connect five air loops and connect them to the muzzle, letting in two bars.
  Let's go back to the center, tying the chain with simple bars.
 Symmetrically connect the second eye socket.
  And finish the muzzle, tying it around in a circle with simple bars. On both sides also make two increases.
  All parts of the monkey are ready, you can proceedassembly. We begin to assemble it from sewing the leg to the body. But for this, the trunk needs to be tied down from below. While it is at our bottom is even, but we need to make it the same as the top - rounded. To do this, we will tie the body around and make a decrease. The first row is tying the loop into a loop, unchanged.
  Next we will reduce every 10 loops. Losses are done until the trunk is exactly on the two legs of the monkey.
  When the hole below the body is reduced to the right size, tie the legs. To do this, you need to turn the torso on the wrong side and apply the legs as in the photo.
  Now we knit a row immediately behind the loops of legs and trunk.
  When the legs are tied to the body, we turn everything to the face.
  While the body is not full, you need to sew a tail to it. For the tail to be flexible, insert the wire into it. Cut a piece of wire longer than a knitted part for 3-4 cm.
  One end is wrapped with a ringlet.
  And push the wire into the tail with a ring forward.
  The second, sharp, end of the wire is inserted into that place on the trunk, where there should be a tail.
  From the inside, we also bend the wire into a ringlet.
  And we sew the tail to the body.
  Now you can stuff the legs. Since it is knit, it is easily stretched and deformed. Therefore, when filling, it is important to ensure that all paired parts are of the same size.
  It is better to stuff the legs using thick knitting needles, small batches of cotton wool or sintepon.
  Now we fill the trunk. The body is packed tight, at the same time we make sure that the tail does not move. We stuff it not completely, but to the level of the hands.
  Now you need to cut off a piece of wire a little more than the span of the arms of our monkey. We put it in the trunk right through to where the hands should be.
  We bend one end with a ringlet.
  And put the first pen on the wire.
 Gently, in small pieces stuff your hand with cotton. It is important to ensure that the wire reaches the very end of the hand and does not move during the filling. In the same way we do with the second hand.
  Then sew our first hand.
  And the second.
  That's how it turns out after sewing hands.
  Fill our monkey to the end.
  Then fill the cotton head.
  And sew her loop into the noose to the trunk.

 After the head has taken its place, sew the muzzle.
  And a little stuffed with cotton wool to make it voluminous.
  Then sew the ears to the head.
  At both sides.
  We decorate the muzzle with eyes.
  Spout.
  We sew the mouth with red thread.
  Now you need to finish the legs of our beauty. To do this, we add a 4-row spiral to the white thread. And we'll make the adjustments by tying all the loops in pairs until it's left alone.
 A thread of red color will make an imitation lacing and tie a small bow.
  We will do the same with the second leg.
  Now dress our monkey, and in hand give a beautiful bouquet of dandelions.
  On our site you can find a master class knitting skirts and vests for our beautiful monkey.
Comments
Related posts:
 Master class with photo and step-by-step description will teach how to tie an amigurumi crochet toy
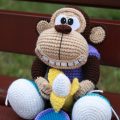 Master class on knitting monkey amigurumi crochet with their own hands with step-by-step description and photo.
 Master class on knitting monkeys with amigurum crochet for beginners with step-by-step description and photo.
 Master class on crochet summer dresses for girls from 3 years with their own hands with a step-by-step description and photo.
 Master-class with detailed photos and step-by-step description will teach how to crochet a toy minion