At the word "doll", the imagination immediately drawsfunny toys for little girls. Of course, this was not always the case. In ancient times, dolls were intended not only for children's games, they served as attributes for rituals, served as wards or symbols of the gods. That era has long gone, now amusing, cute dolls please little girls of different ages and serve as interior decorations. Original in performance, harakternye dolls, created by hand, become decor elements and create a certain atmosphere in the room. One of the great materials for creating such hand-made articles is polymeric clay. It can be self-hardening and baked. And if modeling has become a hobby very recently, it is better to choose the latter. The baked clay (thermoplastic) does not freeze in air, so the parts made of it can be adjusted and changed throughout the process of creating the doll. Funny Haitian woman, who even in winter will remind you of the warm beach and summer. To avoid errors and alterations, it is better to draw a sketch of the future doll before molding. 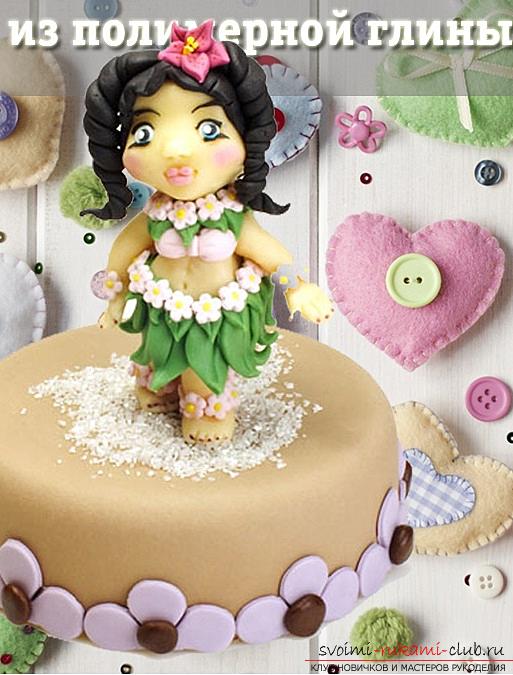 It will take:
- Polymer clay is white, yellow, blue, black, green, dark pink, flesh-colored;
- Rolling pin;
- Pink paint (dry pastel or acrylic);
- Stacks for working with plastic (you can use toothpicks and needles);
- Stationery knife;
- Drop-shaped and round forms (suitable baking molds).
The work surface must be clean and smooth. Head.
Carefully stretch the white, yellow and solid clay together. Roll the ball. It will be a head.
2 with your thumbs flatten a little ball on both sides. Formed for the eyes and cheeks.
Less pressing the bottom to form a chin.
In the center of the face, form a spout. Nostrils draw a toothpick.
Roll out a small layer of white clay.
Cut 2 circles and paste the doll's eyes in place.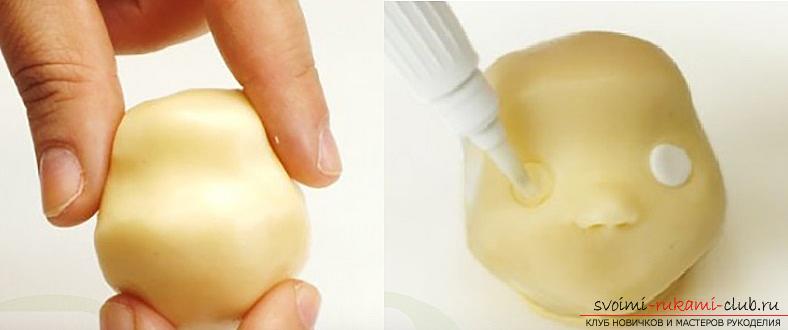 Silicone stack or toothpick to cut the sponge of a Haitian woman.
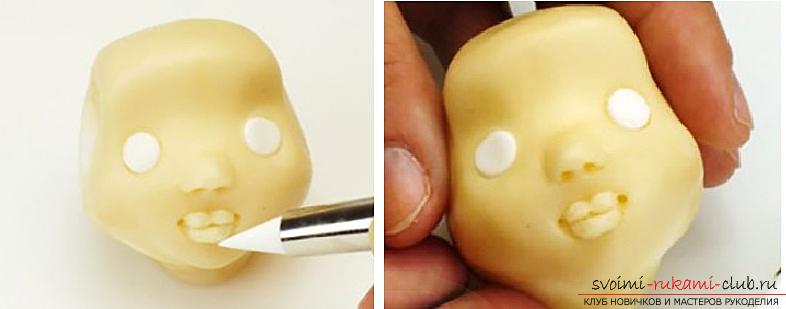 Roll out the clay layer of blue color.
Cut 2 circles (smaller diameter than the white circles of the base of the eyes). Place them on white circles. If desired, you can make a doll with a different eye color (brown, green).
Roll out the clay layer of blue color.
Cut 2 circles (smaller diameter than the white circles of the base of the eyes). Place them on white circles. If desired, you can make a doll with a different eye color (brown, green).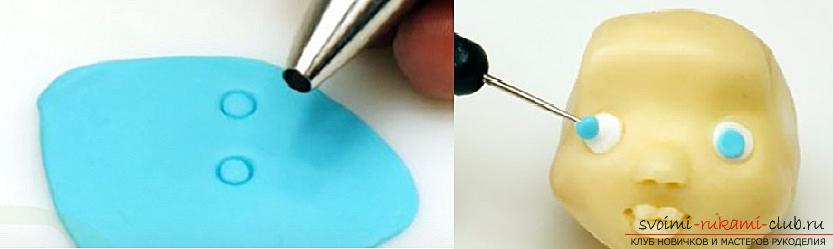 From a thin layer of black cut out the pupils and attach over blue circles.
It is possible to place a very small circle of white on top of the pupil, this will add to the expressive look.
From a thin layer of black cut out the pupils and attach over blue circles.
It is possible to place a very small circle of white on top of the pupil, this will add to the expressive look.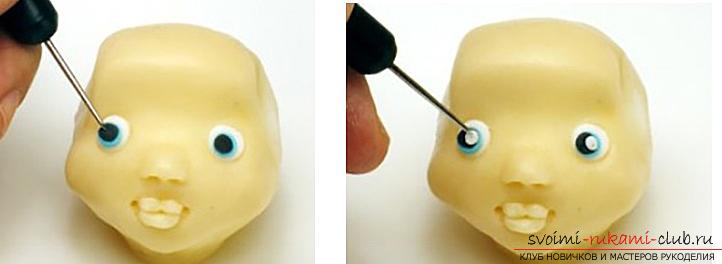 Roll 4 thin sausages from black clay (eyebrows and eyelashes).
Color the lips, and make a blush on the cheeks with a pastel or acrylic paint in pink.
Roll 4 thin sausages from black clay (eyebrows and eyelashes).
Color the lips, and make a blush on the cheeks with a pastel or acrylic paint in pink.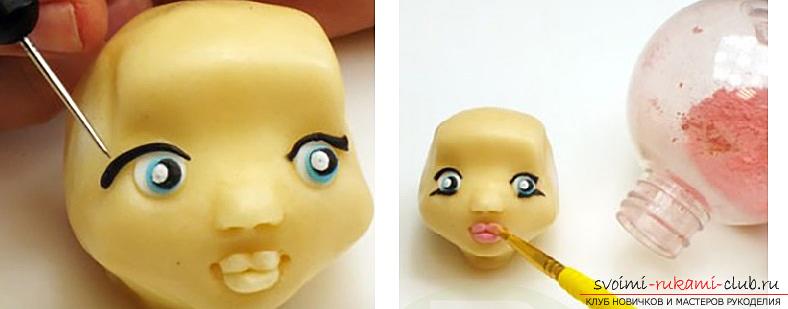
Torso.
Roll 1 thick sausage for the torso and 2 thin sausages for the hands and feet. Give them the appropriate form.
Bend a little leg in the knees, knife on the handles and legs to cut the fingers and dye the marigold.
Give them the appropriate form.
Bend a little leg in the knees, knife on the handles and legs to cut the fingers and dye the marigold.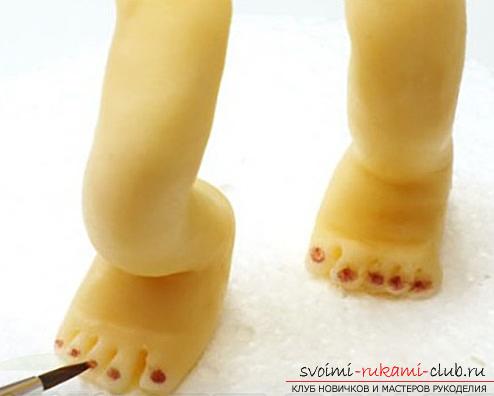
 Mix dark pink and white clay.
From the resultant light pink plastic to make a bow. He will also serve as a bust of the Haitian woman.
Mix dark pink and white clay.
From the resultant light pink plastic to make a bow. He will also serve as a bust of the Haitian woman.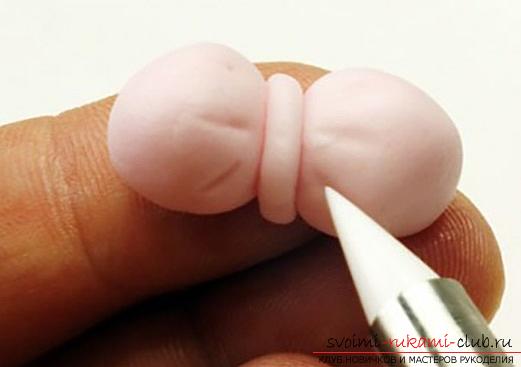
Hairstyle.
Roll out the layer of black clay.
Cut the circle and attach it to the head. Edges make wavy. A stitch or a toothpick can draw strands of bangs.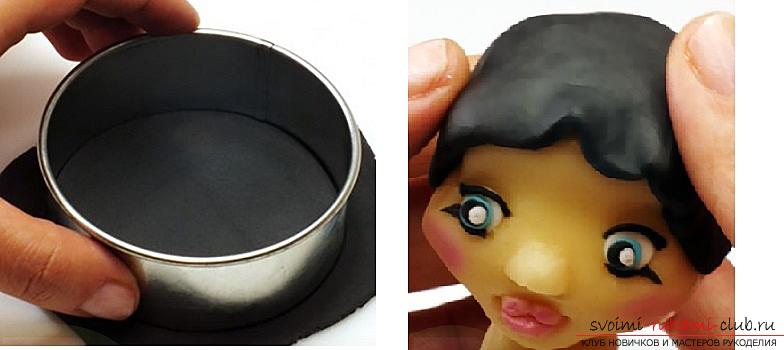 Roll 4 sausages of black clay with a thickening at the end.
Twist 2 in bundles and attach to the head with thicker tips.
Thin ends slightly curl.
Roll 4 sausages of black clay with a thickening at the end.
Twist 2 in bundles and attach to the head with thicker tips.
Thin ends slightly curl.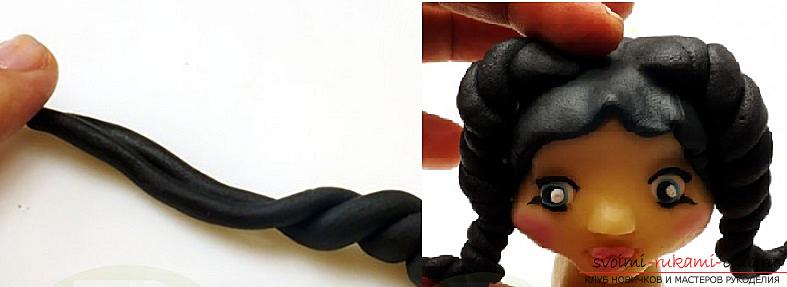
Attire.
Roll out the layer of green clay.
Drop-shaped molds of different sizes cut out the leaves for the loincloth.
Stitch or a toothpick to draw a groove, and with fingers slightly bend the leaves.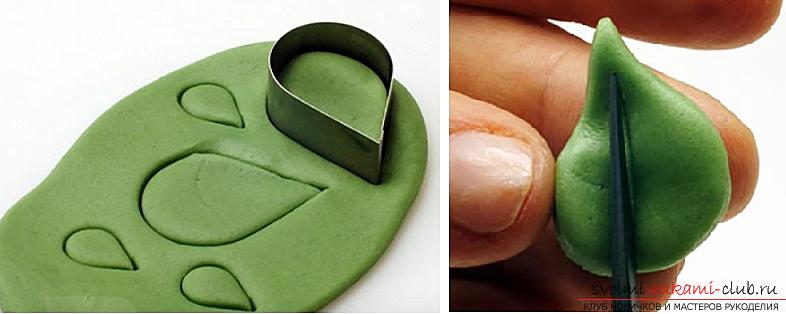 It takes 3 rows of leaves.
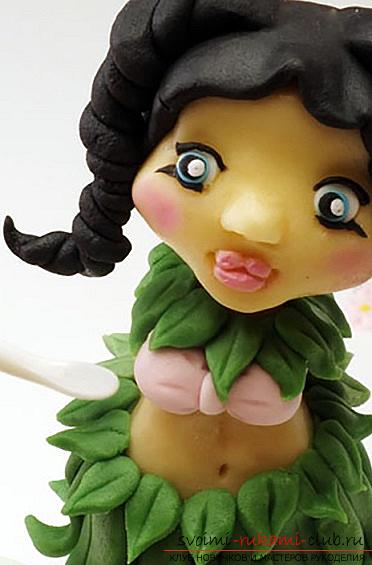 From a layer of light pink clay, cut out small flowers.
Clay yellow color to make the core.
Attach the flowers with a necklace around the neck and another row around the waistband.
From a layer of light pink clay, cut out small flowers.
Clay yellow color to make the core.
Attach the flowers with a necklace around the neck and another row around the waistband.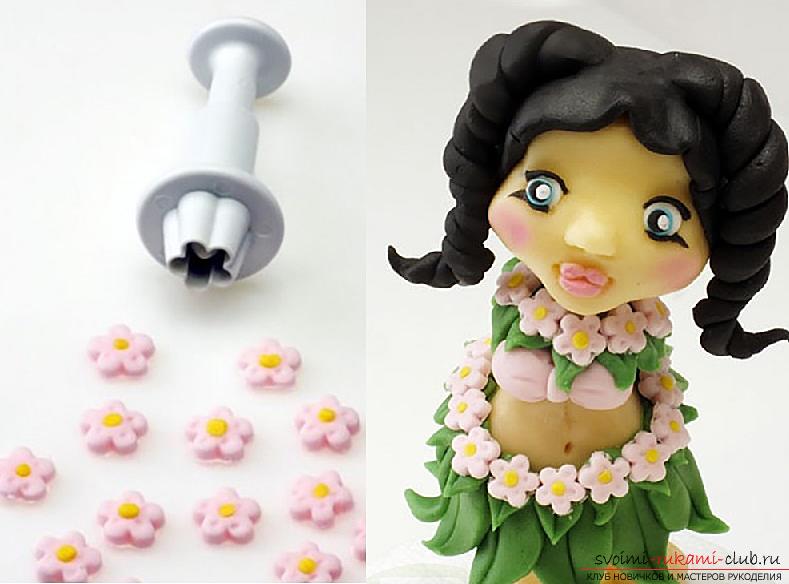 From a layer of dark pink clay, cut a drop-like shape of 5 petals for a large flower.
Floss a longitudinal groove on each petal. Fingers to sharpen the tips and attach 2 sausages of yellow color (stamens).
Attach the flower to your hair.
From a layer of dark pink clay, cut a drop-like shape of 5 petals for a large flower.
Floss a longitudinal groove on each petal. Fingers to sharpen the tips and attach 2 sausages of yellow color (stamens).
Attach the flower to your hair.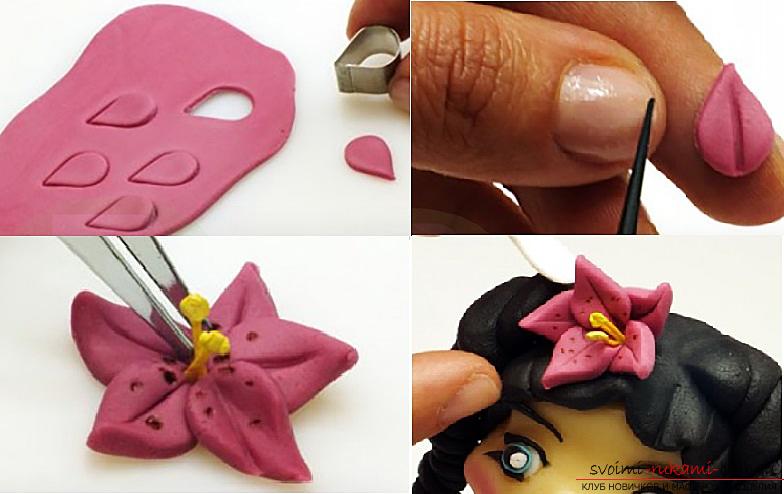 Hands decorate with small pink flowers.
The Haitian dancer is ready. Of polymer clay, you can sculpt not only funny toys. With the help of plastic, the wizards create surprisingly realistic dolls, which differ in appearance from people only in size. Sleeping baby.  Before work it is better to stock up several photos of babies, and to consult with them during molding. It will take:
- Baked polymer clay in pink color;
- Wire;
- Foil;
- A set of stacks for working with polymer clay (can be replaced by dental instruments);
- Gloves (not to leave prints on the hand-made);
- Paints.
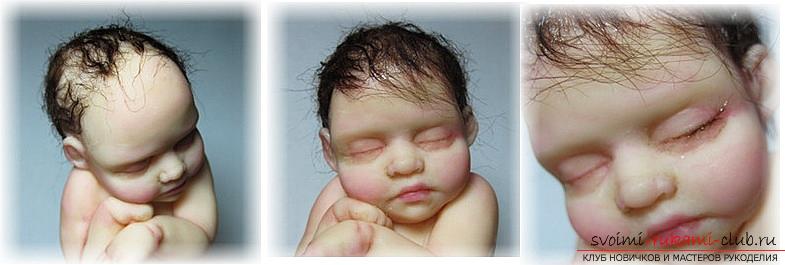
The wire is suitable for both steel and copper. In order not to get injured while working, it is better to bend it with a loop. Head.
To bend a loop on the end of a wire and to wind a ball from a foil. You need to squeeze the ball as tightly as possible. The diameter should not exceed 3 - 4 cm.
Wrap the blank with a layer of clay about 4 - 5 mm thick. Align. The workpiece must be without dents, symmetrical and round.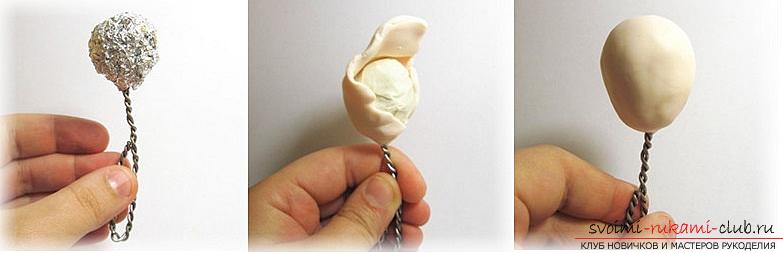 To create baby's cheeks, you need to formA small piece of clay dome shape and attach it to the head, slightly laterally. In crumbs, the cheekbones are almost invisible, because the cheeks are located lower than in adults.
Symmetrically arrange the second cheek. Smooth the junction points very carefully, so as not to distort or flatten the features.
Stack with a ball on the end to form grooves for the eyes, pressing it. The eyes of the children are located below the axial horizontal line of the face.
To create baby's cheeks, you need to formA small piece of clay dome shape and attach it to the head, slightly laterally. In crumbs, the cheekbones are almost invisible, because the cheeks are located lower than in adults.
Symmetrically arrange the second cheek. Smooth the junction points very carefully, so as not to distort or flatten the features.
Stack with a ball on the end to form grooves for the eyes, pressing it. The eyes of the children are located below the axial horizontal line of the face.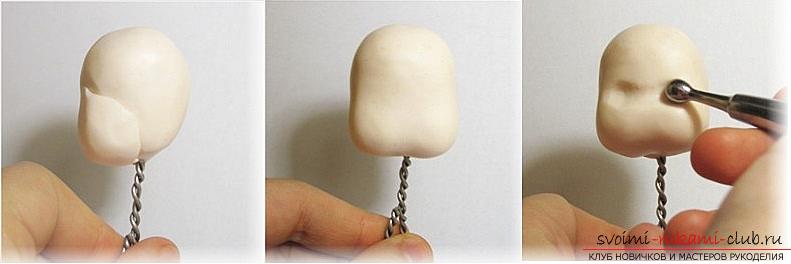 Roll a small ball for the baby's forehead. Give it a rectangular shape with thinner edges and a thicker middle.
Attach over the eye cavities. Carefully smooth joints. Control that the forehead is not strongly sloping or massive.
Smooth the irregularities of the fingers of the baby should be a pretty face with a small forehead and beautiful brow ridges.
Roll a small ball for the baby's forehead. Give it a rectangular shape with thinner edges and a thicker middle.
Attach over the eye cavities. Carefully smooth joints. Control that the forehead is not strongly sloping or massive.
Smooth the irregularities of the fingers of the baby should be a pretty face with a small forehead and beautiful brow ridges. Roll 2 tiny balls, flatten them and place them in the eye sockets of the baby. These are the future eyelids. The eyes of the crumbs will be closed.
Carefully smooth the joints of the eyelids, make sure that they remain convex.
Draw a line along the center of the eye. Make indentations in the corners.
Roll 2 tiny balls, flatten them and place them in the eye sockets of the baby. These are the future eyelids. The eyes of the crumbs will be closed.
Carefully smooth the joints of the eyelids, make sure that they remain convex.
Draw a line along the center of the eye. Make indentations in the corners.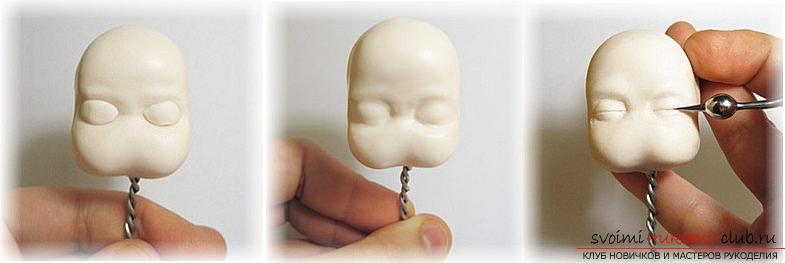 Between the eyes to attach a small piece of clay (the bridge of the nose in babies is usually small).
Stick a small ball and give it a bulb shape. This is a spout.
Smooth the joints.
Determine the location of the nose, the base of the nose and chart the nostrils. During modeling, it is often possible to compare with photos of kids.
For nostrils use a tool with a small ball. Slightly pressing on it, form a rounded nostril.
Between the eyes to attach a small piece of clay (the bridge of the nose in babies is usually small).
Stick a small ball and give it a bulb shape. This is a spout.
Smooth the joints.
Determine the location of the nose, the base of the nose and chart the nostrils. During modeling, it is often possible to compare with photos of kids.
For nostrils use a tool with a small ball. Slightly pressing on it, form a rounded nostril. Roll the ball, flatten it into a thick cake and attach directly under the spout. From it will be formed the upper sponge and the space between it and the spout.
Smooth the joints. Nasal folds do not draw deeply.
Tool clearly outline the upper sponge.
Spoon-shaped tool to make a small notch slightly above the center of the lip.
The same tool to form the lower part of the upper sponge in the form of "Luke Cupid".
Roll a small sausage, fasten it under the upper lip. The upper sponge should protrude above the bottom.
Smooth the joints without touching the line between the lips.
Roll the ball, flatten it into a thick cake and attach directly under the spout. From it will be formed the upper sponge and the space between it and the spout.
Smooth the joints. Nasal folds do not draw deeply.
Tool clearly outline the upper sponge.
Spoon-shaped tool to make a small notch slightly above the center of the lip.
The same tool to form the lower part of the upper sponge in the form of "Luke Cupid".
Roll a small sausage, fasten it under the upper lip. The upper sponge should protrude above the bottom.
Smooth the joints without touching the line between the lips.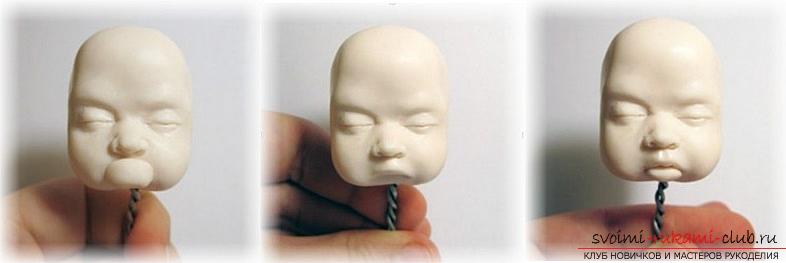 Thick sausage to attach under the lower lip. This is the preparation for the lower jaw.
Smooth the connection points.
To form a chin, add a little clay to the right and left of the lower jaw. Indicates a fossa under the lower lip and a line of the chin. Check with a photo of a real baby.
Thick sausage to attach under the lower lip. This is the preparation for the lower jaw.
Smooth the connection points.
To form a chin, add a little clay to the right and left of the lower jaw. Indicates a fossa under the lower lip and a line of the chin. Check with a photo of a real baby. Attach the ears to the head. They must be symmetrical with respect to the eyes. For a more realistic, you should check with a photo of a real baby. A tool with a ball make cavities.
Bake the workpiece according to the instructions on the clay packaging.
Attach the ears to the head. They must be symmetrical with respect to the eyes. For a more realistic, you should check with a photo of a real baby. A tool with a ball make cavities.
Bake the workpiece according to the instructions on the clay packaging.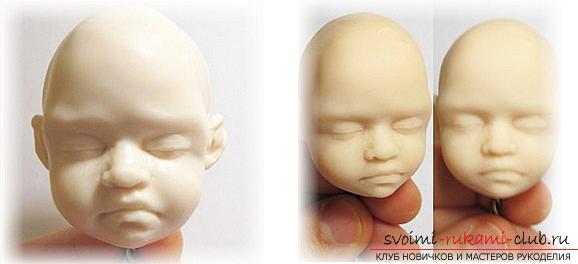
Torso. In a 1-year-old baby, the body will be 1 ¾ of the length of the head. The head is measured from the chin to the top of the forehead. Cut a piece of wire of the required size. This is the length of the body from the chin to the end of the buttocks.
Wind the wire frame with foil. Remember that there will be another layer of clay and not making the body too thick. There should be no air pockets in the foil.
Wrap the body with clay. The thickness of the layer is 3-4 mm.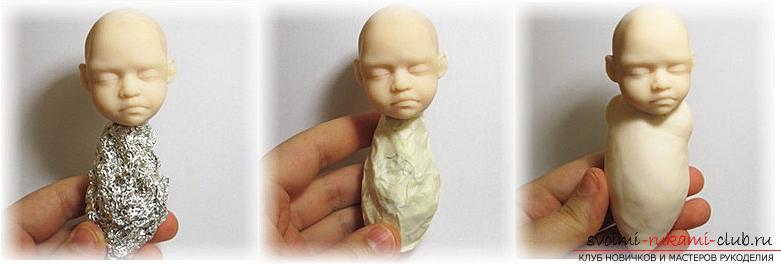
Pens.
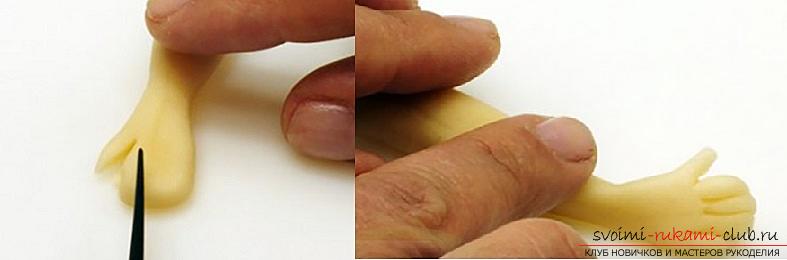
Roll the sausage from the clay, based on the calculation,the length of the child's hand is such that if he lifts the handle, the wrists are pulled to the top of the head. Attach the necessary length sausage to the baby's body and form the shoulders.
Bend your arm in half, form an elbow (not too sharp).
The end of the sausage is bent as if the baby is propping the chin with the handle.
Stack your fingers. Lines should be held under the brush, as if the child squeezed his fingers in the fist. Spoon the instrument to form small joints on the fingers.
A thin tool to press wrinkles on the outside, compressed into a cam, palms.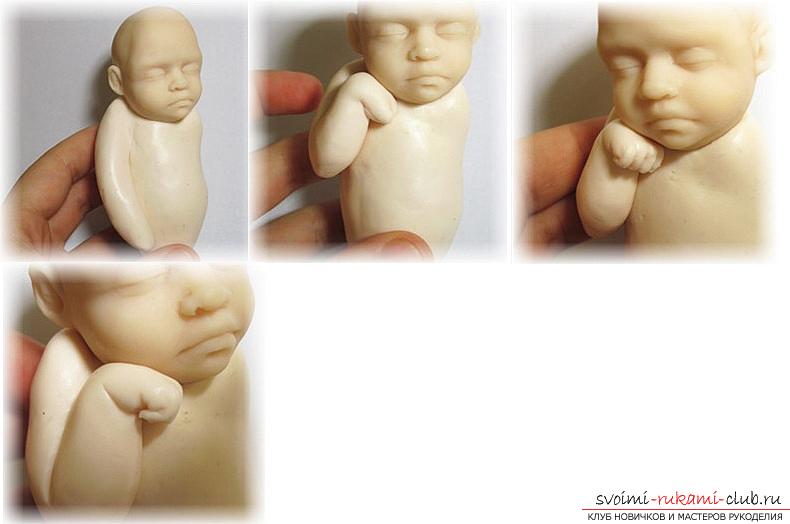 Similarly, stick the sausage for the left handle.
To bend a preparation in an elbow. Flatten the end of the sausage where the palm should be. The edge must be very thin, so you can cut off excess clay.
Bend the workpiece under your fingers, cut into 4finger. To iron fingers. Infants have puffy fingers with narrowed tips. A thin tool to identify the nails and folds of a chubby child's handle. Give the brush a relaxed position.
Similarly, stick the sausage for the left handle.
To bend a preparation in an elbow. Flatten the end of the sausage where the palm should be. The edge must be very thin, so you can cut off excess clay.
Bend the workpiece under your fingers, cut into 4finger. To iron fingers. Infants have puffy fingers with narrowed tips. A thin tool to identify the nails and folds of a chubby child's handle. Give the brush a relaxed position.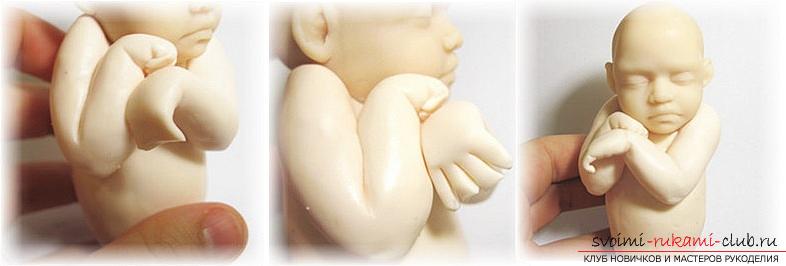 Babies often sleep, bending the handles and pressing them to the chin.
Feet.
Roll a thick short roller and attach to the body. Smooth the hip, it should not be large, and slightly turn aside the workpiece for the leg.
Smooth the joints and squeeze the wrinkle at the junction of the foot with the body. Where the leg connects with the buttock to make a hole.
Add the long sausage to the workpiece. It will be the knee with the shin. Press to the hip. Smooth out any irregularities.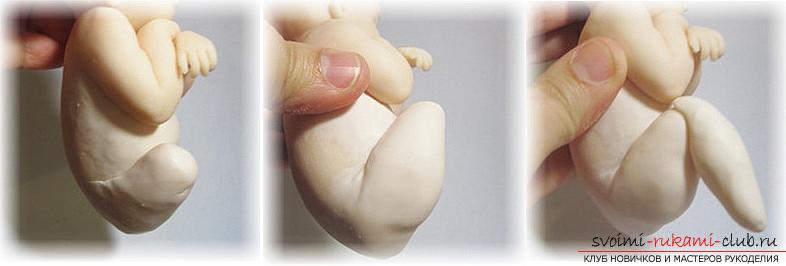 Add a piece of clay where caviar touches the hip. Again, iron.
The length of the baby's foot is equal to the distance from the eyebrows to the chin. Form a chubby foot. It is desirable to look more often at the photo of the kids for greater accuracy.
Slightly flatten the end of the foot where the fingers will be.
Cut into 5 fingers. Make sure that the thumb is on the inside of the foot.
Add a piece of clay where caviar touches the hip. Again, iron.
The length of the baby's foot is equal to the distance from the eyebrows to the chin. Form a chubby foot. It is desirable to look more often at the photo of the kids for greater accuracy.
Slightly flatten the end of the foot where the fingers will be.
Cut into 5 fingers. Make sure that the thumb is on the inside of the foot.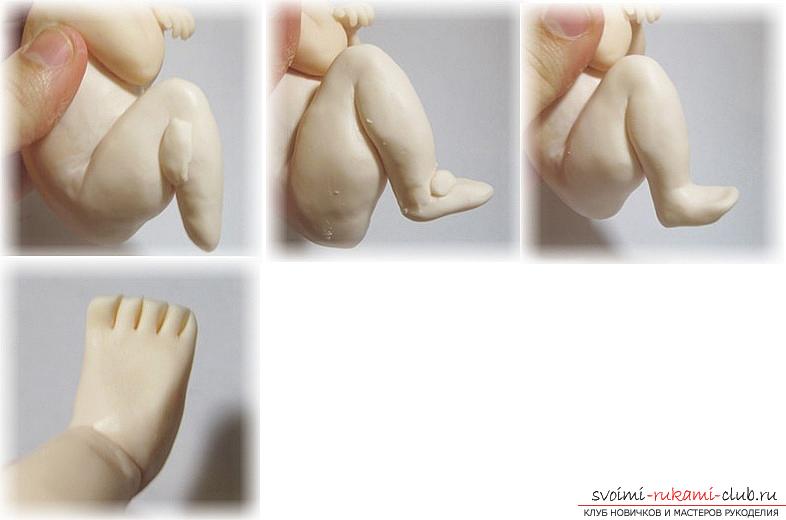 Round the fingers. Mark marigolds and wrinkles on the upper and lower parts of the foot. They need to be pushed, not cut through.
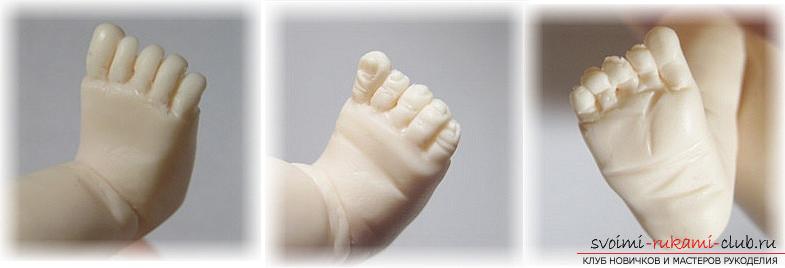 Similarly, attach the second leg.
Cut the end of the foot into 5 fingers. To iron them.
Arrange the legs, as if the baby is sleeping. Smooth out unevenness.
Similarly, attach the second leg.
Cut the end of the foot into 5 fingers. To iron them.
Arrange the legs, as if the baby is sleeping. Smooth out unevenness.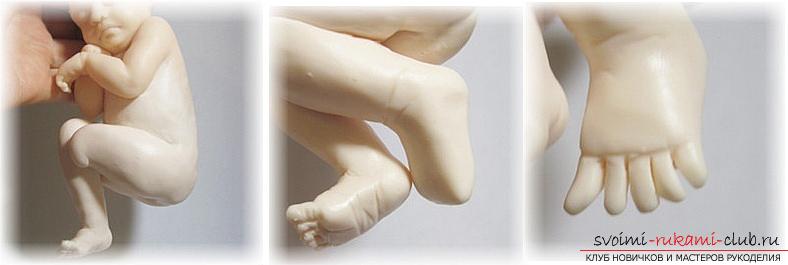 Sell wrinkles under the buttocks and around the hips.
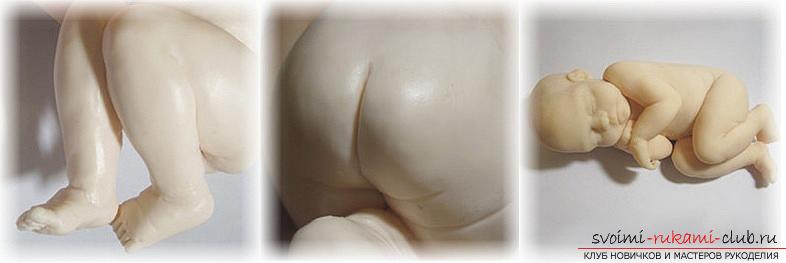 Baby is ready. It remains to bake it according to the instructions given on the package.
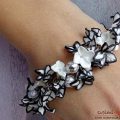
Colorize with colors, you can take acrylic. Focus on color photos. For gluing hair, you can use PVA glue or liquid polymer clay, in the latter case the product will need to be dried once more.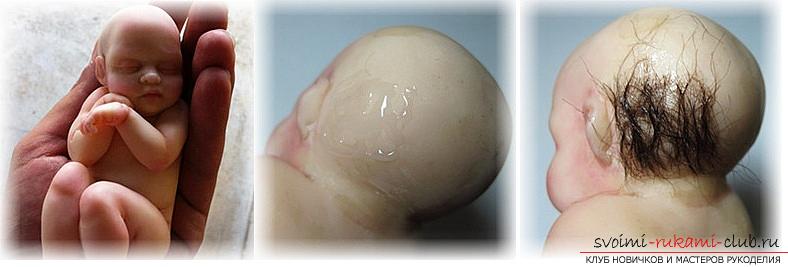
 Eyelashes can be cut off from dolls.
Comments
comments
 Pearl bead from polymer clay own hands - master class
 How to create a bracelet of polymer clay with your own hands, master class with a photo.
 We make a gradient of polymer clay with our own hands - a lesson and a master class with a photo
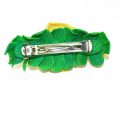 This detailed master class with photo and description will teach you how to make your own flowers from polymer clay for hair clips.
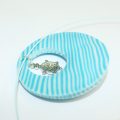 This detailed master class with photo and description will teach how to create with your own hands a set of jewelry made of polymer clay - a pendant and earrings with a turtle.