A master class on knitting will teach you how to knit gloves with knitting needles.
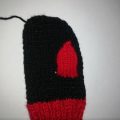
 In the winter period of time, notonly knitted hats, sweaters and scarves, but also gloves. Some like to wear mittens, but it's not always convenient, though, that mittens that gloves are very necessary in the winter. In the master class I will tell you in detail how it is possible to connect gloves with a pattern that is located on the outside of the hand, that is, the palm will be connected solely with the facial surface, which is very convenient for wearing. Gloves are not only practical, but also beautiful with an unusual pattern. I suggest knitting them out of pure wool, or take acrylic with the addition of real wool. Thread better to choose thicker, so that the gloves are denser and warmer. In this master class I use a thread of two colors: white and brown. Brown thread has acrylic and wool in its composition. Since it is the most part of the glove that will be associated with it, acrylic must be present in it, so that the coat does not irritate the skin very much. A white thread for the pattern can be taken from pure wool. If it turns out that you can not wear woolen knitwear, then a knitting thread for knitting on the basis of artificial wool, but also choose a thick thread. These gloves are connected for a young girl, the approximate size of the palm of the middle finger is 17 cm, plus the length of the rubber was 6-7 cm. Now let's talk about the tools and materials needed for knitting. We will need: brown yarn (acrylic + pure wool); white yarn (wool); stocking knitting needles - 2 sets; hook; pins - 2 pcs .; scissors. In addition, knitting will require a great desire and a good mood. Let's start knitting gloves, which starts with a rubber band. Therefore, for stocking knitting needles (4 pcs.) It is necessary to dial 8 loops, that is, 32 loops are obtained.
  To fix the loops on the knitting needlesthe next row of facial loops. Brown yarns 2 and 3 rows are tied like this: 1 front loop, 1 loop purl, 1 loop front and so tie all 4 knitting needles.
  With a white thread of 5 and 6, tie the rows according to the same pattern: 1 front loop, 1 back loop, 1 front loop and so to tie all 4 knitting needles.
  Face rings and brown yarn are knitted in 7, 8, 9 rows.
  White thread and facial loops are knitted 10 and 11 rows.
  Facial loops and brown yarn twine 12, 13, 14 rows. White thread and facial loops are knitted 15 and 16 rows.
  Facial loops and brown yarn are knitted in 17, 18, 19, 20 rows. In the end, this is the striped rubber band for the glove.
  With 21 rows, knitting is external and internalparts of the glove in different ways. That is, for yourself you need to determine what 2 knitting needles the upper pattern will be knit, and what 2 knitting needles is the palm. So, on 2 spokes to tie a pattern: 3 purl brown loops (we will use the text: pron.kor.p.), 1 obverse white loop (faces.bel.p.), 3 ap.kor.p., then knit to the end of the second spoke. The next 2 knitting needles with a brown thread (this is row 21).
  Next, it is necessary to tie rows No. 22, 23,24 in the same way as the 21 rows. Lace the hinges and brown thread all 25 and 26 rows.
  On 2 knitting needles a pattern: 1 ap.kor.p., 1 persons.bel.p., 3 ap.kor.p., then knit until the end of the second knitting needle. The next 2 knitting needles with a brown thread (this is row 27). Next, it is necessary to tie rows No. 28, 29, 30 according to the same scheme as the 27th row. Bind the hinges and brown thread with 31 and 32 rows.
  On 2 knitting needles a pattern: 3 ap.kors.p., 1 persons.bel.p., 3 ap.kor.p., then knit until the end of the second knitting needle. The next 2 knitting needles with a brown thread (this is row 33). Next, it is necessary to tie rows 34, 35, 36 according to the same scheme as the 33 series. We were tied up to the thumb, that is, we need to leave room for him. To do this, from the side of the thumb, it is necessary to transfer 5 loops to the pin.
  Loops are removed that are on the side of the palm. Now the same 37 row should be tied with facial loops, 38 the row knits in the opposite direction, but already with the wrong hinges to observe the facial smooth surface. Two knitting needles in the 39th row should be tied according to the following pattern: 1 ap.k.p., 1 persons.bel.p., 3 ap.k.p., then knit until the end of the second knitting needle, then one spoke (i.e., this the needle will have 8 loops + 3 loops left from the second knitting needle) to be sewn with the front loops. 40 tie the wrong thread with a brown thread. 41 ranks: 1 ap.cor.p., 1 persons.bel.p., 3 ap.kor.p., then knit until the end of the second knitting needle, then one spoke (i.e., there are 8 loops + 3 loops on this knitting needle from the second knitting needle) to be tied with the front loops. 42 thread the wrong thread with a brown thread. 43 row - with the front loops of a brown thread. 44 series - with the wrong loops of a brown thread. Now the 45th row needs to be tied in a circle, according to this scheme 2 knitting needles: 3 primordiums, 1 persons.bel.p., 3 ap.cor.p., then knit until the end of the second knitting needle, the other 2 knits are knit facial loops. In this case, in place of the thumb, do not forget to get the missing 5 loops and then knitting will be in a circle. Next, it is necessary to tie rows No. 46, 47, 48 according to the same scheme as the 45 series. Face straps and a brown thread should be tied in 49 and 50 rows.
  Now we connect the thumb, and then continueknitting other fingers. Numbering for the thumb will be its own. We take for knitting a finger the 2nd set of stocking knitting needles. Therefore, remove 5 loops from the pin with a spoke, and take 5 loops on the other 3 spokes. To knit 7 rows with face loops, then in the 8th row, cut 1 loop on each spoke. To fasten 9 and 10 rows with face loops. In the 11th row, also cut 1 loop. Bind the 12 and 13 rows with the hinges. In 14, 15, 16 rows also cut in 1 loop. Tighten the thread and cut off excess. The thumb is ready.
 Let's move on to knitting the rest of the fingers. All 32 loops need to be divided into 8 loops, which will go to each finger. Superfluous loops are removed on pins, knitting itself occurs on 2 spokes. Only 8 loops remain on the spoke, to which 5 more loops are to be added, I begin to knit from the index finger. Rows 52 and 53 should be tied with a brown thread.
  On the spoke, which with a pattern, we knit so: 2 ap.cor.n., 1 persons.bel.p., 2 ap.cor.p., the other spoke-facial loops (54th row). Similarly, 54 rows to tie 55 and 56 rows. Then, 57 and 58, use a brown string to tie the row with facial loops. On the spoke, which with a pattern, we knit like this: 2 ap.kors.p., 1 persons.bel.p., 2 ap.k.p., the other spoke - facial brown hinges (59th row). Similarly, 59 rows of 60 and 61 rows. Then, with 62 and 63 rows, use a brown thread to tie the front loops. On the needle, which with a pattern, knit like this: 2 pron.kop.p., 1 persons.bel.p., 2 ap.k.p., the other spoke - facial brown loops (64 row). Similarly 64 rows of 65 and 66 rows. Then, in 67 and 68 rows, use a brown thread to tie the front loops. In 69 and 70 rows, you need to tie two loops together, eventually one finger is ready.
  It is necessary to link the rest of the fingers using the same scheme, but for the little finger to 8 loops add 3 loops instead of 5 loops.
 By the same scheme it is necessary to connect the second glove, the only difference is that the place for the thumb should be left in a mirror image. Gloves are soft and very warm, theywell adhere to the hands. The thickness of the fingers and the size of the brush are different for all, so you should focus on your parameters by typing more or less loops.


Comments
Related posts:
 This master class with the description and the scheme will teach how to bind the mittens with two spokes
 Master class of New Year's adornments will teach how to knit a knitted star on a Christmas tree
 A master class on crochet will teach you how to tie your mittens with your own hands.
 This master class in knitting is designed for lovers - he will teach how to tie a heart crochet
 This master class on knitting slippers will teach you how to knit warm and comfortable slippers with knitting needles.