Master-class weaving from the rubber bands will teach how to weave figurines of an angel on a machine.
 Angels are lovely creatures that cause usonly the brightest feelings and emotions. We believe that they guard and protect us. Therefore, they often draw, knit, sew. Weaving of rubber is a rather young kind of needlework, but it also gives us the opportunity to weave an angel. You can put it for beauty, and you can give it to someone as a sign of exceptionally pure and bright feelings and intentions. Materials for weaving: - Elastics of several colors (flesh, white, yellow, black and red). Tools: - machine; - the hook. Stages of work: First of all we'll make wings for an angel. Place the machine open part to the right, the middle row to the left for 1 bar. Now we have the 1st layer. First, put on 1 white gum on the 1 st and 2 nd column (st-eets) of the middle ryadochka. Another 1 elastic (cut-ku) - on the 2nd st-tsy middle and lower ryadochka. Now we consistently stretch 9 rubber bands on the bottom row. 7 re-ok now have to put on the middle row. 1 cut-we put on the 9th st-tsy middle and lower rows. Another 1 to 2 st-tsy middle and top rows. On the top row we have 5 rez-ok. 1 cut-ku pull on the 5th st-ce of the top ryadochka and on the 8-th st-ets of the middle row. Next, we will put on 1 elastic triangle on the 3 rd, 4 th, 5 th, 6 th and 7 th st-ts of all series. On the 11th st st of the bottom rower we wind the cut 3 times.
  Let's weave. Push the hook into the 11th st-cell of the lower ridge and pull out the lower cut. She now needs to be worn on the 10th st-ce. Next, we start the hook in the 10th st-ts and drag the lower cut on the 9th. And so we'll wake up to the end. But on the 9th st-ts you will need to pull out and throw first the top cut, and then the bottom one. The upper cut goes from the middle ryadochka, so, there it is thrown. And rez-ka from the 2nd st-tsa also comes from the middle ryadochka. We weave the middle row, pulling only the lower cut. But we only weave until the 2nd st-tsa. We'll sew the top row. And in the last turn we weave the 2nd st-c of the middle ryadochka. Next, shoot the cut from the 1st st-tsa middle ryadochka on the hook and remove the weaving from the machine. We place all cuts from the hook on 1 cut-ku and tighten a weak knot.
  We will sew another 1 same wing. We now turn to the weaving of the angel himself. We remove the middle row from the machine. The weaving will begin with the head. The angel will have curly hair, so we'll wind up a yellow cut on the hook three times and put it on a yellow cut. This cut must be placed on any 2 st-ts somewhere in the middle of the hostess on the diagonal. Then we make the same curl and place it in the same diagonal way, but that it intersects with the one already on the machine. Now we put the same part in the same way, but it must necessarily be on the same side of the same station of the lower rim, which has already been cut. And the first part crosses the previous one. We now have 6 st-tsov on all ryadochkah. We will consider them. Now it is necessary to put the same detail on the 3rd and 1st st-ts of both rows. And 2 of the same details for each row.
  We crochet one lower cut withof each st-tsa. Now, from the third and from the first st-tsov both rows we pull the upper cut to the neighboring free station. So we increased the weaving to 10 st-tsov. We will sew two more such ryadochka with curls. Remove the bottom layer. Now on the bottom row we throw beige cuts, and on the side sts and upper row - cuts with curls. In the new series, we will also have cuts, but we will add eye sights. Screw 4 times cut on the hook and drop it on 1 beige cut. We cling it to the 2 nd and 3 rd st of the lower ryadochka. 2-nd eye - on the 3rd and 4th st-tsy lower ryadochka. On the upper row and lateral sts-tsy now it is necessary to put on kucheryashki. You can take all the time yellow, and you can vary orange. In the next row, add a nose. Beige cut is wound 5 times on the hook. We put it on 1 beige cut. And both sides of this cut now have to be worn on the 2nd st of the lower ryadochka. And now we have cuts.
  We will sew two more exactly the same ryadochka. Here we need to reduce the weaving. To do this, cut all the cuts from the first sts of both rows to the second sts-ts and take off the 2 lower cuts. And from the last sts-tsov we transfer cuts to the previous st-tsy and also we remove on 2 lower cuts. Now we have 6 st-tsov again. We will weave an ordinary row with white cuts. And again we increase the weaving, as in the last time. We again have 10 sts. Let's make the pens. We will form them from a chain of 5 links. Now you have to put the handles on the side sts.
 Weaving can be lifted up so that it does not interferestand flat. Now we need to put white cuts on the bottom row. In the upper row we attach the wings. We remove the bundle and now we must put the wing on the 2 nd and 3 rd sts. 2nd wing - on the 3rd and 4th. On the remaining sts-tsy now it is necessary to put on 1 white elastic band. We weave. We increase the weaving. Now we have 14 sts. We'll sew a white row. Change the cuts to yellow and weave a row. Again, take the white cuts and weave the layer together. We increase the weaving. We will sew 2 ryadochka. We increase the weaving. We will sew 2 ryadochka. We'll sew a series of yellow cuts. To complete the weaving, from the inside of the last stall of the top ryadochka pull out the lower cut and drag it to the last st place of the bottom ryadochka. Now we start the hook in the last st place of the lower ryadochka and pull out the lowest cut from the inside. We change it to the previous st-etz of the same ryadochka. And so we'll sew up the bottom row and the top row to the end.
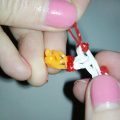
  We shoot on the hook cuts from the last sts-tsov andwe remove all the weaving. We spend 1 cutting through all on a hook, we make a knot. Fill the angel and give it a shape. We turn the bottom of the dress. To make a candle, we dial a chain of 5 yellow rubber bands, folded in half. At the end, we drop all the cuts for 1 red and 1 orange. We attach it to the pens. Our cute little angel is ready!
Comments
Related posts:
 Master class braiding bracelets with their own hands will teach how to weave bracelets of rubber bands on the machine.
Master-class weaving from the rubber figurines of the Minnie-Mouse figure will teach how to weave toys on the machine.
Master class braiding bracelets with their own hands will teach how to weave bracelets of rubber bands on the machine.
Master-class weaving from the rubber figurines of the Minnie-Mouse figure will teach how to weave toys on the machine.
 This master class of weaving from rubber bands will teach how to weave a Ronald McDonald figure
This master class of weaving crafts from rubber bands will teach the creation of a rubber toy - an animal.
Master-class weaving from rubber bands will teach how to make your own hands of rubber bands shoes for dolls - slippers.
This master class of weaving from rubber bands will teach how to weave a Ronald McDonald figure
This master class of weaving crafts from rubber bands will teach the creation of a rubber toy - an animal.
Master-class weaving from rubber bands will teach how to make your own hands of rubber bands shoes for dolls - slippers.