Master classes on weaving snowflakes, free schemes, step-by-step photos, job description
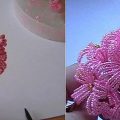
Someone likes hot summer with hot sunnyrays and hot days, and someone more like a frosty winter morning and snowflakes whirling in the air. There are so many fairytales and legends associated with small crystals, it's impossible not to love them. It is known that there are no two identical snowflakes, they are all different and unique. But who said that sparkling beauties can not fall on the palm in the height of summer and not melt? It is possible to make a non-snowflake with your own hands, to weave from beads. Small crystals of glass and plastic, as well as possible, are suitable for their creation. This article will offer several master classes and schemes for weaving snowflakes. Such crafts will be an excellent decoration of the interior, a Christmas tree toy or a wonderful and original gift. In order to practice, our Club offers to weave a bright red snowflake. 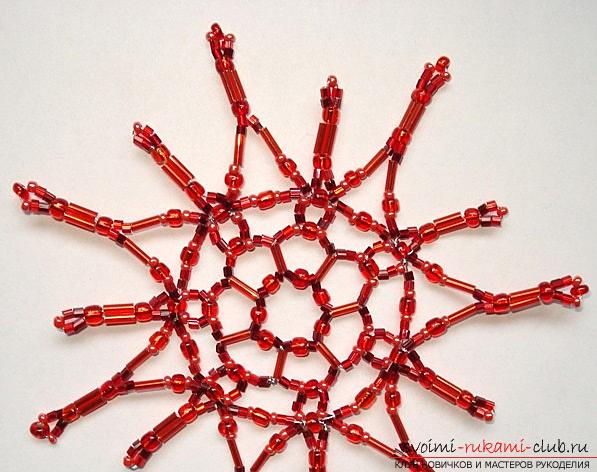 It will take:
- Beads;
- Felling;
- Bugle;
- Beads;
- The wire.
String on a convenient piece of wire (about 50 cm) 1 bead, 2 felling, 1 bead, 1 bead, 1 bead, 2 felling, tails of the wire cross in the first bead and tighten. 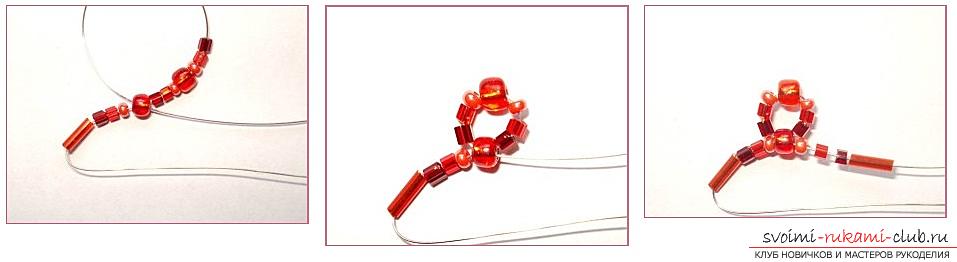 At each end of the wire string 1 bead, 2cutting, 1 bugle. Then, on one ponytail, thread 2 more felling and 1 bead between them. The ends of the wire are crossed in a glass beads on the second tail. The first petal of the snowflake was obtained.
 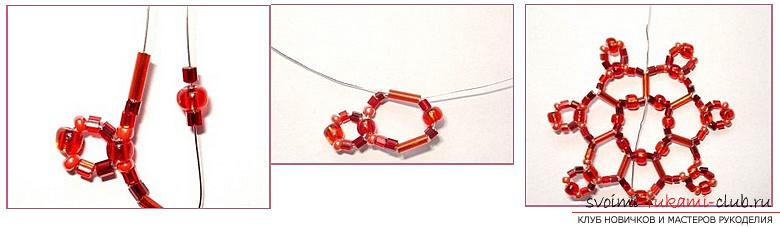 On the right tail of the delay, put on 1 wheelhouse, 1bead, 1 felling and 1 bugle. On the left tail, thread 2 felling, 1 bead, 1 bead, 1 bead, 2 felling, 1 bead, 1 bead, 1 bead, 2 felling, pass the wire in the first bead of this low, put on it 2 more felling and cross the tails of the wire in glass beads. Make the remaining 5 elements in exactly the same way. One ponytail of a wire to hide. The place in the figure is indicated by an arrow.
 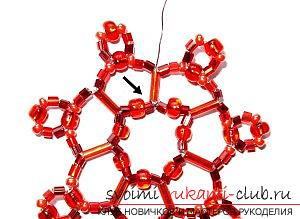 To create rays, you need a segmentThe wires are 70 - 75 cm. One end is screwed to the tail, which remains, and the second is threaded into the bead on the top of the last petal. A short "ray" To string 2 wires, 1 bead, 1 glass bead, 1 bead, 2 cuttings, 1 bead, 2 cuttings, wire the tail into the first bead from the tail, bugle and the next bead, thread 2 cuttings and pass the wire in the bead vertices petal. It turned out a small "ray" of snowflakes.
 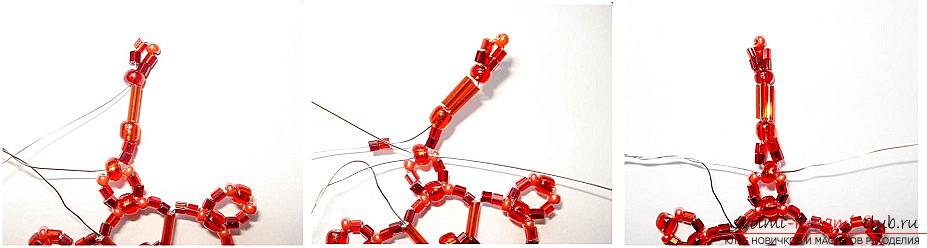 Long "ray" Working tail of procrastinationgo out from the bead of the top of the petal to put on it 1 chopping board, 1 bead, 1 bead, 1 bead, 1 bugle, 2 cuttings, 1 bead, 1 bugle, again bead, 2 felling, 1 bead, 1 bead, 1 bead again, 2 felling and pass the tail of the wire into the second (from the worker's tail) bead, the following glass bead and bead. Then again, thread 2 tailings, 1 bugles, 1 bead, 1 bead, again beads, 2 cuttings on the tail, and thread the wire tail into the bead of the next vertex of the next petal.
 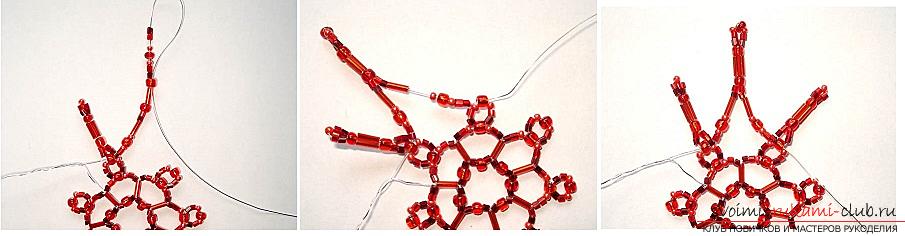 Then again we need to make a short "ray" andthen again a long one. And so on the circle to the end. Hide the wire tails, and the snowflake is ready to sparkle and rejoice. The next snowflake will be an excellent element of the New Year tree dress, an ornament in the form of a suspension in a Christmas party or simply an elegant souvenir for guests.
 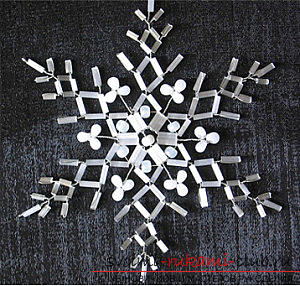 It will take:
- Silver wire;
- Silvery white bugles (8 mm, 5 mm);
- The beads are large in size, translucent and white.
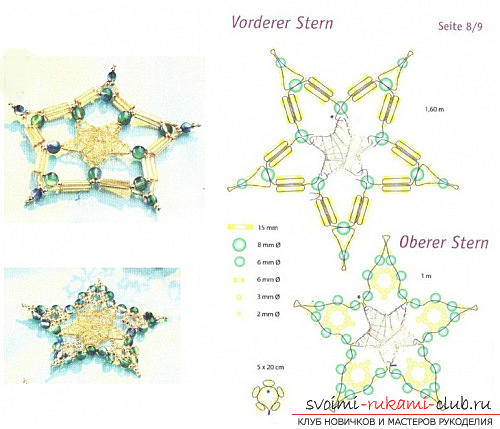
For a piece of 32 cm long wire, put on 4glass beads 8 mm. Move to the center and twist the wire tails. It turned out a diamond. On both ponytails string 2 bugles 8 mm and twist the wire tails between these beads. String on 1 glass beaker 8 mm for each ponytail and pass the ends of the wire back to the second bugle from the previous step. On the wire, 2 rhombs were obtained, the second rhombus had 1 "outgrowth" to the right and left. 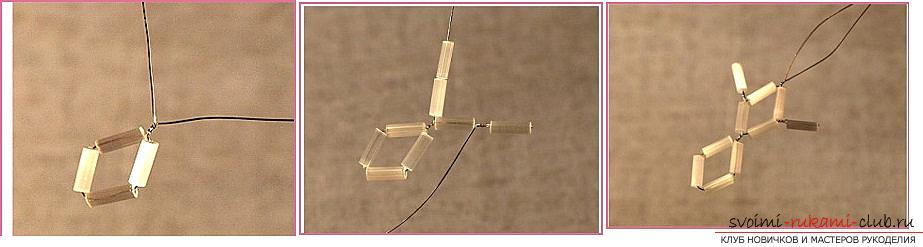 Make a 5 mm diamond bead with another diamond with"Outgrowths". String on both tails of 1 glass beaker 5 mm and twist the tails, fixing the glass beaker. At both ends put on 1 bugles 5 mm, twist the wire tails below the last bugle, cut and hide the tails.
  It is necessary to weave 6 such blanks. The next stage is decoration with beads. To do this, simply pass a piece of wire between the glass bead stringing the beads. It's in the center. For the sides, cut a piece of wire with two ends into two adjacent bugles so that they go out into the honeycomb with diamonds, scroll both tails about 1.5 cm, put on the beads, fasten it, cut and hide the tails.
  All the following snowflakes have detailed schemes of weaving, understandable even for beginners. It will take:
- Various beads;
- Glass beads and beads of different colors;
- The line (0.3-0.4 mm) or wire (0.2-0.4 mm) in diameter;
- Different shoelaces and ribbons for snowflakes to be conveniently suspended.
Snowflakes can be of a variety of shapes, havedifferent number of rays and sizes. For them, you need to cook more beads, glass beads, beads. The density of the snowflake will depend on whether it is from a wire or from a fishing line. 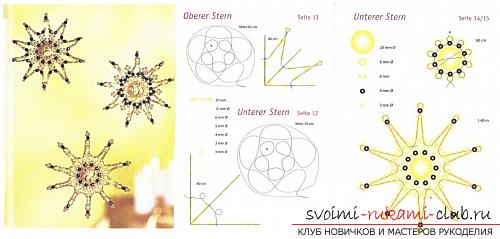 Work begins in the center and moves in a circle,weaving each vertex and "rays" of a snowflake. Some of the snowfields consist of a skeleton that is twisted from four pieces of wire. These beads are stringed with beads, the edges are bent into a loop so that the beads do not crumble. Between these beams, a snowflake can be decorated with beads, bicones or something else to the taste of the needlewoman.
 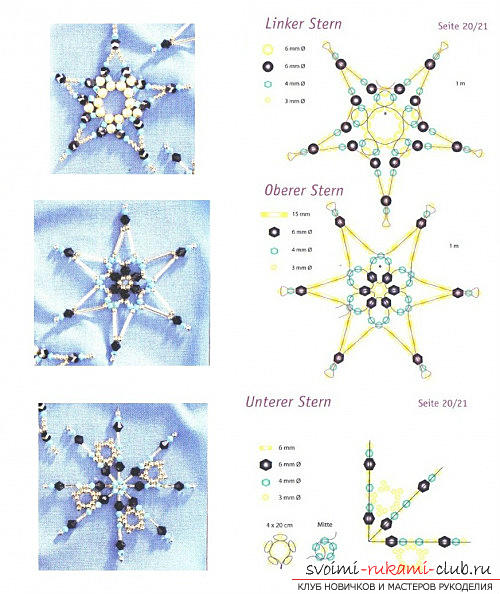 For the middle of snowflakes great greatbeads or rings made of metal. And still very beautiful will look middling from the winding of gold or silver wire. For this, bend from a thicker wire a frame in the form of an asterisk or a snowflake and chaotically wrap it with a golden wire. Woven snowflakes can be hung on ribbons,strings or a thin line. In the latter case, they will look hovering in the air. Such beaded hand-made articles can decorate not only the Christmas tree. Snowflakes will look great as an element of decor on curtains or windows. They will become even a New Year's necklace or lovely souvenirs.
Comments
Related posts:
 Master classes on weaving various Christmas decorations, photos, charts, description
 Free schemes and master classes with a photo on the weaving of baubles and beads.
 Free master classes on weaving rings of beads and beads with a photo.
 Free master classes to create modular origami balls, step-by-step photos and description.
 A detailed master class on weaving a hyacinth flower from beads, step-by-step photos and job description