Modern ornaments on herringbone from improvised materials - a master class for toys
Each of us remembers the times when we studiedin schools and always did something. Each holiday was the occasion for a new craft or greeting card, which you had to do with your own hands. Greeting cards were made on any subject, regardless of the holiday, but the methods were often the same. But, there are also such topics that remain in the heart for a long time and after years, I want to repeat the knowledge I have passed, and maybe even to create something new and extraordinary. The simplest seemingly material can be a real foundation for the future decoration of your Christmas tree and at the same time, completely cover its entire perimeter. Products made of paper, cardboard, wood and polymer clay have recently gained increasing popularity as new Christmas toys. You can consider options and color solutions. In place of bright and variegated Christmas trees with a multi-colored solution comes minimalism. Thanks to these materials we will try to make a very beautiful and extraordinary white Christmas tree. We need a few lessons with the help of which this idea will be easy to implement!
Modern ornaments on herringbone from improvised materials - a master class for toys
 Using the material of conventional cardboard or colorpaper, plain unicoloured foil and ribbons from satin, as well as gifts of nature, we can make ourselves real wizards and create a unique, universal creation of art with our own hands. In addition, their children should also be accustomed to the fact that holidays are an opportunity to reveal their talents, to make a nice gift to a loved one and, of course, to learn new knowledge. Toy of paper greeting cards with their own hands The New Year period is the best time for such experiments. We will use the interesting idea of a New Year's toy in the form of a Christmas tree. And why make a Christmas tree for herringbone? We answer! For the New Year holiday, there are not many Christmas trees, but this special technique will tell how to make your idea more interesting and thus, to diversify the set of toys on a coniferous tree. Old postcards can be a great material for future Christmas balls. Even an old glossy magazine risks becoming an excellent material specifically to ennoble and brighten your Christmas tree. Old notebooks and records will also become valuable elements in such a craft
- Take old postcards or other above suggested options
- Prepare a thick paper in color design
- Take the template
- Prepare a pencil, a ruler for drawing
- Take the scissors for processing
- You will need a sticky substance
- Brush for processing
- Ribbon, or rope for the product
- Let us also take an awl
Preparation of the basis 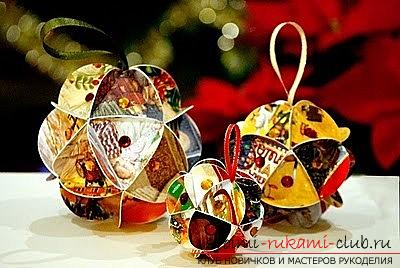 Using the reverse side of our oldcongratulations, postcards or magazines, we use circular drawing to draw twenty circles in the same size for a radius of 3.5 centimeters. However, you can consider the size of your workpiece and adjust the size of the future crafts so that you get twenty circles. In this case, the most important detail is the same size of each circle. Next, you need to cut these circles. Now, it is necessary for each circle to make an insignia of an equilateral triangle. You can draw it yourself, using a ruler, or use a stencil blank from a dense material of cardboard. Form the surface
 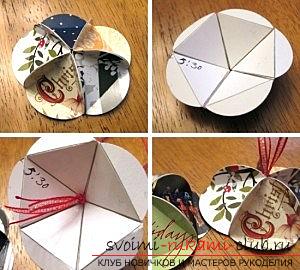 Next, using each circle, we produceBends for three identical valve variants. The fold should be smooth, but for this you will need a line and an old template for the triangle, which we have redrawn. If you wrap the edges on the inside - we get a ball without a pronounced face, and if on the outside - each face will be visible. Thus, at this stage you can decide for yourself how to make the ball: in a classic or new style. We use the first five fragments in order to lubricate them with an adhesive. then, circles must be glued on special valves to get the top of the ball of paper. For the very top, we form a hole with an awl. Then, it is necessary to pass the tape, which we fix with the help of the knot. In the same way, it is necessary to fix the remainder of 5 other fragments.
 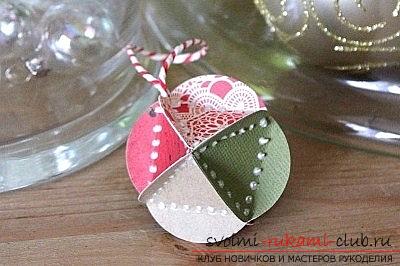 Thus, we formed the bottom surfaceball. Then, using the remainder of 10 figures, we form the middle of the unusual solution of the ball. Then, we need to glue together the elements of the fragments that we got. Then, you need to close our hand-made article in the shape of a ring. Remains only to collect the ball, gluing together at one time both the upper part, and the bottom, the middle of the product.
 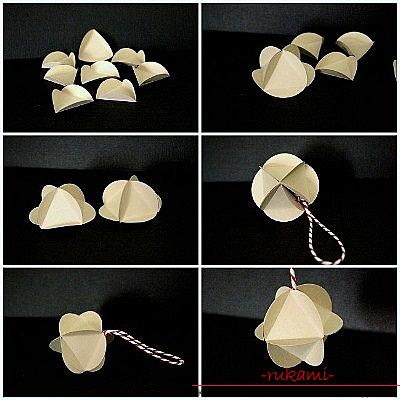 So it turns out that doing simple, but alsotime the original ball is sometimes even more convenient and faster than picking up a new one in the store. In addition, such a simple piece of art can easily be mastered even by children, with the condition that you explain to them the subtleties of such crafts. The technique of a New Year's toy-hedgehog! New Year's hedgehogs - this is a new trend in the field of creating unique balls, with which you only have to get acquainted. Well, it's time to get acquainted with the new solutions. Make a luxurious version of the New Year's ball, which will be decorated with cut glass, as well as silk ribbons is not so difficult. Moreover, they really will look like funny hedgehog variants.
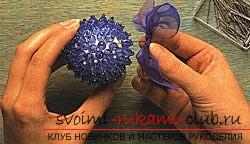
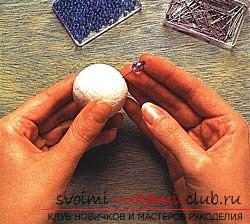
- Let's take beads in a 5-millimeters diameter of cut glass, or plastic
- Take the balls in diameter by 4.5 centimeters (cellulose from cotton, polystyrene)
- Pins
- Glass beads
- Ribbon of silk
We take a long pin for tailors andstring on it a small bead, and then - a bead with faces. A small bead will not only be a spectacular complement-decoration, but at the same time, it will be able to protect a large bead from slipping in the future. Then, string the beads in this way onto the pin, and then stick it into a ball of foam or cellulose. The surface of the ball should be decorated so that only the decorated part of the pin is visible. Free to leave only a small areaa ball, where the ribbon will be attached. Then, the tape should be tied with a small, neat bow, then - cut the ends of the product and put another bowl on the bowknot, then fasten it behind the ball. Thus, our hedgehog is ready to be populated by a Christmas tree. A new Christmas tree from the fabric Now we form the Christmas tree. It is necessary to take cardboard and form templates of them. They will look like triangles with a rectangle at the bottom. Such a version of herringbone with a trunk. Then, the finished template must be pasted with a suitable cloth. Further, if you want to dress up a Christmas tree in a lace dress with a frame, you need to make a series of a template with a multicolored braid. Here you can not skimp on accessories. In addition, to make them look more solemn, they should be decorated with butterflies, as well as banners. Take the beads, rhinestones, flowers and other ornaments. For the top of the tree, you need to fix the thread, or tape, which will fix the product. The second version of the Christmas tree - a miniature beauty Let's take and make a pattern on the fabric of two details, in the shape of a Christmas tree. Next, the details must be filled with filler: for this you can take cotton, or sintepon. then, for the dress of our Christmas tree, you need to make beads, sequins, strasses and beads. These decorative elements will only improve the appearance of the herringbone. Mastery of pasta A lot of wonderful toys can be made using the most common pasta. In order to make such beauty, it is necessary to take ordinary macaroni in raw form, then prepare the glue and paint in order to paint the products. In order to form a New Year creative from macaroni, the forms of spiral, shells, bowls, tubes, stars and other macaroni will perfectly suit. The more macaroni - the more space for imagination! As a glue we take a thermo-gun, which is ideal for such fasteners. Macaroni should be decorated with glitter, or complement with sequins and beads, glitters and rhinestones. In order to paint the product, a spray version of a balloon or acrylic paint is suitable. Colors of your choice, but, it is better to choose a gamma for our holiday: Blue, silver, gold and white. So, we have to pour the pasta on the table in a dry and raw form and then make a version of the composition that fits the Christmas tree. Which option can be successful? It all depends on your imagination. You can make a little man, stars, angels or New Year's objects. After you decide on the design, you need to make a sequential connection of each macaroni to each other. To do this, use the usual gun-glue. We wait until the glue dries down completely and then hardens, it seizes. After, let's start painting the product. If the work goes with the spray, it's better to bring the workpiece to the balcony. Before that, you must necessarily bed the newspaper, or take an oilcloth. So you protect your household items from the unwanted influence of paint. After the paint has been applied, the product can be sprinkled with glitter. Dream of a New Year's ball Each of us has such a goal for the next year, which we want to carry out no matter what. To implement this dream, you need repeated reminders and resources, which you need to invest in it. If you celebrate the New Year with a little reminder of such a dream, we are sure that it will come true with a higher probability! How can you make this dream come true? Suppose, let's imagine that next year you set the main goal for a trip to Miami, and preferably for a whole month! Then, you need to make a ball in the style of sea decoration. To do this, you need to take a ball and glue it with a sticky tape. Empty particles must be filled with glue and then, sprinkled with sand or pebbles. After the glue captures the elements, and then it withers, we will form the final touch. To do this, take the seashells and fix them on the product. You can also take pearl buttons
Comments
Related posts:
 The master class will teach you how to make your own hands a developing toy from improvised materials
 Master class for the parents of the younger group for making Christmas-tree toys from various materials - crafts and home-made items by their own hands
 Crafts from improvised materials: a panel of pipes for the contest Spring 2016, hand-made articles from improvised materials
 New Year's tree from improvised materials with their own hands.
 This master class will teach you how to make your own hands a New Year greeting card.