
Napkin with your own hands. Master class for beginners in knitting wipes crocheted.
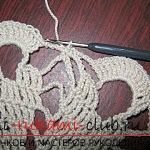
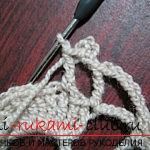
Often in magazines, and on the Internet, you canto meet photos and diagrams of very beautiful openwork napkins without a detailed description. And you want to connect such beauty with your own hands! And in fact it is absolutely not difficult, as it may seem at first glance. Today we will learn to knit napkins and read the diagrams using the example of a small napkin. Crochet wipes are best to start yarn thicker (but not very), so as not to get tangled in the thread. For example, half-woolen or acrylic. The hook is chosen according to the thickness of the thread. This is done by the method of samples: if you take a very thin hook, then knit thick yarn will be hard, almost impossible. A hook with a very large number will get too holey napkin. To knit a dense wipes for beginners, a hook with number 2-2.5 will do. But, do not follow strictly what is written. Try it, choose the option that you think is more convenient. The dense napkin obtained as a result of knitting can be used as a stand for glasses, cups. White or colorful dense small napkins will look good in the table setting. Well, in the future, for knitting openwork napkins, it is better to use thin cotton coil threads, such as those used for sewing (No. 0-10). Of these, the product will turn out to be gentle and airy. Hook should also be taken with the smallest number of 0.5 or 1. You can also knit wipes from cotton yarn type Iris. So, let's start knitting our little napkin according to the following scheme: 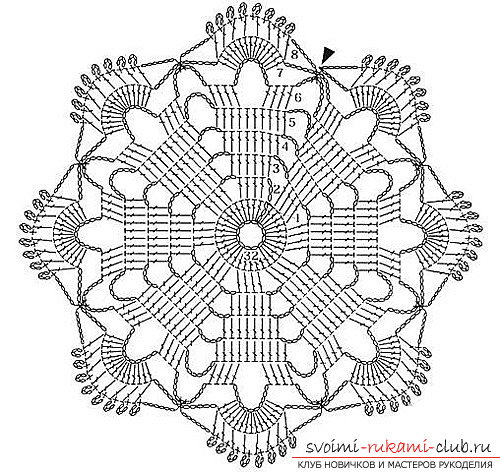 On the relevant page you can alwaysfind the Symbols used in diagrams and text descriptions. 1. Knitting a round napkin begins with a set of chain of air loops. (Conditionally denoted by the VP). In the diagram, the air loops are designated as a small loop or a small circle. For this napkin we knit a chain of 12 air loops. Then we connect the first and last loops with a half-tube to make a ring. We knit a napkin in a circle in one direction from right to left. 2. Knitting each row usually starts with a set of several air loops, this is necessary for lifting the row. The required number of loops is indicated in the diagram. In this case, in the first row we knit 3 air loops (VP) for lifting. The icon next to the VI in the diagram indicates a column with 2 overlays (C2H). We find the definition of the icon on the Legend page (link to the page above) and try to remember it.
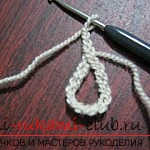
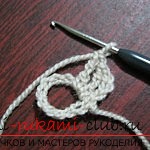
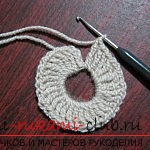
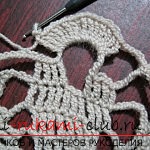
 We tie a ring according to the scheme 32columns with two crochet (or rather, it remains to link the 31 columns, since the first we replaced with air loops). We insert the hook into the ringlet. The last column is connected with a chain of 3 air loops (VP), dialed at the beginning of the row, half-column (PS). 3. The remaining rows are knitted, looking at the diagram. In the second row: 3 air loops (VP), 4 columns with two capes (C2H) in each column of the previous row and so on.
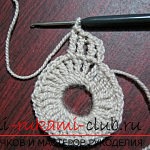
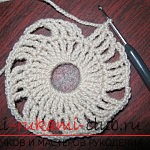
 3rd row: alternate 4 air loops (VP) and 6 columns with 2 nakidami (C2H). We look at the diagram that when knitting medium 4 columns, the hook should be inserted into the base of the columns of the previous row, and the first and sixth columns are knitted by inserting a hook under the chain from the air loops of the previous row.
 4th row: alternate 5 air loops (VP) and 8 columns with 2 nakidami (C2H). 5-th row: alternate 9 air loops (VP) and 10 columns with 2 nakidami (C2H). 6th row: alternate 11 air loops (VP), 4 columns with 2 napkin (C2H) in the base of the columns of the previous row, 11 VP, skip 2 columns of the previous row and knit 4 C2H (remember the notation - four columns with two capes) in the base of the last four columns of the rapport of the previous row (the rapport is a repeating part of the pattern), at the end of the 5-V line, we connect the latter with the arc from the VP bound at the beginning of the row, with a column without a crochet. 7th row:
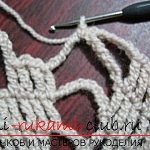
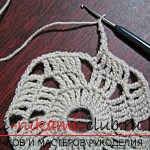
 * 5 VP, 15 columns with 2 nakidami (C2H) under the archfrom the air loops of the previous row (ie, the hook is inserted under the arch from the VP), 5 VP, the column without the cap under the arch from the EP of the previous row *. At the end of the row, connect the 6 VPs and connect them to the beginning of the row with a column without a crochet. Did you pay attention to the * sign in the entry? This means that the knitting of rapport, described between the two *, must be repeated several times (instead of the word "alternate", which I applied in the description of knitting of the 3rd-6th series). 8th row:
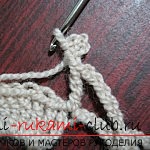
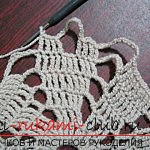
 * 6 VP, column with two nakidami (C2H) in the basethe first column of the previous row, the picot of 4 VPs (we knit a chain of four air loops, then we connect the first and last loop together with a column without a crochet, we get a small ring, or rather not a ring, and a small lump), C2H in the bottom of the third column of the previous one row (the second column of the previous series is skipped) and so on (see the diagram). In total, there will be 8 posts with a pico between them. 6 VP, a column without a crochet under the arch of the sixth-row VI *. 4.Obryvaem and fix the thread, from the inside of the end of the thread neatly hide, stretching crochet under the posts. Our little napkin is ready! The napkin should be starched, straightened and ironed.
Comments
Related posts:
 How to quickly connect small openwork napkins "under the hot" crochet? A lesson on knitting napkin napkins with your own hands
 Master class on knitting a bright jacket for beginners according to the instructions with photos and diagrams
 This master class on crochet will teach you how to create a beautiful frame for your photos.
 Master class on knitting monkeys with amigurum crochet for beginners with step-by-step description and photo.
 How to tie a warm plaid crochet with your hands. A simple master class on crocheting a beautiful and warm blanket