
Knitting with knitting needles, a scheme of a scarf, how to tie a scarf with knitting needles, a scarf-snud scheme, a scarf-collar with knitting needles, tips, recommendations, detailed descriptions and photo of finished products.
For a long time the scarf has ceased to be a thing thatjust warms us during the bad weather. First of all, this accessory is a stylish thing that can emphasize individuality, femininity and beauty. To look stylish, you do not have to run to the store behind this wardrobe thing. Try to knit with a bright and unusual scarf. Knitting with knitting needles allows you to diversify your wardrobe. And if you are a supporter of bright and beautiful clothes, then first try to make a scarf yourself. Making scarves with knitting needles does not require any expensive materials or tools. All you need, you can buy in the store for needlework at a reasonable price. To get started, prepare a set of spokes, threads of the desired color, a picture of the finished product, as well as the scheme by which the scarf will be made. What should be the scarf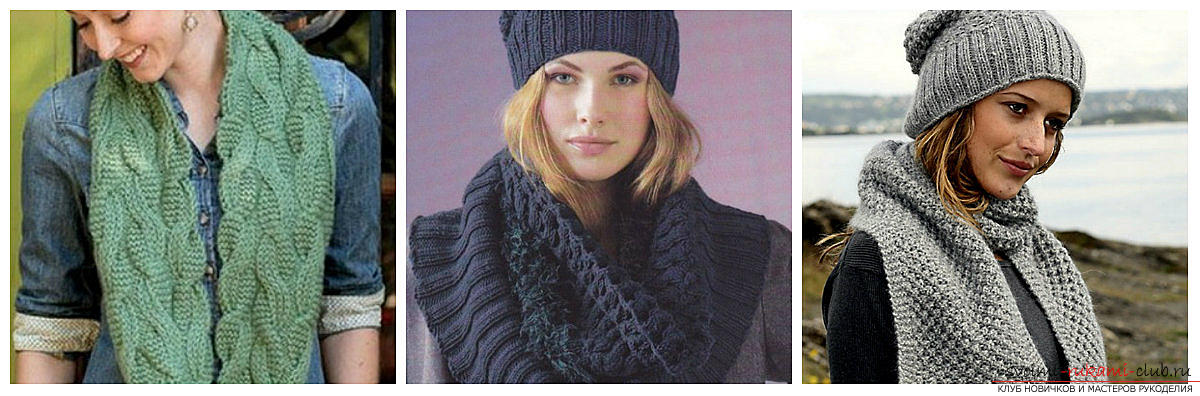 Scarf combines several aspects at once -it's beauty and convenience. He must warm his owner in bad weather, and also add an image of a beautiful and attractive look. Scarf is not an invention of our days. For a long time he was exclusively a man's thing, and only in the 19th century women began to wear on their shoulders wide stoles made of wool and silk. But now the assortment is so great that any selective woman of fashion can find the ideal model for herself. Before you start to search for the desired scheme, decide for whom you want to knit the product: whether it will be a male scarf, for a child, a woman or a teenager. Schemes of knitting scarves for children will be significantly different from those that are designed for adults. Here you need to choose bright colors of threads, all kinds of ornaments, so that the child is captivated by feeling the relief surface.
  If you will knit a product for a teenager,it is very important not to miscalculate with the right model. This is not surprising, because at this age, all without exception, primarily focused on the style and fashion. If the product is intended for a woman, then when choosing a model, you must take into account its style, preferences and colors prevailing in the wardrobe. If the owner of the future scarf is aged, choose for her not too flashy models and colors. In this case, the product should not have large decorative elements. Take into account all these nuances, if you are going to present a knitted scarf to someone as a gift.
 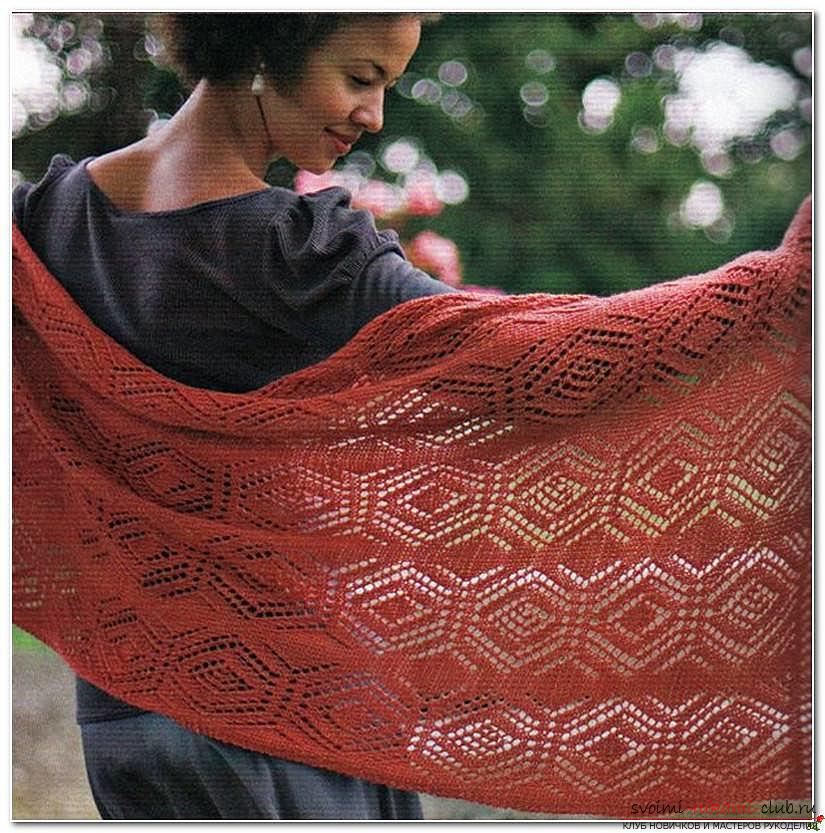 Patterns for scarves, knitted needles, are so diverse that you can always choose something suitable, and no items will look alike. The main ones are:
- Garter;
- elastic;
- 3D patterns (braids, bumps, etc.);
- combined;
- bilateral.
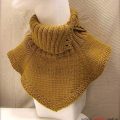
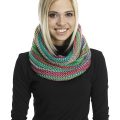
The first and second kinds are used in the manufacture ofclassic products. Many variants turn out to be rather original and extravagant. Scarf-snoot. Knitting with knitting needles To knit such a stylish thing to date, like a snitch, prepare knitting needles No. 3 - 3.5, as well as fairly thick yarns of the shade you like. It is best to choose the yarn that contains lurex, mohair or angora. To make a scarf-snood with your own hands, initially you have to do some measurements and calculations. 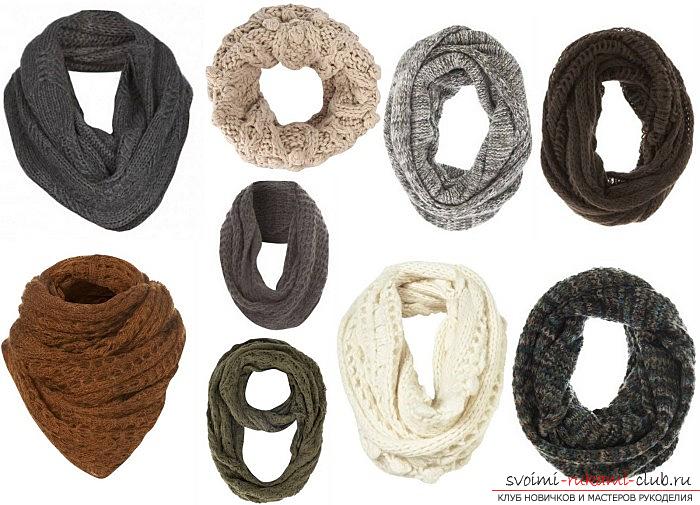 To start, measure the length from the thread tochin - this will be half the diameter of the product. That is, if you get 25 cm, then the diameter of the product will be 50 cm. But in order to determine exactly how many loops to take on a certain length, you need to tie a small piece (about 10 cm) of the same viscous, which will knit the whole product , and only after that you can calculate the number of loops for a certain length. Do not worry, these manipulations may seem complicated, but in fact it is not. If in your sample 10 cm left 20 loops, then for 40 cm you will need 80 loops. Thus, perform other calculations. Scarf-clamp facial smooth This version of the product is best knit with threads of different colors, but one color. For example, you can pick up threads of dark green, turquoise and green color, so your scarf will acquire a gradient color and give the general appearance of a product of brightness and unusualness.
  To make such a product, you will need needles with a diameter of at least 8 mm. On the circular knitting need to dial 80 loops and connect them to the ring. It is very important to designate the beginning.
 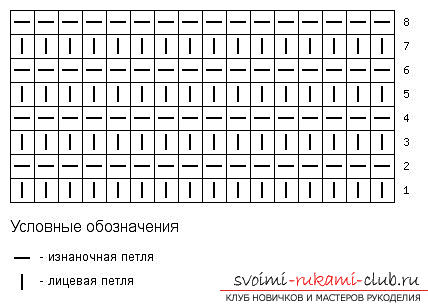 Spray the first circular series, using onlyfacial loops. When creating the second circle, perform only the purl loops. Alternating with each other with the front rows, tie the product to a certain length. If you decide to make a gradient transition, change the yarn. As a result, after tying up to the desired length, just close the hinges. Snud No. 2 This product will have a circumference of 91 cm, its width will be 23 cm. In this example, 5 skeins of King Cole Baby Alpaca DK yarn of plum color were used.
 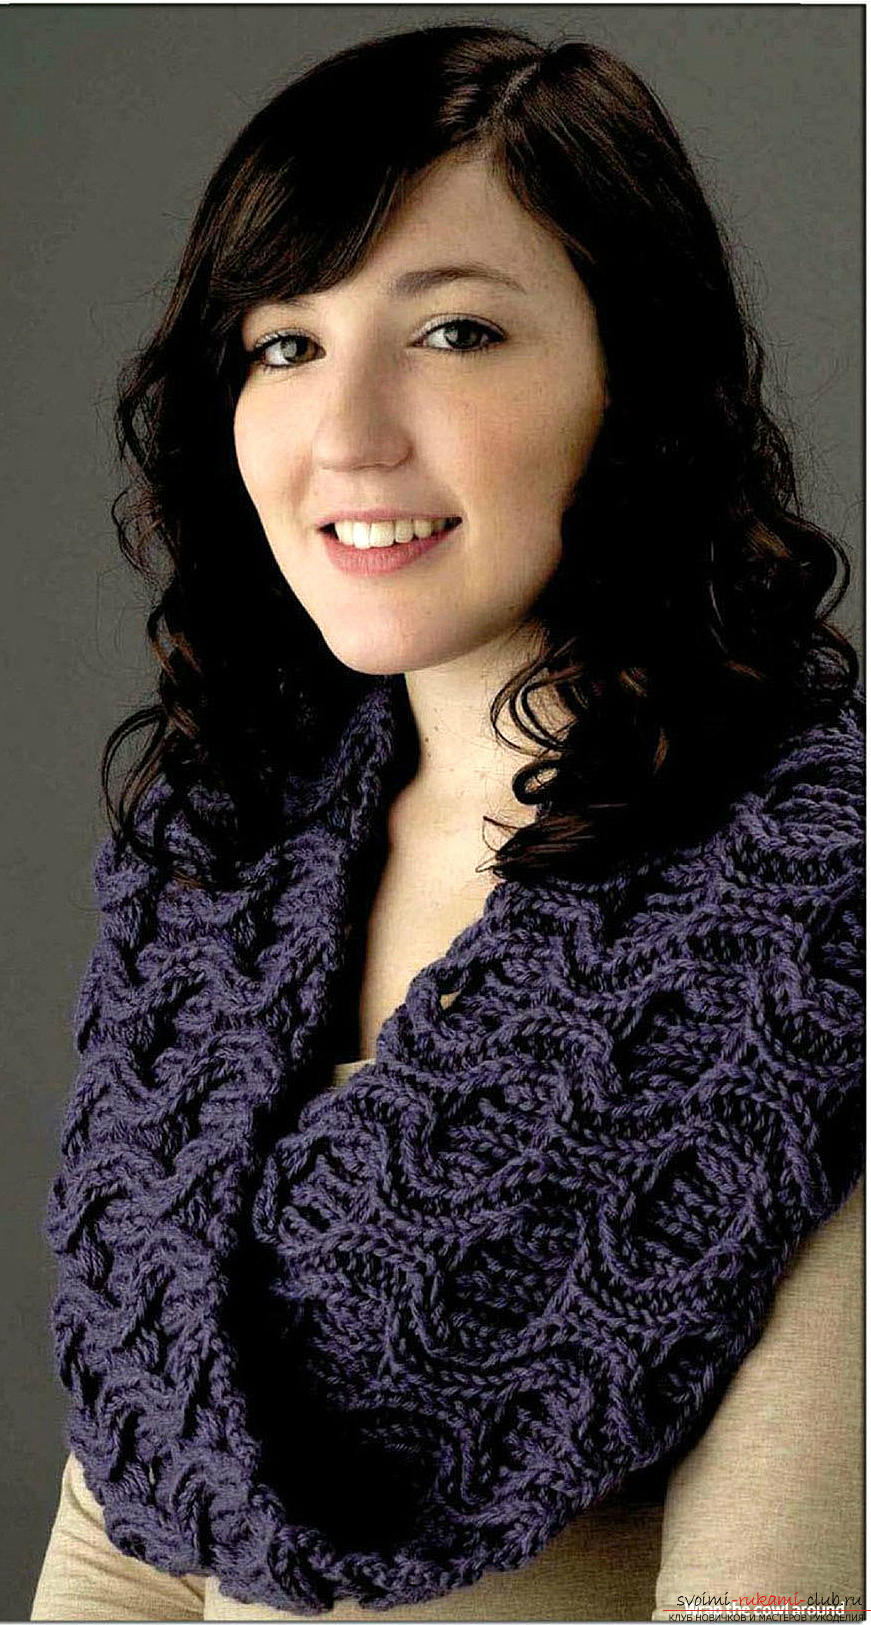 As for the tools, you need to pick upneedles 80 mm, their length should be 60 cm, you will also need an extra spoke, which you will use when making braids. It should also be noted in advance that in this version, the snipe is knitted in two strands. First, dial 192 loops and mark the beginning of the product with the marker.
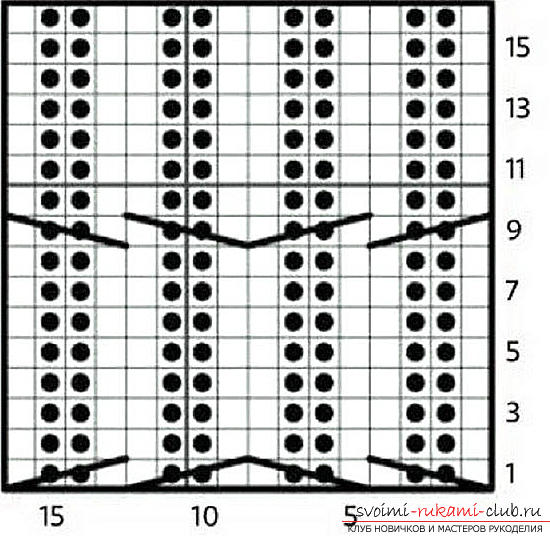

 In the first two circular rows tie, alternatingtwo facial with two purl loops. The first loop should be connected with the front one, as for the last three loops, here you need to make two purl and one face loop. Then follow everything according to the scheme. The first row begins with the crossing of eight loops to the right, then cross the left to the 8 loops. Similarly, execute the entire series in a circle. Next, all the rows in a circle from the second to the eighth are carried out as well as the first two: tie the first loop to the front one, then alternate the two face loops with two purlins to the last three loops, which are tied with two purlins and one face loop. The ninth row must be done in this way: cross eight loops to the left, then cross the eight loops to the right and tie the whole circle in this way. Circular rows from the tenth to the sixteenth are tied in the same way as from the second to the eighth. Completed sixteen laps can already submit a drawing. Similarly, repeat sixteen rows in a circle, then nine more. The last two circles are tied in the same way as the first two: the first loop is tied with the front one, then the two front and two back loops alternately until you reach the last three loops (two purl and one face loop). In the end, close all the eyelets and your scarf is ready. Snud number 3, knit a man's scarf To make this scarf you will need about 300 g of Bulky yarn. Also, instead of it you can use Aran yarn, and most likely you will need to increase the number of loops and use knitting needles of a larger size.
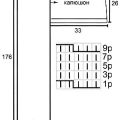
 With the spoke, then use the circular(6-7mm), you can use knitting needles and a larger size, so the knitting will get more bulky and loose. In this example, it took six skeins of Schulana Merlana yarn. The width of this product on average was 25 cm, and the length of the diameter - 120 cm. First, you need to type 180 loops on circular spokes 6 mm. Do not forget to put the marker at the end of the row, then connect the loops and start knitting in a circle. Tie the six rows. Alternate the front and back rows of loops to get a dress code. Spray one row with the eyelets, and replace the spokes by 7 mm. Now tie another row of faces, but already on the spokes 7 mm, then start the product in accordance with the scheme below, to the required height. In this case, even rows are tied in accordance with the figure. After tie one row of facial and change the spokes back to 6 mm, tie another row of facial. Perform six more rows. Knit, alternating between the front rows with the purlins (you should get a handkerchief), left to close all the loops. Scarf-tippet with a scheme and description In this version, the length of the finished product is 174 cm and its width is 40 cm. From the materials in the example of this scarf, 600 g of Merinos 6 Sei yarn and needle No. 4 were used.
 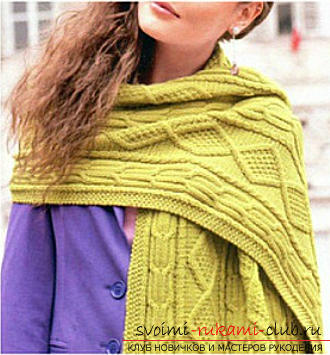 On the sides of the product there is a pattern described in Scheme A, while in the center the pattern described in Scheme B is executed.
 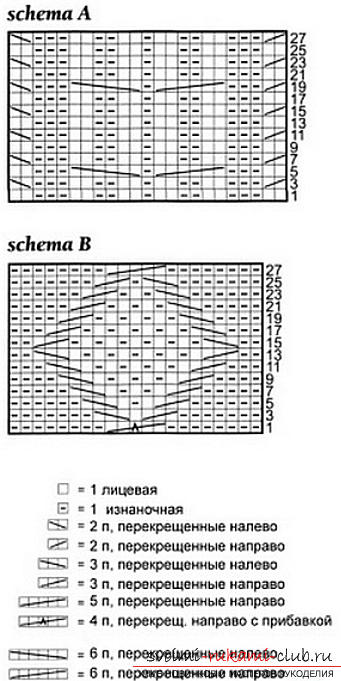 Pattern A In this scheme, even rows (they are notillustrated) you need to tie in the way viscose looks. Spray 28 rows according to the scheme, and then repeat the same from the first row. For two loops crossed to the right, you need to put one loop for work, then go one front, then you need to hang a delayed loop. For two loops that cross to the left, set one loop before work, tie the front lap loop. For the six loops that are crossed to the left, put four loops to work, connect the first two loops with the two faces, the second two should be tied with the backs. For the two hinges that cross to the right, postpone the two hinges before work, then tie the two face hinges, at the end you need to loom the front lap loops with two purlins. Pattern B In this case, as in pattern A, tie even rows on the pattern of the mating, completing 28 rows. Then you need to repeat from the third. For the three loops that are crossed to the right, you need to put one loop to work, then tie the 2 loops, then tie off the loop. For the three loops that are crossed to the left, you need to postpone two loops before work, tie one of the lash loops with the hinged front loops. For four loops crossed to the right with an increase, postpone two loops for work, then tie two facial ones, then add one loop of the purl, for this you need to untangle one wrong cross between the two loops, then tie the faceted loops. For five loops that have been crossed to the left, put three loops to work, then tie two facial ones, then transfer the first of the laid loops to the left knitting needle and tie it to the wrong side. The rest keep postponed at work, then tie the next two pending loops with the front ones. Scarf, knitted, with a diagram and a description of the work
  In this example, knitting needles No. 4,5 are used. Dial 43 loops on them and perform two rows of garter stitching.
  The third row should be knit like this: eight facial loops, then one double broach (you need to remove one loop as the front, connect the front two loops together and stretch the resulting loop through the one that was originally removed), * nine facial, one double broach, then need to be duplicated from * once, then tie eight facial loops. As a result, you should get 37 loops. And the next row you need to knit facial. The loops will then be arranged as follows: 3 fasten the loops with garter stitch, 31 the loop will go to the openwork pattern and the last 3 loops also need to be tied with garter stitch. Thus, tie 119 cm, then tie two rows, using a plaque. The next row is knitted this way: eight face loops, untie one crossed front loop from the transverse thread, then there is one face loop, and then again from the transverse thread, tie one crossed front loop, * knit nine facial loops, from cross thread to perform one crossed front , one facial, then again perform one crossed facial, repeat once from * and perform eight facial loops. As a result, you should get 43 loops. The next purl series should be tied with facial loops, which in the end should be simply closed. So, after a little training, you can tie up a lot of original scarves with your own hands. The examples presented in this article are only a few of the many existing ones. In the wardrobe of each girl should be a collection of favorite scarves, one rarely who is limited. For each season, you can knit a new beautiful accessory that fits into your wardrobe and becomes an original highlight that emphasizes your personality. In conclusion, it should be noted and the fact that the density of the scarf should always be selected, starting from the time of year. For autumn and winter scarves it is best to choose warmer models with increased density. Moreover, when knitting winter scarves, volumetric patterns are most often used, these can be harnesses, braids, etc. If you knit the product for use in the warm season, then these scarves perform the function of a bright accessory that complements a certain image. In this case, it is best to use smaller needles, while choosing lacy patterns, fit strips, rhombuses, leaves, etc.
Comments
Related posts:
 Knitting a universal scarf-knitting needle. Detailed diagrams with descriptions and photos for beginners
 How to tie a shirt for a woman with knitting needles, a detailed description of the work, recommendations for modeling the length of the front man, photos of finished products
 Knitting a scarf with knitting needles for beginners. A simple scheme of knitting a scarf-pipe and the availability of a job description
 Schemes and detailed description of knitting scarves with knitting needles and crochet, photo of finished products, recommendations and advice on the implementation of various scarves, arans, lush columns and many other patterns for scarves
 Knitted knitting needles fashion scarf-yoke. Detailed diagram with description and photo for beginners