
New and original ideas for the design of fashionable clothes for girls. Beautiful and unique solutions that will help you make a wonderful gift to your beloved daughter. Easy instructions and photos
For any girl it is necessary to have a largea variety of outerwear for every occasion of life. This summer jackets, and winter coats, and autumn raincoats. It's about the cloaks that we will talk about. In the autumn rains very often go, therefore also clothes should be calculated on such weather whim. Your attention is offered a pattern of clothes for girls, and in particular a children's raincoat with a hood, as well as a pocket for various trifles. In this paper we will use a light waterproof fabric of two different colors. This outfit is very convenient because it can easily be put in a purse, and, if necessary, quickly removed and deployed and saved from the rain. Thus, your child will always be ready for any weather change, and will be able to get full pleasure from walks in the fresh air.  The main thing when creating a raincoat for a girl isinclude at full power all his imagination and talent. Choose any colors and fabrics that will only suit your taste. If the clothes look beautiful - you did your job well. If you choose wool, cashmere or velor as a material, you will get a nice little coat for your daughter for the spring and autumn. You have a pattern, and the rest depends only on your skills, abilities and imagination. Good luck! We'll figure out the pattern of our autumn raincoat from the rain. To create it we need:
- Waterproof fabric, for example red. Length - 60 centimeters, width 150 centimeters;
- Waterproof fabric, already different, green. Length - 60 centimeters, width 150 centimeters;
- Kapron cord, diameter 4 millimeters, length - 90 centimeters;
- Four buttons;
- Two eyelets. These are the rings where the cord will be stretched, they turn into the fabric;
- Two tips for the lace;
- Stoppers for a lace - two pieces;
- Spool of thread. The color should match the basic color of the fabric. In our case, the threads will be red.
Let's start. Let's fold the fabric face-to-face, place the pattern on it so that the right half of the cape and the left side of the hood are on the red fabric, and their opposite elements are green. The details of the pocket and the straps will be of both colors. The valve of our pocket is made of red fabric, and the slanting bake is made of green. Its parameters are 34 by 4.5 centimeters. 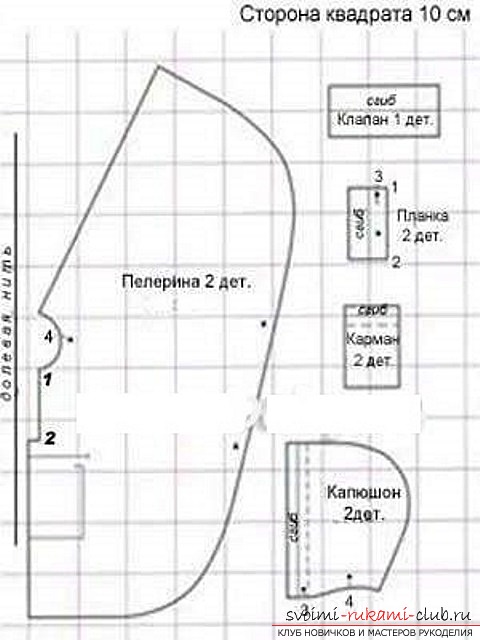 It is very important not to forget about the allowances. For linen stitches will be 1.5 centimeters, on slices - one centimeter. From the bottom of the product, that is, the pelerine, indent two centimeters. Connect the details of the halves of the hood, pocket and pelerine with a double underwear seam. The finishing line should be done on the green part using a red thread, making a pre-indentation half a centimeter from the edges. After that, on all our parts, where the eyelets and buttons should be installed, attach the pieces of fabric on the wrong side. They should be stacked in several layers. After installing the eyelets on the hood, fasten both halves of the hood together. On the front side make a tunnel, the width of which is two centimeters. Pre-lay the lace inside, which you have threaded through the eyelets. Stitch the back and front seam of the pelerine. The details of the laths are located on the front of the cloak, facing inwards. On the opposite sides, curl the allowances and carefully sweep them. The hood must be stitched in half exactly between the cuts No. 3. Place the slats on the fold so that they are the front side inward. Slant the bake, also fold along in half. Then place it on the edge of the neck. First, sweep, and after one side, attach a slanting bake to the cape, and sweep again. Then it is necessary to cut the allowances at the corners of the fastener. Cut slats, sweep, and then put the wrong side over the seams for pritachivaniya. Along the side and top sides of the strips, make the finishing lines to the edge. Stitch the finished oblique bake.
  The final stage. On the red bar, put the green, as if with a closed buckle. Connect the allowances from the bottom of the slats and the cutout of the fastener. After fix it all with a finishing line. Pocket details must be worn. Top his allowance tucked one centimeter, wrap on the front side, sew to our side cuts, and in the end - turn out. Again, adjust all the allowances for the remaining slices and go through the finishing line on the top side of the pocket. The finished part needs to be adjusted according to the markup. Fold the valve in half, then grind along the side cuts, unscrew it and again stitch it into the edge. Then, on the marking, stitch it, turn it away, and fasten it to the fabric with a finishing line. Very carefully and gently treat the bottom of our wonderful autumn coat. On the slats of the fastener and the pelerine, attach the buttons to the markings. The ends of the cord will now pass through the stoppers, and with the help of the tips we secure them firmly. That's all. Our raincoat is ready for the girl. In any bad weather, it can be reliably protected with its help. Thank you for attention.
Comments
Related posts:
 New and original ideas for the design of a children's skirt. Beautiful and unique solutions that will help you make a wonderful gift to your beloved daughter. Easy instructions and photos
 New and original ideas for the design of children's dresses. Beautiful and unique solutions that will help you make a wonderful gift to your beloved daughter. Easy instructions and photos
 New and original ideas for the design of a fashionable dress with a lush skirt. Beautiful and unique solutions that will help you make a wonderful gift to your beloved. Easy instructions and photos
 New and original ideas for the summer pattern of dresses of large sizes. Beautiful and unique solutions that will help you make a wonderful gift to your beloved. Easy instructions and photos
 New and original ideas for the design of children's clothing. Original and simple solutions that will help you make an excellent gift to your child. Simple instructions and photos