
New and original ideas for the design of a fashionable dress with a lush skirt. Beautiful and unique solutions that will help you make a wonderful gift to your beloved. Easy instructions and photos
Lovely Newlook skirts again became popular. Fashion trends are constantly changing, and lush skirts are a stylish trend this year. Feminine styles began to prevail over formlessness, vulgarity and sporting styles. Boy's clothes became less popular. Dresses with voluminous skirts go as a young lady, and older women. The main thing that distinguishes all the outfits of age groups is the length. In the presented a little below the pattern, the length is only 75 centimeters, if you count from the waist line. There will be a desire, it will be possible to slightly correct this value. Experienced craftsmen and beginners do this will not be a huge task. All dresses look attractive, and it depends on length, material and color. The presented pattern of a retro dress with a lush skirt is perfect for women of 34, 36, 38, 40, 42 sizes. What will it take to make a dress? 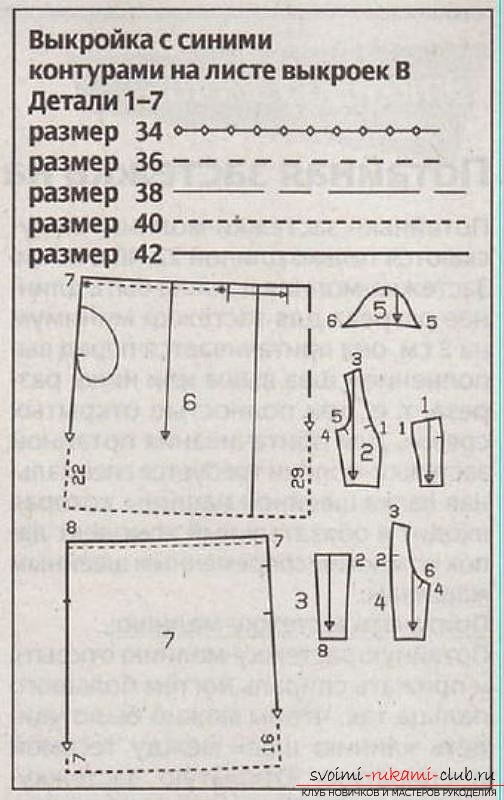 For the dress:
For the articulator:
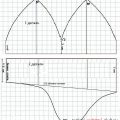
We create patterns. All the details of the dress pattern on the paper. 6 and 7, the elements must be extended by the required amount. With the 6th pattern, reseat the burlap pocket as a separate pattern (it is universal for all sizes). Cut the front panel along the drawn seam line. What are the allowances for seams?
- In sections - 1.5 centimeters;
- To hem the hem of the skirt - 4 centimeters;
All the details of the lower skirt should be cut with the calculation of allowances in 1 centimeter. What details should be obtained when cutting? From rep, you get the following elements:
- The middle part of the transmission is 2 pieces;
- The middle part is transferred as a lining - 2 pieces;
- The middle part of the back is 2 pieces;
- Sleeve - 2 pieces;
- Lateral detail of back - 2 pieces;
- The lateral part of the transmission - 2 pieces;
- The lateral part is transferred as a lining - 2 pieces;
- Back cloth - 2 pieces;
- The lateral side of the front cloth is 2 pieces;
- The middle part of the front cloth with a fold is 1 piece.
 Pantucant From tulle:
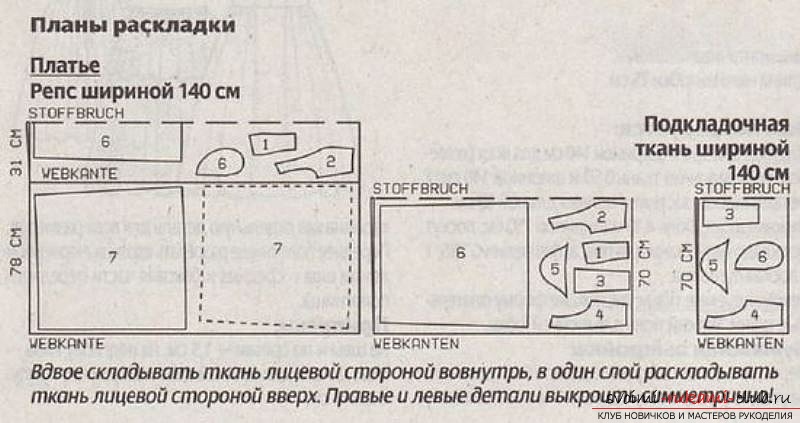
- 2 canvases, in which the width is 148 centimeters, length - 150 centimeters. In ready form - 75 centimeters.
- 2 upper cloths, in which the width is 148 centimeters, length - 150 centimeters. In ready form - 75 centimeters.
From lining matter:
- The belt is 68-72-76-80-84 centimeters long (take your measurements into account!), Of which 3 centimeters is necessary for the allowance for the fastener. Width - 4 centimeters. In the finished form - 2 centimeters. Iron the belt.
When the preparatory work is completed, you canproceed directly to sewing. On the upper area of the outfit, make the front middle seam. Place it just below the transverse mark. Then follow the front and rear relief seams. They begin and end exactly at the cross marks. Now it is necessary to stitch the side and shoulder sections. When finished, iron the seam allowances. Lining details in the same way as the top of the dress. Lining fold with the top of the dress. Then kill them along the slices of the necks. Now sew them slightly above the middle seam, next to the edges of the incision pass. Do not forget to leave the allowances on the seams untouched. Now cut the necks of the outfit and the lining together, but at the embroidered seams, the line should be interrupted. The allowances for seams remain untouched. Seam allowances are cut in rows with a stitch, at the corners create slices diagonally. Lay the lining on top and sew it to the seam allowances. In the end turn the lining inside out, iron the edges. 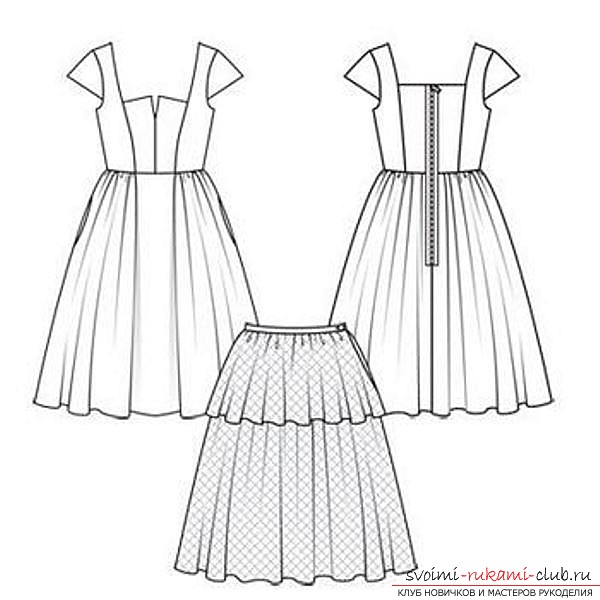 Turn the armhole and lining sections. Now grind them at the side seam. Hand grab the slices of the armhole and turn them out. Between the control points 5 and 6, the faces should be worn. Cut the seam allowances. Put the armholes back in place. Now iron the edges. Sweep away the remaining slices of the armhole. The next step is to sweep the lining along the edges of the incision of the back of the future attire, as well as along the lower cut of the top part of the outfit. Combine all sleeves from the main and lining materials, and then grind the lower sections. Now unscrew the lining in the lower area and secure to the allowances on the seams. Unscrew the lining on the wrong side. Sweep open sections of sleeves. Then stitch the sleeves between the control marks 5 and 6. Spread the allowances together on the seams. In the area of the pellet sleeve, allow the seam allowances. Connect the lower ends of the allowances from the wrong side to the front and back. Pratachaet central part of the front panel to the side elements of the front. Stitch the side cuts, while leaving the openings in the pockets. Create pockets Pins pin the sacking of the pockets to the allowances of the entrance: front - from the lining, from the back - from the main material. Stitch the burlap along the marked seam line. Iron the sackcloth of the pocket and mend. Grab the top section of the front panel between the star marks to 10 centimeters, this if you create a size 34 order. For each next size, add a half centimeter. Similarly, select the top section of the rear panel between the star marks to 16 centimeters - for 34 sizes. For each next size, add a half centimeter. Create creases in the front panel in the direction of the arrows and draw the folds at the top. Sew a skirt to the top of the dress. Pripuski chute upward. On the back and back curtain parts, press the allowances along the very edge of the cut. Connect the opened zipper from the front side to the back and back sheet parts. Do this in such a way that the zippers of the lightning coincide with the edges of the cut. At the very end, leave the zipper slightly protruding. Close the zipper. Prikolite just below the incision, another clasp top the middle seam. Her lower ends of the ribbons tucked.
  Place the upper ends of the ribbons of lightningedge of the neck at the edges of the cut directly under the allowances. Stitch it tightly to the zippers and along the edges of the straps. Iron the allowance that you specifically left on tucking the bottom of the dress, inside out. Gently sew it by hand. We now turn to sewing a sucker. Sew on the ponytail and its upper skirt the side cuts. However, leave small cuts in the left seam in the open state with a length of 18 centimeters. Fold the skirts to half the length and iron the fold. Cut edges of the sections. Put the upper skirt on the bottom. Collect the upper sections together and score up to 65 centimeters. This is done for 34 sizes, for each subsequent add 4 centimeters.
 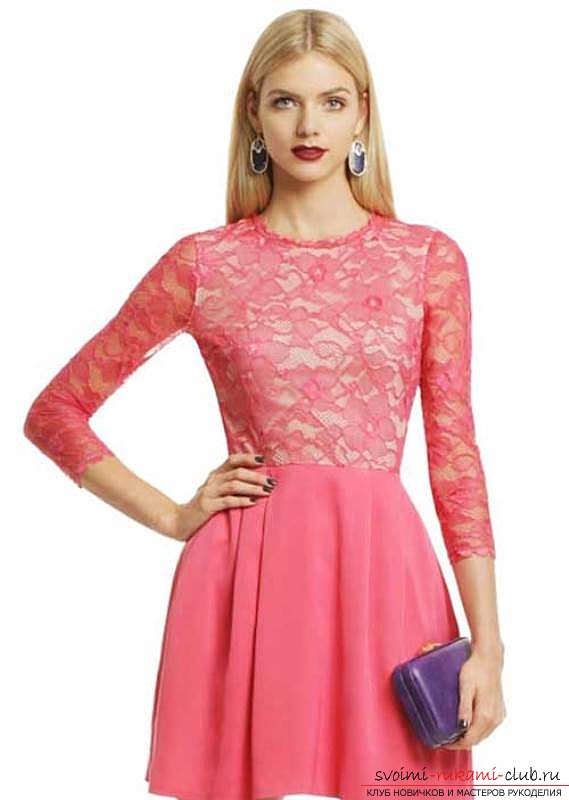 Sew a belt to the top of the skirt. Leave the allowance under the clasp. The seam allowance for the belt is ironed together with the allowance for the other cut. Now, longitudinally put the girdle and tie off its ends. Inner edge turn and sweep. Sweep the cutoff sections under the zipper. The belt should be stitched exactly along the contour. The eyelet on the front side of the band is swept.
Comments
Related posts:
 New and original ideas for the design of children's dresses. Beautiful and unique solutions that will help you make a wonderful gift to your beloved daughter. Easy instructions and photos
 New and original ideas for the design of children's clothing. Original and simple solutions that will help you make an excellent gift to your child. Simple instructions and photos
 New ideas for the design of a cute baby cap. Original and simple schemes that will help you make a good gift to your child. Simple instructions and photos
 Various patterns of children's costumes for the holidays. Beautiful and bright models that will help you make an unforgettable image for any holiday. Simple instructions and photos
 New and original ideas for a coat for a girl. We make clothes for the child in the latest fashion of 2014. Simple instructions and photos