New and original patterns of beautiful toys with their own hands. We make great gifts for our children. Photos and instructions
Toys created by hand are specialcreation, which please every child. It is very difficult to be indifferent to such products, and sometimes it is generally unrealistic. The thing is that the masters at sewing such a soft friend, invest a part of their own soul, and the toys come to life. Hands can do a lot of amazing things - Teddy bears, felt toys, Tilda dolls and so on. The main thing is to have a living imagination and a bit of free time, and also patience, so as not to stop before failure. Making toys is an amazing thing. Usually, talented masters once sewing a soft toy can not stop, and they constantly improve their craft. However, why pause? After all, toys can give a lot of joy to loved ones, children and friends! This master class will show every artist how to sew a nice and charming sheep with his own hands. By the way, thanks to lambs, everyone can do needlework. After all, these wonderful and harmless animals give wool, from which you can play and knit warm clothes and amazing toys to your children. First, you need to decide which materials will be needed for sewing lamb.
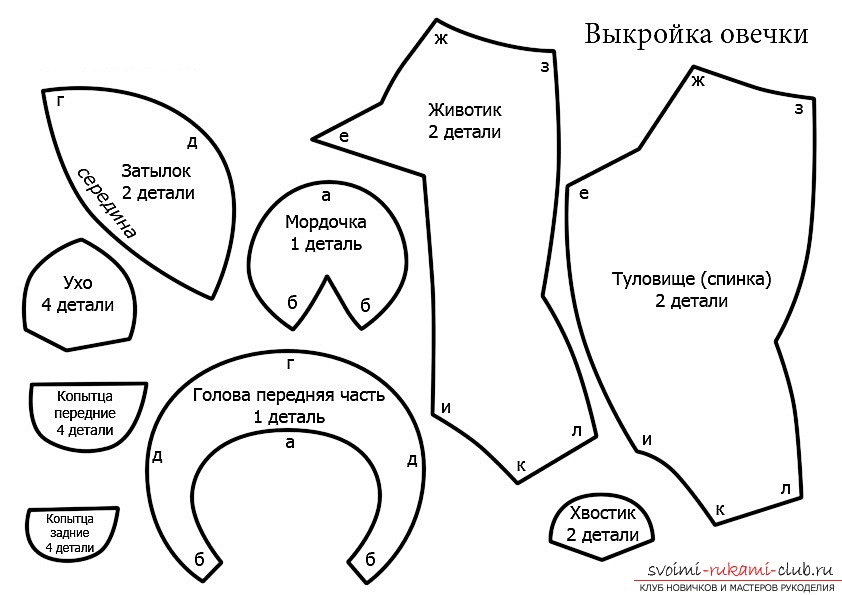
The size represented by the patterns is calculated on a sheetformat A4. However, it can be increased at any time. Download and save the pattern on the computer, and then print it on the desired scale. Look closely at the pattern of angles and sides are called letters. When sewing parts, you should combine the sides with the same name. This is done so that no one can get confused in the stapled details. Patterns should be cut and transferred to a canvas. First of all, it is necessary to understand what material to cut parts of the future sheep.
- Muzzle of fleece;
- Torso, tail, front part of head, posterior halves of ears, nape of artificial fur;
- Hooves, tummy, front halves of ears made of cotton fabric.
 Let's start sewing lamb. First, let's head on. On a muzzle it is necessary to combine "b", and to stitch with a straight seam. Use the advantage of a sewing machine, and if it is not, then do it by hand. To the muzzle sew the front half of the head. We sew the occipital part along the line of the middle. We sew the head together. Ears stitch, and then turn them out and lower edge tighten, giving the necessary shape. Kopytsa sewn to the tummy and details of the back. Stitch and tummy stitch together. There were two mirror parts! Compare the result with the photo.
 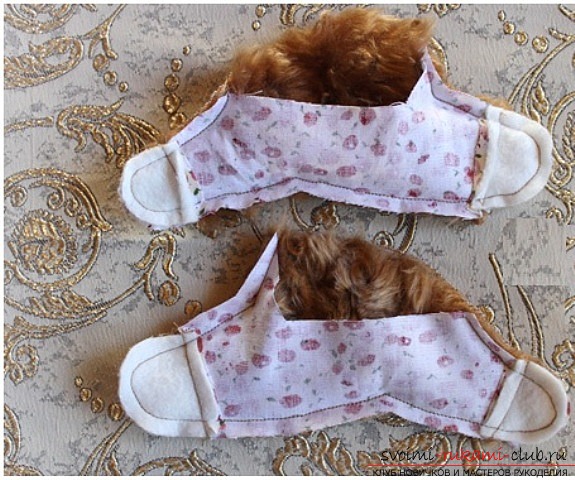 After the details, sew on the backrest. The tummy is not sewn, because it is necessary to fill the lamb with filler. After this procedure, the tummy can be sewn with a hidden seam. All parts of the toy are stitched together, thereby collecting the toy. Ears sew and make out the muzzle of a sheep. Eyes can be made from black beads, it is better that it was glossy, then the eyes will turn out shiny and alive. It is necessary to embroider the nose with black thread. After the muzzle has become ready, it is necessary to sew a head to a trunk. Then sew a tail. A little advice. If you are sewing a lamb of fur, which has a long nap, then after the assembly of the toy, the pile should be shortened slightly.
 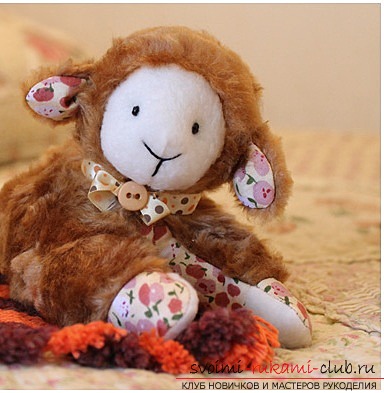 Tie a bow around your neck! Everything, the lamb is ready to please your children! Now let's go on to sew an Easter bunny. You can create a beautiful toy even from simple socks. Sewing a toy from socks is not so difficult as it might seem at first. Working with a knitted fabric is very simple, and socks, often, are created precisely from such material. The main problem - the seam should, in the end, turn out to be even, neat and inconspicuous. What materials will be needed to sew an Easter bunny?
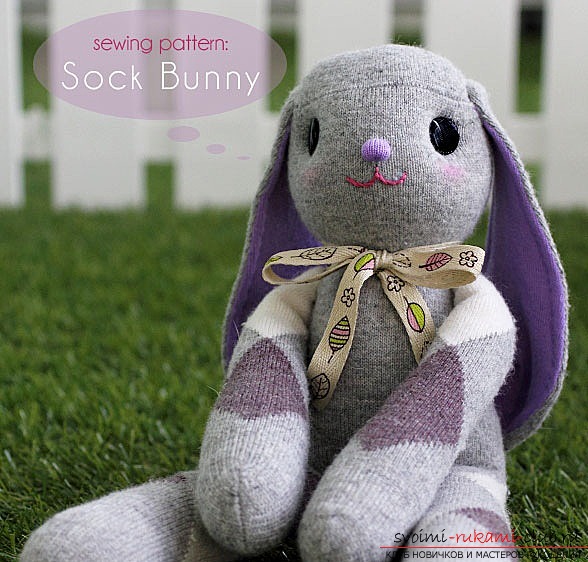
Tools that will be needed for sewing bunny:
- Sewing machine (optional);
- Needles;
- Scissors;
- Tweezers.
Of course, you can change the size of the bunny. All depends on the chosen socks: you can make a miniature bunny from children's socks, and if you take an adult size, then the bunny will get much more. With the help of scissors it is necessary to beat an elastic band. Sock the socks with the wrong side, and fold, thus, as shown in the photo. Transfer the pattern. At one toe, cut off the heel, and then cut it in half. All marks on the patterns are made in English, so below is a translation for those skilled workers who do not know a foreign language.
- head - head;
- body - body;
- ears - ears;
- arms - handles;
- legs - legs;
- tail - tail.
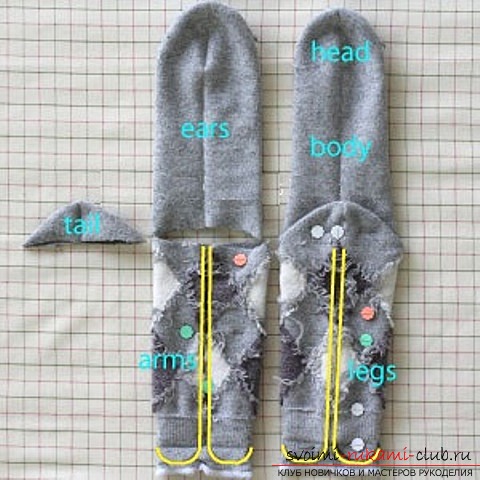 By the way, if the socks have a pattern, and you are one of themgoing to create a toy, then when cutting, try to combine the patterns. Sew along the seam line, and then cut out all the details. Between the paws, leave a hole in order to fill the toy with filler. In order to sew a bunny's eye you need to take two socks. Let one be purple, long to the ankle, and the second - gray. Cut two pieces into each ear. It turns out 1 violet and 1sere ear. On the wrong side of the gray toe, draw a picture that resembles a drop. Through the seam line, sew and cut the part. Pull out the tab with the front side. Carefully, so that the seam is almost invisible, sew a hole in the upper half of the ear. Fill the toy with a filler. First, head, give it a ball-shaped shape, and after less tightly stuff the legs and body of the toy. Sew a hole. Fill the bunny sticks. The upper half is sewn neatly. Look for a suitable place for pens and fasten them with pins, and then gently sew the handles to the trunk. Now he moves to the tail. Cut off the gray heel with a notch at the very edge. Tail the nail and sew a hole. Sew the resulting tail to the back of the bunny. Ears sew to the head. The ears should be fixed in such a way that they are placed on the back half of the head, and the face is completely open. Do you want the bunny's ears to be flat? Then sew them along the contour with a stitching suture. Now we sew the spout of the rabbit. Such a small detail requires the master of patience, some skill and perseverance. You may need tweezers. From a purple fabric, cut a small oval. The detail is sewn with a notch, and after tightening the thread. Using the tweezers, tie the edges with the inside. Sew a nape. The photo below shows the placement of the eye and the rot of the bunny. Rotik embroider in pink. Eyes sew. At the same time, the head must be pierced through, and thread a little to make the eyes turned a little in the groove. Tie a ribbon around the neck of the bunny. The toy is completely ready! By these two original schemes, you can create amazing and very beautiful toys that will be able to delight your children every day. In the creation of soft products there is nothing difficult, the main thing is to work with love, and be patient.
Comments
Related posts:
 New and original ideas for the design of a funny bear toy. We make excellent gifts for our beloved children with our own hands. Photos and instructions
 Beautiful and original ideas for the design of children's toys made of felt. We make wonderful gifts for the holidays for our beloved children
 We make new clothes in our summer wardrobe with our own hands. Modern patterns of peasant dresses without difficulty. Instructions and photos
 We make beautiful and original patterns of bright New Year's toys. Holidays became even more pleasant and beautiful. Simple instructions and photos
 Beautiful and original ideas for the design of a soft horse toy. We make wonderful gifts for the holidays for our beloved children