New schemes of cross stitch with autumn motifs for the kitchen for beginners and experienced craftsmen with photo and description.
This kind of needlework, like embroidery, has always beenespecially love the female. However, the opposite sex is also not indifferent to such an occupation. The elegance and tenderness of this needlework in many respects cause his extreme popularity. Yes, you can see for yourself when you see how much the usual things change, which are decorated with embroidery. The onset of autumn in many causes depression when it's damp and slushy outside. To cheer up and make a useful thing with your own hands is easy, if you embroider the objects presented in this master class.  1. We embroider a heating pad for a teapot. This product, designed to preserve the temperature of tea, will help turn everyday tea drinking into a kind of ritual similar to the East Asian tea ceremonies. First let's figure out what you should have in stock to create such a thing. So, you can not do without:
- canvas "Aida" 180x130 mm in color of olives;
- sintepona 400h250 mm;
- scissors with bent tips;
- tapestry needle (with blunt tip);
- a mulberry of metallic "Gamma" M-09, DMC 5279;
- mulina from cotton (see table);
- hoop;
- chintz 400x250 mm (on the lining);
- flax 400x250 mm; thread in the tone of the fabric.
Thread the floss folded in half and a full crossembroider letters in a patterned frame. In the process of embroidering symbols to the light-brown threads add one thread of metallic color. We steal from the wrong side and postpone the embroidery. 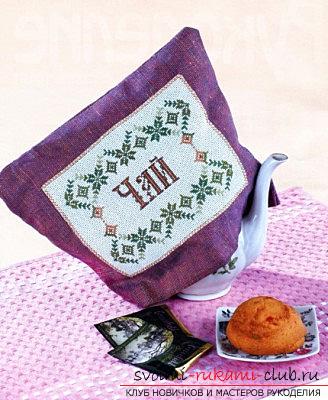 We add the linen material in half and marka serpent of one of the sides (at least approximately). Embroidery is applied to the material. Next, with the help of a large cross, we embroider the frame, capturing the material and canvas, fixing the embroidery so. In this case, the cross acts as a wrap. From the back of the side we spread the flax in the form of a bag. Similar actions are performed with the wrong material. We bend flax from the wrong side, turn out the bag and insert the sintepon. Then, the back cloth is put in, refueled for the bend of the linen material and sewed together, combining all 3 layers. It is allowed to gently squeeze the heating pad to fix the internal sintepon layer.
 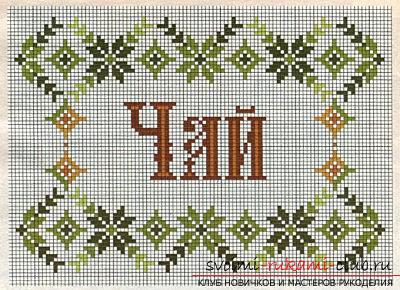 2. We embroider autumn leaves. Here is a leaf on the pillow, we suggest you embroider: This is easy and will not take much of your time. Before you start, get:
- blue canvas 70x140 cells;
- a needle for embroidery;
- mulina in accordance with the scheme;
- golden beads;
- a needle for beads;
- a golden bead.
The canvas is divided in half. In the center of the first square, the image is embroidered in accordance with the scheme and is sewn with the help of a "back needle" seam with orange thread, having retreated three squares from the embroidery. On the other part of the canvas, with the same "back needle" seam, a square of 560x560 mm is embroidered. After that, both parts are sewn together, capturing only the strands of the backstick, and through each stitch the bead is sewn.  For a pillow to be hanged for, it should bethread on the thread beads of golden color, pass both of its ends through the bead and fix it on the corner of the pillow. 3. We embroider the cheerful cubs. Surely, many embroiderers have heard about such a popular form of arts and crafts, as filing, or, as it is called, felting out of wool. However, very few people know how these two needlework can be successfully combined. This is exactly what we will demonstrate with the example of creating a set of hot-water bottles for a brewer and a mug, on which we will depict gay tigers.
 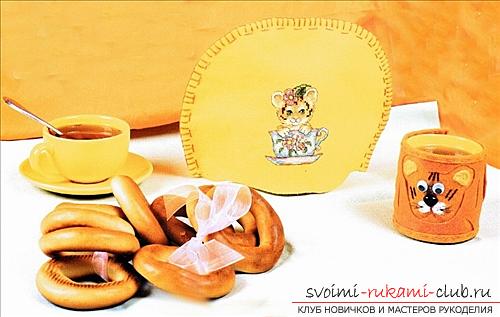 You will need the following materials and inventory:
- floss DMC;
- set for embroidery H196 (RTO Co., Ltd.);
- Textile glue;
- wool for felting (RTO Ltd);
- needles for felting;
- a set of multi-colored felt fabric (RTO Ltd);
- spouts and eyes;
- water-soluble canvas DMC;
- brush-mat for felting;
- needle embroidery.
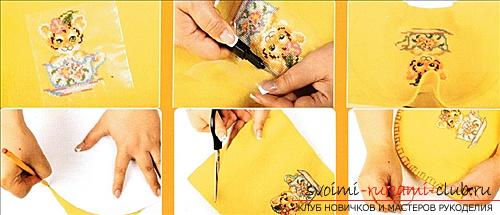
First, cut off a patch of water-soluble canvas and apply it to the felt. Next, embroider the image, eliminating the "back needle" stitches. 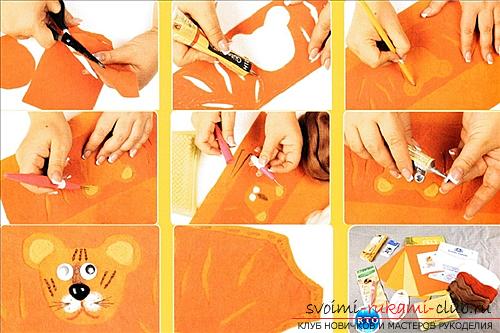 After this, the hint is removed, and the extra canvasis cut along the line of embroidery. The felt drops into the heated water until the canvas is completely dissolved. Then the embroidery is supplemented with a contour stitch "back needle". Now the back and front parts are cut outwarmers. Sew two parts with a decorative seam "forward needle" thread a moulin folded six times. So we will create a heating pad for the brewer. Now you can go to the hot water bottle for the mug. A strip of felt is cut off, which is equal in width to the height of the mug. After sitting, using the stencil, we cut out the image of the muzzle of the tiger and perform slots that look like tiger bands. From the wrong side of the strip of felt we apply glue and connect it with a piece of felt more dark color. Using a simple pencil, we apply a contour and place a spout, eyes and ears. We attach the small piece of wool to the required shape and attach it to the ear of the ear. Gently weil the serum of the cheeks, spout and ears. We remove two needles, and the rest we work out the muzzle. The plastic eyes and the tip of the spout are fixed with a textile glue. Using the tambour and stalk seams, we create the mouth, antennae and stripes. We cut out the "tail" as a handle. The lower layer of felt is cut off, leaving a 0.6 cm clearance, turning away on the face and sewing with a stitch "forward needle". At the end we sew the Velcro. We believe that these autumn novelties will be enough for you to raise your spirits.
Comments
Related posts:
 Cross-stitch embroidery of pions, cross stitch patterns with a description and a photo for beginners.
 Schemes of embroidery of beautiful landscapes with a cross, a lesson for beginners with a description, embroidery schemes for free.
 Lessons of cross-stitch embroidery, cross-stitch for beginners free of charge, cross-stitch patterns, free cross-stitch patterns
 Cross-stitching lessons for beginners for free, cross stitch patterns, free embroidery schemes
 We learn how to cross-stitch towels for beginners for free, schemes of cross-stitch embroidery, free schemes of embroidering towels