How to weave from beads, lessons with step-by-step photo creation of beautiful bracelets for beginners, tips and instructions for beadwork
Looking at the bright and original gizmos from beads,it seems that the very idea of such crafts is absolutely new. However, the history of beading is rooted in the fourth millennium BC. Even then, the first bead products appeared, which were melted from gold, silver and copper, cut from shells, corals and bones. There were wooden and porcelain beads. Archaeologists have found beads not only from different materials, but also the most unusual shapes and sizes, for example, in the pyramids of Indians, products were found in the form of teeth and claws of a jaguar. But the history of that bead, which we know now - glass - is inextricably linked with glassmaking. There are many legends about the appearance of glass. One of them tells that a caravan of Phoenician merchants carried a cargo of natural soda through the Mediterranean Sea. One evening the travelers pestered the deserted shore for an overnight stay. In order to cover the hearth, stones were not found and it was decided to use pieces of saltpetre. In the morning, having razed the ashes of the fire, they found ingots of a durable and transparent material. How true this story can not be said. But the glassmaking was known even to the ancient Egyptians. They used glass beads to imitate precious stones. From the beads of that time, various decorations were created, for example, pendants and necklaces. Later, the Romans learned to cook the glass from the Egyptians. They used it not only for decorative purposes. The first glassware and other household products appeared. Then several centuries Venice became almost a monopoly center for glass making and, as a result, the creation of beads. The secret of creating the glass was jealously kept secret, and the masters of glass business enjoyed incredible privileges. With the passage of time, the development of navigation and the opening of new lands led to the emergence of whole glassworks. Beads are becoming more popular and affordable. In Russia, it successfully competes with pearl embroidery. Bright colors and a wide range of shades make beads a popular material for needlework. It is used not only to decorate clothes. For example, the Empress Catherine the Great ordered to decorate all the walls in one of the rooms with a glass bead, and I. Stalin had a beautiful ornament of beads on the pipe. Our article is intended for those who only master the art of beading. We will recommend a few simple products, let's talk about the selection of beads by sight and colors, about what materials are needed to fasten the beads, additional accessories for making jewelry and tools for work. Types of beads Of all the variety of plastic, metal and glass beads of different manufacturers, one must choose the one that is calibrated best. It is precisely selected by size beads that will make it possible to create a neat and beautiful thing. The best option will be Japanese and Czech beads. Beads differ in form:
- The most common is round;
- Felling - small hollow tubes;
- Bugle - long hollow tubes;
- "Rice" - elongated oval shaped beads;
- A drop-hole in these beads is offset to one of the edges;
- Twin - oval beads with two holes;
- Farfal is a figured bead;
- Bohemian beads look like cut crystals in miniature.
In addition to the bead itself, needlewomen often usevarious beads and crystals, for example, bicones, rivoli, rondeli, abacus and carboshons. The size of the beads is inversely proportional to its number, the bigger it is, the smaller the beads. Most often used from 8/0 to 15/0. The most convenient for beginners needlework beads - 10/0 and 11/0. In addition to the beads, you will need ancillary tools:
- A line, thread, monofilament or wire;
- Pliers, nippers, round nose pliers and other devices for working with wire;
- Scissors;
- Ruler;
- Needles for beads;
- Fittings in the form of hugs, pins and locks (if you decide to weave something from jewelry);
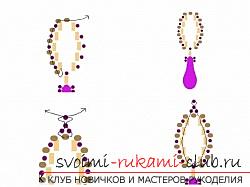
In addition to the above materials can be usefulglue, different capacities, if you want to make a craft in the form of a tree. Alabaster or gypsum and various decorative elements, for example, seashells, moss, beautiful pebbles. Below we offer you three master classes for weaving jewelry. You will not only learn how to work with beads, looking at step-by-step photos and drawing on detailed instructions. As a pleasant bonus, you will have beautiful and original hand made jewelry, which every day becomes more popular. Try using different color beads, pick up crystals of a different shape or shade, experiment. Bracelet made of beads with square crystals 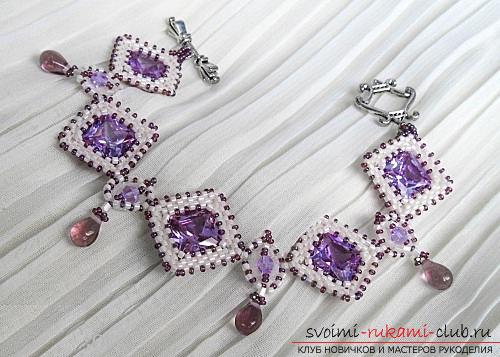 Similarly you can weave a necklace, then you will get a gentle and elegant set. Materials and tools:
- Beads 11/0 Delica milky;
- Cutting Matsuno milk color;
- Beads 15/0 of purple;
- Drop-shaped beads 4 pcs. purple;
- Bicones 6 mm purple 4 pcs .;
- Square rhinestones from crystal with side 12 mm 5 pieces;
- Lock for the bracelet;
- Monofilament and needles for beads.
To begin with, we will cut crystal rhinestones. To do this, dial 48 beads of delicacy into the ring. The knot is not tied. Next we will work in one thread. Ply the mosaic with five beads, then you have to skip one bead of the circle in order to make a corner. This is necessary because the rhinestones are square. If you take a round, you can not make corners. 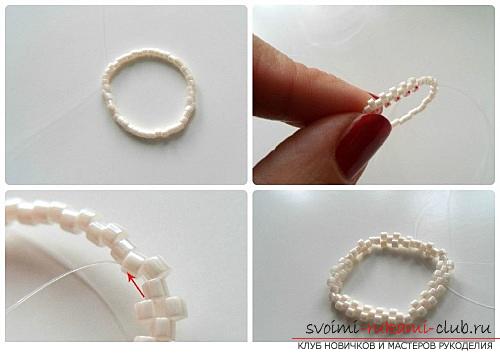 Flog further mosaic, making three more corners. In the photo, passages are indicated by red arrows. The next circle of the plait is similar, skipping angular beads. We work with the inside of the box. On one side, it is no longer five, but four beads.
 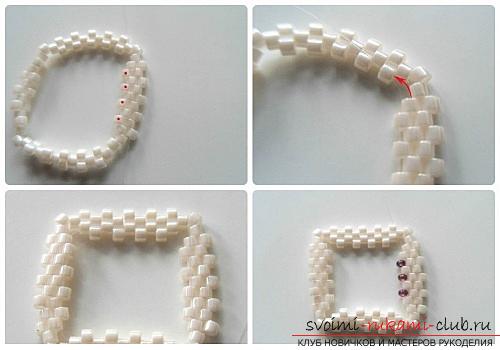 In the next circle on the inside of the squarewe weave little purple beads, and in the corners we add one bead of delicacy. In order to consolidate our weaving, we need to go through the whole series again. Too tight is not necessary. The sides of the frames for the crystal are ready and we must now weave the bottom.
 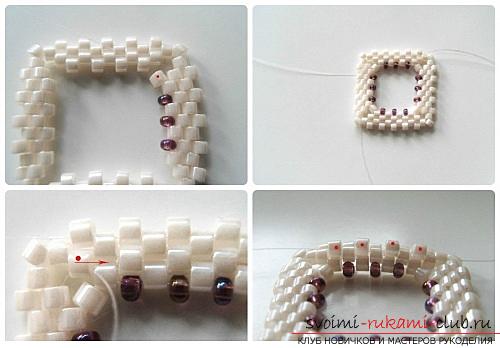 The line comes from the beads of delicacy in the second row. In the photo it is shown as a red dot. The arrow indicates the direction of work. It is necessary to weave a number of mosaic techniques, not missing corners. It should be in this serving row 19 beads. A sham soldier. In the next row for the corners we add two beads, we make the reception "turn". On the sides we weave three beads. Now we need to put the crystal in the resulting nest. The convex side is facing us. Now you need to make the last row of small purple beads and tighten. The photo shows in detail the steps and the red beads required for the beads.
 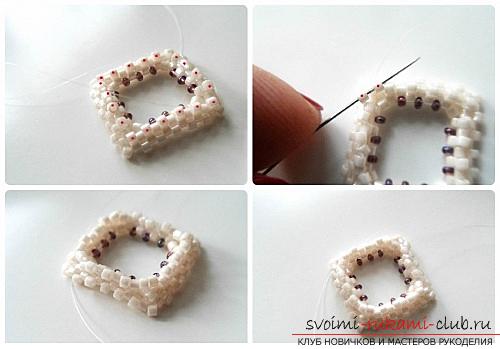 So you need to make a braid for all five crystals. The next stage will be the weaving of the connecting elements.
 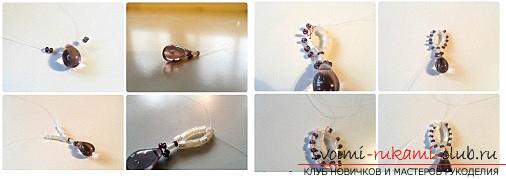 On the piece of monofilament we put on 2 purplebeads 1 a drop and two more purple beads. We shall weave in two threads. We shift the beads to the center. Now, both ends of the thread pass through 1 felling and one bead of purple. Now, for each ponytone, we sew five cuttings separately. We close the circle in one bead of delicacy, having crossed in it both hvostika threads.
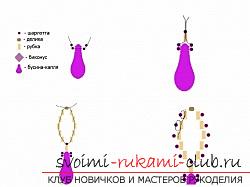
 The photo shows how to violetbead rings. Next series we weave delicacy between purple beads. The tails of the thread must come out of the beadwork, which we closed the ring.
 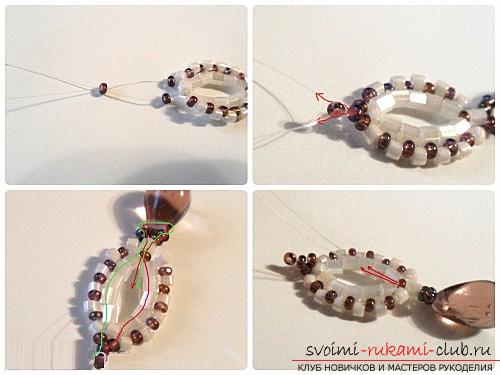 At each end of the thread on the 1st violetbeads, then both ends cross through another purple bead. Now it is necessary to pass the tails of thread along the sides of the ring through the felling and exit from the central bead (see photo). On both ponytails thread stringed two purple beads, one beacon and two more purple beads. Cross the ends of the thread in the center bead deic. This will fix the bicones.
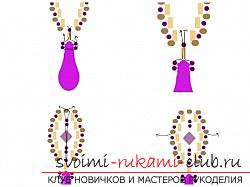
 Now it is necessary to pass the ends of the thread in a circle and withdraw them from different sides. In the photo, the joints are shown in red circles.
 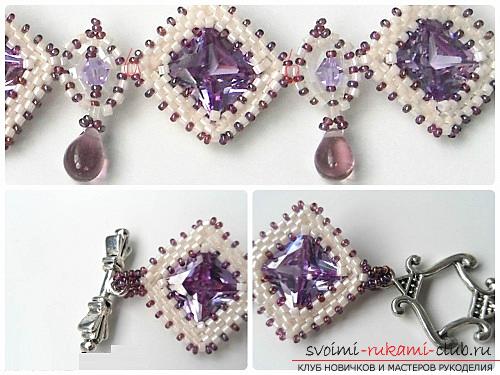 To fasten the lock you have to make two eyelets from purple beads 15/0. Bead bracelet with round beads
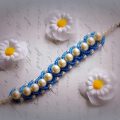
 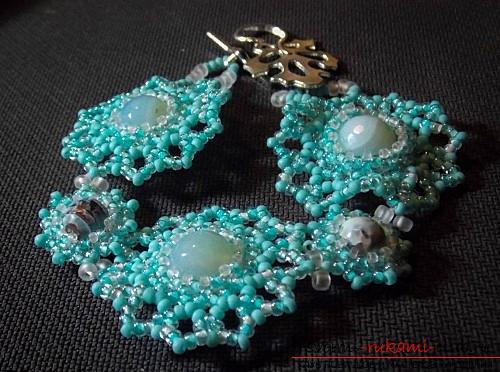 Materials and tools:
- Blue beads (2 pieces of 8 mm and 3 pieces of 10 mm diameter);
- Beads 11/0 in turquoise color;
- Beads 15/0 transparent matt;
- Beads 6/0 transparent matt;
- Needle for beads and thread;
- The lock.
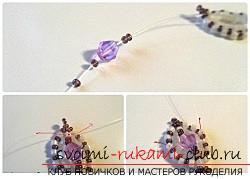
We make braiding of beads as follows: dial 12 beads 11/0 and thread the bead. We pass again through all the beads and string 12 more beads. Now we are already threading through all the beads for fastening. The number of beads must be necessarily even. Perhaps you use beads of smaller or larger diameter, but the number of beads must be divided into two necessarily. 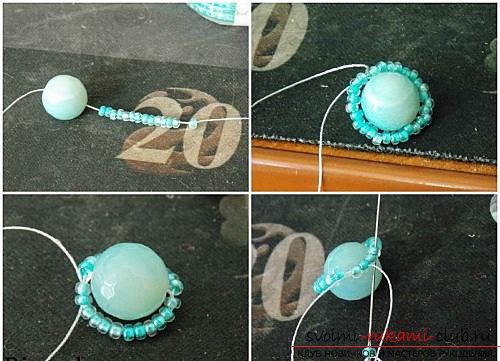 Plait the circle in a mosaic method with beads 11/0, andthen the next row is exactly the same, but we take the beads 15/0. It will be more narrow. And the beads will be better attached to the bead. On the other side of the first main row of the plait is exactly the same two rows of mosaic. The beaded ranks seem to be encircling the bead.
 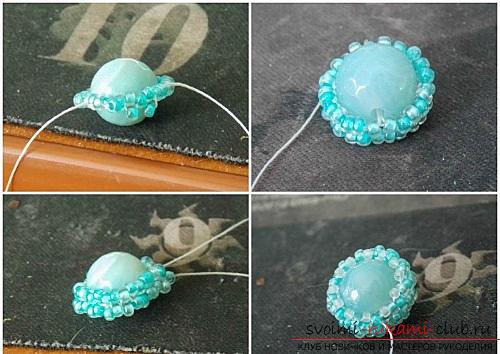 Lapel lace edging. For those who know how to crochet, this will resemble the execution of arches from three eyelets-beads. One primary color, one auxiliary, and again one primary. We thread the thread in every second bead. The entire row should be in the same plane. The next row will also be of arches (three bead-eyelets), one auxiliary color, one primary and one auxiliary. We fix these arches, threading the string into the central bead (auxiliary color) of the previous row. The next circle is also made of arches, but not from three of seven beads. Lower first three beads of the main color, then one auxiliary and three more basic ones. Thread to fasten the arches we pass into a bead of the main color of the previous row. The last row will help us to fasten the bead lobes. The thread comes out of the sixth bead of the arch. Now you need to string the bead of an auxiliary color and go to the second bead of the next arch, etc.
 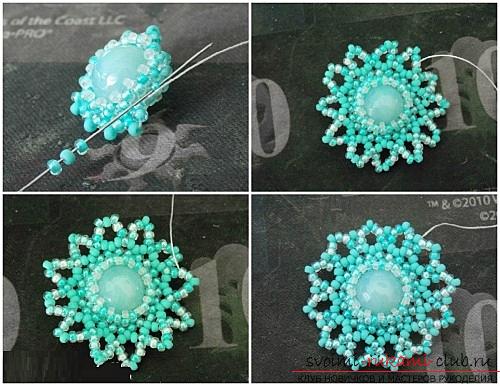 We are braiding smaller beads on the sameprinciple. But initially we string not 12 beads, but 10. Mosaic rows will also be smaller. From the main series in one direction, weave a circle with beads 11/0, and then circle with beads 15/0. In the other side of the main series is a shaving only one round of beads 15/0.
 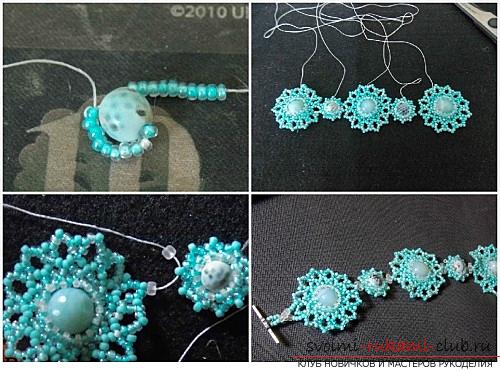 For small beads, we make only one row of archesfrom three beads. We take one basic, one additional color and one more basic. The photo shows how to connect large and small beads. For this, beads 6/0 are used. It remains only to attach the clasp. If you want to get a bracelet with an adjustable dina, you can use chains. Using this method, you can make beautiful earrings and a pendant or a whole necklace. Even the ring will turn out very original and beautiful. Twin Beaded Bracelet
 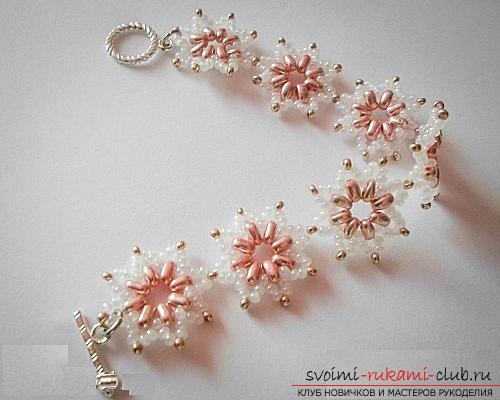 A very gentle and cute bracelet in a floral version is perfect for spring. Materials and tools:
- Beads 10/0 white and golden colors;
- Twin beads of pink color;
- Line and needle for beads;
- Lock and connecting rings.
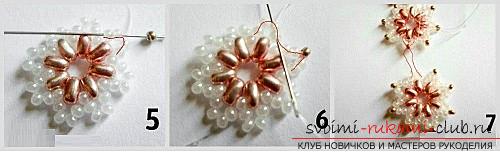
We will perform weaving in one thread. On the line we string out eight beads of Twins and tie a knot, closing in a ring. We deduce the line to the second hole of Tween. String one white bead and pass the line to the next Twin. Now you need to thread 4 white beads and pass the needle in the same Twin from the opposite edge. White beads formed a loop around Tween. Again string one white bead, etc. to the end of the circle. 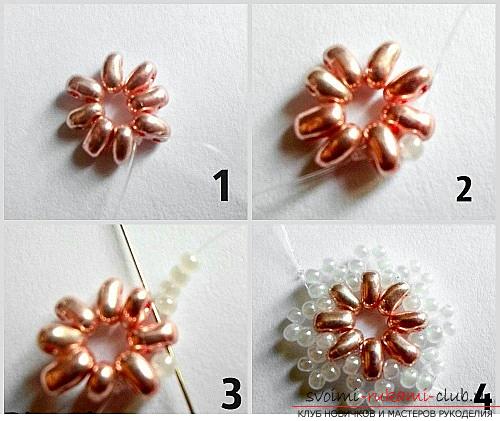 For the next step, the needle should exitsecond on account of a white bead of four. With one gold bead and go through the needle through the third and fourth white beads of this loop and through the first and second beads of the next. Again, we put on a fishing line a gold bead, etc. Plait as many elements as needed. The first we weave completely, but the rest do not weave one golden bead. We will connect them just in this place. In the non-woven element, the fishing line emerges from the second white bead in the place where the gold should be located. We thread the line into the gold bead of the full element and fix it. Now two star florets are connected. The rest is attached similarly. Now it remains with the help of connecting rings to attach the lock and the bracelet is ready to decorate the gentle female handles.
Comments
Related posts:
 Weaving beautiful bracelets from ribbons. A simple master class for beginners with step-by-step photos.
 Free master class on weaving bracelets from beads with step-by-step photos.
 Making a flower from beads for beginners, lessons of creating a flower from beads
 This master class with step-by-step photo and diagram will teach how to weave bracelets from beads.
 How to make a variety of jewelry from satintapes with their own hands, lessons with step-by-step photo creation of jewelry for hair, creating decorative items for the interior, decorating bottles of champagne