Openwork pattern for a scarf crochet - a scheme and description of an openwork pattern with their own hands
Knitting lace patterns - a favorite activity for many needlework. Sometimes, using our old supplies, we can build completely new items that you can later carry with you.
Openwork pattern for a scarf crochet - a scheme and description of an openwork pattern with their own hands
Even old stocks of threads can be usedin business. For this work we will need threads, as well as a special scheme for work. Let's try to make a beautiful fishnet scarf. It is desirable that the threads are denser, so that your product lasted longer than one season. For work we will need certain items:
- Thread such as "Iris" or any other thin or medium thread.
- Hook No. 1.3
- Knowledge of receptions: Stobik, air loop, column with a crochet, polustolbik.
Beginning of work - crochet 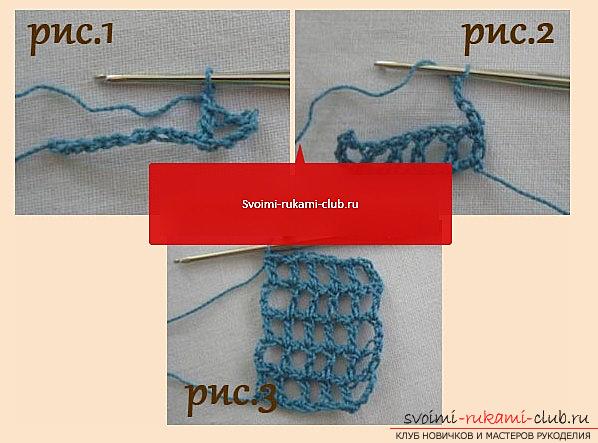 As the main ornament we take the variantdiamond in the grid. For the initial chain, we will need to make 11 air-type loops and four loops separately. Get 15 loops. Next, for the ninth loop, starting from the beginning of our work chain, we are tying a column with a cloak. Get the first cell. After that, the first loop of the air type goes and then, again, the column with the crochet is repeated. Next, you need to loop through the bottom row of the chain, so that the next cell is obtained.
 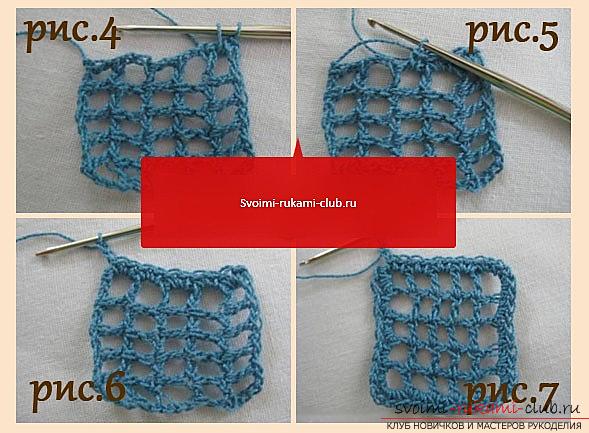 The next loop will be airy, then againa column with a crochet is suitable. After that, we have to skip another loop for the bottom row of the chain, to get the next cell. For the series should be five such things. The second row is formed by turning the cage, without taking out the work (hook) device and after that, we make four air loops (three of them consist of lifting loops and one is horizontal.) This work is done at the beginning of the chain of a number of cells. We need to make five rows, five cells each, by tying the diamonds of the center with half-columns
 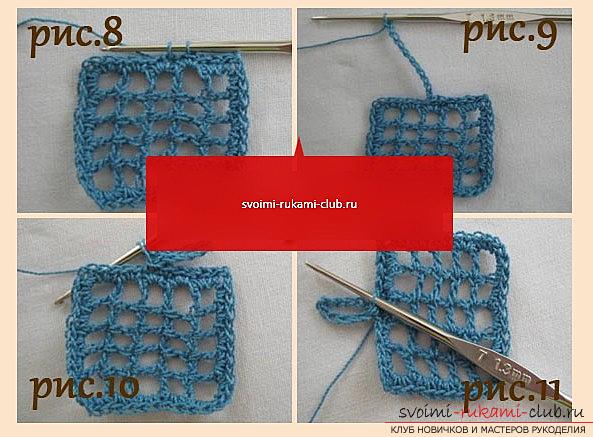 It is necessary to insert a hook onto the cell space andthus, to sew two half-stalls for each. After that, for the remaining end of the thread, we fix the straps in the first row, applying from above and doing the strapping along with the edge of the grid further, make the corner box the strapping in this way: create two polustbols, then the corner top (it is formed by two air-type loops and two polustbolikov) - this forms the beginning for the straps in the next side for the diamond. Then, it is necessary to finish the series with two air loops, fixing them with a connecting loop to the first column on the first cell.
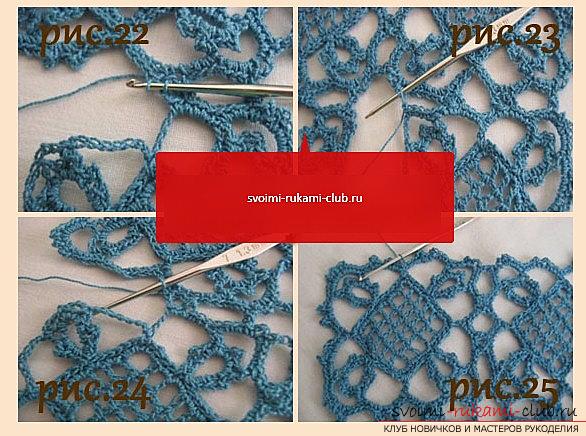
 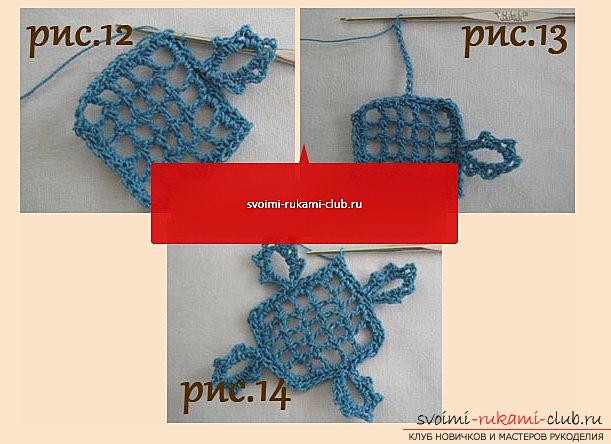 We form openwork rings So, we find the middleseries in the central cell. For this, it is necessary to crawl along the loops to the bottom row with the help of connecting tambour hinges. Further, above the central version of the cell, it is necessary to raise eleven air-type loops. Afterwards, we make a bend in the ring, tying them together with the last loop of the chain and the base for the half-column in the bottom row. Next, work should be rotated so that you return to the beginning of the ring, as it will need to be tied along a circular axis. After this, we make the next knitting: first we make two half-columns, and then - an arch, which will be formed from three air loops. After that, again two half-columns and again - the arch. There should be six pairs of half-stalls and then five arches. Half-columns are located between the arches and around the edges. Next, you need to complete the strapping for the ring with the help of a connecting loop in the base for the left half-column and do it over the center cage.
  Then again crawl the loop in the loop, bendingangles to the central cells, to the next side of the diamond. It is necessary to make exactly the same ring, as in the previous time. Then, it is necessary to finish a number of openwork rings for the top of the corner in the diamond (where the hook crawls and ends the row). Performing the exterior finish For this action, it is necessary to raise the chain in length by eight air-type loops and then, to couple them with the second arch. After this, it is necessary to make a chain-base in length for seven air loops and to connect it with the fourth arch. After that, tie a chain of eight loops and fix it with the top of the diamond's corner. In the final row, you need to make a vault with the help of a connecting loop (for the first and last chain in the upper corner and get the basis for making the last openwork edge.) Making an openwork completion series. The motive of the right edge (series) consists of a special set of three half-columns, arch with three air loops, also two half-stems, again to the arch and after - the completion of the series with the help of three half-columns. For the upper-corner binding in the motive, it is necessary to take four polustbols, three arches for three air loops and after - one after the other (successively), then - to carry out the completion of the series with the help of four half-columns.For a number of the left edge of the motive, it is necessary to perform the same ornament as for the right one.
 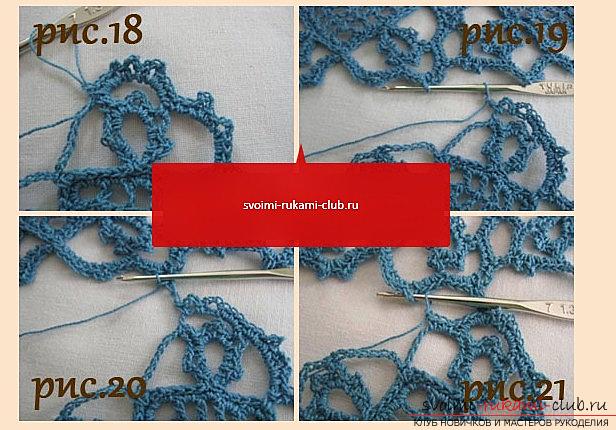 Thus, we reached the second peak inmotive and now, it is necessary to connect the motive to everything else. In this case, we can make a bandage for the two central loops in the appropriate arches for the adjacent motif in the scarf. This action is necessary for the solid connection of individual motifs to a holistic version of the product. For the third arch, you need to link a certain set of air loops, the second loop in conjunction with the central loop from the arch for the motif (ready), and then make an air loop again. When we work with corner joints - we need to leave a free central arch - and remains untouched. For the second and first archs in the side parts, it is necessary to connect the air loop, make the second loop together with the central loop for the same arch of the motif (ready) and secure with an air loop. For the side part it is necessary to makejoining with the help of the center for each arch of the two present. The connection of the outer edge (edges) must be done with the help of an air loop that connects to the central loop on the third arch to the finished motif, then again make an air loop and unbolted into a free central arch, and for the third arch we make connections in the center part from the third arch, for the top of the motive. After this, it is necessary to attach the side parts in the center of each side arch. Then, finish the join and make the completion of the row for the strapping (here free execution) - it is necessary to cut the thread and then, crochet inside the product. The scarf is ready!
Comments
Related posts:
 How to tie a delicate openwork pattern with your own hands. Basic knowledge when knitting an openwork pattern with knitting needles
 Methods of creating a pattern of crochet and columns - a magnificent pattern by your own hands
 The pattern of "paired leaves" for the pattern of the scarf - how to make a beautiful pair pattern?
 Crochet star pattern - schematic and photo of the star pattern for work by own hands
 Dress and pattern "Pineapple" with your own hands - crochet for girls, scheme