Origami and applique for the creation of the New Year Snow Maiden - master class of needlework
Sooner or later, but the New Year holidays comein our house. Of course, many families sit down together at a round table to spend the evening after cutting out new forms of snowflakes. Of course, because this activity helps to make the house more magical and much better prepared for the holiday of Christmas and New Year. But, some craftsmen also like to spend their time cutting out different characters from paper using popular themes and techniques for needlework.
Origami and applique for the creation of the New Year Snow Maiden - master class of needlework
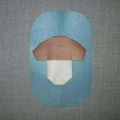
 Origami or Application - it does not matter. The main thing is that your mood is on top, and the instructions remain understandable and bear fruit in the form of fine crafts. Consider the most interesting options that can help us in creating an interesting and unique New Year's toy. We work with the first crafts The first task that will become before us is the creation of the Snow Maiden in the form of a postcard. To begin with, we have to prepare sketches for the subsequent work on the postcard. Then, the sketch should be doubled and make a complete symmetry, check for this factor paper. Further, it is necessary to take the sidewalls and fold them up to the middle, make sure that the genital parts of the fur coat do not overlap each other. Further, using our template, we form a complete workpiece, previously cutting it out of paper of dense type. Then, use the template to cut out the bulb from the paper - for the top postcard element. Next, you need to form a face. To do this, take the pink paper, draw on it the elements of the Snow Maiden's face: a nose, eyes, lips and hair. Then, we attach them to the kokoshnik. We take the same paper from which we have a kokoshnik, in order to prepare the lower part of the floors for a fur coat. To do this, use the initial template. Then, paste on the edges of strips of paper in white, on top of them we lubricate with the help of PVA glue. We fix on the tape cotton wool. Thus, a sample of a fur coat will be ready. We form small mittens Then, cut out small mittens, make for them edges and paste in the same way. So, now we have to work a little bit in Origami. For this, you need to take colored paper and prepare design elements. We decorate the product with snowflakes and write our wishes. We take nail polish in order to make beautiful variations of patterns on the kokoshnik and fur coat. This gift option is useful for those who want to make a nice present for a man. You can paste your picture instead of the face, and instead of a sarafan inside, make a cut from the model magazine in a bikini. And of course, we should not forget about the wishes. Snegurochka-origami The following technique is directly related to the origami lessons and, therefore, you have to spend a little time to learn it. But before you start your work, you need to prepare a complete scheme and select the necessary materials:
- Take the scissors for paper processing
- The glue is required for fixing the surfaces
- Take a sheet of blue paper, the wrong side of the sheet - white
- Let's take also a sheet of yellow paper, the underside of the sheet is white
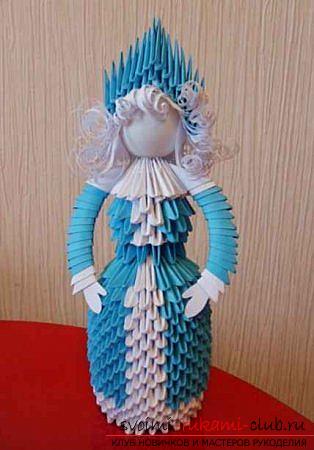
To carry out the work, we need to preparesquare shape of a sheet of blue. Then, the craft should be folded along the horizontal position, and then - to the vertical one. We unfold the product and mark the axes for it. We wrap the two edges of the verticals opposite each other. We turn to the middle two corners from above and turn the lower part of the fur coat. We turn origami to ourselves, to the opposite side. Next, using a pencil, we form two lines of the oblique view from the central corner at the top. After, divide it into 4 corners evenly to each other. We wrap the sides of the product to the middle. To form origami, you need to create a square shape using a blue leaf. To do this, add it by the parameters of the horizontal position and then, the vertical one. After we unfold the handcraft, we need to chart the axes for these parameters. Then, wrap two vertical edges, which are opposite to each other. After - wrap up the middle of both corners to tuck the bottom of the fur coat. We take a strip of paper of white color and bend it to the ve parts, as shown in the diagram. Then, we attach our elements to the middle. Thus, the fur coat will be completed. Head for the Snow Maiden To make a head for the Snow Maiden, you need to take a square of yellow color, and then - two variants of opposite corners to reach the middle and connect with each other. We fold this about several times, then, outline the version of the oblique line higher than the face and bend the element of origami on it. Then, slightly round the chin, by bending the lower corner. Mittens for the Snow Maiden Make mittens can be using small squares of colored paper. To do this, connect the opposite corners of the product again in the center. Then, you need to twist one side of the edge by 10, then expand and make a mark with the line on which we will bend the thumb for our mittens. Then, glue our mitten to the fur coat. A cap for the Snow Maiden Will remain the final touch in the form of an origami technique cap! To do this, take the rectangular shape of the colored paper in blue and turn it into two parts, across. Then, we bend the upper corner to the middle. Then, bend the bottom strip on two sides, make the bend of the tip. It turns out the option of a cap. She needs to "dress" on the head of our fairy-tale heroine, and then, draw a face. The end of the braid is made with a bow. The toy is ready! You can hang it on a Christmas tree, or use an odd thing to design your New Year's card. Snow Maiden on the technique "Modular origami" There is another popular theme of origami,which is called a modular construction. With the help of various modules - pieces of paper blanks, we are preparing a whole image of a certain figure. Consider one of the popular examples of constructing such crafts with your own hands: The workpiece will be done in several steps, which will consist of certain parts of the body. Let's make a skirt, sleeves, the top part of a fur coat, a crown and of course - a head. We will analyze each element separately. Yubochka To create a skirt snegurochki we will need to make a ring, which will consist of 27 modules per row. The starting lineup in the composition will be five. It should be noted that the modules are located along the long side in the outer part. For the workpiece, use white paper. We bend the version of the design, which we will get, as it is done in the figure. then, it is necessary to put the modules on top, while alternating the product of blue and white modelles. Thus, we will make an image for the dress. Here the truth, you decide. Modules need to be connected in order of chess. From the sixth to the 11th row we make 3 white modules, as well as 24 blue modules. From the 12th row to the 17th row, two white color modules are formed, as well as 25 modules of a blue hue. To the 18th row we use 3 modules of white color and 16 modules of blue hue. In the 19th row you will need to make 2 modules of white color and 17 - blue shades. In the end, it is necessary to bend the edges of the module using the center of the ring. On this, our work on the skirt will be considered finished. We are moving in the future work. You need to make the top of the fur coat. Here we make a ring in two rows. The first row is formed on the basis of 13 modules of a blue hue, which are arranged by means of the long side to the outer part. The second row is formed using 10 blue modules, as well as 3 white modules. Here, a module is formed on the short side into the outer part. Then, the product must be turned and bent. Add the fourth row to the 1 white module, as well as 12 blue modules. Also, we form the fifth row using 2 modules of white color and 11 - a blue hue. Then, make the sixth row on one white module, and also on the 12 modules of the blue hue. Blue should be installed using the short side in the outer part. Then, the final element is formed, which consists of the seventh row, on which it is necessary to collect 13 modules of white color, and then, the corners of these modules are reduced to the central part. We continue work on assembling the origami modules "Snow Maiden", which can be done by working with the kids. Sleeves To make sleeves, you need to make a chain of 2 modules in white, 11 modules in blue, and again two modules in white. The mitten can also be made of paper and glued to the base of the sleeve. The second one also makes a mitten. We collect the parts with the help of glue. Crown and head For the crown it will be necessary to make an arch, where the blue modules are assembled in the likeness of the scheme. Then, make a head. Take an ordinary tennis ball, which we fix on the workpiece with a toothpick, as a binder. Hair is formed also from paper.
Comments
Related posts:
 Master class of quilling of a New Year's snowflake with own hands - a needlework lesson
 Modular origami: the swan. Master-class for the 2015 Competition, master classes on modular origami
 This detailed workshop of origami for children of 8 years will teach how to make an origami-mushroom from paper.
 This detailed master class with a photo and description will teach you how to make origami for beginners - an origami-crown made of paper.
 Materials for creating the original origami tami. Various lessons and ideas for creating an origami tank.