
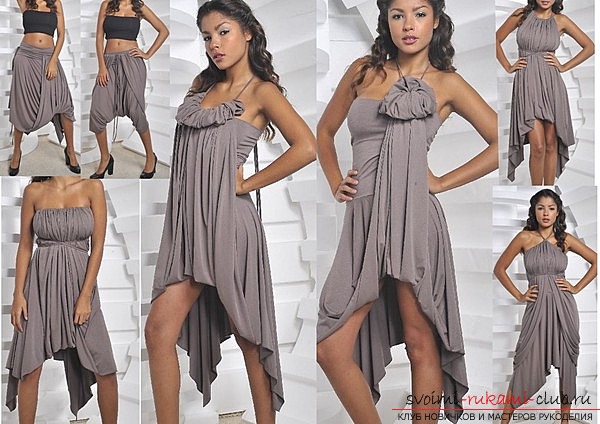
The original design of the pattern of a stylish dress-transformer. A beautiful outfit for a beautiful woman. Photos and instructions
The article will tell you how to sew a dresstransformer yourself. Buy a finished product to date - exorbitant costs, which can not everyone afford. The model, which will be described below, can be sewn in 20 minutes even for women who have never sewed anything in their lives. This outfit can be dressed for a party, and it's very easy to remake it. The main thing is that in your wardrobe there will not just be one dress, but several, and completely different! First you need to melt pick up the material. For such a product, a bielastic fabric or material is required that stretches perfectly in the longitudinal and transverse directions. The color on both sides should be the same! During the purchase ask the seller to deploy the cloth on the table, and carefully study the color from the front and the underside. Check the cut of the fabric - pull the tip, and if the hinges do not "run", then the material is ideal for you. The presented pattern can be adapted to your own parameters. Dress transformer for the full ladies, and for the girls-models is completely different. Therefore, correctly remove the measurements. By the way, cutting must be done on the expanded matter, but it will be more convenient to do this in a fold. In other words, fold the canvas in half and then cut. Before sewing you need to remove all measurements:
 How correctly to remove all measures? Chest circumference. Measured along the horizontal line around the trunk through the maximum protruding points of the mammary glands. The height of the chest. It is measured from the highest point of the shoulder seam that is projected, near the cervical base to the central region of the mammary glands. Backrest width. We measure along the horizontal line along the scapulae between axillary basins. The length of the future product. Measurements pass in the middle of the back from the line of stitching the collar to the end of the desired length. Girth of the shoulder joint. Measurements pass when the arm is lowered perpendicular to the axis of the shoulder, the upper edge of the centimeter tape should touch the back of the armpit. The distance from the armpit to the waist line is measured from the side. Waist circumference. We measure on the narrowest places on the waist. All original patterns are made from measurements, where the girth of the chest is approximately equal to 48-50 centimeters. Therefore, we strongly recommend that you accurately measure your own parameters so that when cutting, do not make a mistake. Especially, this applies to those of the fair sex, who have a smaller size or vice versa, more than 48-50. If your size is less than the 48-50 represented, then it is best to somewhat reduce the width of the pattern, because practice shows that too wide dresses are not at all comfortable to wear. In the original pattern is a measurement of 150 centimeters, and if your size is 42-44, then you can safely reduce the width by 10-15 centimeters. The upper third of the pattern, this is the same part, due to which the drapery of the product will be created, so its size is somewhat relative. For example, if you have a height of 176 centimeters, then you are quite enough 50 centimeters. If you are a tall enough woman or a full lady, then the measure should be increased.
 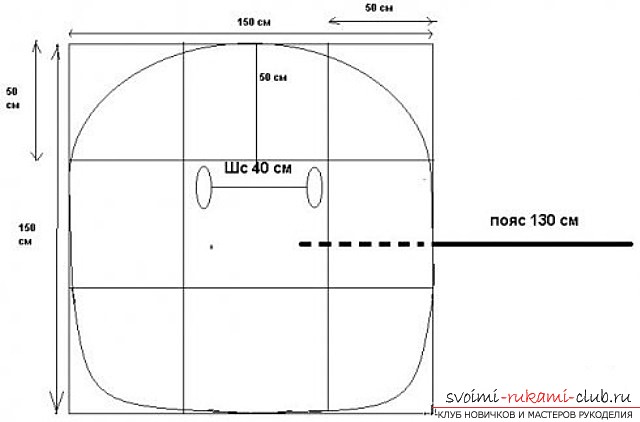 The distance to the armhole on the side should beconsist of such your parameters: half the width of the back we sum up with the addition to the freedom of clinging (the minimum value). For example, the back width is 39 centimeters. Then. The distance to the armhole on the side will be calculated as follows: (39 + 0.5-1.0) / 2 = 19.75 centimeters. Now you need to calculate the distance to the armhole from the top area. How can this be done? It is required to postpone the measurement of the upper pattern area (in the original there is 50 centimeters) from the upper fold of the fabric. After adding a measure that is equal to the height of the chest, and this will be the lower section of the armhole. The hole for the armhole can be added from such parameters: the measure of the girth of the arm part is summed with the addition to the girth of the shoulder. Why do you need an increase in the product? They provide the free fit of the product in the figure, and free movement of the person, not limiting in anything. Thanks to the correct additions, the necessary layer for heat protection will be created in the product, and only in this way you can get the designed silhouette.
 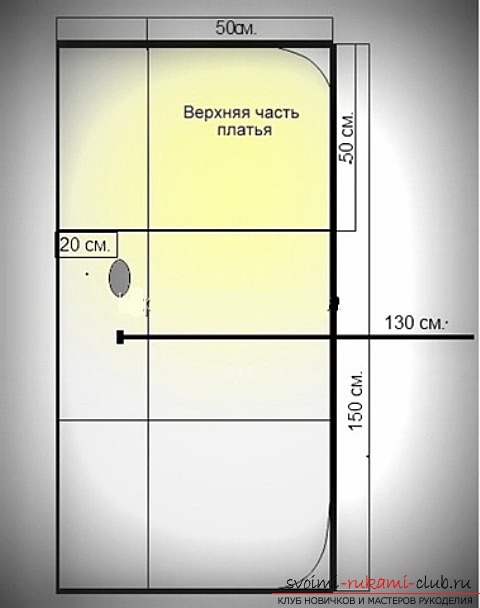 Now we need to build a hole forgirdle. To do this, use the distance from the armpit to the waist line. Measurements must pass exactly under the center of the armhole. After all the measurements, you can safely build holes for the girdle. The length of the dress can be independently chosen. For example, for an increase of 176 centimeters, the length of the product, if everything is built strictly according to the pattern, will be slightly lower than the kneecap. Therefore, you should decide for yourself whether you need to make a dress longer or shorter, it all depends on your preferences and desires. The required length of the product should be postponed in this way: add to your measure the measure of the upper part of the pattern - drapery (in the original it is 50 centimeters). In other words, if your measure of the length of the finished dress is 90 centimeters, then add to this value 50 centimeters. 90 + 50 = 140 centimeters is your dress-transformer length. The pattern for the 44-46 size is the red changes on the finished schemes. If you have this size, you can use these parameters.
 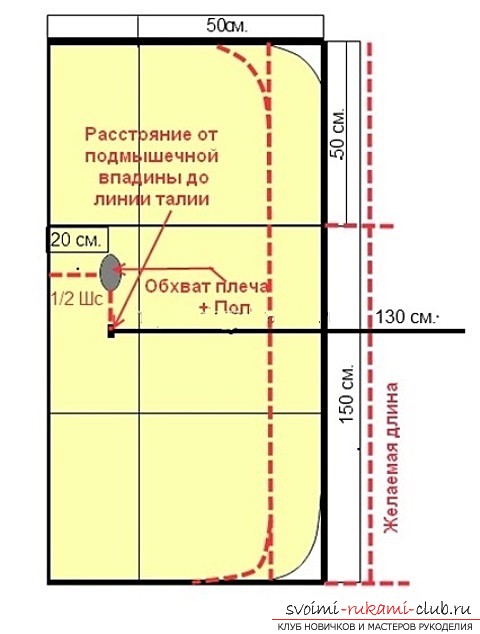 Council. Do not cut the armhole at once! The presented material is greatly stretched, and most likely, in the future, it turns out that your hole for the armhole will be too large. To begin with, it is best to first cut a 1-1.5 centimeter smaller, then try on, and then adjust the product. Each rounding line can be independently adjusted. In other words, it can be increased or decreased, it all depends on the desire. The belt can be carved along the entire width of the material. For example, the growth of 176 centimeters, the length of the belt will be 150 centimeters, and the width - 7 centimeters. In the finished form, the width will decrease slightly and will be about 3 centimeters. After that, you can cut the strip into two equal parts to get the halves of the girdle. Finished product processing. You need to process the swaths with a zigzag stitch, and you also need to make a belt loop. Then it is necessary to fold the strip for the belt with the inside sides. After it is required to sew on a long and short cut. In the end, turn the product out. The belt is sharpened on the two sides of the front part of the product, however, beforehand, the marking points must be marked. Everything, the dress is ready! Here is a dress that can turn out eachrepresentatives of the fair sex, in just 20 minutes of hard work. It is a pleasure to wear such a product, especially if it is cut according to all your standards. What is special about this outfit? It can be changed at any time beyond recognition. Thus, on one hanger you can have several dresses in your wardrobe at once, although in fact only one product will be available.
Comments
Related posts:
 How to build a pattern of a long dress for a woman with your own hands, using step by step instructions with a photo and description.
 Infinity: the original design of the chair
 How to decorate a T-shirt. Original design of old clothes.
 We make our wardrobe more diverse. We make a pattern of a simple dress base with our own hands. Simple diagrams and photos
 Creative design of shelves for books - 40 photos