
Original ideas for new patterns of children's hood. We make together a practical and quality hood for outerwear. Instruction and photo
Your attention is invited to an article thatwill tell you how to properly and qualitatively sew a pattern of a child's hood. This is a very beautiful and practical element for outerwear, which is created specifically to protect you from cold winds, snow and other nasty weather. It can be conveniently fastened to the neck of the jacket with the help of buttons, zippers, buttons, just stitching it into clothes. Also you can make a one-piece jacket with a hood. Here only a few convenient options for cutting a hood for a child are shown. In order to properly fabricate the hood, it is necessary to accurately measure the length of the neck of the product, which we will refer to as Z. To construct the hood, you need to know the length of the neck of the article (Z), which is equal to the sum of the length of the neck of the back, LTSp, and the length of the neck from the front, Lpn. In the example shown, our parameters are as follows: Z = Ltsp + Lnp = 9 + 12 = 21 centimeters. Another dimension that we need to do is the hood height parameter. We designate as Bk. This measure should be taken from the point of the base of the neck, passing right through the highest point of the head, right to the point of the base of the neck on the left, and then divide the value in half. For our parameters we get: Bk = 66/2 = 33 centimeters. Also do not forget about the increase for a free hanging of the hood. It is taken both in height and width. Its size depends on the type of model you will cut. 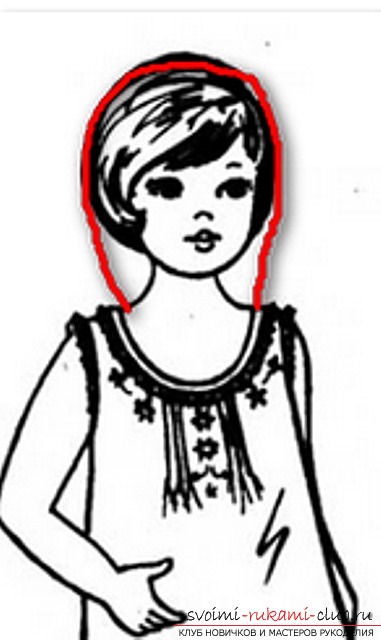 Let's consider a variant of a hood vtachnoy withoutdart and with a dart. After all the necessary measurements have been taken off and counted, we will proceed directly to the creation of the hood. Both vtachnoj, and fastening are under construction under the identical scheme. To begin with, let us consider the construction of a right angle, the vertex of which is at point O. From our point, we draw up the vertical line of the hooking of the hood.
  Mark a new point K. The length of our segment OK will be from two to five centimeters. Further from the point K we draw a horizontal line to the right, its length is the amount of the center line of our hood from the vertical. We put the point K1. The length of the KK1 is not more than two centimeters.
 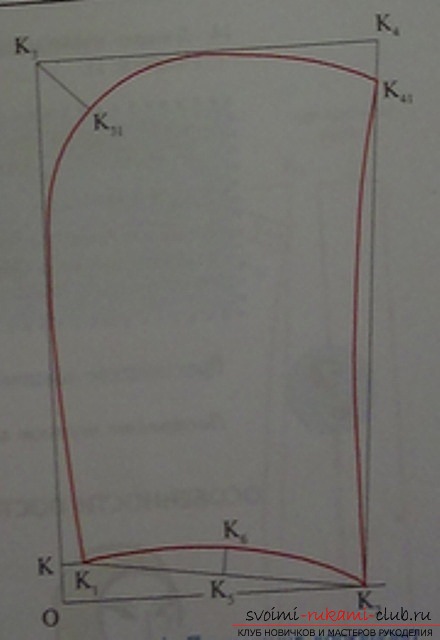 From the point K1 horizontally, we make a notchradius, the length of which is equal to the width of the hood along the line of the stitch. There we put a new point K2. The length of the segment K1K2 is equal to the sum of Z and B, we get: 21 + 2 = 23 centimeters. B is a tumbling solution, it is equal to two centimeters. It is necessary to create a more round shape. Up from point K we draw a vertical and debug the height of the hood. This will be point K3. The length of the KK3 is equal to the sum of Bk and the increase in the free fit along the height of the hood. Its value varies from one to ten centimeters or depending on the type of model. In our case, we get 33 + 5 = 38 centimeters. Further from the point K3 we draw the horizontal to the right, and on it we mark the width of the hood from above. Mark the point K4. The length of K3K4 will be equal to K1K2 plus Пш, an increase for a free fit along the width of the hood from above. Its length can be from zero to five centimeters, also depending on the model. In our example, there will be 23 + 3 = 26 centimeters.
 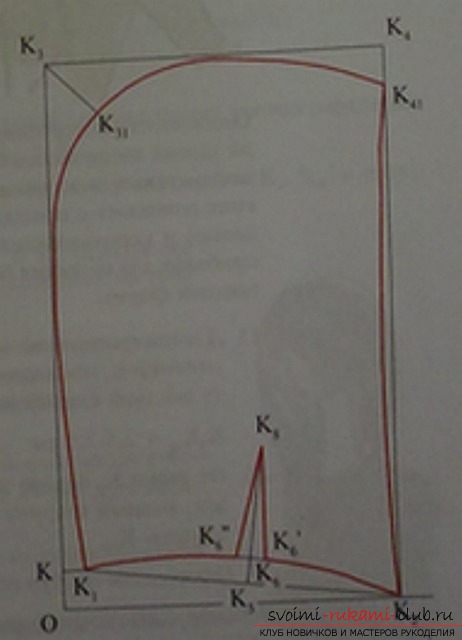 Draw a straight line from point K4 to point K2. Down from the point K4 on the line K2K4 we measure the size of the bevel of the hood from above. We place the new point K41. The length of the segment K4K41 will be from zero to four centimeters. We draw a bisector for the angle KK3K4. On it, it is necessary to mark the point K3 at a distance of three and a half to five centimeters. At this point we put the point K31. We connect the points K1, K31 and K41 by a smooth line. This will be the mid-hood line. The front side of the product is made according to the pattern presented. To properly draw the hood stitching line, it is necessary to connect the points K1 and K2 with a straight line. In the middle of the obtained segment, we need to put the point K5. Through a new point K5 we go upwards perpendicular to the straight line K1K2. Mark the amount of deflection of the stitching line on it. Mark the point K6. The distance between K5 and K6 is from one to one and a half centimeters. The hooking line of our hood is made through points K1, K6 and K2 with a smooth line. If our model provides for a recess, then from the point K6 it is necessary to continue upward the line K5K6 by a distance equal to the length of the dart. There we put the point K8. The segment K6K8 is six to eleven centimeters. In both directions from the point K6 along the line of stitching, we make the cuts equal to half of the tuck groove. We put new points K6 'and K6 ". After that, these points are connected to the point K8. That's all. This version of the hood is ready. Next, consider the hood-helmet model. The main feature of this hood is that a clasp is added to it. The construction is almost identical with the previous pattern, which was detailed above.
  To build a buckle, it is necessary upwards frompoint K2, postpone the height of the hood projection for fastening. There we put the point K21. The length of the segment K2K21 varies from two and a half to seven and a half centimeters. From point K2 to the right we postpone the horizontal segment, which is equal to the width of the bead, the value from the drawing of the shelf. Mark the point K10. After draw out the tab for the fastener according to the model. The upper part of the front line of our hood-helmet model can be decorated with a corner.
 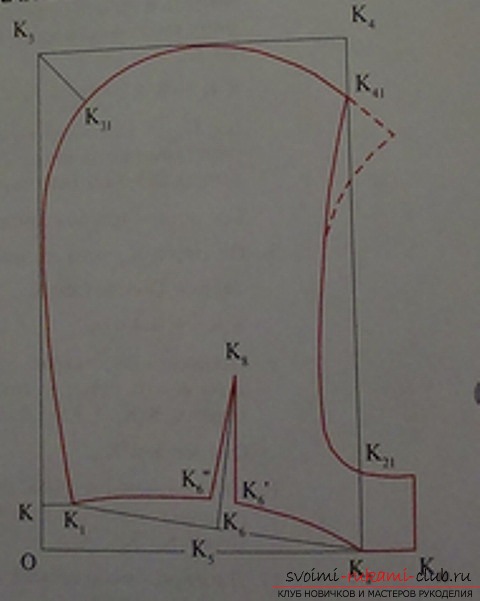 That's all. This hood model is also built. Now go to the last model of our hood, it will be a model with a central insert. This kind of hood is very common in most outerwear. It consists of three parts, two of which are lateral, and also one central part. Let's look at how you can calculate the details for the hood cover. After you have completed the construction of the vtachnogo hood (this is our first pattern), draw on the drawing lines for pritachivaniya central part. To do this, it is necessary to draw a line from the points K1, K41 and k31 for pritachivaniya central part of the model. In our case, it is four centimeters. The center of the central part is formed by a smooth line running parallel to the line K1K31K41. Our new line passes through the points K1 ', K31' and K41 '. To obtain the central part of the hood, you need to measure the segment from point K41 to K41 '. The resulting distance is doubled. Now it is necessary to measure the length of our curve of the line K1'K31'K41 '. During the measurement, put a centimeter tape with the edge.
 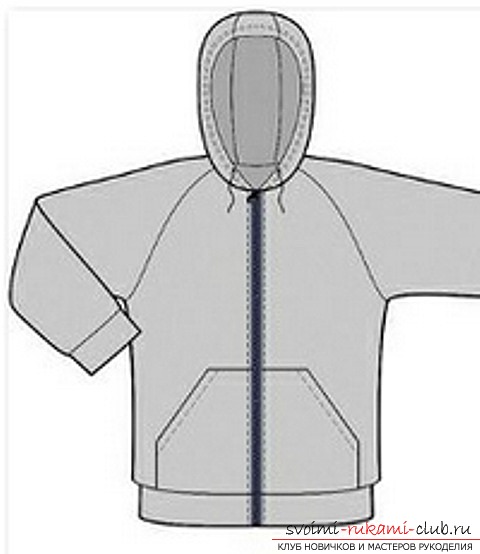 Let's proceed to the construction of a rectangle. The short side will be equal to: 4 * 2 = 8 centimeters. The long side is equal to the length of the curve of the line K1'K31'K41 '. In order for the seam, which connects the central part with two lateral, more accurate appearance, the central part needs to be cut out by an oblique thread, the angle is equal to 45⁰. It is noteworthy that such a hood construction is suitable, both for children's clothes, and for male and female models.
 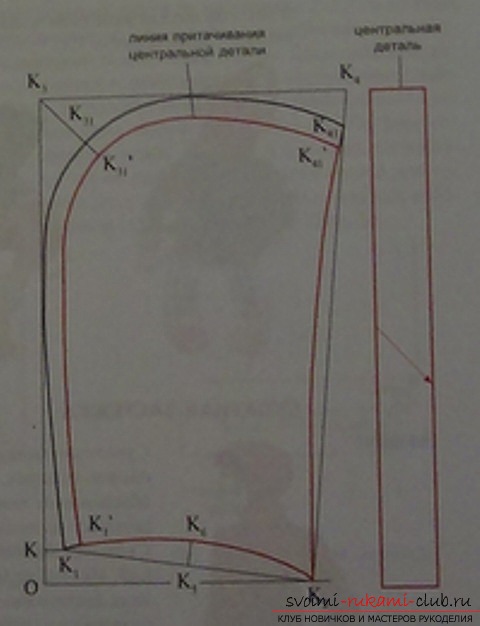 The front line can be decorated with a furfinishing, you can also choose other decorative elements. To further decorate our hood, you can sew extra "ears", "tails" and other original jewelry. That's all. The third hood model is ready. Each of them will perfectly protect the child from bad weather, so you can safely choose any pattern. Successes.
Comments
Related posts:
 New and original ideas for the design of children's clothing. Original and simple solutions that will help you make an excellent gift to your child. Simple instructions and photos
 Photos of patterns of women's clothing models will be an excellent tool in creating fashionable clothes
 The original design of new patterns of elegant dress. A great outfit for every woman. Photos and instructions
 New and original ideas for a coat for a girl. We make clothes for the child in the latest fashion of 2014. Simple instructions and photos
 We make interesting toys out of the box with our own hands. Original ideas. View Results