
Patterns of women's jackets with their own hands. Easily and cheaply sew a quality outfit for yourself. Simple instructions and photos
Create a pattern of women's jacket - not easy, becauseyou need to take into account all the small details and nuances, otherwise nothing will come out. Attach a little effort and a little patience, prepare all the materials and slowly do everything clearly according to the instructions, and then you will have a lovely jacket! 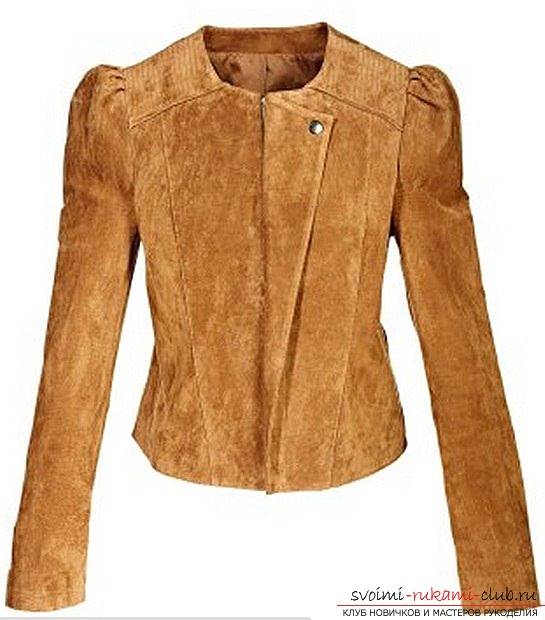 We begin to build a drawing for a typical figure of 40 sizes. All the schemes are given without allowances for seams.
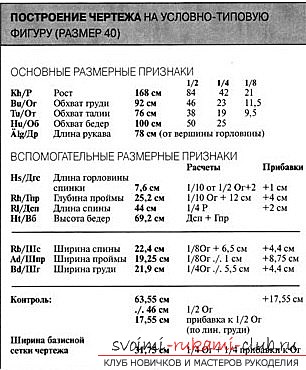
- Let's start with the construction of the shelf and back on onethe basic grid, the details are superimposed on each other. When done, the lines of the chest, bottom, waist, side sections, back and middle of the shelf will be common.
- The hose must be built, based on a solid one.
- The basis of the basic grid is taken by the vertical, on which it is required to postpone the segment from the point W (the level of the seventh cervical vertebra) to the bottom of the measurements of the depth of the armhole, the height of the hips and the length of the back.
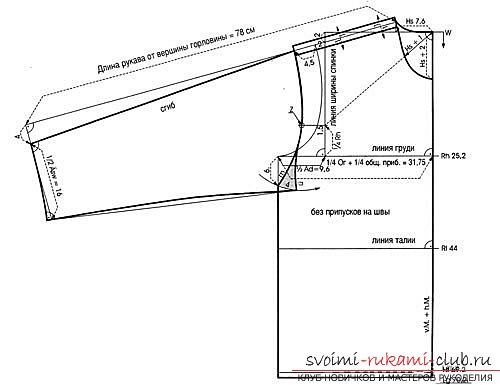
- To draw the right bottom line, you need to measure the last point on the main vertical 1 centimeter down. From the points obtained, it is necessary to draw horizontal lines.
- From point W to the left side, postpone your value of the length of the neck of the back, and from the end, draw a perpendicular line upwards by 2 centimeters.
- On the chest line measure from the middle of the backto the left, a value equal to ¼ of the chest circumference + ¼ of the chest increment, and down from the resulting segment, draw a perpendicular line to the bottom, and you will get a slash of the side cut.
- From the obtained lateral cut along the linechest, put the value equal to ½ the width of the armhole to the right, and from the resulting point draw up the vertical line. Thus, you will get a line of width of the back. In this line, set the depth of the armhole upwards, and get a point. From it, draw to the left a perpendicular line 1.5 cm long to the width line of the back.
- To determine the angle of inclination of the originalthe features of the shoulder cut are required to postpone 2 centimeters down from the value of the intersection of the width line of the back with the base of the neck. From the resulting point, draw a smooth line of the original shoulder cut. To determine the length of the initial line of the shoulder slice, it is necessary to put 2 centimeters to the left of the width line of the back. Then draw the original armhole for the given patterns.
- On the side cut measure down 6 centimeters to deepen the armhole.
- Set it to the left 4.5 centimeters on the original line of the shoulder cut to lengthen it and draw a new line of cut of the armhole to the point of deepening. You should get it as shown in Figure 1.
- The line of the humerus section should be extended to the left side, and from the top of the neck to the end of the sleeve, put down about 78 centimeters.
- Slightly dislodge the shoulder line,somewhere on 1 centimeter on the shelf and back. Everything must correspond to the first figure. Extend the line of the neck of the back to the shifted line of the shoulder cut of the back.
- Set the base length from the starting point W down to the length of the neck of the back, and add 2 centimeters. This is necessary for the design of the shelf neck.
- From the initial value to the point ¼ of the depth of the armholedraw an auxiliary line, and measure the length of the neck of the back on it and add 1 centimeter. Draw the neck of the shelf as shown in figure 1.
 Now we turn to the direct construction of the sleeves.
 That's all. You got a ready-made pattern that you can use to sew a fashionable and stylish jacket for a female audience.
Comments
Related posts:
 The original design of the pattern of an air beach dress. A beautiful outfit for a beautiful woman. Photos and instructions
 The original design of the pattern of a stylish dress-transformer. A beautiful outfit for a beautiful woman. Photos and instructions
 A stylish and seductive outfit that will accentuate your slim figure. Simple patterns of dress-tunic. Detailed diagrams and photos
 We make an excellent outfit with our own hands. A pattern of a stylish swing dress that will make you the most beautiful and irresistible. Photos and instructions
 We make an excellent outfit with our own hands. Pattern of universal dress bat that will make you the most beautiful and irresistible. Photos and instructions