Flower poinsettia and snow-berry berries - a lesson of polymer clay and a master class
How close to us New Year's holidays! Until the day of St. Nicholas is not very long, and then for him will go all the Christmas holiday - Catholic Christmas, New Year, Orthodox Easter and of course, the old New Year! Therefore, to decorate the apartment will have a minimum, for a month.
Flower poinsettia and snow-berry berries - a lesson of polymer clay and a master class
 Many housewives and simply not indifferent to the fact,to decorate their homes, looking for a variety of ways to design and create beautiful decorative elements. We offer you a lesson, which can be suitable for a gift, as well as for decorating a home. Using the capabilities of polymer clay, you can model a beautiful brooch, or prepare a unique drawing of a polymer toy, which can be hung on a Christmas tree. Poinsettia - many of you probably heard about this flower. He is one of the few, the heyday of which occurs during the new year. Therefore, it is not strange that the sample of floristics became popular in this period and is associated with winter holidays. In addition, it looks very nice and because many people want to build it themselves. Snow-melon - also belongs to this list and as you probably already guessed, we will combine these two plants into one to form a brooch for a gift. Well, or a toy for our beautiful and New Year tree.
 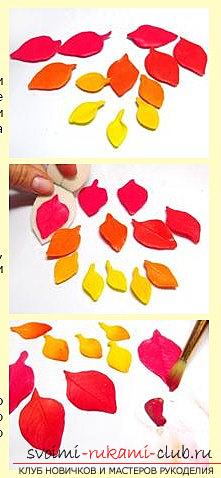 Materials for processing poinsettasto form a unique gift, we will need the possible materials of polymer clay, with which we will produce deformation and recreate the unique shape of the figure. This will require special materials with which we will work on the subsequent idea of a flower in order to realize and recreate the necessary forms:
- Take a small amount of polymer clay in a variety of colors: red, orange, yellow, green (shades), white.
- It will take a color of acrylic in a brown color scheme
- Also need a pastel in pink tones, light green tones, red and orange tones.
- Take the wire for the product
- Tape tape (dark green color)
- Metal base for a brooch (or toy)
- Knife
- Needle
- Nippers
- Quick-drying glue
- glue gun
- Gloss varnish
- Texture leaf
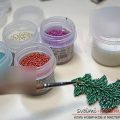
 To begin with, it is necessary to form petals withdifferent colors. Use polymer clay in orange, yellow and red to make petals with pointed tips in length by 2 or 3.5 centimeters. Small petals make yellow, large - form red, medium - orange. Then, the texture is formed in order to make the streaks. For them, we squeeze the petals under a special mold, which can also be replaced by painting the veins with the tip of a sharp object. Then, the petal needs to be sunk. We use pastel in red and orange colors. You need to scrape the desired paint with a knife and apply a pastel on the ends of each petal. We use different color shades for leaflets. Stem and bud formation
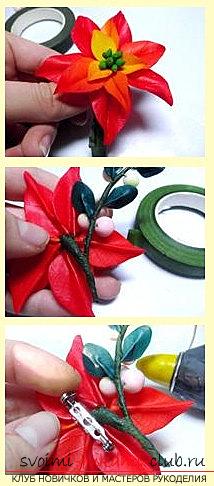
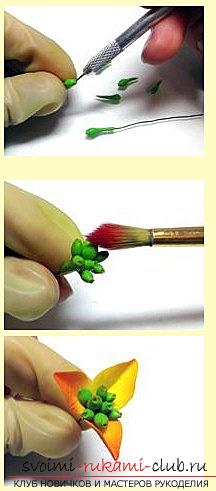
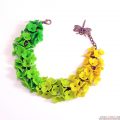
 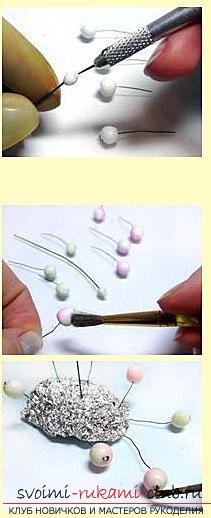 Using wire, we cut it into pieces in lengthto 4 centimeters, the ends of the segment bend and clamp with the help of pliers. Next, we fold the vein of a vertical kind with the bent end of the wire, pinch the petal on its lower part so that the wire is not noticeable. Thus, we form stems for each of the petals. The four smallest versions leave without an element of wire. Then, we form a bud for the heart of the flower. Here, for a piece of wire, it is necessary to throw a ball, using a clay of light green color in diameter by 0.5 centimeters. It must be shaped into an oval, then stretched to the bottom of the wire and to the tip of the oval we form a tip of a pointed type, which must be picked up with a needle. Then, we blind the workpieces in this way, only without using the wire. Beams Buds must be attached to the wire, then, the tops of the buds can be decorated with toning of pastels of red color. Or to be sunk after baking with the help of paint. Then, fasten the small petals to the bud. To do this, the three small petals are placed at a distance from each other. Snowflake In order to form leaflets for a snow leopard,It is necessary to mold a green mold from clay (dark shade). The shape of the oval, in length by 1.5 centimeters. We will make them in such a way that streaks are placed on the surface. Next, we place the wires in the likeness of leaves of poinsettia. We form 5 such sheets. The berries are formed by using a ball for 1 centimeter. Take a few pieces of wire for a length of 3 centimeters and form the eyelets at the ends. On the loops put on balls of white clay and then smooth out the unevenness. Then, the smallest ball is placed on the wire in the size of 8 centimeters long. Each ball is fixed by a ball of diameter 2 millimeters. The center of the ball is framed by a groove with the help of a needle and raskvyrivayem. Completion of work Next, it is necessary to sink berries. This is done in this way. We take pastel colors of green and pink. We place on our berries. Then, the berries should be baked, like other elements. After, the berries need to be varnished. We use for this purpose a brown paint of acrylic color, and then - a varnish for clay. After, it is necessary to collect the flowers of the snowberry, and after, the flower of poinsettia. We fasten the fastener for our flower, now the brooch is ready! If you want to make a toy - fix the other fixing element.
Comments
Related posts:
 Clover of polymer clay, a flower of luck for beginners - a master class
 We make a daisy flower with the help of polymer clay - a master class for a beginner
 How to make a brooch in the form of a Christmas tree made of polymer clay - a lesson and a master class
 Cat on a cup - a lesson of polymer clay and a master class for beginners
 We make a gradient of polymer clay with our own hands - a lesson and a master class with a photo