Getting ready for winter. Three versions of great hats that will not let you freeze. Simple patterns of a warm hat with earflaps, instructions and photos
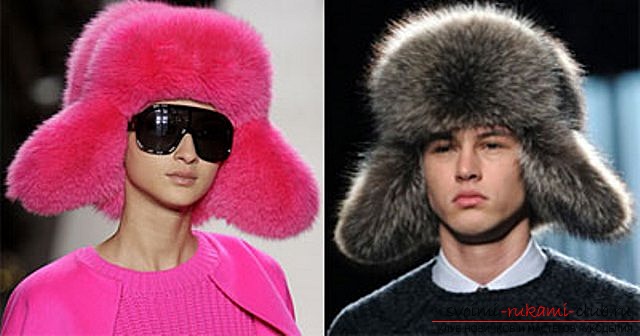
Warm hat with earflaps is an indispensable attribute of the periodcold and cold. It perfectly warms even in the most severe frosts, suitable for both male and female audience. Of course, the easiest way is to simply purchase such an attribute of clothing, but most often the price is exorbitant. It will be more economical to sew independently, using ready-made patterns and general advice. Below, we will consider 3 models of hats. Winter hat with a visor. Pattern is suitable for a man with a head circumference of 56 centimeters. The original thing can be sewn even from scraps of fabric, and this will be a unique element of the wardrobe. 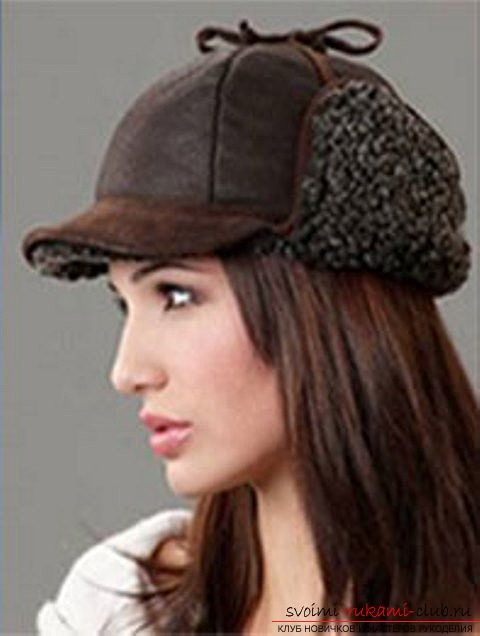 The future hat-earflap consists of such layers: top, lining and insulation. For the top is ideal synthetic water-repellent fabric, for example, bologna. You can also use corduroy or knit tight. The top can be combined from different colors and fabric structures, the product will not suffer from such an invention. For a visor, a back part and "ears" use a fur, at which a low pile. For lining will suit soft jersey, flannel. You can use fleece, as it is soft and pleasant to the touch, and there will be no discomfort. As a heater, use a sintepon or batting, but you can easily do without it. The pattern of a cap with earflaps is given with all allowances on seams:
- On the stitch sutures 1 centimeter is allocated;
- On the fillet welds - 0,7 centimeters.
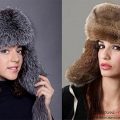
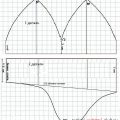
Before you get started, you will needslightly prepare a pattern. All patterns can be printed on the printer, and connect them with all the schema matches. Check that the scale complies with all standards. In other words, on the printed sheets, where a 10x10 centimeter box is depicted, the sides of 10 centimeters should correspond exactly to ten centimeters. If everything meets the standards, then you can start working. Cut out all the details. The drapes were ready! It is worth remembering that before you begin to cut the hat with earflaps, it is worth checking the measurements of the circumference of the head with the given parameters of the pattern itself. Take into account the thickness of the lining, warming and allowance for freedom of fit. Does the future owner or possessor have a magnificent haircut? Then consider the volume of hair! After all, if the cap turns out to be cramped and will cause discomfort, then the wearer may have frequent headaches. 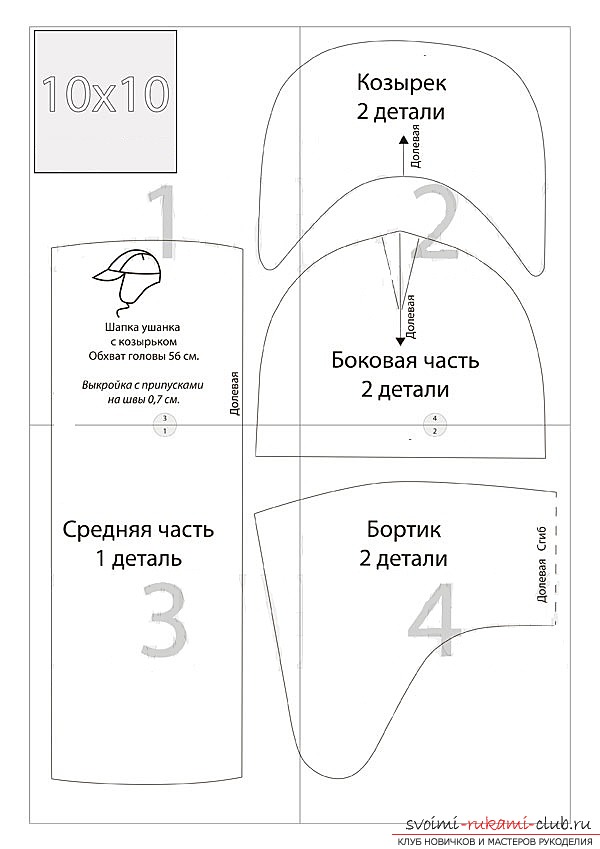 Do not forget that the templates already contain everythingallowances. It is possible, if necessary, to correct the pattern, and only after all these manipulations can you start to cut. The details of the cut are only for the top of the cap. Lining with a heater is covered by the main templates. During cutting, account should be taken of the direction of the share thread! If you connect the fantasy, then one pattern can be sewn different products. You can modify the material, the shape of the "visor", the ears and so on. Fur hat with ear flaps with a convex visor. Fur hat-earflap will be very helpful in February frosts and cold weather. It can be made from natural fur or from artificial fur. Fur is perfectly combined with leather, suede and other materials. The size of the presented hat-ear flaps is designed for a person with a head circumference of 57 centimeters. If there is a need, you can change the size. In other words, it is necessary to increase or reduce the patterns of the pattern of the fur cap. The visor of the product has such an original shape due to obtachki. The hood of the product itself consists of two parts.
 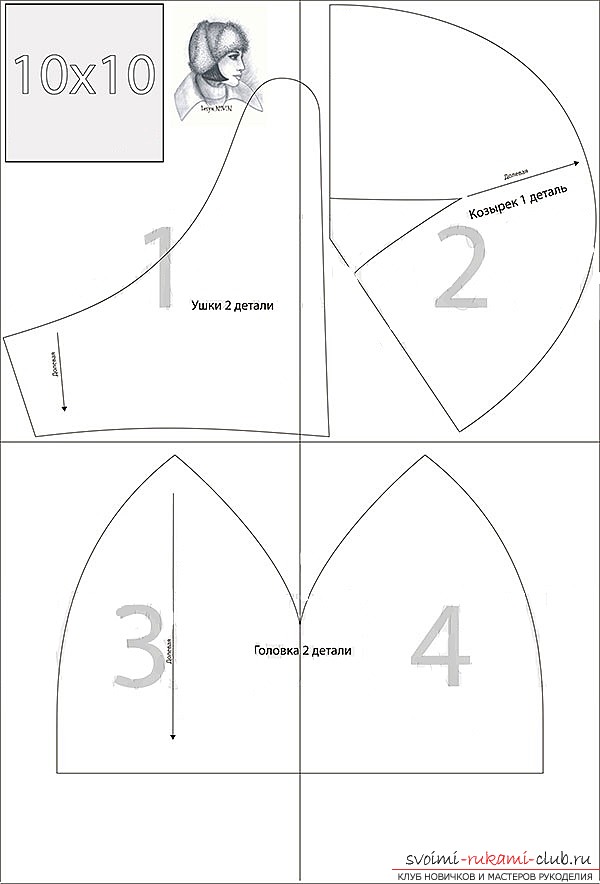 The hat-earflap consists of three parts: lining with insulation, top and lining. Fur is used for sewing the back part, visor and "ears". For other details of the future product, you will need to choose water-repellent fabrics, for example, bologna, leather, suede, corduroy and so on. The lining is required to sew from silk, soft jersey, flannel and so on. The main thing is to use soft and pleasant fabrics that do not cause discomfort. Heat insulation can be made of sintepon, batting and other materials. Patterns are given without allowances on the seams! Before you start, will require preparatory work. Pattern print on the printer, and connect all parts, as required by the example. Check the scale match. On the printouts, squares of 10x10 centimeters should be depicted, their sides of 10 centimeters should correspond exactly to this value. All the details of the future cap are cut out and get to work. Before you need to compare it with all the standards. They must match the parameters of the pattern itself. Take into account the lining, the heater, the fitting allowance and the volume of the hair.
 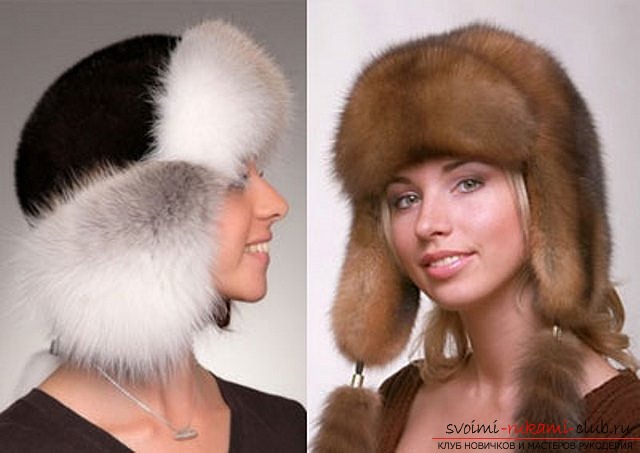 Allowance for seams allowance! If there is a need, then correct all parameters of the pattern, and only then proceed to cutting. Lining and insulation are based on the basic patterns. The top of the product is the details of the cut. In order to make a template for the lower part of the visor and the "ears", it is required to cut off from the basic patterns 0,3-0,5 centimeters on the outside. The direction of the share thread must be taken into account. If you connect the fantasy, then you can make several original caps-ushankov different shapes, patterns and colors. Experiments are only good for you! Hat-ear flaps with 6 wedges The feature of this product - the presence of "ears". They can be of different shapes. They can be decorated with embroidery, beads or other accessories. The peculiarity of the presented model is the presence of 6 wedges, a visor with an enlarged edge from above. Crown "ears" with the back of the lapel of the cap. You can wear them in different ways: tie it up on the vertex, on the back of the neck, lower it down. The size of the future product is 57 centimeters. If necessary, the size can be modified. Increase or decrease the templates of the fur cap. The pattern is presented without allowances for seams. Prepare a pattern before work. Print out the whole scheme on the printer, and connect the details according to all the rules.
  Observe the scale. Cut out the details, and proceed directly to the work itself. The curves are ready for use. If necessary, correct the pattern to fit your size. The cap consists of three components: top, lining and insulation. For the back part, visor and "ears" fur is used. For other parts you can use dense materials: leather, suede, knitwear, corduroy and so on. Suitable for lining is silk, soft jersey, flannel and other pleasant fabrics. It is better to make a heater from a sintepon or batting. This material is warm, and will suit even in severe frosts. Before you start cutting, you need to check all the measurements. They must match the value of the pattern. If there are no matches, then it is necessary to slightly increase the parameters. Consider the heater, the volume of hair, lining. Do not forget about the allowances on the seams! Observe the direction of the share thread. In order to correctly draw the lap on the lower part of the visor and the "ears", it is necessary to cut off the main details of the patterns 0.5 centimeters on the outside. If you put a little effort, then everyone can get a wonderful hat-earflap that will warm in the winter cold. Experiment with materials, colors and the product itself. You will receive an original hat with ear flaps! Such work is always open to experiments. If you have original new ideas, then on one pattern you can make a large number of different caps. Choose the material, color or texture. Also you can change the whole design, make the cap a cap, remove the ears and much more. As a result, a great thing will come out. The decision is up to you. Create and enjoy the work and creativity.
Comments
Related posts:
 Getting ready for winter. We make a warm hat together, which will not allow you to freeze. Simple patterns of high-quality winter hats, instructions and photos
 Various patterns of children's costumes for the holidays. Beautiful and bright models that will help you make an unforgettable image for any holiday. Simple instructions and photos
 New ideas for the design of a cute baby cap. Original and simple schemes that will help you make a good gift to your child. Simple instructions and photos
 A new pattern of Greek dress. We make beautiful dresses together, prepare for a hot summer. Simple instructions and photos
 New and original ideas for the design of children's clothing. Original and simple solutions that will help you make an excellent gift to your child. Simple instructions and photos