Pumpkin to the celebration of Halloween can be done in several ways and decorate them with the interior.
How to make a pumpkin for Halloween - this issueMany needlewomen start to ask themselves, with the approach of the most unusual and mysterious autumn holiday. Why pumpkin? Yes, because this fruit is a kind of symbol of the holiday, it was used by the ancient Celts of Ireland and Scotland who are the founders of Halloween, for creating magical flashlights that have not lost their popularity and at modern events. In addition, pumpkins are used in various decor, in festive dishes and even in carnival costumes, and it does not have to be real, it is entirely permissible for it to be artificial copies of various materials. From what and how you can make a Halloween pumpkin, we will tell you in our article. How quickly to make a pumpkin for Halloween from an old sweater. If you did not manage to get a real holiday attribute, do not worry, you can always make it yourself, and, from the most unexpected things. For example, to make our first Halloween pumpkin we will need:
- Old wool orange sweater;
- orange yarn for knitting on spokes;
- sintepon or any other filler;
- a large button in the tone of the sweater;
- scissors.
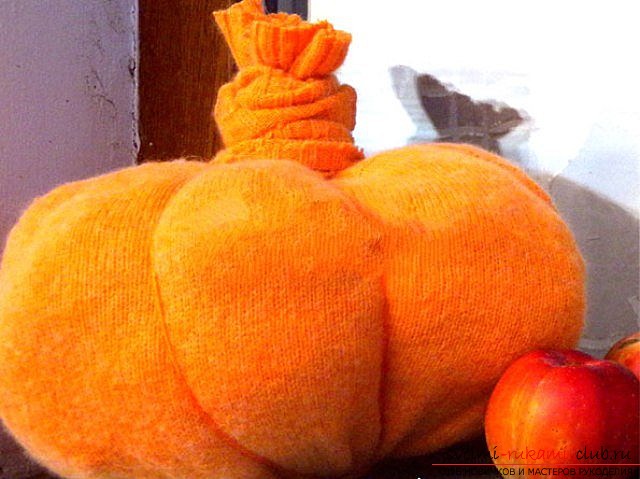 How to make a pumpkin for Halloween photo and descriptionwork on the steps. Step 1. As you could already guess, we will make our craft from an old woolen or acrylic sweater, the material in this case is not of fundamental importance, but the color, very much, it should resemble the coloring of a natural fruit. To begin with, we cut the two sleeves along the armhole line from the model, and cut off half of the lower part. Step 2. Next, we turn the product out on the wrong side, collect the remaining bottom together in a bundle and tightly rewind it with a strong thread for knitting, it is important that it be in the tone of the former element of clothing. Step 3. After this, the resulting part is turned to the face and tightly packed with sintepon or any other suitable filler. Step 4. To make the fruit as real as possible, we will divide the fabric with a wool orange thread into separate parts, for this we take three identical segments add them to each other crosswise, so that the point of intersection is at the center of each section, and place this workpiece on the lower part of the already formed toy. Step 5. We sew the threads to the fabric with a large button of a suitable color and straighten them upwards in different directions, while we necessarily stretch each so that it can divide the soft foundation of the toy into separate parts. Step 6. We connect the ends of threads together with a neck of a sweater and all this we fasten on a tight knot. Crop the excess fabric and admire the resulting decorative toy for the holiday.
 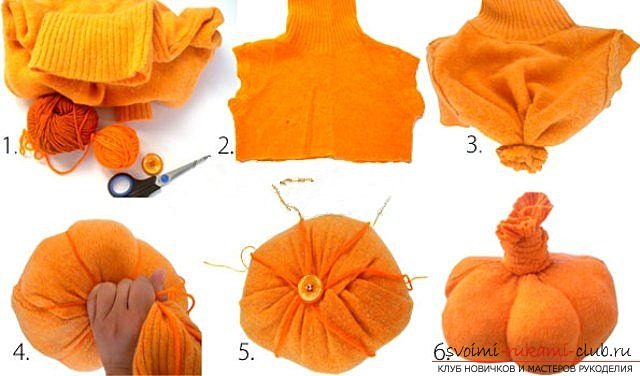 How to make a pumpkin for Halloween from paper Veryaffordable and easy material for the manufacture of various crafts, including those dedicated to the holiday - Halloween, is paper and cardboard, what exactly we can get, let's look further. Option number 1. Choose the following materials for work:
- double-sided cardboard of the desired color;
- strong fine thread;
- sewing needle;
- glue;
- scissors;
- decorative lace;
- thin floral tape;
- line;
- pencil.
Description of work. 1. To make this craft, take a sheet of loose two-sided cardboard in yellow-orange shades and draw it with a ruler and a simple pencil on individual strips. The length of such strips should be about 15 cm, and the width of 2 cm. In total, 18-20 pieces will be needed for one toy. 2. Next, using a pair of scissors, carefully cut the sheet and get the strips we need for work. You can also use scissors with shaped blades, from this pumpkin-crafts will get even more original. 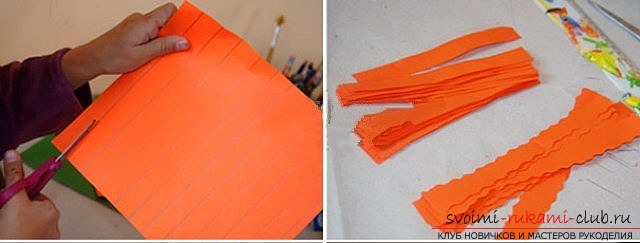 3. Now all the cut strips, we put them in a flat pile on top of each other and with the help of a needle and a thread pierce them through, stepping back from one of the edges about 1-1.5 cm. From the back, we fix the thread on a three-dimensional knot so that it holds firmly, pull it, and pierce the strips again, retreating from the opposite edge also 1-1.5 cm. We fix the thread again, and so that it stretches like a string and the entire stack of stripes bends into an arc (see the photo below). 4. After that, the resulting workpiece is accurately unfolded, placing the strips in a circle, and we get the detail of the shape we need. 5. From the green cardboard we cut out a piece of paper and paste it in the top part of a cardboard crafts-pumpkin. 6. Also from the top through the base of the craft and the leaf stretch the decorative lace and form a loop from it, thanks to which our jewelry can be hung. 7. In order for the fetus-pumpkin to have curly tendrils, take a thin plastic floral ribbon and curl it with a scissors blade, for this it is necessary to simply hold it on the base, and it will get the desired shape. Tie the ribbon to the base of the lace-loop.
  8. From black colored paper or cardboard we cut out our eyes, mouth and nose for our crafts. To make it more like a real traditional Halloween flashlight, the details of the eyes and nose should be made in the form of triangles, and the mouth be cut out with denticles.
 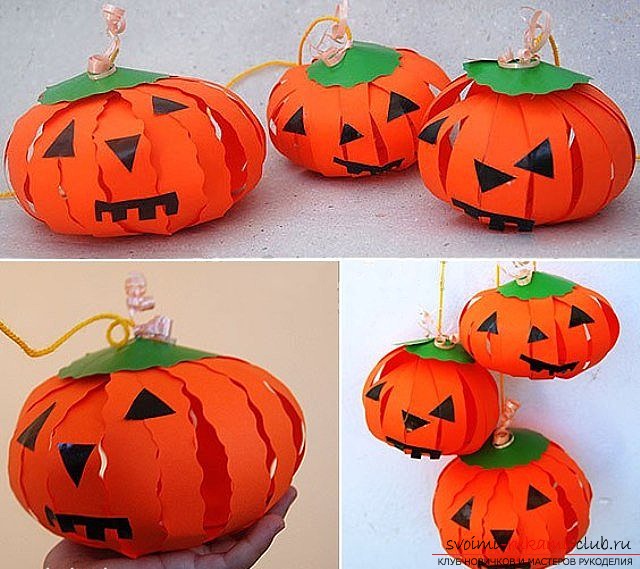 9. We paste the cut out details, after which the work can be considered finished. Option number 2. For work we need:
- two-sided colored paper;
- scissors;
- glue;
- thread.
Description of work. 1. To make such a paper pumpkin we take a sheet of paper of the desired color of A4 size and fold it in the width to the accordion, so that each bent strip is no more than 1 cm in width. 2. Precisely so we will add three more identical accordions from a paper. 3. Next, each piece in a folded form, gently fold in half.  4.Now we need glue, it is better to use a clerical glue for this work, it is very convenient to handle, does not spread and does not deform the paper in case of copious application. Glue we glue to begin with both internal sides of the folded accordion, so that we get a blank that looks like a fan. In total, we must have 4 identical fans. 5. After that, we lay out all the details in a circle, connecting their corners in the center with each other, so that a shape of the desired shape will form. We glue all parts together, also using a glue stick. 6. The base of the pumpkin is ready, it remains to supplement it, from the green paper we cut out the stem and paste it in the upper part, later we will thread a thread through it so that the toy can be suspended. Another cut out of black paper eyes and mouth and glue them.
 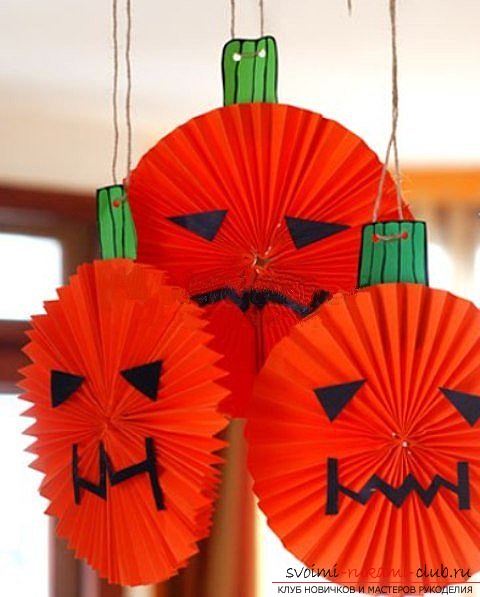 Festive homemade article - ready! If you make such pieces 10-15, you can form a whole garland and add to it the solemn decor of the interior. Option number 3. To make this decoration, we need:
- colored paper (two-sided);
- glue;
- scissors;
- line;
- pencil;
- satin ribbon.
Description of work. 1.This version of the festive decoration is very similar to the New Year's flashlights, which we used to make from the early childhood for decorating the Christmas tree, it turns out that they can have another reading, and they look very interesting in this form. What we do, we take a sheet of orange paper and fold it across in half. 2. Then from the edge of the resulting blank we recede 2.5-3 cm and draw a straight line with a pencil along the straight line. 3. Further from the applied line downwards to the fold we draw the same strips, the width of each of which should be 1 cm. 4. Now take the scissors and make cuts along the applied vertical lines from the fold up to the horizontal straight line. 5. After that, we unfold the work and get the workpiece with cuts similar to the fringe in the center of the sheet. We carefully fold it into a tube, the edges of which are glued from the top to the bottom, the same flashlight is produced. 6. To give the crafting rigidity, we take a sheet of yellow paper and form a cylinder of the same height as the flashlight of a slightly smaller diameter. We insert the cylinder inside the flashlight and glue both parts together. 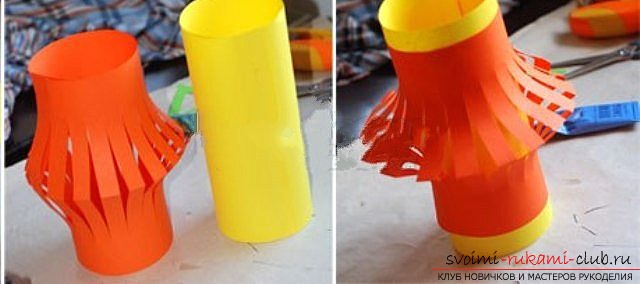 7. Cut out a strip of green color, 12-15 cm long and 1-1.5 cm wide, and glue it on top of the hand-made flashlight. 8. Next, we form eyes and mouth on the basis of black paper, glue them. 9. In conclusion, decorate our festive pumpkin-lamp with a small bow formed from a thin satin ribbon, and glue it on the side.
  The work is finished, the original decoration is ready! How to make a pumpkin for a Halloween flashlight. As we noted at the beginning of this article, the main symbol of the Halloween feast is a pumpkin lantern, all the previously presented master classes will help you to make a pumpkin from various materials, but it is unlikely that a real festive lamp will come out of it. To do this, we need a real fruit, and how to turn it into the right attribute, read on. In addition to the pumpkin itself, we will also need:
- Sharp knife;
- A simple pencil;
- tablespoon;
- candle.
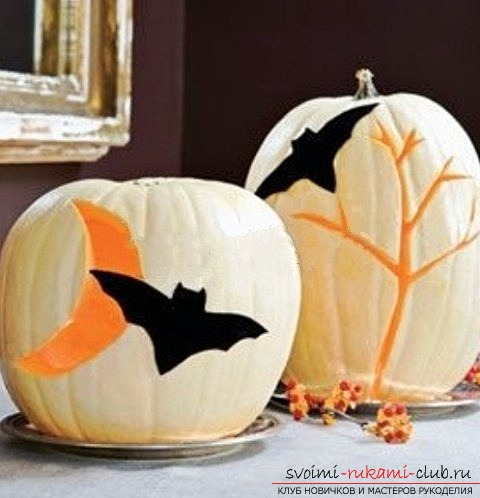
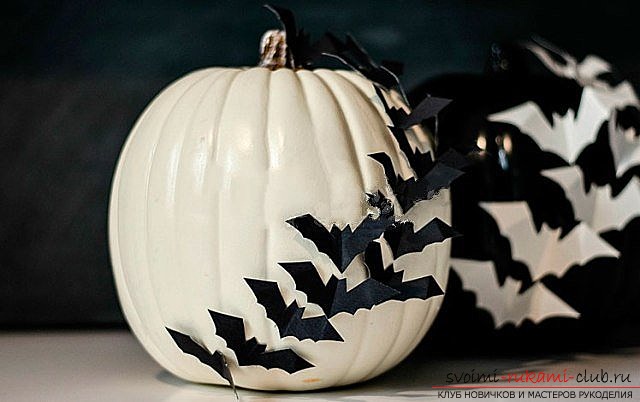
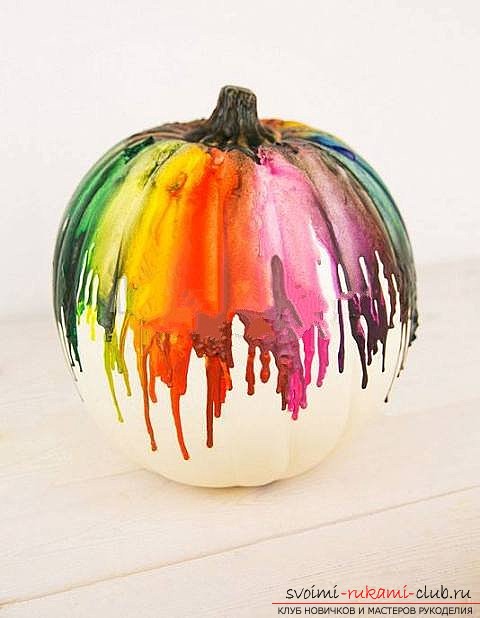
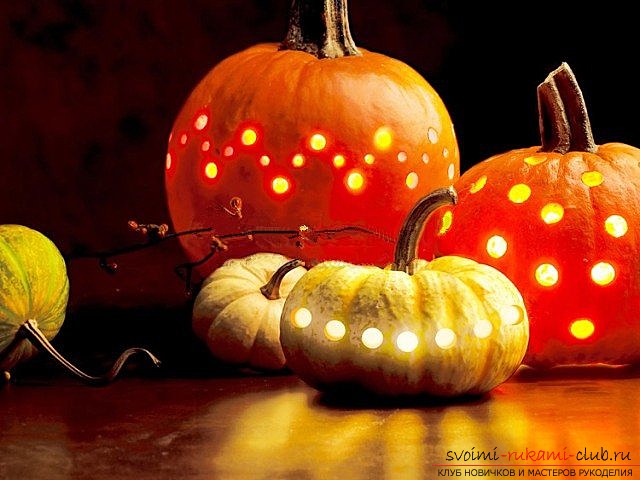
Step-by-step description of the work. Stage 1 st. We select the fruit, it must be round, proportional and stable. The size can be anything from a tiny pumpkin to a huge one. If you can not find a stable specimen, do not worry, but just gently cut off the rounded base, making it flat, but only touch the skin until it reaches the flesh. Stage 2-nd. Next, using a sharp knife, cut out a piece that looks like a hat from above the stem. We set it aside temporarily, we still need it. Stage 3-rd. Now gently cut the flesh, trying to separate it from the peel, and extract using a tablespoon. By the way, the pulp is not worth throwing out of it, you can cook a lot of delicious dishes and desserts, both for the festive and for the ordinary table. Stage 4-th. After the inner part is cleaned out, let's proceed to the design of the frightening mug, for this is how a festive lamp should look like. And here everything depends on your skill of the artist and how well you own a knife. You can make the eyes, the nose and mouth simpler in the form of triangles, and you can cut out the figured "facial features." Whichever of the options you choose, we recommend that you first draw a face with a simple pencil on the outer crust, and then cut it all out according to the sketch. Stage 5-th. The main part of the lamp is a candle, we place it inside, so that it stays there steadily, it is better to choose a suitable flat shape for this, or to drip some melted wax and attach the usual one. Stage 6th. Choose a suitable place for the lamp, for example, on the windowsill or on the porch of the house, we light the candle and close the hole cut out from above, previously laid out by the "cap". 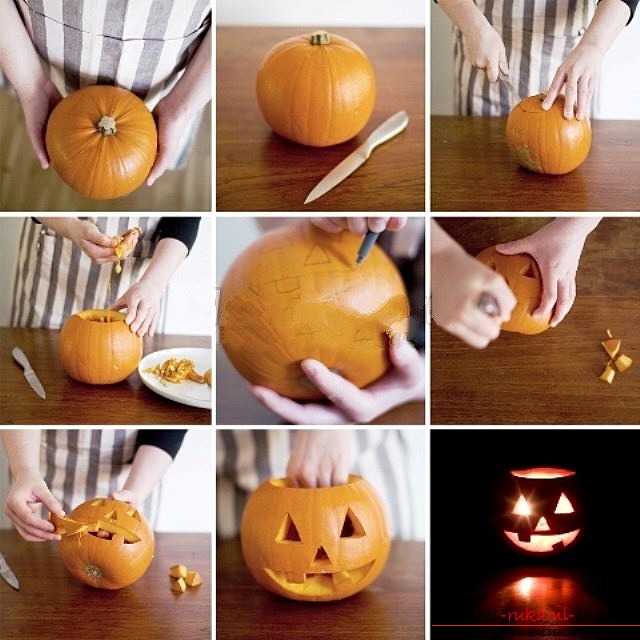 The work is over! Festive decor - ready! It should be noted that today the old Celtic tradition of making pumpkin lanterns has turned into a whole art direction, unique masterpieces are cut out from the fruits of pumpkins, which are worthy elements of decor not only on the Halloween holiday, but also in the design of many interiors, celebrations, celebrations. You can also try to make a similar masterpiece, for example, it is possible to make not knifes in a pre-cleaned pumpkin peel, but to drill holes in the form of a certain ornament, it will turn out very unusual and incredibly beautiful. It is also possible to supplement the carved fragment with appliqué, pattern, decorate with decorative details, perform decoupage on the skin or paint it with colored paints. Below we offer you a small photo collection of original pumpkin design ideas. Perhaps it will help you to create your own unique festive decor.
 Well, we hope now you know a lot of ways to make Halloween pumpkins with your own hands, and you can adequately meet and hold this mysterious and terribly interesting holiday.